background image

Network settings

Press 

 Keywords

 and look up 

Network, settings

.

Update software

Press 

 Keywords

 and look up 

Software, Internet

update

 or 

Software, USB update

.

Software settings

Press 

 Keywords

 and look up 

Software, current version

.

Watch demo

With 

Watch demos

 in the 

Setup

 menu, you can watch some

demonstration videos of some of the picture quality features of
your TV.

Active control


The TV monitors the incoming picture quality, the level of
motion in the picture, brighter or darker scenes and the light
conditions in your room. With these values, the TV adjusts the
picture for best performance. 

22.2

Picture

Picture style

For easy picture adjustment, you can select a preset setting with 

Picture style

.

1 - 

While watching a TV channel, press 

 OPTIONS

 to open

the 

Options

 menu.

2 - 

Select 

Picture and sound

 in the menu bar and select 

Picture

style

.

3 - 

Select a style and press 

OK

The available Picture styles are . . .

• 

Personal

 - Your preferences made in Quick picture settings

• 

Vivid

 - Ideal for daylight viewing

• 

Natural

 - Natural picture settings

• 

Movie

 - Ideal for watching movies

• 

Energy saving

 - Energy-efficient settings

• 

Standard

 - Factory standard settings

• 

Photo

 - Ideal for viewing photos

Adjust a Picture style


You can adjust a Picture style . . .

1 - 

Select the style and press 

OK

.

2 - 

Press 

 and select 

Setup

 and press 

OK

.

3 - 

Select 

TV settings

, navigate to the individual setting and

adjust it.

4 - 

Press 

, repeatedly if necessary, to close the menu. 

To return to the original Picture style values . . .

1 - 

Press 

 and select 

Setup

 and press 

OK

.

2 - 

Select 

TV settings

 > 

Picture

 > 

Picture style

 and select the

style you want to reset.

3 - 

Press 

 Reset

. The style is reset. 

For more information on adjusting individual picture settings,
press 

 Keywords

 and look up 

Picture

.

Vivid


If the Picture style is switched back to 

Vivid

 every time you

switch on the TV, the TV location is set to 

Shop

. A setting

meant for in-store promotion.
To set the TV for Home use . . .

1 - 

Press 

 and select 

Setup

 and press 

OK

.

2 - 

Select 

TV settings

 > 

General settings

 > 

Location

 and press 

OK

.

3 - 

Select 

Home

 and press 

OK

.

4 - 

Press 

, repeatedly if necessary, to close the menu.

Picture settings

Colour

With 

Colour

, you can adjust the colour saturation of the

picture.

To adjust the colour . . .

1 - 

Press 

 and select 

Setup

 and press 

OK

.

2 - 

Select 

TV settings

 > 

Picture

 > 

Colour

.

3 - 

Press 

 (right) and adjust the value with 

 (up)

or 

 (down).

4 - 

Press 

, repeatedly if necessary, to close the menu.

Contrast

With 

Contrast

, you can adjust the contrast of the picture. If you

are watching 3D pictures, this setting is switched to 

3D contrast

.

To adjust the contrast . . .

1 - 

Press 

 and select 

Setup

 and press 

OK

.

2 - 

Select 

TV settings

 > 

Picture

 > 

Contrast

.

3 - 

Press 

 (right) and adjust the value with 

 (up) or 

 (down).

4 - 

Press 

, repeatedly if necessary, to close the menu. 

Sharpness

With 

Sharpness

, you can adjust the level of sharpness in fine

detail of the picture.

74

Summary of Contents for 40PFH4509/88

Page 1: ...Register your product and get support at www philips com welcome User Manual ...

Page 2: ... 25 6 4 Cleaning 25 7 TV channels 26 7 1 Watching TV channels 26 7 2 Channel installation 31 8 Satellite channels 35 8 1 Satellite channels 35 8 2 Watching satellite channels 35 8 3 Satellite channel list 35 8 4 Favourite satellite channels 35 8 5 Lock satellite channels 36 8 6 Satellite installation 37 8 7 Problems with satellites 40 9 Home menu 42 10 TV guide 43 10 1 What you need 43 10 2 Using ...

Page 3: ... non satellite TVs 83 23 3 Reception for satellite TVs 84 23 4 Display 84 23 5 Power 84 23 6 Dimensions and weights 6100 6400 series 84 23 7 Dimensions and weights 5600 series 85 23 8 Dimensions and weights 4500 series 85 23 9 Dimensions and weights 5500 series 85 23 10 Connectivity for two side connector 86 23 11 Multimedia 86 24 Software 87 24 1 Software update 87 24 2 Software version 87 24 3 O...

Page 4: ...surf the Internet on TV In Help press Keywords and look up App gallery for more information 1 3 Rental videos To watch a rental video you don t need to leave your home Simply rent the latest movie from your regional online video store Start Smart TV and add the video store App to the Smart TV start page Open the video store App create your personal account select the movie and press play No fuss w...

Page 5: ...k during a sports match while the TV stores the broadcast on the USB Hard Drive You can start watching again later With a USB Hard Drive connected you can also record digital broadcasts You can record while you are watching a programme or schedule a recording of an upcoming programme In Help press Keywords and look up Pause TV or Recording for more information 1 9 Gaming If you select your game co...

Page 6: ...In Help press Keywords and look up EasyLink for more information 6 ...

Page 7: ... M6 For 4500 series 50 inch TV VESA MIS F 400x200 M6 For 4500 series 40 inch TV VESA MIS F 200x200 M6 For 4500 series 32 inch TV VESA MIS F 100x100 M6 Caution Wall mounting the TV requires special skills and should only be performed by qualified personnel The TV wall mounting should meet safety standards according to the TV s weight Also read the safety precautions before positioning the TV TP Vis...

Page 8: ...2 5 Antenna cable Insert the antenna plug firmly into the ANTENNA socket at the back of the TV You can connect your own antenna or an antenna signal from an antenna distribution system Use an IEC Coax 75 Ohm RF antenna connector Use this antenna connection for DVB T and DVB C input signals 2 6 Satellite dish Attach the satellite F type connector to the satellite connection SAT at the back of the T...

Page 9: ...to make the connection If you have devices in your wireless network that use the WEP security encryption system you cannot use WPS If you must use the WPS PIN code to connect select Scan instead of WPS Step 7 In the list of networks found select your wireless network and press OK If your network is not in the list because the network name is hidden you switched off the SSID broadcast of the router...

Page 10: ... for an overview of supported media server software Connect the router To connect and setup the router follow steps 1 to 5 1 Connect the router to the TV with a network cable Ethernet cable 2 Make sure that the router is switched on 3 Press and select Setup and press OK 4 Select Connect to network and press OK 5 Select Wired and press OK The TV constantly searches for the network connection A mess...

Page 11: ...ngs remotely with a smartphone or tablet TV network name If you have more than one TV in your network you can rename the TVs here Netflix Settings Adjust Netflix settings Clear Internet memory With Clear Internet memory you can clear all Internet files stored on your TV You clear your Philips Smart TV registration and parental rating settings your video store app logins all Smart TV app favourites...

Page 12: ...using EasyLink press Keywords and look up EasyLink CEC DVI to HDMI Use a DVI to HDMI adapter if your device only has a DVI connection Use one of the HDMI connections and add an Audio L R cable mini jack 3 5mm to AUDIO IN for sound on the back of the TV Copy protection DVI and HDMI cables support HDCP High bandwidth Digital Content Protection HDCP is a copy protection signal that prevents copying c...

Page 13: ... Audio In Optical connection on the HTS The Audio Out Optical connection sends the sound from the TV to the HTS You can set the type of the audio out signal to fit the audio capabilities of your Home Theatre System For more information press Keywords and look up Audio Out settings If the sound does not match the video on screen you can adjust the audio to video synchronisation For more information...

Page 14: ...their own picture quality processing To avoid bad picture quality caused by interference with the TV processing the picture processing of these devices should be disabled The TV comes with Pixel Plus Link switched on and disables the picture quality processing of recent Philips devices connected to the TV To switch off Pixel Plus Link in the EasyLink settings menu select Pixel Plus Link and select...

Page 15: ...Set top box has no HDMI connection Switch off timer Switch off this automatic timer if you only use the remote control of the Set top box Do this to prevent the TV from switching off automatically after a 4 hour period without a key press on the remote control of the TV To switch off the Switch off timer press and select Setup and press OK Select TV settings General settings Switch off timer and s...

Page 16: ... you might need to adjust the audio sync delay to synchronise the audio to the video On the HTS increase the delay value until there is a match between picture and sound A delay value of 180ms may be required Read the user manual of the HTS With a delay value set up on the HTS you need to switch off Audio out delay on the TV To switch off the Audio Out delay 1 Press and select Setup and press OK 2...

Page 17: ...etting the Audio out format of the TV to Stereo Press and select Setup TV settings Sound Advanced Audio out format No sound If you cannot hear the sound from the TV on your Home Theatre System check the following Check if you connected the HDMI cable to an HDMI ARC connection on the Home Theatre System All HDMI connections on the TV are HDMI ARC connections Check if the HDMI ARC setting on the TV ...

Page 18: ...le to the TV Y shares the same jack with CVBS Component and Composite share audio jacks 4 10 USB Hard Drive What you need If you connect a USB Hard Drive you can pause or record a TV broadcast The TV broadcast must be a digital broadcast DVB broadcast or similar To pause To pause a broadcast you need a USB 2 0 compatible Hard Drive with a minimum of 32GB disk space To record To pause and record a ...

Page 19: ...n connect a keyboard and a mouse to the TV Use one of the USB connections to connect Install the keyboard To install the USB keyboard switch on the TV and connect the USB keyboard to one of the USB connections on the TV When the TV detects the keyboard for the first time you can select your keyboard lay out and test your selection If you select a Cyrillic or Greek keyboard lay out first you can se...

Page 20: ...ing content from a USB flash drive press Keywords and look up Your photos videos and music 4 13 Photo camera To view photos stored on your digital photo camera you can connect the camera directly to the TV Use one of the USB connections on the TV to connect Switch on the camera after you made the connection If the contents list does not appear automatically press SOURCE select USB and press OK You...

Page 21: ...ur computer to watch movies or use it to play games you might want to set the TV back to the ideal TV watching or gaming setting To set the TV to the ideal setting manually 1 Press and select Setup and press OK 2 Select TV settings Picture Advanced Activity style and press OK 3 Select Game for gaming or select Computer for watching a movie and press OK 4 Press repeatedly if necessary to close the ...

Page 22: ...22 ...

Page 23: ...tch off the TV completely disconnect the power plug When disconnecting the power plug always pull the power plug never the cord Ensure that you have full access to the power plug power cord and outlet socket at all times 5 2 Keys on TV While the on screen display is on press the Joystick to display the menu Use the arrow nevigation keys to nevigate up down left or right Press the Joystick to confi...

Page 24: ...or close the channel list Middle 1 SMART TV To open the Smart TV start page 2 Colour keys Follow on screen instructions Blue key opens Help 3 INFO To open or close programme info 4 BACK To switch back to the previous channel you selected To close a menu without changing a setting To go back to the previous Smart TV page 5 HOME To open or close the home menu 6 EXIT To switch back to watching TV 7 O...

Page 25: ...Batteries 1 Slide the battery door in the direction shown by the arrow 2 Replace the old batteries with 2 type AAA LR03 1 5V alkaline batteries Make sure the and the ends of the batteries line up correctly 3 Reposition the battery door and slide it back until it clicks Remove the batteries if you are not using the remote control for a long time Safely dispose of your old batteries according to the...

Page 26: ...s LIST to open the channel list 2 Select All to view all channels 3 Select the channel and press to mark as favourite 4 The selected channel is marked with a 5 To finish press The channels are added to the Favourites list To remove a channel from the favourites list select the channel with then press again to unmark as favourite Reorder You can reorder reposition channels in the Favourite channel ...

Page 27: ...o unlock a channel select the locked channel in the channel list Press OPTIONS and select Unlock channel You will need to enter the Child lock code Parental rating To prevent children from watching a programme not suitable for their age you can use an age rating Some digital broadcasters have age rated their programmes When the age rating of a programme is equal to or higher than the age you have ...

Page 28: ... this channel You can block the HbbTV pages from a channel that offers HbbTV For more information press Keywords and look up HbbTV MHP applications Enable or disable the MHP applications For more information press Keywords and look up MHP Status Select Status to view technical information on the channel if it is analogue or digital or a connected device you are watching Share Enables the user to c...

Page 29: ...enu language and press OK 3 Select the language you want and press OK 4 Press repeatedly if necessary to close the menu Audio languages If the TV channel broadcasts multiple or dual audio languages you can select your preferred audio language 1 While you watch TV press OPTIONS 2 For digital channels select Audio language For analogue channels select Alternate audio Press OK to confirm your selecti...

Page 30: ...ome digital TV channels broadcast special audio and subtitles adapted for people who are hearing or visually impaired For more information press Keywords and look up Universal access Menu language To change the language or the TV menus and messages 1 Press and select Setup and press OK 2 Select TV settings General settings Menu language and press OK 3 Select the language you want and press OK 4 Pr...

Page 31: ...nel update message Off To switch off the Automatic channel update 1 Press and select Setup and press OK 2 Select Channel settings and press OK 3 Select Channel installation Automatic channel update Off and press OK Start an update To start an update yourself 1 Press and select Setup and press OK 2 Select Search for channels and press OK 3 Select Update channels and follow the instructions on scree...

Page 32: ...ect Setup and press OK 4 Select TV settings General settings Channel list copy Copy to TV and press OK You might be asked to enter the Child lock code of this TV 5 The TV notifies you if the channel list is copied to the TV successfully Unplug the USB memory device To an already installed TV 1 Verify the country setting of the TV To verify this setting press and select Setup and press OK Select Se...

Page 33: ...h the Symbol rate mode set to Manual you can enter the symbol rate value you received from your cable provider To enter the value use the number keys Network frequency mode If you intend to use the fast Quick scan method in Frequency scan to search for channels select Automatic The TV will use 1 of the predefined network frequencies or HC homing channel as used by most cable providers in your coun...

Page 34: ...lue use the number keys Manual installation Analogue TV channels can be manually installed channel by channel To install analogue channels manually 1 Press and select Setup and press OK 2 Select Channel settings Channel installation Analogue Manual installation and press OK System To set up the TV system select System and press OK Select your country or the part of the world where you are now Sear...

Page 35: ...ct All or a list filter The lists Radio or New are only shown when radio stations are available or new channels were found with a channel update Tune from the channel list To tune to a channel from the channel list 1 In the channel list select or in the menu bar to select the TV or Satellite channel list 2 Select a list 3 Select a channel in any of the lists and press OK The TV will tune to the se...

Page 36: ...In the channel list Favourites highlight the channel you want to reposition 2 Press 3 Select the channel to reorder and press OK 4 Press the Navigation buttons to move the highlighted channel to another location and press OK 5 Once complete press EXIT to exit from the Favourite channel list 8 5 Lock satellite channels Lock a channel You can lock a channel to prevent children from watching it To wa...

Page 37: ...d select Setup and press OK 2 Select Search for satellite and press OK 3 Select Install satellites and press OK 4 The TV shows the current installation setting If the current setting corresponds with the satellite installation you want you can start searching for satellites Select Search and press OK Go to step 5 If the current setting is not the setting you want select Settings and press OK Go to...

Page 38: ...nnels User band number In a Unicable system each connected satellite receiver must be numbered e g 0 1 2 or 3 etc You can find the available user bands and their number on the Unicable switchbox User band is sometimes shortened as UB There are Unicable switchboxes that offer 4 or 8 user bands If you select Unicable in the settings the TV will ask you to assign the unique user band number for its b...

Page 39: ...e satellite 4 Select Done and press OK to close the menu The TV will not update the channels from the satellite you unmarked Start an update yourself 1 Press and select Setup and press OK 2 Select Search for satellite and press OK 3 Select Update channels and press OK 4 If you want to check which satellites are set for updating select Settings and press OK 5 With the arrow keys mark or unmark the ...

Page 40: ...stallation is intended for expert users You can use Manual installation to quickly add new channels from a satellite transponder You need to know the frequency and polarization of the transponder The TV will install all channels of that transponder If the transponder was installed before all its channels the former and the new ones are moved to the end of the channel list All You cannot use Manual...

Page 41: ... have changed the transponder location of these channels To restore the channel positions in the channel list you can try an update of the channel package I cannot remove a satellite Subscription packages do not allow removing a satellite To remove the satellite you have to do a complete installation again and select another package Sometimes the reception is poor Check if the satellite dish is so...

Page 42: ...topic in an alphabetical list Setup Select Setup to install channels or adjust all TV settings Satellite Select Satellite and press OK to watch satellite channels only for TVs with a built in satellite tuner TV Select TV and press OK to watch TV channels Smart TV Select Smart TV and press OK to open the Smart TV start page only for Smart TVs Source Select Source and select a connected device in th...

Page 43: ...ails To call up the details of the selected programme press INFO Change day The TV guide can show scheduled programmes for the upcoming days maximum up to 8 days If the TV guide information comes from the broadcaster you can press to view the schedule of one of the next days Press to go back to the previous day Alternatively you can press OPTIONS and select Change day Select Previous day Today or ...

Page 44: ...s specific settings or the position within the Sources menu When you connect a new device to the TV the icon of the device jumps to the front of the Sources menu If the TV does not detect the device automatically select the connection you used to connected the device and adjust the Device type and name Original name and icon To restore the device icon to its original name and type icon press OPTIO...

Page 45: ...mode and select Country dependent 3 Select Daylight saving and select the appropriate setting 4 Press repeatedly if necessary to close the menu To set the TV clock manually 1 Press and select Setup and press OK 2 Select TV settings General settings Clock Auto clock mode and select Manual 3 Select Day and Time to adjust 4 Press repeatedly if necessary to close the menu 12 3 Switch off timer If you ...

Page 46: ...y compartment that prevents the battery from running empty Switch on and off Switch on When a 3D programme is shown on screen press on the 3D glasses and put them on The glasses need some seconds to adjust to the 3D signal from the 3D transmitter on the TV At first use this may take up to 15 seconds Battery level You can check the battery level when you switch on the 3D glasses If the LED light bl...

Page 47: ...t surfactant or wax benzene thinner mosquito repellent or lubricant Using these chemicals can cause discoloration or cracks Do not expose the 3D glasses to direct sunlight heat fire or water This may result in a product malfunction or fire Do not drop bend or apply force to the lenses of the 3D glasses Use a clean soft cloth microfiber or cotton flannel to clean the lenses to avoid scratching them...

Page 48: ... stop watching 3D and do not immediately engage in any potentially hazardous activity for example driving a car until your symptoms have disappeared If symptoms persist do not resume watching 3D without consulting a medical professional first To avoid discomfort such as dizziness headache or disorientation we recommend not watching 3D for extended periods of time Do not use the 3D glasses for any ...

Page 49: ...y a two player game To start a two player game 1 Press SOURCES select the game console and press OK 2 On the game console start the game and select the multi or two player mode Select the mode for split screen viewing 3 On the TV press OPTIONS select Picture and sound select Two player gaming and press OK 4 Select the format in which the split screen game is shown on screen Side by side or Top bot...

Page 50: ... 2 different screens put on the 3D glasses To switch the glasses to watch the Player 1 screen or Player 2 screen press the Player 1 2 selection key on the glasses In and out of split screen view In two player split screen view you can switch back and forth from split screen to combined view to be able to read the game menu or game scores To switch views back and forth press OK on the remote contro...

Page 51: ...u browse files from a computer you can only browse the files and folders as they are organized on the computer The menu bar Navigate to the menu bar and select the type of file you want to watch or play Select Photos Music or Videos Alternatively you can open the Folders view and browse your folders to look for a file Sorting To browse your photos by date month year or alphabetically by name press...

Page 52: ... rewind or go fast forward press or Press the keys several times to speed up 2x 4x 8x 16x 32x To stop the video playback press Stop Info To view info on a video playhead position duration title date etc select the video and press INFO Press again to hide the info Options Press OPTIONS Subtitles If available you can switch subtitles On Off or On during mute Shuffle Plays your videos in a random ord...

Page 53: ...CES to open the Sources menu and select a connected device Block a device The first time you receive a request to connect from a device you can block the device This request and all requests in the future from this device will be ignored To block a device select Block in the request window and press OK Unblock all devices All previously connected and blocked devices are stored in the Wi Fi Miracas...

Page 54: ...ive stops buffering and the broadcast is cleared Also when you switch the TV to standby the broadcast is cleared Whilst recording a programme on the USB Hard Drive you cannot pause a broadcast Instant replay Whilst watching a broadcast from a digital TV channel you can easily instant replay the broadcast To replay the last 10 seconds of a broadcast press Pause and press Left You can press repeated...

Page 55: ...The programme is scheduled for recording A warning will appear will be shown automatically when overlapping recordings are scheduled If you plan to record a programme in your absence remember to leave the TV switched to standby and the USB Hard Drive switched on List of recordings To view the list of recordings and scheduled recordings press select Recordings and press OK In this list you can sele...

Page 56: ...an limit the number of days a recording can be viewed A recording in the list can show the number of days before it expires Failed recording When a scheduled recording was prevented by the broadcaster or when the broadcast was interrupted a recording is marked as Failed Delete a recording To delete a made recording select the recording in the list press OPTIONS and select Delete recording For more...

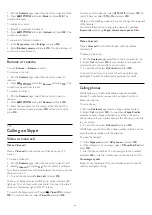
Page 57: ...ype account To sign in to Skype 1 Press to open the Home menu 2 Select Skype and press OK to start Skype and open the Sign in page 3 Select the Skype Name text field and enter your Skype Name To open the on screen keyboard select the text field and press OK If you have signed in before press LIST and select your Skype Name The TV remembers the 5 last Skype Names that signed in 4 Select the Passwor...

Page 58: ...crosoft account If you have a Microsoft account you can use this account to sign in to Skype on TV To sign in with a Microsoft account 1 On the Skype Sign in page select Sign in with Microsoft account and press OK 2 Select Next and press OK The TV will open the Microsoft account sign in web page 3 Enter your Microsoft account email and password 4 Select the Submit button and press OK No emergency ...

Page 59: ...to enter a name To open the on screen keyboard press OK When you re done press OK 4 Skype will search for the contact you are looking for and will show the search results 5 Select the contact you want and press OK to send a contact request 6 Write the request and press OK Skype will send the request message to your new contact If the contact accepts the request the Skype Name of the new contact wi...

Page 60: ...ff and press OK To switch it back on select Video On and press OK To mute your microphone select Mic Off and press OK To switch it back on select Mic On and press OK While you are making a video call you can change the viewpoint of the camera For more information on changing the viewpoint press Keywords and look up Skype camera zoom pan and tilt Make a Voice call Make a Voice call to call without ...

Page 61: ...cord a Voicemail When you call a contact and they can t take the call you can leave a voicemail To record a voicemail 1 Call a contact If your call was not answered Skype will propose to send a Voicemail 2 Select Yes and speak your message 3 To stop recording select End call and press OK Play a Voicemail A contact can send a voicemail message to you If a voicemail was sent to you a small icon will...

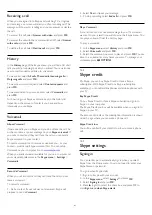
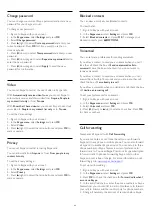
Page 62: ...u select Settings and press OK 3 Select Blocked contacts and press OK To manage your blocked contacts press OPTIONS Voicemail You can set some preferences for sending voicemails If you allow a contact to send you a voicemail when you can t take the call check the box of Send unanswered calls to voicemail Leave the box unchecked if you do not want to receive voicemails If you allow a contact to sen...

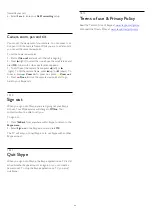
Page 63: ...Done to store the camera viewpoint and to go back to your Skype call 18 10 Sign out When you sign out of Skype you are signing out your Skype account Your Online status will change to Offline Your contacts will not be able to call you To sign out 1 Press Back from anywhere within Skype to return to the Skype menu 2 Select Sign out in the Skype menu and press OK The TV will ask you to quit Skype or...

Page 64: ...your email address select Continue and press OK 3 Confirm the email address Parental control To lock Adult 18 rated apps 1 Switch on Smart TV parental control by selecting Enable and then press OK 2 Enter an unlock PIN code of your choice 3 Confirm your PIN code Adult 18 rated apps are now locked To open a locked app select the app and press OK The TV will ask you to enter your 4 digit code 19 4 S...

Page 65: ...he slider bar View security info You can check the security level of an App page On an App page press OPTIONS and select Security info If a lock is shown next to the loading animation on the bottom of the screen while loading a page the transfer is secured Feedback on an App Select the App and press Feedback to select a like or don t like button and send a suggestion or remark to us You can also r...

Page 66: ... you missed or watch programmes whenever it suits you best Open Online TV To open the Online TV App 1 Press Smart TV 2 On the start page select the Online TV icon and press OK 3 Select a programme on the page and press OK to start watching You can use the Play and Pause keys List per broadcaster To view the Online TV programmes ordered by broadcaster press All broadcasters Select a broadcaster and...

Page 67: ...are met you can use Multi room 20 3 Using Multi room First time use When you start Multi room for the first time switch on both TVs Once this TV made a connection with the other TV the other one will appear automatically in the Browse network menu even when it s in standby Stream a TV channel With Multi room you can watch the current TV channel or open the channel list of the other TV If you selec...

Page 68: ...TV name To change the TV name Press Setup Network settings TV network name 68 ...

Page 69: ...te JointSpace If you have a 2010 model you only need to activate JointSpace on the TV TV models from 2011 and onwards are ready to use the MyRemote App To know in what year your TV was built check the TV type number E g xxPFLxxx4 If the last number is a 4 your TV is a 2009 model If the last number is a 5 your TV is a 2010 model A 6 for 2011 a 7 for 2012 and an 8 for 2013 21 2 What you need Home ne...

Page 70: ... Tap the button Select device at the top right corner of the App menu You can check the compatibility of MyRemote with your other Philips products at the online support page of your product at www philips com support Also ensure your Philips product has been updated with the latest software 21 5 App functions SimplyShare With SimplyShare you can send media files like photos music or videos from a ...

Page 71: ...an call up the TV guide of your TV on your smartphone or tablet You can consult the TV schedule and read programme info You can tap the programme title to switch the TV to the selected channel directly If you have a USB Hard Drive installed on your TV you can schedule recordings on the TV from your smartphone or tablet To open the TV guide tap the TV guide button on the MyRemote App menu The first...

Page 72: ...If you pause the TV broadcast on TV or start recording a broadcast with the TV on a connected USB Hard Drive the Wi Fi smart screen function will stop Sound The sound that comes with the TV channel is mono sound Subtitles Subtitles on Wi Fi smart screen are not supported Channel bar To switch to a channel further up or down the TV channel list you can call up the Channel bar To call up the Channel...

Page 73: ...found channels are added to the channel list You can also do a reinstallation of all channels A channel update or a channel reinstall may take some time Press Keywords and look up Channel update or Channels reinstall Channel settings In the Channel settings menu you can set your language preferences or switch on the Universal access for people who are hearing and visually impaired You can set an a...

Page 74: ...t TV settings navigate to the individual setting and adjust it 4 Press repeatedly if necessary to close the menu To return to the original Picture style values 1 Press and select Setup and press OK 2 Select TV settings Picture Picture style and select the style you want to reset 3 Press Reset The style is reset For more information on adjusting individual picture settings press Keywords and look u...

Page 75: ...ngs Picture Advanced Colour Custom colour temperature 3 Press right 4 Select a setting with the arrow keys WP is white point and BL is black level 5 Press OK to confirm a setting You can also select one of the presets in this menu 6 Press repeatedly if necessary to close the menu Contrast settings Contrast modes With Contrast modes you can set the level at which power consumption can be reduced by...

Page 76: ...edly if necessary to close the menu Noise reduction With Noise reduction you can filter out and reduce the level of image noise To adjust the noise reduction 1 Press and select Setup and press OK 2 Select TV settings Picture Advanced Sharpness Noise reduction 3 Press right and select Maximum Medium Minimum or Off 4 Press repeatedly if necessary to close the menu MPEG artefact reduction With MPEG a...

Page 77: ... Factory standard News Ideal for speech Movie Ideal for watching movies Game Ideal for gaming Music Ideal for listening to music Adjust a Sound style You can adjust a Sound style 1 Select the style and press OK 2 Press and select Setup and press OK 3 Select TV settings navigate to the individual setting and adjust it Press to close the menu to store your setting To return to the original Sound sty...

Page 78: ...ce The TV will switch off the TV speakers when the device is playing the sound If you select EasyLink autostart the TV will switch on the audio device send the TV sound to the device and switch off the TV speakers With EasyLink or EasyLink autostart selected you can still switch to TV speakers or device speakers in the Picture and sound menu To set the TV speakers 1 Press and select Setup and pres...

Page 79: ...p and press OK 2 Select TV settings Ambilight Ambilight style Static and press OK 3 Select the colour from the colour palette Press OK to confirm 4 Press repeatedly if necessary to close the menu Ambilight settings Ambilight brightness With Ambilight Brightness you can set the level of brightness of the Ambilight To adjust the level 1 Press and select Setup and press OK 2 Select TV settings Ambili...

Page 80: ...d your hue bridge yet you can select Scan again and press OK If the TV found the only hue bridge you have select Next and press OK If you have more than one hue bridge available press up or down to select the hue bridge you want to use and then select Next and press OK 2 After you pressed OK go to the Philips hue bridge and press the link button in the middle of the device This will link the hue b...

Page 81: ...epeatedly if necessary to close the menu TV switch off With TV switch off you can set Ambilight to switch off immediately or slowly fade out when you switch off the TV The slow fade out gives you some time to switch on the lights in your living room To select the TV switch off 1 Press and select Setup and press OK 2 Select TV settings Ambilight Advanced TV switch off 3 Select Fade out to off or Im...

Page 82: ...close the menu Visually impaired Mixed volume You can mix the volume of the normal audio with the audio commentary To mix the volume 1 Press OPTIONS and select Universal access in the menu bar 2 Select Mixed volume and press OK 3 Use the arrows up and down to set the slider bar 4 Press OK to confirm Audio effect Some audio commentary can hold extra audio effects like stereo or fading sound To swit...

Page 83: ...ergy efficiency class of this product The greener the energy efficiency class of this product is the lower the energy it consumes On the label you can find the energy efficiency class the average power consumption of this product in use and the average energy consumption for 1 year You can also find the power consumption values for this product on the Philips website for your country at www philip...

Page 84: ... cm 47 inch 122 cm 48 inch 127 cm 50 inch 140 cm 55 inch 164 cm 65 inch Display resolution 1920x1080p Input resolution for HD FHD TVs Video formats Resolution Refresh rate 480i 60 Hz 480p 60 Hz 576i 50 Hz 576p 50 Hz 720p 50 Hz 60 Hz 1080i 50 Hz 60 Hz 1080p 24 Hz 25 Hz 30 Hz 50 Hz 60 Hz Computer formats Resolutions amongst others 640 x 480p 60 Hz 800 x 600p 60 Hz 1024 x 768p 60 Hz 1280 x 768p 60 Hz...

Page 85: ...with TV stand Width 952 2 mm Height 616 9 mm Depth 213 1 mm Weight 11 7 kg 47PFx5609 without TV stand Width 1063 9 mm Height 619 9 mm Depth 69 6 mm Weight 13 4 kg with TV stand Width 1063 9 mm Height 679 7 mm Depth 254 4 mm Weight 14 8 kg 55PFx5609 without TV stand Width 1234 mm Height 716 mm Depth 92 mm Weight 18 8 kg with TV stand Width 1234 mm Height 782 mm Depth 300 mm Weight 20 5 kg 23 8 Dime...

Page 86: ...10 AVC H264 VC 1 WMV9 Audio Codecs AAC HE AAC v1 v2 AMR NB Dolby Digital Dolby Digital Plus DTS 2 0 Digital Out MPEG 1 2 2 5 Layer I II III includes MP3 WMA v2 to v9 2 WMA Pro v9 v10 Subtitles Formats SAMI SubRip SRT SubViewer SUB MicroDVD TXT mplayer2 TXT TMPlayer TXT Character encodings UTF 8 Central Europe and Eastern Europe Windows 1250 Cyrillic Windows 1251 Greek Windows 1253 Turkish Windows ...

Page 87: ...itself off for 10 seconds and then back on again Please wait The TV software has been updated You can use the TV again To prevent an accidental update of the TV software delete the autorun upg file from the USB memory device Update from Internet If the TV is connected to the Internet you may receive a message from TP Vision to update the TV software You need a high speed broadband Internet connect...

Page 88: ...rg libmng 1 0 10 libmng THE reference library for reading displaying writing and examining Multiple Image Network Graphics MNG is the animation extension to the popular PNG image format This piece of software is made available under the terms and conditions of the libmng license which can be found below Source http sourceforge net projects libmng files u Boot loader 1 3 4 Used by boot loader and o...

Page 89: ...ttp www gnu org software libc mtd utils 1 The aim of the system is to make it simple to provide a driver for new hardware by providing a generic interface between the hardware drivers and the upper layers of the system Hardware drivers need to know nothing about the storage formats used such as FTL FFS2 etc but will only need to provide simple routines for read write and erase Presentation of the ...

Page 90: ...ms and conditions of the alsa license which can be found below Source http www alsa project org lvm2 2 02 89 DM_VERITY This piece of software is made available under the terms and conditions of the lvm2 license which can be found below Source ftp sources redhat com pub lvm2 releases encfs 1 3 2 A library provides an encrypted filesystem in user space Source http www arg0 net encfs boost 1 15 0 A l...

Page 91: ...l Source http procps sourceforge net index html psmisc 22 13 This PSmisc package is a set of some small useful utilities that use the proc filesystem We re not about changing the world but providing the system administrator with some help in common tasks Source http psmisc sourceforge net sed 4 1 5 sed stream editor isn t an interactive text editor Instead it is used to filter text i e it takes te...

Page 92: ...oyd yajl 2 0 1 0 gf4b2b1a tar gz df6a751e7797b9c2182efd91b5d64017 lloyd yajl 2 0 1 0 gf4b2b1a tar gz HMAC SHA1 0 1 keyed hash message authentication code HMAC is a specific construction for calculating a message authentication code MAC involving a cryptographic hash function in combination with a secret cryptographic key As with any MAC it may be used to simultaneously verify both the data integri...

Page 93: ...s startup screen is displayed then the TV returns to standby mode This is normal behaviour When the TV is disconnected and reconnected to the power supply the startup screen is displayed at the next startup To switch on the TV from standby press on the remote control or the TV The standby light keeps on blinking Disconnect the power cable from the power outlet Wait 5 minutes before you reconnect t...

Page 94: ... shown When a HDMI CEC audio device is connected this behaviour is normal Photos videos and music from a USB device do not show Make sure that the USB storage device is set to Mass Storage Class compliant as described in the storage device s documentation Make sure that the USB storage device is compatible with the TV Make sure that the audio and picture file formats are supported by the TV Choppy...

Page 95: ...5 5 Consumer Care Repair For support and repair call the Consumer Care hotline in your country Find the telephone number in the printed documentation that came with the TV Or consult our website www philips com support TV model number and serial number You might be asked to provide the TV product model number and serial number Find these numbers on the packaging label or on the type label on the b...

Page 96: ...he power plug power cord and outlet socket at all times Risk of injury or damage to the TV Two people are required to lift and carry a TV that weighs more than 25 kg or 55 lbs If you mount the TV on a stand only use the supplied stand Secure the stand to the TV tightly Place the TV on a flat level surface that can support the weight of the TV and the stand When wall mounted ensure that the wall mo...

Page 97: ...light heat or extreme humidity If condensation occurs it will disappear spontaneously while the TV is playing for a few hours The condensation moisture will not harm the TV or cause malfunction 26 2 Screen care Never touch push rub or strike the screen with any object Unplug the TV before cleaning Clean the TV and frame with a soft damp cloth and wipe gently Avoid touching the Ambilight LEDs on th...

Page 98: ...res not recommended or authorised in this manual shall void the warranty Pixel characteristics This LCD LED product has a high number of colour pixels Although it has effective pixels of 99 999 or more black dots or bright points of light red green or blue may appear constantly on the screen This is a structural property of the display within common industry standards and is not a malfunction CE c...

Page 99: ...s technology to protect their intellectual property including copyrighted content This device uses PlayReady technology to access PlayReady protected content and or WMDRM protected content If the device fails to properly enforce restrictions on content usage content owners may require Microsoft to revoke the device s ability to consume PlayReady protected content Revocation should not affect unpro...

Page 100: ...pending applications in other countries throughout the world Other trademarks All other registered and unregistered trademarks are the property of their respective owners 100 ...

Page 101: ...8 Channel packages 37 Channel update message 33 Channel favourite 26 Channel options 27 Channel problems 93 Channel status 29 Channel switch 26 Channels rename 27 Channels update 35 Child lock code 29 CI 16 Clear LCD 76 Clear sound 78 Clock 45 Colour 74 Colour Colour enhancement 75 Colour Colour temperature 75 Common Interface slot 16 Connectivity guide 12 Consumer Care 95 Contact Philips 97 Contr...

Page 102: ...ter 9 Network DHCP 11 Network password 13 Network problems 10 Network settings 12 Network Static IP 15 Network wired 10 Network wireless 9 New channels 33 Noise reduction 76 O On and Off 23 On screen Help 96 Online support 94 Online TV 66 Open source software 87 Options on a channel 31 Original language 36 P Parental rating 31 Pause TV 54 Philips hue 81 Photo camera connect 20 Photos slideshow 51 ...

Page 103: ...e 96 Surround mode 79 Switch off timer 45 Switching on 27 Symbol rate 33 Symbol rate mode 35 Synchronise audio and video 18 T Teletext 30 Text 32 Treble 77 TV clock 47 TV guide 43 TV guide clock 49 TV network name 14 TV on Demand 68 TV placement 79 TV speakers 80 Twitter 68 U Unicable 40 Universal access 81 Universal access audio effect 82 Universal access hearing impaired 84 Universal access mixe...

Page 104: ...71 0 10 min Norge 22 97 19 14 Österreich 0820 40 11 33 0 145 Min Polska 22 397 15 04 Połączenie lokalne Portugal 707 78 02 25 0 12 min Móvel 0 30 min Romānä 031 6300042 Tarif local Россия 8 800 22 00004 бесплатно Suisse Schweiz Svizzera 0848 000 291 0 081 CHF Min Србија 011 321 6840 Lokalni poziv Slovakia 2 332 154 93 Vnútroštátny hovor Slovenija 1 888 83 12 Lokalni klic Suomi 09 88 62 50 40 Sveri...

Reviews: