background image

3

Preparation

&

Place the TV on a solid surface

.

For ventilation, leave at least 5 cm free all around the TV.
To prevent any unsafe situation, do not place any objects on top of the TV.

é

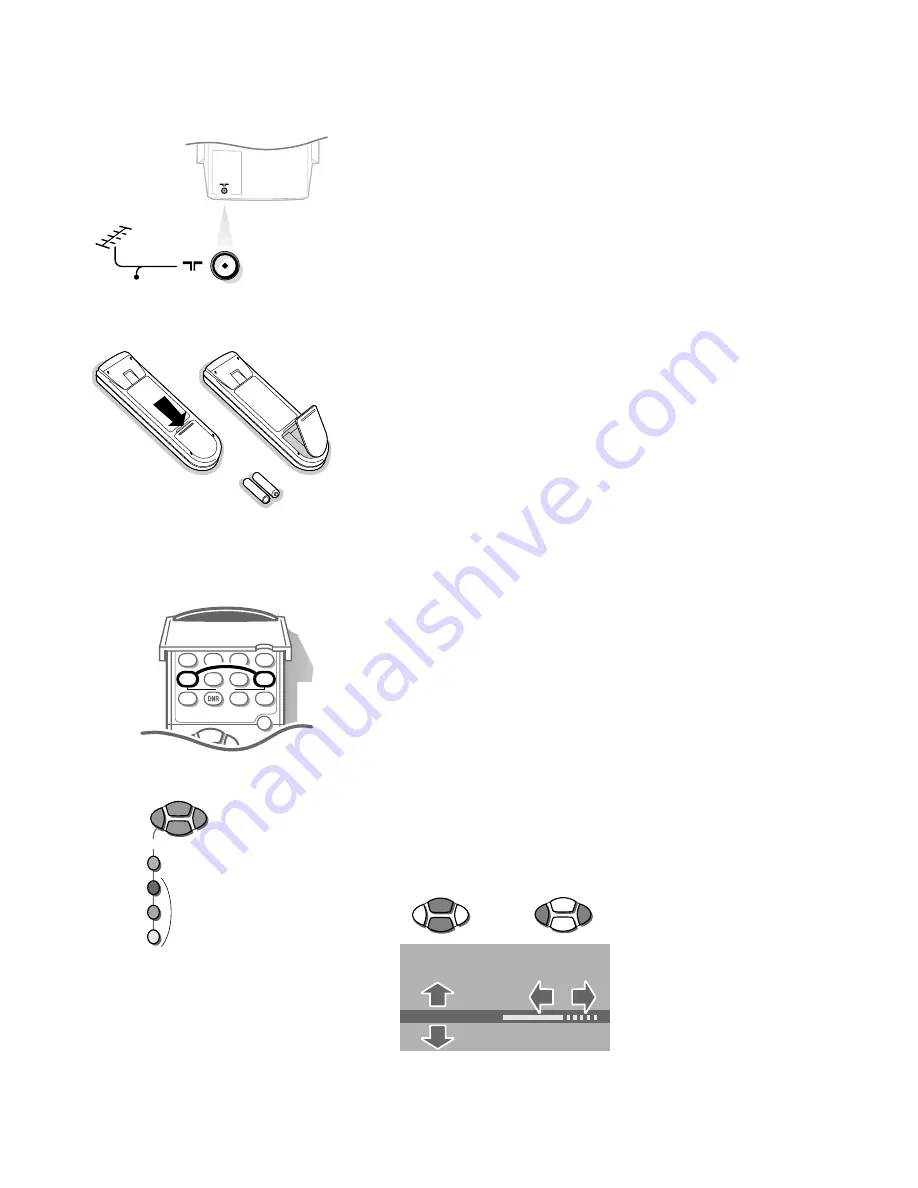
Insert the aerial plug

tightly into the aerial socket 

x

at  the back of the

TV. You can improve the picture quality by using the suppressor-aerial cable
supplied.

Insert the mains plug in the wall socket with a mains voltage of 220V - 240V.

Remote control: Remove the cover of the battery compartment.
Insert the 2 batteries supplied (type R03G-1,5V).

The batteries supplied do not contain the heavy metals mercury and cadmium.
Nevertheless in many countries exhausted batteries may not be disposed of with your
household waste. Please ensure you dispose of exhausted batteries according to local
regulations.

(

Switch TV on 

: Press the power switch 

A

on the front of your TV.

A green indicator and the screen light up.
If the indicator is red, press the 

P

key on the remote control.

The green lamp blinks every time you press a key on the remote control.
When you switch on your set 

for the first time

, the menu 

LANGUAGE

automatically

appears on the screen. Alternatively the explanation appears in the different
languages. Choose your own language and press the 

OK

key on the remote control. 

Go on to page 4.

RO3 / AAA

CABLE

Installation

Select the 

INSTALLATION 

menu :

&

Open the door of the remote control.

é

Press 

f

and 

U

at the same time.

To use the menus

&

Use the 

B

keys to select a menu item.

é

Use the 

OK

key to activate.

Use the red 

MENU 

key to return or to switch menu off.

MENU

j

i

X

u

h

d

fi

S

s

B

o

p

œ

π

f

U

MENU

o

p

œ

π

OK

Select

Activate

MENU TITLE

Subject 1
Subject 2
Subject 3

J

Subject 4
Subject 5
Subject 6

J

Subject 4

L         M

o

p

œ

π

o

p

œ

π

3104 305 4768.5.gb  26-05-1999  15:41  Pagina 3

Summary of Contents for 32PW9403/12

Page 1: ...________7 Operation Use of the remote control __________________________________8 9 Use of the menus Picture menu __________________________________________10 Sound menu___________________________________________10 Features menu ______________________________________11 12 Teletext_______________________________________________13 14 Connect peripheral equipment_________________________15 18 Tips __...

Page 2: ...u p 8 B switch to standby p 3 Installation U f yÚ p 8 V volume key P programme selection temporarily switch sound off 0 previous programme p 8 a picture M sound p 13 b teletext on off p 8 q picture format p 8 æ programme guide on off b for future use Menu yÚ B 8 7 9 5 4 6 0 3 1 2 F yÚ h d U f i j X u P fi S s MENU B b æ a q b M 0 V P OK p 17 u selection of EXT1 EXT2 EXT3 or FRONT p 9 X bilingual c...

Page 3: ...rding to local regulations Switch TV on Press the power switch A on the front of your TV A green indicator and the screen light up If the indicator is red press the P key on the remote control The green lamp blinks every time you press a key on the remote control When you switch on your set for the first time the menu LANGUAGE automatically appears on the screen Alternatively the explanation appea...

Page 4: ...tallation or a TV channel transmitting a teletext page with the frequencies and programme names of all the TV channels which can be received is detected the search is stopped and a programme list appears The programme list is automatically filled with all the programme numbers and names of the TV channels transmitted It is possible that the cable company or the TV channel displays a broadcast sele...

Page 5: ...e of poor reception you can improve the reception by adjusting the frequency with the P key Direct selection of a TV channel If you know the frequency or the C or S channel number enter it directly with the digit keys 0 to 9 Ask for a list from your cable company or dealer alternatively consult the Table of frequencies on the inside backcover of this handbook Store steps till Select Store and pres...

Page 6: ...enu A space numbers or other special characters are located between Z and A Give name After leaving the installation you can browse through the TV channels by pressing the P key Only those TV channels which are in the favourite list will be displayed The non favourite TV channels can still be selected with the digit keys Select Favourite Programmes in the INSTALLATION menu and press the OK key é S...

Page 7: ...ion of a TV programme or after pressing the i key on the remote control a TV channel which broadcasts teletext may transmit the name of the TV channel or the programme name or another message which appears briefly in the information line on the screen When selected Off the information line will only appear after pressing the i key and not after the selection of a TV channel Auto Format Selecting A...

Page 8: ...mits PALplus signals the Movie Expand 16 9 picture format is selected automatically Sometimes video recorders or TV programmes carry special signals which will automatically switch the TV to the correct screen format Selecting Auto format the screen will be filled as much as possible with the picture in case of no PALplus transmission or when TV programmes are not carrying special signals detectin...

Page 9: ...uce the image noise and improve picture quality when receiving weak signals Press this key to select Off or Automatic When Automatic is selected the image noise reduction is set automatically j Continuous subtitles TV channels with teletext often transmit certain programmes with subtitling Switch on teletext and select the proper subtitle page from the index Press j to store the subtitle page Swit...

Page 10: ...Off Store the modified adjustments for Contrast Brightness Colour Tint Digital Scan and Dynamic Contrast for all TV channels with Store PP in the FEATURES menu Sound menu Switch Loudness on or off When Loudness On is selected the low and high frequencies are amplified so that the natural balance is restored when listening at a low volume The selected setting for Loudness is stored for all TV chann...

Page 11: ...s set to go to standby the remaining minute appears on screen You can always switch off your set earlier or change the set time Child Lock If the child lock is on the TV can only be switched on with the remote control The and keys on top of the TV cannot be used to select a TV channel In this way you can prevent unauthorised use of your TV If the message Child Lock On appears the child lock must b...

Page 12: ...creen when the TV is switched on again If you selected Once the message will disappear from the screen after 30 seconds If you selected Continuous the message will appear on the screen until the display frequency is switched off in the Message menu The message does NOT appear when Continuous Subtitles have been switched On See p 9 FEATURES Store PP Sleeptimer Message Child Lock Animation demo J Me...

Page 13: ... counter seeks the page or the page appears immediately when the page number has been stored in the memory A message appears when you have entered a non existent or an incorrect page number Page numbers beginning with 0 or 9 do not exist Choose another number With the option line Select with the colour keys corresponding to the coloured options at the bottom of the screen the desired subject Quick...

Page 14: ...ored in the memory so that they are available while the teletext page is on screen Select with the CD keys the previous or the following subpage 2 With the U key Enter the subpage number yourself Press U Enter the desired subpage with the digit keys e g 3 for the third page of seven subpages The TV searches for the selected subpage Automatically rotating subpages Press U again to cancel the entere...

Page 15: ... Searching for and storing TV channels Manual Installation p 5 Store the test signal either under programme number 0 or between 90 and 99 Replace the aerial cable in the aerial socket x of your video recorder after you have stored the test signal Decoder and video recorder Connect a eurocable 4 to your decoder and to the special euroconnector of your video recorder See also the video recorder hand...

Page 16: ... Connect the audio cables to the audio input of your audio equipment and to AUDIO L and R at the back of your TV You can listen to your TV sound via your audio equipment Headphone Insert the plug into the headphone socket L at the right side of the TV Press on the remote control to switch off the internal loudspeakers of the TV The headphone impedance must be between 8 and 4000 Ohm The headphone s...

Page 17: ... watch TV channels again Enter the programme number of the TV channel which you want to watch with the digit keys Most of the video equipment from our range of products can be operated with the remote control of the TV Video recorder keys Press simultaneously on the VCR key and π k for play k for record Ò k for rewind k for fast forward k for stop F k for programming on certain models for selectin...

Page 18: ...ice Then the recording is stopped and your video recorder switches to standby If you switch to standby during recording a programme from a peripheral connected to EXTERNAL 1 or FRONT the blinking red lamp on the front of your TV indicates that you are still recording The blinking stops after the recording is finished using a eurocable connected to the euroconnector EXTERNAL 2 With a video recorder...

Page 19: ...ion Switch your TV off and then on again Never attempt to repair a defective TV yourself Check with your dealer or call a TV technician End of life directives Your new TV contains materials which can be recycled and reused At the end of life specialised companies can dismantle the discarded TV to concentrate the reusable materials and to minimise the amount of materials to be disposed of Please en...

Page 20: ... audio components in HiFi systems and between TV and VCR Scart connection required Turns source selection and control into a one button operation Easy Text Teletext memory that automatically memorises Teletext pages and gives you instant access to them Euroconnector A 21 pins connector system enabling you to simply connect various types of audio video and computer equipment Incredible Surround Fea...

Reviews: