background image

18

E

DITING OF 

C

HANNELS

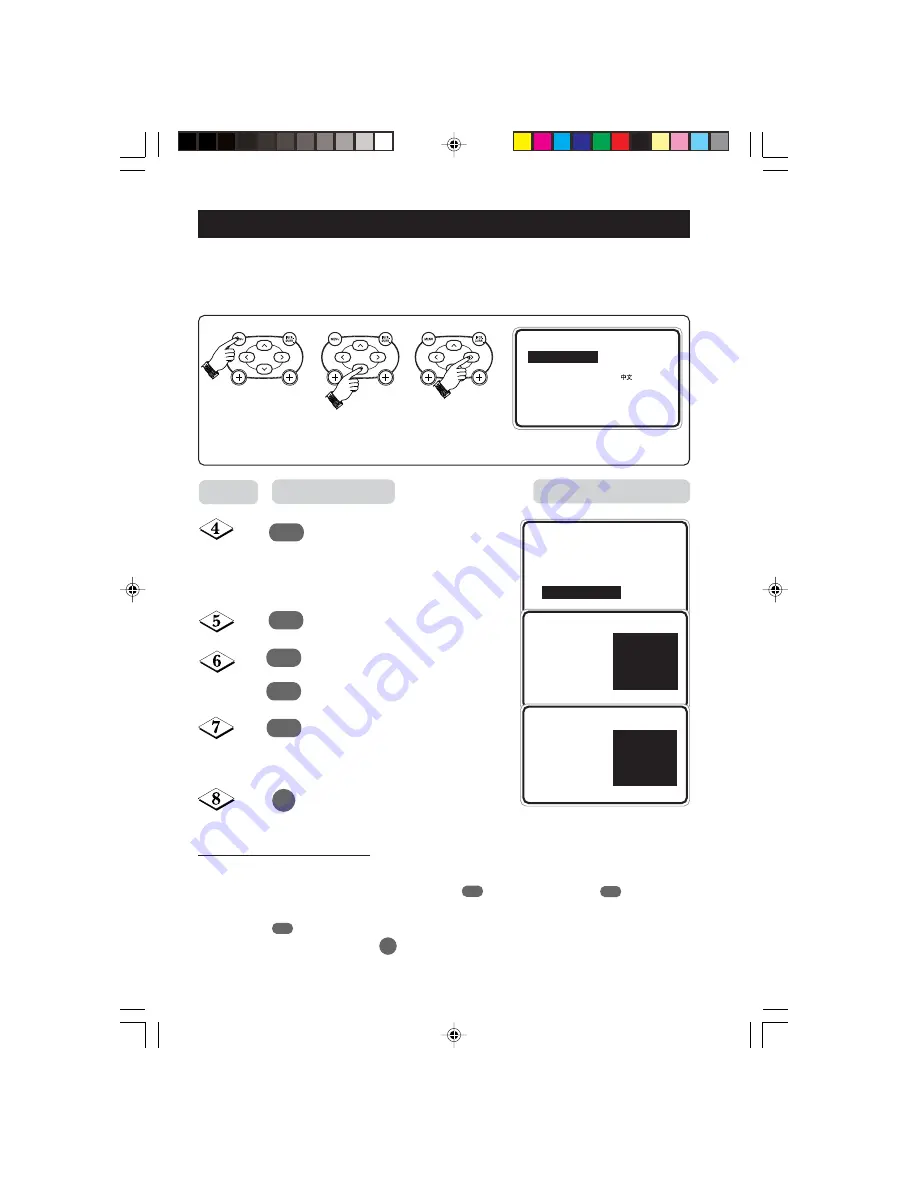
This feature allows you to edit or skip channels which have bad or weak TV signal or channels
that you do not watch often.

Note

 : Once a channel is skipped, you cannot have access to it by the 

CHANNEL

 +

 or 

 –

button. You can only access the channel by the 

DIGIT (0 -9)

 button.

1. Enter main menu.

2. Select 

INSTALL.

3. Enter install mode.

Press button repeatedly until

CHANNEL EDIT

 is selected.

Enter channel edit mode.

Select the channel you want to skip.

Activate skipped mode.

Exit menu from screen.

How to add back channels

• Repeat steps 1 to 5 as in 

“Editing of Channels”

.

• Select the channel you want to add back by the        

(CURSOR UP)

  or       

  (CURSOR

DOWN) 

button.

• Press the         

  (CURSOR RIGHT)

 button to activate adding back of channel.

• Exit menu from screen by the       

  (OSD)

 button.

Result on screen

Press button

Step

or

¸

˙

¸

˚

˙

m

¸

˚

˙

m

Ñ

INSTALL

LANGUAGE

ENGLISH

AUTO STORE

B.MELAYU

MANUAL STORE

SORT

CHANNEL EDIT

É

Ñ

É

INSTALL

LANGUAGE

3

AUTO STORE

4

MANUAL STORE

5

SORT

6

CHANNEL EDIT

7

Ñ

É

INSTALL

LANGUAGE

3

AUTO STORE

4

MANUAL STORE

5

SORT

6

CHANNEL EDIT

7

Ñ

É

INSTALL

LANGUAGE

3

AUTO STORE

4

MANUAL STORE

5

SORT

6

CHANNEL EDIT

7 SKIPPED

Ñ

É

8521/Eng/69R/79R/p17-20

6/16/03, 4:16 PM

18

Summary of Contents for 32PW8521

Page 1: ...32PW8521 32PW8521 32PW8521 Colour Televison Operating Instructions 8521 Eng 69R 79R p1 5 5 6 03 3 17 PM 1 ...

Page 2: ...the Audio Video Sockets Recording 8 Functions of Remote Control 9 Functions of TV Controls 11 TV Installation Selecting the Menu Language and AutomaticTuning of Channels 12 ManualTuning of Channels 14 Selecting the Colour Sound System 15 Fine Tuning Of Channels 16 Sorting of Channels 17 Editing of Channels 18 Naming of Channels 19 Features Using the Picture Sound Menu 20 Using the Active Control F...

Page 3: ...e placed on top the TV so as to avoid dripping or splashing of liquids on the set UsefulTips Do not leave your set on standby mode for a prolonged period of time Switch off set to allow it to be demagnetised A demagnetised set supports good picture quality Do not shift or move the set around when it is switched on Uneveness in colour in some parts of the screen may occur Never attempt to repair a ...

Page 4: ... theTV Possible TV station problem Try another channel Good picture Try increasing the volume but no sound Check that the sound is not muted If it is muted press the Mute button on the remote control to restore sound Good sound but poor Try increasing the contrast and brightness setting colour or no picture Snowish picture and Check antenna connection at the rear of theTV noise Horizontal dotted l...

Page 5: ...ent Note This diagram is not representative of the actual plug and socket Switching on the Set Press the main power button to switch on off the TV If the set is on standby indicator is red press the Power button on the remote control to switch on set HOOKING UPYOUR TV BASIC CONNECTION USE CARE OF REMOTE CONTROL Insert the correct type of batteries into the compartment Ensure the batteries are plac...

Page 6: ...from a normal antenna RF connection Connect the S VIDEO socket on the rear of the TV to the S VHS OUT socket on a S VHS VCR Connect the AUDIO IN sockets from the rear of the TV to the AUDIO OUT sockets on the VCR Note You need not connect the VIDEO IN socket of the TV if S VIDEO IN socket is connected AV sockets on rear of TV AV sockets on rear of TV Back of VCR VCR Equipped with Video and Audio O...

Page 7: ...the Camcorder to the Side AUDIO IN sockets You can view the playback of DVD discs by using the COMPONENT VIDEO INPUT sockets on the rear of the TV Connect the Y Pb and Pr INPUT sockets on the TV to the Y Pb and Pr OUTPUT sockets on the DVD to view playback of DVD discs Note Y Pb Pr sockets and AV1 sockets cannot be connected simultaneously Connect headphone jack to socket for personal listening Ca...

Page 8: ...ponding sockets at either AV1 or AV2 Connect the sockets of the receiving VCR to the MONITOR OUTPUT sockets on the rear of the TV VCR Equipped with Video and Audio Input sockets AV sockets on rear of TV L Mono R S VIDEO VIDEO AUDIO AV1 in AV2 in Monitor out COMPONENT VIDEO INPUT Y Pb Pr ANTENNA OUT IN OUT IN AUDIO R L VIDEO IN OUT L Mono R S VIDEO VIDEO AUDIO AV1 in AV2 in Monitor out COMPONENT VI...

Page 9: ...cified time while you are watching another channel or when the set is on standby mode Smart Sound Button Press the Smart Sound button repeatedly to access 4 different types of sound settings and choose your desired setting è Menu Button Displays the main menu Also exits menu from screen Cursor Up Button Allows you to select the next item on the menu ç Cursor Left Button Allows you to select the su...

Page 10: ...t the next item on the menu 9 Channel Buttons Allows you to select channels in ascending or descending order 20 Mute Button Mutes sound To restore sound press button again 21 Teletext Button Refer to section on Using the Teletext 22 OSD button Allows you to display the current channel number It also allows to exit menu from the screen after control adjustments 23 Digit 0 9 Buttons Press to select ...

Page 11: ...ols of the TV when remote control handset is aimed at it Volume button Adjust sound volume louder softer Channel button Select channel in ascending descending order Menu button Press the MENU button to enter main menu Press the Channel or button to select the next item on the menu Press the Volume or button to access the sub menus and adjust the settings CH M 3 é 8521 Eng 69R 79R p9 11 4 23 03 2 5...

Page 12: ...generally explains the operation of theTV set using the buttons on the remote control unless otherwise stated Please read the following instructions carefully and follow the steps as shown to familiarise yourself with the installations and all features available in your set Result on screen MENU PICTURE BRIGHTNESS SOUND COLOUR FEATURES CONTRAST INSTALL SHARPNESS COLOUR TEMP É Ñ INSTALL LANGUAGE EN...

Page 13: ...m Ñ É INSTALL LANGUAGE ENGLISH AUTO STORE B MELAYU MANUAL STORE SORT CHANNEL EDIT Ñ INSTALL LANGUAGE ENGLISH AUTO STORE B MELAYU MANUAL STORE SORT CHANNEL EDIT É Ñ É Ñ É INSTALL LANGUAGE AUTO STORE SEARCH MANUAL STORE SORT CHANNEL EDIT Ñ Ñ INSTALL LANGUAGE AUTO STORE SEARCHING MANUAL STORE PLEASE WAIT SORT CHAN FOUND 8 CHANNEL EDIT 048 31 MHZ É Ñ É INSTALL LANGUAGE AUTO STORE SEARCH MANUAL STORE S...

Page 14: ...11 Exit menu from screen Result on screen Press button Step 9 10 11 12 MENU m PICTURE LANGUAGE SOUND AUTO STORE FEATURES MANUAL STORE INSTALL SORT CHANNEL EDIT É INSTALL LANGUAGE COLOUR SYSTEM AUTO STORE SOUND SYSTEM MANUAL STORE SEARCH SORT CHANNEL CHANNEL EDIT STORE INSTALL MANUAL STORE COLOUR SYSTEM SOUND SYSTEM SEARCH 048 31MHZ CHANNEL STORE Ñ É INSTALL MANUAL STORE COLOUR SYSTEM SOUND SYSTEM ...

Page 15: ... mode Select the desired sound system Exit from sound system mode Press button repeatedly until STORE is selected Store selected system Exit menu from screen Result on screen Press button Step 9 10 11 12 or or m Ñ É INSTALL MANUAL STORE COLOUR SYSTEM AUTO SOUND SYSTEM PAL SEARCH SECAM CHANNEL STORE INSTALL MANUAL STORE COLOUR SYSTEM SOUND SYSTEM AUTO SEARCH B G CHANNEL D K STORE Ñ Ñ INSTALL MANUAL...

Page 16: ...rom screen Result on screen Press button Step 9 10 or m Ñ INSTALL LANGUAGE ENGLISH AUTO STORE B MELAYU MANUAL STORE SORT CHANNEL EDIT É Ñ É INSTALL LANGUAGE COLOUR SYSTEM AUTO STORE SOUND SYSTEM MANUAL STORE SEARCH SORT CHANNEL CHANNEL EDIT STORE É INSTALL MANUAL STORE COLOUR SYSTEM AUTO SOUND SYSTEM PAL SEARCH SECAM CHANNEL STORE Ñ INSTALL MANUAL STORE SOUND SYSTEM SEARCH CHANNEL STORE FINE TUNE ...

Page 17: ...he channel number in the TO column that is the channel you want to swap to Select EXCHANGE Activate exchange of channels Exit menu from screen Result on screen Press button Step 9 10 11 m Ñ INSTALL LANGUAGE ENGLISH AUTO STORE B MELAYU MANUAL STORE SORT CHANNEL EDIT É Ñ É INSTALL LANGUAGE FROM AUTO STORE TO MANUAL STORE EXCHANGE SORT CHANNEL EDIT É INSTALL SORT FROM 8 TO EXCHANGE Ñ É INSTALL SORT F...

Page 18: ...ode Exit menu from screen How to add back channels Repeat steps 1 to 5 as in Editing of Channels Select the channel you want to add back by the CURSOR UP or CURSOR DOWN button Press the CURSOR RIGHT button to activate adding back of channel Exit menu from screen by the OSD button Result on screen Press button Step or m m Ñ INSTALL LANGUAGE ENGLISH AUTO STORE B MELAYU MANUAL STORE SORT CHANNEL EDIT...

Page 19: ...haracters and select desired character Move to next character slot by the CURSOR RIGHT button and select in the next character You can enter up to a maximum of 5 characters Store named channel Exit menu from screen Result on screen Press button Step 9 10 or or MENU m Ñ INSTALL LANGUAGE ENGLISH AUTO STORE B MELAYU MANUAL STORE SORT CHANNEL EDIT É Ñ É INSTALL AUTO STORE MANUAL STORE SORT CHANNEL EDI...

Page 20: ...n the PICTURE SOUND menu 3 Use the CURSOR LEFT RIGHT buttons to access the sub menus Note HUE feature is only applicable to NTSC programmes The HUE item will not appear on the menu if programme is in PAL mode Sound Activities menu items Treble Increase or decrease the high frequency level Bass Increase or decrease the low frequency level Balance Adjusts the balance of the right and left speakers s...

Page 21: ...n repeatedly until FEATURES is selected 2 Press the CURSOR RIGHT button to enter FEATURES menu 3 Press the CURSOR DOWN button to select ACTIVE CONTROL 4 Press the CURSOR RIGHT button repeatedly to select ON option to activate the Active Control function 5 Press the m OSD button to exit menu from screen MENU PICTURE TIMER SOUND ACTIVE CTRL FEATURES CHILD LOCK INSTALL FORMAT ROTATION É FEATURES TIME...

Page 22: ...t 3 and 0 in the minute column Exit from TIME mode Select START TIME Enter the START TIME mode Key in the time you want the programme to be switched on Exit from START TIME mode Select STOP TIME Enter STOP TIME mode Key in the time you want the programme to be switched off FEATURES TIMER TIME START TIME STOP TIME CHANNEL ACTIVATE Ñ É FEATURES TIMER TIME 12 30 START TIME STOP TIME CHANNEL ACTIVATE ...

Page 23: ...cating the time left for the channel switch will appear on the screen To disable the channel switch press any button on the remote control Press button Step 12 9 Result on screen MENU m FEATURES TIMER TIME START TIMEE STOP TIME CHANNEL 3 ACTIVATE Ñ É FEATURES TIMER TIME START TIMEE STOP TIME CHANNEL 8 ACTIVATE Ñ É FEATURES TIMER TIME START TIMEE STOP TIME CHANNEL ACTIVATE OFF Ñ É FEATURES TIMER TI...

Page 24: ... Key in access code 0711 0711 is the default access code A message INCORRECT will appear Key in 0711 the second time When the message CORRECT appears the CHILD LOCK menu is now accessible You can now proceed to change the access code of your choice Result on screen Press button Step FEATURES TIMER TIME ACTIVE CTRL START TIME CHILD LOCK STOP TIME FORMAT CHANNEL ROTATION ACTIVATE É É FEATURES TIMER ...

Page 25: ...you have forgotten the new access code key in 0711 twice to enter the child lock menu Upon entering the child lock menu you can proceed to change code again Result on screen Press button Step 9 10 11 12 m Ñ FEATURES CHILD LOCK LOCK CHANNEL ENTER CHANGE CODE NEW CODE CLEAR ALL Ñ FEATURES CHILD LOCK LOCK CHANNEL ENTER CHANGE CODE NEW CODE CLEAR ALL x x x x Ñ FEATURES CHILD LOCK LOCK CHANNEL CONFIRM ...

Page 26: ...ise if CV1 source is locked AV1 source is also automatically locked as they share the same audio input If you attempt to enter the INSTALL menu after locking a channel a message Enter ACCESS CODE will appear on the screen You need to enter the ACCESS CODE to enable you to enter the INSTALL menu Press button Step or 9 10 m FEATURES TIMER TIME ACTIVE CTRL START TIME CHILD LOCK STOP TIME FORMAT CHANN...

Page 27: ...7 as in ACTIVATING THE CHILD LOCK LOCK CHANNEL Select the channel you want to unlock by the or CURSOR UP DOWN buttons Press the CURSOR RIGHT button to unlock channel the keylock symbol will disappear Result on screen Press button Step 9 m FEATURES TIMER TIME ACTIVE CTRL START TIME CHILD LOCK STOP TIME FORMAT CHANNEL ROTATION ACTIVATE É É FEATURES TIMER ACCESS CODE ACTIVE CTRL CHILD LOCK FORMAT ROT...

Page 28: ...re The and buttons allow you to move the image up or down Zoom 16 9 Mode This picture is enlarged to 16 9 format This mode is recommended when displaying pictures which have black bands at the top and bottom letterbox format The and buttons allow you to move the image up or down Subtitle Zoom Mode This mode is use to display 4 3 pictures using the full surface of the screen leaving the subtitles v...

Page 29: ...ter FEATURES menu 3 Press the CURSOR DOWN button repeatedly until ROTATION is selected 4 Press the CURSOR RIGHT button when picture is tilted to the left Press button until you deem picture is in normal position If picture is tilted to the right press the CURSOR LEFT button until you deem picture is in normal position Picture tilted to the left Picture tilted to the right After adjustment After ad...

Page 30: ...S is selected 2 Press the CURSOR RIGHT button to enter FEATURES menu 3 Press the CURSOR DOWN button repeatedly until BLUE MUTE is selected 4 Press the CURSOR RIGHT button to select ON option to activate the Blue Mute function 5 Press the OSD button to exit menu from screen MENU m PICTURE TIMER SOUND ACTIVE CTRL FEATURES CHILD LOCK INSTALL FORMAT ROTATION É É Ñ FEATURES ACTIVE CTRL CHILD LOCK FORMA...

Page 31: ...urs SOFT Emphasize warm colours Suitable for dimly lit room condition and gives cinema like effect when light is switched off MULTIMEDIA Emphasize soft colours Suitable for playing computer games surfing etc Note The PERSONAL setting is the setting that you set up using the Picture menu in the main menu This is the only setting in the Smart Picture settings that can be changed All the other settin...

Page 32: ... The page number is displayed at the top left hand corner of the screen When the teletext page is located the counter stops searching If the counter keeps searching it means that the page is not available for selection If you make a mistake in keying the page number you have to complete keying the 3 digit number before re keying the correct page number 3 Accessing Press the CURSOR UP button to a t...

Page 33: ...ou select 4 of your favourite or most commonly viewed page and stored them in the favourite page selection You can then access directly your favourite page by the colour buttons without having to key in the page number 1 Press the TELEXTEXT ON OFF button to enter teletext mode 2 Press the MENU button to enter favourite page selection Note The colour alphabets at the bottom of the screen is now cha...

Page 34: ... PAL B G PAL D K PAL I SECAM B G SECAM D K SECAM K1 Playback System NTSC 3 58 NTSC 4 43 PAL 60 Set Dimensions Width 88 6 cm Depth 53 3 cm Height 57 0 cm Net Weight of Set approximate 54 kg Note For Operating Voltage Frequency Power Consumption and Version Number refer to the type number at the rear of the set 8521 Eng 69R 79Rp32 35 5 6 03 3 19 PM 34 ...

Page 35: ...3139 125 31201 8521 Eng 69R 79Rp32 35 4 23 03 3 00 PM 35 ...

Reviews: