background image

USB

Your TV is fitted with a USB Connection that enables you to view JPEG
photos or watch Motion JPEG files stored on a USB Memory Stick.

1

Connect the USB Memory Stick to the USB terminal on the side of
your TV.

2

Press 

Q

 and use 

H


I

 to select 

USB

, then press 

OK

.

The Highlighted Text will move to 

Start now

, then press 

OK

 again.

device.

pictures and videos via your USB

This menu allows you to enjoy your

USB

Language

Features

Setup

Sound

Picture

Start now

3

Use 

H


I

 to Select the 

Picture

 or 

Video

, then press 

OK

.

These Recorded Files must meet Specifications shown below:

Picture (JPEG)

Upper limit

24M pixel

Video

(Motion JPEG)

Size

320 x 240 (QVGA)

Frame rate

30fps

Audio type

LPCM

Sampling frequency
(32 kHz, 44.1 kHz or 48 kHz)
Quantization bit rate (16 bit)

Note(s)

Up to 2GB (FAT16) or 8GB (FAT32) capacity can be supported.

Up to 10,000 files or 1,000 folders with 19 hierarchies can be recognized.

Up to 255 English characters can be recognized.

This unit does Not Support MTP (Media Transfer Protocol).

This unit supports FAT16 and FAT32 file systems.

If the file is Not Supported, an Error message appears.

When the USB Memory Stick is not recognized, try reconnecting it again.

We cannot be held responsible if your USB Memory Stick is Not Supported, nor will we
accept any liability for damage or loss of stored data.

To protect your USB Memory Stick files from being erased place the write protect sliding
tab in the protect position.

Be sure to keep a backup copy of the original files on your device before you play them
back on this Unit.

This unit does not recognize USB Memory Stick that requires a special driver.

This unit is not allowed to use the USB Memory Stick which requires an External Power
Supply (500mA or more).

A file name exceeding 128 characters or contains a dot character is Not Supported on
this TV.

Progressive JPEG files are Not Supported.

Only a Motion JPEG file with an “.avi” extension is supported. An extension “.mov” is Not
Supported.

During Motion JPEG Playback, “Pause”, “Forward” and “Reverse” Do Not Work on this
Unit.

Picture (JPEG)

1

Use 

H


I

 to select the desired file, then press 

OK

.


1

2

3

4

Press "OK" key to play/pause.
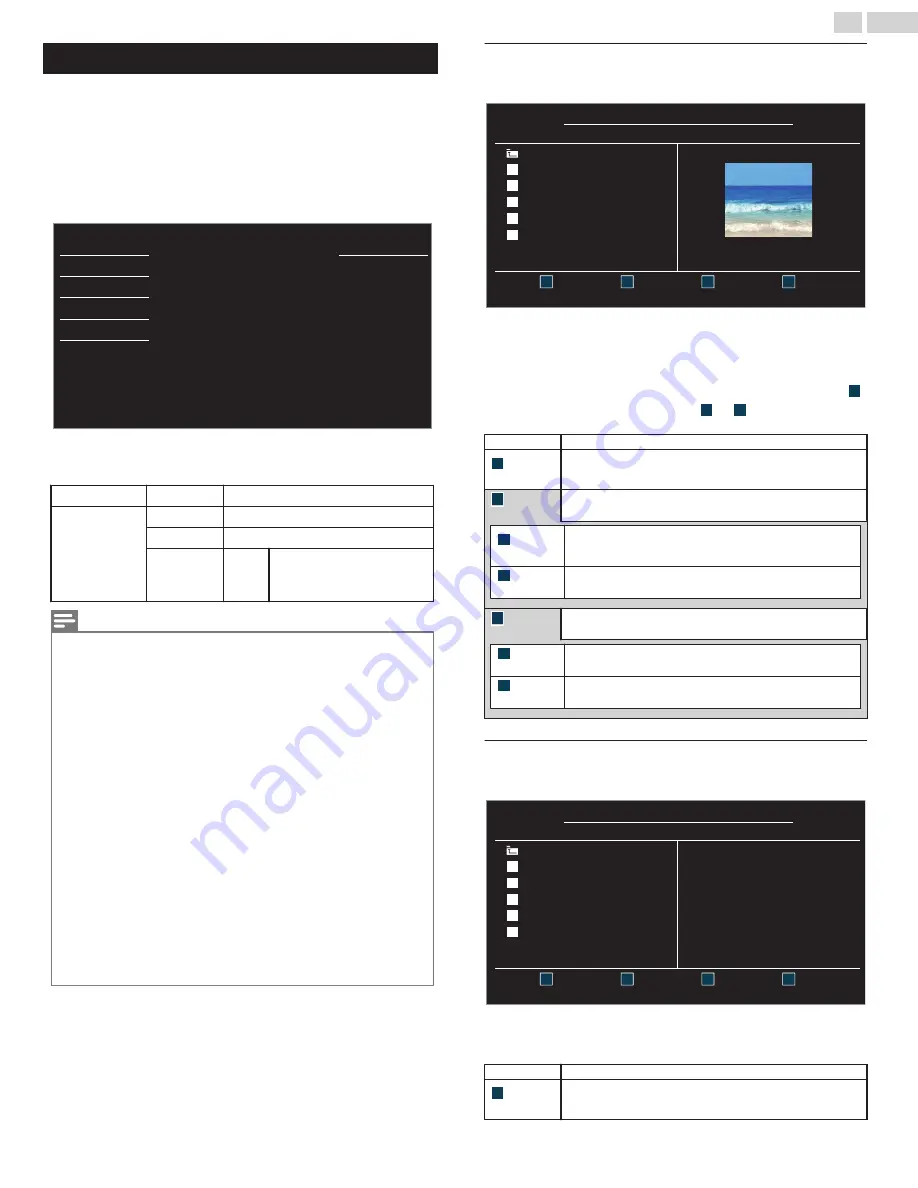
Thumbnails

Image5.jpg

Image4.jpg

Image3.jpg

Image2.jpg

Image1.jpg

Image1.jpg

Picture

Picture

1024:768
2009/04/02  17:42:06

Image1.jpg

Go to root folder

To toggle between 

List

 and 

Thumbnails

 press 

the NUMBER 2

key

 each time.

The unit goes to the Slide show Automatically.

To Pause / Play the Slide show, press 

OK

.

Use 

the NUMBER keys

 (

1

 through 

4

) to see the file details (

1

)

or change the following settings (

2

 ~ 

4

).

See the description in table below.

Item

Detail

1

More Detail

Press 

1

 to display file details below.

Name

Album

Date

Size

 and 

Next

.

Press 

1

 again to remove file details.

4

Start show

Press 

4

 or 

OK

 to start the Slide show.

While the Slide show is on, the following 2 settings will be displayed.

2

Transitions

Press 

2

, then use 

H


I

 to select the transition mode choosing from;

None

Dissolve

Wipe right

Wipe left

Wipe up

Wipe down

Box

in

 and 

Box out

.

3

Slide time

Press 

3

, then use 

H


I

 to change the display time choosing from; 

Short

,

Medium

 and 

Long

.

4

Stop show

Press 

4

 or 

OK

 to stop the Slide show.

While the Slide show is Off, the following 2 settings will be displayed.

2

Rotate

Every press on 

2

 will turn the picture clockwise by 90 degrees.

3

Zoom

Press 

3

, then use 

H


I

 to select the zoom factor (1x, 2x or 4x). Press

OK

 to set the zoom factor.

Video (Motion JPEG)

1

Use 

H


I

 to select the desired file, then press 

OK

.


1

2

3

4

Supported format: motion jpeg, 320 x 240, 30FPS

Duration:

Date:

Director:

MOVIE1.avi

Title:

MOVIE5.avi

MOVIE4.avi

MOVIE3.avi

MOVIE2.avi

MOVIE1.avi

MOVIE1.avi

Video

Video

2009/04/02
00:06:37

Go to root folder

To stop Playback and return to the file list, press 

BACK

OK

 or

CH +

.

Press 

CH -

 to play back from the beginning.

Item

Detail

1

More Detail

Press 

1

 to display file details below.

Title:

Director:

Date:

 and 

Duration:

.

Press 

1

 again to remove file details.

32

.

English

Summary of Contents for 32PFL3509

Page 1: ... con Centro de atención al cliente de Philips En los Estados Unidos en Canadá Puerto Rico o en las Islas Vírgenes de los Estados Unidos 1 866 309 8147 México D F y Área Metropolitana 58 87 97 36 Interior de la Republica 01 800 839 19 89 FR Pour obtenir de l aide supplémentaire communiquez avec le centre de service à la clientèle de votre pays Pour obtenir de l aide communiquez avec le centre de se...

Page 2: ...l Audio Output Connection 13 PC Connection 14 USB Memory Stick 14 Initial Setup 15 4 Use your TV 17 Switching on your TV and putting it in Standby mode 17 Adjusting Volume 17 Switching Channels 17 Watching Channels from an External Device 18 Sleep Timer 18 Switching Audio Mode 18 EasyLink options 19 Changing Picture Format 19 TV Screen information 20 5 Making more use with your TV 21 Displaying th...

Page 3: ...me entertainment safe and enjoyable As you enjoy your television please note that all televisions new and old must be supported on proper stands or installed according to the manufacturer s recommendations Televisions that are inappropriately situated on dressers bookcases shelves desks speakers chests carts etc may fall over resulting in injury TUNE IN TO SAFETY ALWAYS follow the manufacturer s r...

Page 4: ...ay such as power supply cord or plug is damaged liquid has been spilled or objects plug is damaged liquid has been spilled or objects have fallen into the apparatus the apparatus has been have fallen into the apparatus the apparatus has been exposed to rain or moisture does not operate exposed to rain or moisture does not operate normally or has been dropped normally or has been dropped Note to th...

Page 5: ... or relocate the receiving antenna Increase the separation between the equipment and the receiver Connect the equipment into an outlet on a circuit different from that to which the receiver is connected Consult the dealer or an experienced radio or television technician for help Declaration of Conformity Trade Name PHILIPS Responsible Party P F USA Inc Model 32PFL3509 Address PO Box 2248 Alpharett...

Page 6: ...etely turn off the Unit you must unplug the AC power cord Disconnect the AC plug to shut the Unit off when trouble is found or not in use The AC plug shall remain readily available AC plug Never use a gas duster on this TV The gas trapped inside of this Unit may cause ignition and explosion CAUTION Danger of explosion if battery is incorrectly replaced Replace only with the same or equivalent type...

Page 7: ...to be controlled by the HDMI cable connected to your TV HDMI Input HDMI DVI Input If your Video Device has a DVI Output jack use an HDMI DVI Conversion Cable to connect the Unit Component Video Input PC Input Input from a Computer AV Input Audio and Video Input from an External Device USB terminal The Picture JPEG and Video Motion JPEG files stored on a USB Memory Stick can be played back on this ...

Page 8: ...it into the base When attaching the base ensure that All Screws are tightly fastened If the base is not properly attached it could cause the Unit to fall resulting in injuries as well as damage to the Unit To remove the base from this Unit unscrew the Phillips head screws in step 2 Be careful not to drop the base when you remove it Installing the Remote Control Batteries 1 Slide the battery cover ...

Page 9: ... U OPTIONS Opens EasyLink options menu Note s You must set On in the Master EasyLink L p 19 to operate the above functions h S SOURCE Selects Connected Devices i CH Selects a Channel in the Memorized Channel Ring Low to High or High to Low j COLOR keys Use these Keys according to the directions On screen k 0 9 NUMBER keys Used to enter a Channel Program number DOT Use with 0 9 to select Digital ch...

Page 10: ...nnect Analog Audio Signals from HDMI DVI Analog Audio L R jacks Signal Component Video Analog Audio L R jacks Signal Composite Video Analog Audio L R jacks Signal PC Connection Analog Audio L R jacks Signal with Stereo Mini 3 5mm Plug Audio Cable on PC j Digital Audio Output jack Digital Audio S PDIF Output to Home Theaters and other Digital Audio systems k HDMI Input jack s Digital Audio and Vide...

Page 11: ...T Component Y Pb Pr video cables IN OUT Audio L R cables IN Connecting a Cable Satellite IPTV Box Blu ray Disc DVD Recorder via Composite Connectors and Analog Audio Do Not place your Recorder too close to the Screen because some Recorders can be susceptible to Signals from the TV Cable RF cable RF cable RF cable RF cable IN IN Set top Box OUT OUT OUT OUT OUT OUT Audio L R Video cables Audio L R V...

Page 12: ...DMI Highest quality Supports high definition Digital signals and gives highest picture and sound quality Video and Audio signals are combined in one cable You must use HDMI for full high definition Video and to enable EasyLink HDMI CEC Note s Philips HDMI supports HDCP High bandwidth Digital Contents Protection HDCP is a form of Digital Rights Management that protects high definition content in Bl...

Page 13: ...61 861B Component Analog Video Connection Component Analog Video Connection offers Better Picture quality for Video Devices connected to the Unit If you connect to the Unit s Component Video Y Pb Pr Input jacks connect Analog Audio Cables to the Analog Audio L R Input jacks IN IN IN IN OUT OUT Blu ray disc DVD recorder or Set top box OUT Component Y Pb Pr video cables IN OUT Audio L R cables IN No...

Page 14: ...logo a certified HDMI cable High Speed HDMI cable is recommended for the Better compatibility The Unit accepts 480i 480p 720p 1080i and 1080p Video signals HDMI DVI Connection requires separate Audio Connections as well and the Audio signals are Output as Analog L R Audio DVI does not display 480i image which is not in compliance with EIA CEA 861 861B USB Memory Stick This unit offers easy Playbac...

Page 15: ...channels Initial setup 4 Use H I to select the desired Location setting then press OK Home is the ENERGY STARN qualified setting OK Select Home Retail Initial setup In the Retail store mode all settings are fixed and is ENERGY STAR qualified Location Home is recommended for normal home use Select Home the Unit is set to maximize the energy efficiency for home setting and it can be adjusted through...

Page 16: ...rom the Antenna terminal and no operation for several seconds after you Turn On the Unit Helpful hints appears Follow the instructions listed on the TV screen Skip OK Select Later Retry Initial setup the appropriate source input press SOURCE key on the remote control to select the input which you have connected to the box and If you are using a cable or satellite box please confirm installation pr...

Page 17: ...or VOL to recover the original sound Switching Channels TV Remote Control To select Channels by using CHI H or CH Press CH I Down H Up on the Front panel or press CH on the Remote Control or the Side panel To select Channels by using the NUMBER keys DigitalTV Operation For Digital channels press a number followed by a dot and the corresponding sub channel number When selecting Digital channel 11 1...

Page 18: ... Repeatedly to change the amount of time increases the time by 30 minutes up to 120 minutes Press SLEEP Once to call up the display for checking the remaining time To cancel Sleep Timer press SLEEP Repeatedly until Off is displayed Switching Audio Mode DigitalTV Operation 1 Press SAP to display the currently selected Language and the number of available Languages 2 Press SAP Repeatedly to cycle th...

Page 19: ...an HDMI Device is selected This picture format similarly displays like Normal Full HDMI Device only Wide Zoom Movie expand 4 3 Normal Normal Original size 4 3 Shortened horizontally Sidebars appear on both edges of the screen Movie expand Vertically stretched to fill the screen This only crops out the top of the picture Zoom Maximum size without changing its horizontal and vertical ratio Wide Hori...

Page 20: ...umber Switching channels L p 17 d Audio Language DTV Audio mode Analog TV Switching Audio Mode L p 18 e Program s image Aspect Ratio Changing Picture Format L p 19 f CC Not available if Closed Caption is set to Off Caption settings L p 25 g Child Lock rating Child and Ratings Lock L p 27 2 Press T INFO to hide the information Note s When the program guide consists of more than 4 lines use H I to s...

Page 21: ...ss OK or use H I J K to determine the setting Adjusting the Picture Mode or customize the Picture quality as your preference Adjusting the Sound Mode Equalizer and some other Sound functions Scanning the Channels available in your area and see what the Antenna Signal levels are Adjusting the Closed Caption Parental Guide and some other useful functions You can choose English Spanish or French as y...

Page 22: ...tings to Select the desired Setting then press OK Color alignment Noise reduction Black stretch Dynamic contrast and Gamma You can set a Particular Picture Quality using Advanced settings Gamma2 On On On Normal Gamma Dynamic contrast Black stretch Noise reduction Color alignment USB Language Features Setup Sound Picture Color alignment Color temperature mode to set the picture color temperature to...

Page 23: ...s function keeps a constant loudness level between the TV commercials and the Programs Auto volume leveling Off to Remove the Auto volume leveling On to Reduce Volume Differences between the TV Commercials and the Programs You can select the Audio Output from the Unit s speakers or not If your amplifier is HDMI link function compatible and connected by an HDMI cable to this Unit some sound operati...

Page 24: ...t while the system is scanning for Autoprogram When the Scanning and Memorizing of Available Channels is Completed the Lowest Memorized Channel will be Displayed Note s After setting Autoprogram using CH skips unavailable channels Automatically If you are not receiving a signal from your Cable service contact the Cable provider If you press B or Q during Autoprogram the Setup of TV channels will b...

Page 25: ...e s If the channel is set to an Analog channel or External Input you cannot confirm the Antenna condition Features 1 Display Setup using Home Menu and use H I to select Features then press OK Home Software upgrade E sticker Location PC settings Child lock Caption settings USB Language Features Setup Sound Picture EasyLink 2 Adjust the following items Caption settings Closed Captions displays the A...

Page 26: ...n HDMI Connection Digital caption service that you can switch differs depending on the broadcast description Caption style will not have any effect if the User setting is set to Off The captions do not always use correct spelling and grammar Not all TV Programs and product commercials include Closed Caption information or All types of the Closed Captioning Refer to your area TV Program listings fo...

Page 27: ...ating to E All ratings turn to E Automatically To Block any inappropriate programs set your limits in US movie ratings lock US TV ratings lock and Region ratings lock The Child Lock setting will be retained after a Power failure or after the Power is removed for longer than 10 seconds except the PIN code reverts to 0000 Child and Ratings Lock L p 27 Region ratings lock will be available when the U...

Page 28: ...ldren TV Y7 Appropriate for All Children 7 and Older G TV G General Audience PG TV PG Parental Guidance Suggested PG 13 Unsuitable for children under 13 TV 14 Unsuitable for children under 14 R Restricted under 17 Requires Accompanying Parent or Adult Guardian NC 17 No One under 17 Admitted X TV MA Mature Audience Only To set the Sub ratings As for TV Y7 TV PG TV 14 or TV MA you can further set th...

Page 29: ...de Enter PIN code again in Confirm PIN entry field Back PIN Code Confirm PIN Enter PIN USB Language Features Setup Sound Picture Note s Make sure to enter a PIN code and the confirm PIN code must be exactly the same If they are different the space is cleared to reenter the New PIN code When a Power failure occurs the PIN code will be erased and Unit returns to the default PIN code 0000 If you forg...

Page 30: ...tandby mode On Your connected EasyLink device Turns Off Automatically when the Unit goes into Standby mode This Unit will Turn On when the Power On Signal is sent from your connected EasyLink device Auto TV on Off This Unit stays in Standby mode even if you Turn On your connected EasyLink device On This Unit Turns On Automatically when you Turn On your connected EasyLink device You can operate som...

Page 31: ...e Menu Otherwise personalized Picture and Sound Settings will Not Be Memorized after the Unit goes into Standby Mode E sticker When you set Location to Retail store E sticker Electronic Sticker is displayed E sticker can be Turned Off using procedure below 1 Use H I to select E sticker then press OK 2 Use H I to select Off then press OK Off You can Turn Off E sticker Top E sticker is displayed on ...

Page 32: ...orted Only a Motion JPEG file with an avi extension is supported An extension mov is Not Supported During Motion JPEG Playback Pause Forward and Reverse Do Not Work on this Unit Picture JPEG 1 Use H I to select the desired file then press OK 1 2 3 4 Press OK key to play pause Thumbnails Image5 jpg Image4 jpg Image3 jpg Image2 jpg Image1 jpg Image1 jpg Picture Picture 1024 768 2009 04 02 17 42 06 I...

Page 33: ...related to your TV and Download the Latest Software Upgrade file to your PC 1 On your PC open a web browser and go to www philips com support 2 Enter the model number in the Type the Model Number field 3 Click the desired Software to be Downloaded Decompress the ZIP file 4 Copy the Upgrade file to the Empty root directory on the clean formatted USB Memory Stick Starting the Software Upgrade Warnin...

Page 34: ...t requires some kind of Antenna Input An indoor Antenna Digital or VHF UHF an External Antenna Digital or VHF UHF or an RF Coaxial Cable from your wall Cable Satellite Set top Box needs to be plugged into the Unit How come there is no image from the Connected External Devices Check if the correct Input mode is selected by pressing S SOURCE or using CH Refer to Watching Channels from an External De...

Page 35: ... jack of your device like Blu ray DVD Recorder View other TV channels The problem might be limited to the Broadcasting Station or Weak Signal Strength Unplug the AC Power Cord and wait for about 1 minute then Plug the AC Power Cord and turn On the Unit again Check whether the Connection of the Antenna or Cable Satellite Set top Box is connected correctly Make sure that the selected Input mode is c...

Page 36: ... Interface that supports All uncompressed Digital Audio Video formats including Set top Box Blu ray DVD Recorder or Digital television over a single cable HDTV High Definition TV Ultimate Digital format that produces high resolution and high picture quality PIN code A stored 4 digit number that allows access to Parental control features SAP Secondary Audio Program Second Audio channel delivered se...

Page 37: ...erage Terrestrial DTV ATSC VHF 2 13 UHF 14 69 Each Channel has e g 2 1 2 9 3 1 3 9 etc Terrestrial Analog NTSC VHF 2 13 UHF 14 69 CATV Analog NTSC 2 13 A W W 1 W 94 Analog W 1 W 84 A 5 A 1 5A Tuning System Channel Frequency Synthesized Tuning System Channel Access Direct Access Number Keyboard Programmable Scan Channel up down and PREV CH Previous Channel Connectivity Component Video Input Y Pb Pr...

Page 38: ...arranty does not apply a to damage caused by accident abuse misuse neglect misapplication or non Philips product b to damage caused by service performed by anyone other than Philips or Philips Authorized Service Location c to a product or a part that has been modified without the written permission of Philips or d if any Philips serial number has been removed or defaced or e product accessories or...

Page 39: ... Av La Palma No 6 Col San Fernando La Herradura Huixquilucan Edo de México C P 52787 Philips and Philips Shield are used under license of Koninklijke Philips N V P F USA Inc PO Box 2248 Alpharetta GA 30023 2248 U S A A4AF2UT ...

Reviews: