background image

EN-13

ENGLISH

FRANÇAISE

ESP

AÑOL

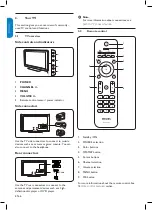
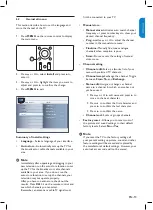
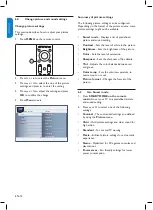
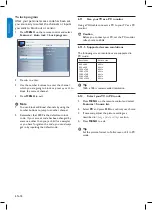
Use install menu

6.3 

This section describe how to set the language and 

store the channel of the TV.

Press 

1. 

MENU

 on the remote control to display 

the main menu.

Press 

2. 

Π

or

 ï 

to select 

Install

 and press 

Æ

 to 

enter it.
Press 

3. 

Π

or

 ï

 to highlight the item you want to 

adjust and press 

Æ 

to confirm the change.

Press 

4. 

MENU

 to exit.

Main control

Install

Auto store

Manual store

Channel setting

Factory reset

Sound

Features

Picture

Language

Install

Summary of install settings

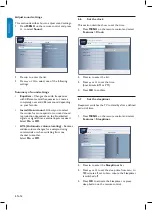
Language

• 

 - Select a language of your interface.

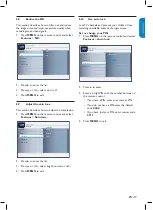
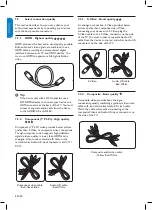
Auto store

• 

 - Automatically sets up the TV for 

the broadcast or cable channels available in your 

area.

Note 


D

Immediately after unpacking and plugging in your 

new television, run the auto store function to set 

up the TV for the broadcast or cable channels 

available in your area.  If you do not run the 

auto store function to set up the channels, your 

television may not operate properly. 

After you have run auto store, check out the 

results.  Press 

CH +/-

 on the remote control and 

see which channels you can select. 

Remember, an antenna or cable TV signal must 

first be connected to your TV.

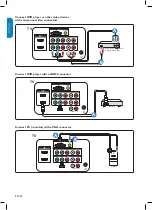
Manual store

• 

 - 

Manual store: 

• 

Activates auto search channel 

frequency or press number keys to show your 

desired channel frequency.

Prog. no: 

• 

Use 

Π

or

 ï 

to adjust the channel 

number in the manual store menu.

Finetune: 

• 

Manually fine tunes analogue 

channels when reception is poor.

Store: 

• 

Stores or sets the setting of manual 

store menu.

Channel setting 

• 

Channel edit: 

• 

Sets up a favorite list of your 

own with preferred TV channels.

Channel swap: 

• 

Exchange the channel.  Toggle 

between 

From

To,

 and 

Exchange

.

Name edit: 

• 

Assigns or changes a channel 

name to a channel for which a name has not 

yet been used.

Press 

1. 

Π

or

 ï 

to edit name and press 

Æ 

to 

move to the next character.
Press

2. 

 Í


to confirm the first character and 

press  

Æ 

to confirm the last character.

Press  

3. 

Æ

 to confirm the name.

Channel sort: 

• 

Sorts or groups channels.

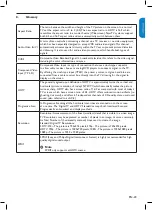
Factory reset 

• 

- Allows you to reset most of 

the picture and sound settings to their default 

factory levels.  Select 

No

 or

 Yes

.

Note 


D

If you reset the TV to the factory settings, all 

your present setting on picture, sound, and other 

feature settings will be erased and replaced by 

the manufacture’s default settings.  However, your 

auto lock access code will not be erased.

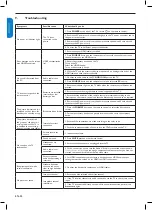
Summary of Contents for 32PFL3403

Page 1: ...Register your product and get support at www philips com welcome EN USER MANUAL ZH 用户手册 32PFL3403 37PFL3403 42PFL3403 47PFL3403 32HFL3330 37HFL3330 ...

Page 2: ...es should not be placed on this apparatus CAUTION To prevent electric shock match wide blade of plug to wide slot fully insert For Customer Use Enter below the Serial No which is located on the rear of the cabinet Retain this information for future reference Model No _______________________ Serial No _______________________ Congratulations on your purchase and welcome to the family Dear PHILIPS pr...

Page 3: ...by qualified service personnel when A The power supply cord or the plug has been damaged B Objects have fallen or liquid has been spilled into the appliance C The appliance has been exposed to rain D The appliance does not appear to operate normally or exhibits a marked change in performance E The appliance has been dropped or the enclosure damaged Tilt Stability All televisions must comply with r...

Page 4: ...oon as possible Pixel characteristics The LCD panel has a high number of colour pixels Although it has effective pixels of 99 999 or more Black dots or bright points of light red green or blue may appear constantly on the screen This is a structural property of display within common industrial standard and is not a malfunction This does not affect the performance of the product Safety symbols Know...

Page 5: ...to standby 10 5 2 Watch TV 10 5 3 Watch channels from a cable receiver box 11 5 4 Watch a DVD 11 6 Use more of your TV 12 6 1 Remote control overview 12 6 2 Use teletext of the remote control 12 6 3 Use install menu 13 6 4 Change picture and sound settings 14 6 5 Use Smart mode 14 6 6 Set the clock 16 6 7 Set the sleeptimer 16 6 8 Reduce the NR 17 6 9 Adjust the skin tone 17 6 10 Use auto lock 17 ...

Page 6: ...life directives Recycling Philips has paid a lot of attention to producing an environmentally friendly product Your new TV contains several materials that can be recycled for new uses At the end of its life specialized companies can dismantle and recycle this set This will minimize the amount of materials being disposed of Please be sure to dispose of this set in accordance with all state and loca...

Page 7: ...devices such as a camera or game console You can also connect to the headphone Rear connectors HDMI 2 HDMI 1 CVI 1 CVI 2 AUDIO IN VGA PC IN 75 Ω L AUDIO OUT R Cable Use the TV rear connectors to connect to the antenna and permanent devices such as a high definition disc player or DVD player Note D D For more information about connections see Section 7 Connect devices 3 2 Remote control 1 2 3 4 5 6...

Page 8: ...ity Slot at the back of the TV If you connect an anti theft Kensington lock not supplied position the TV within reach of a permanent object that can be attached to the lock 4 2 Wall mount theTV Warning B B Wall mounting of the TV should only be performed by qualified installers Koninklijke Philips Electronics N V Bears no responsibility for improper mounting that results in accident or injury Step...

Page 9: ...to 3 your antenna outlet ensuring that the cable is tightly secured at both ends Firmly pull the stand from the bottom of the 3 TV Place both the stand and bolts in a secure location for future reinstallation Step 3 Connect cables Connect the antenna cable AC power cord and all other devices to the back of the TV as described in the following sections and in Section 7 Connect devices Step 4 Secure...

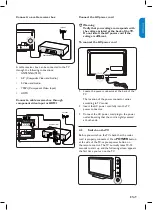
Page 10: ... HDMI 2 AUDIO IN PC IN VGA CVI 1 Pb Pr L R Y Pb Pr L R Y CVI 2 75 Ω L AUDIO OUT R Connect the AC power cord Warning B B Verify that your voltage corresponds with the voltage printed at the back of theTV Do not insert the AC power cord if the voltage is different To connect the AC power cord AC IN AC IN HDMI 1 HDMI 2 Locate the power connector at the back of the 1 TV The location of the power conne...

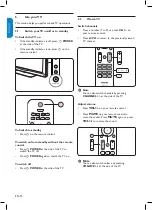
Page 11: ...out the remote control Press POWER at the side of the TV to switch the TV off Press POWER again to switch the TV on To switch off Press POWER at the side of the TV 5 2 WatchTV Switch channels Press a number 1 to 9 or press CH on your remote control Press A CH to return to the previously viewed TV channel Note D D You can also switch channels by pressing CHANNEL at the side of the TV Adjust volume ...

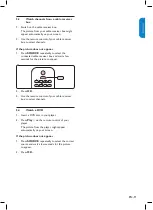
Page 12: ...OURCE repeatedly to select the connected cable receiver box and wait a few seconds for the picture to appear Press 2 OK Use the remote control of your cable receiver 3 box to select channels Watch a DVD 5 4 Insert a DVD disc in your player 1 Press 2 Play on the remote control of your player The picture from the player might appear automatically on your screen If the picture does not appear Press 1...

Page 13: ...t or previous channel NUMBER BUTTONS 8 Selects a channel page or setting A CH 9 Returns to the previously viewed channel STATUS EXIT 10 Displays programme information if available VOL 11 Increases or decreases volume MUTE 12 Mutes or restores sound MENU 13 Toggles the menu on or off OK 14 Press to activate a setting INCR SURR 15 Adds greater depth and dimension to the TV sound SLEEP 16 Sets the TV...

Page 14: ...select Remember an antenna or cable TV signal must first be connected to your TV Manual store Manual store Activates auto search channel frequency or press number keys to show your desired channel frequency Prog no Use Î or ï to adjust the channel number in the manual store menu Finetune Manually fine tunes analogue channels when reception is poor Store Stores or sets the setting of manual store m...

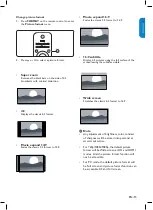
Page 15: ...art mode Displays a list of predefined picture and sound setting Contrast Sets the level of white in the picture Brightness Sets the brightness of the picture Color Sets the level of saturation Sharpness Sets the sharpness of fine details Tint Adjusts the color balance between red and green Color temp Sets the color temperature to normal warm or cool Picture format Changes the format of the pictur...

Page 16: ... the classic 4 3 format to 16 9 16 9 subtitle Display 4 3 pictures using the full surface of the screen leaving the subtitles visible Wide screen Stretches the classic 4 3 format to 16 9 Note D D Any adjustment of brightness color contrast of sharpness will be stored into personal at smart mode section For 720p 1080i 1080p the default picture format will be Wide screen at HD and HDMI modes And the...

Page 17: ...ic volume leveling Reduces sudden volume changes for example during commercials or when switching from one channel to another Select On or Off Set the clock 6 6 This section describes how to set the time Press 1 MENU on the remote control and select Features Clock Clock Main control I Features Timer Start time Stop time Sleep timer Clock AM Press 2 Æ to enter the list Press 3 Î or ï to set the tim...

Page 18: ...ist Bright Normal Rich Auto lock Skin tone Skin tone Press 2 Æ to enter the list Press 3 Î or ï to select bright normal or rich Press 4 MENU to exit Use 6 10 auto lock Lock TV channels and prevent your children from watching unsuitable content of programmes Set or change your PIN Press 1 MENU on the remote control and select Features Auto lock Auto lock Change code Clear all Main control Features ...

Page 19: ... 2 code If your access code has been changed by someone other than you a child for example or you have forgotten the code you can always get in by inputting the default code Use yourTV as a PC monitor 6 11 Using a VGA cable connects a PC to your TV as a PC monitor Caution B B Before you connect your PC set the PC monitor refresh rate to 60Hz Supported 6 11 1 screen resolutions The following screen...

Page 20: ...ctors for DVD players digital receivers game consoles and other high definition devices PC IN 2 VGA Audio connectors for PC CVI 1 CVI 2 3 Component video input Y Pb Pr and Audio L R connectors for DVD digital receiver or game console etc AUDIO OUT L R 4 Sound output cinch connectors for home theatre or other audio systems Antenna input 75 5 Ω Side connectors Headphones 6 Stereo Mini Jack AUDIO L R...

Page 21: ...L R input connectors at CVI 1 CVI 2 Component video red gree blue Audio L R red white S video Composite audio video yellow red white Component video red gree blue Audio L R red white S video Composite audio video yellow red white Component video cable Red Green Blue Audio L R cable Red White S Video Good quality 7 2 3 An analogue connection S Video provides better picture quality than composite vi...

Page 22: ...ng devices Note D D Different types of connectors may be used to connect a device to your TV depending on availability and your needs Connect a cable receiver box with RF In Outputs antennaTV Cable Receiver Box TV CABLE IN TO TV AUDIO OUT L R VIDEO OUT S VIDEO A Pb Pr L R Y CVI 2 75 Ω L AUDIO OUT R Cable TV signal B OR Connect a cable receiver box with Audio Video output Cable TV signal Cable Rece...

Page 23: ...L AUDIO OUT R Accessory Device Equipped with Component Video Outputs TV Y Pb Pr L AUDIO R A B Connect DVD player with a HDMI connector HDMI 1 HDMI 2 AUDIO IN PC IN VGA CVI 1 Pb Pr L R Y Pb Pr L R Y CVI 2 75 Ω L AUDIO OUT R DVD Player TV A Connect PC monitor with a VGA connector HDMI 1 HDMI 2 AUDIO IN PC IN VGA CVI 1 Pb Pr L R Y Pb Pr L R Y CVI 2 75 Ω L AUDIO OUT R Computer TV A B ...

Page 24: ...y into the TV allowing for the signal to display on the screen HDTV The generally agreed upon definition of HDTV is approximately twice the vertical and horizontal picture resolution of today s NTSC TV which essentially makes the picture twice as sharp HDTV also has a screen ratio of 16 9 as compared with most of today s TV screens which have a screen ratio of 4 3 HDTV offers reduced motion artifa...

Page 25: ...from the power socket outlet wait 60 seconds and reconnect the AC power cord The picture is distorted It is stretched out has short fat black bars on the side or top Broadcast video format 1 Press the FORMAT button on the remote control to select the best picture format 2 For some accessory devices the picture format has to be set in the accessory device The picture is mostly red and green or the ...

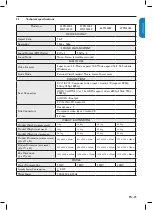
Page 26: ...1 3a HDMI support video 480i p 576i p 720p 1080i p AUDIO L R output PC IN VGA PC Audio IN Side Connectors Headphone x 1 Composite video input Audio L R S Video WEIGHT DIMENSIONS Product Weight without stand 11kg 14 8kg 18 1kg 24 9kg Product Weight with stand 14kg 19 3kg 22 6kg 31 5kg Product Weight incl packaging 16 7kg 22 6kg 22 1kg 29 4kg Product Dimension without stand H x W x D 543 x 809 x 92m...

Page 27: ... 14 L lock program 18 N NR 17 O Overview Connection 19 Remote control 12 TV 6 P PC mode 18 Picture format 15 PIN code 17 Position the TV 7 R Rear connectors 19 Recycling 5 Remote control 6 S Screen resolutions 18 Sharpness 14 Side connectors 19 Skin tone 17 Sleeptimer 16 Smart mode 14 Switch on the TV 9 T Technical specifications 25 Tint 14 Troubleshooting 24 V Volume 10 W Wall mount 7 Watch TV 10...

Page 28: ...的宽插片与宽插槽对 准 并将插头完全插入 客户专用 请将机身背面的序列号填写在下方 请保留此信息已备将来参考 型号 _________________________ 序列号 _______________________ 恭喜您购买此产品 Philips 家族 向您表示欢迎 尊敬的 PHILIPS 产品用户 感谢您对 PHILIPS 的信任 我们将尽一切努力使 您长期对我们的产品感到满意 CA UTION RISK OF ELECTRIC SHOCK DO NOT OPEN CAUTION TO REDUCE THE RISK OF ELECTRIC SHOCK DO NOT REMOVE COVER OR BACK NO USER SERVICEABLE PARTS INSIDE REFER SERVICING TO QUALIFIED SERVICE PERSONNEL 欢迎 ...

Page 29: ...摔落地上 本产品可能含有铅或汞 出于环保考虑 对这些材料 15 的处理应遵守法规限制 有关处理或回收信息 请与当地主管部门或电子工业联盟联系 后者的网址 为 www eiae org 需要进行维修的一些损坏情况 在以下情况下 设备 16 需由合格的维修人员进行维修 A 电源线或插头损坏 B 物体掉入设备中 或设备溅水 C 设备淋雨 D 设备工作不正常或性能发生明显变化 E 设备摔落地上或罩壳受损 倾斜 稳定性 17 所有电视机必须遵守建议的有关机柜设 计倾斜度和稳定性的国际性全球安全标准 请勿违反这些设计标准 使用大力推 拉 机柜正 面或顶部 否则可能最终导致产品翻倒 另外 请勿将电子设备 玩具放在机柜顶部 这可能 给您或儿童带来危险 毋庸置疑 这些物品可能从机 柜顶部坠落从而导致产品受损和 或人身伤害 壁装或吊架安装 18 仅可按照生产商建议的方法将设备 安装到墙壁或天花板上 电线 19...

Page 30: ...ps 会尽 快地纠正用户报告的错误并将其 并公布在 Philips 支持网站上 像素特性 此液晶面板具有很高的彩色像素 数配置 尽管其有效像素比率高 达 99 999 或更高 但屏幕仍可 能出现持续的黑点或亮点 红 色 绿色或蓝色 这是显示器 的结构属性 在通用行业标准之 内 不属于故障 不会影响产 品的性能 安全符号 了解这些安全符号 CA UT I ON RISK OF ELECTRIC SHOCK DO NOT OPEN CAUTION TO REDUCE THE RISK OF ELECTRIC SHOCK DO NOT REMOVE COVER OR BACK NO USER SERVICEABLE PARTS INSIDE REFER SERVICING TO QUALIFIED SERVICE PERSONNEL 此 闪电 符号表示设备中 的非绝缘材料可能会导致触 电 为了您...

Page 31: ...ZH 4 ZH ...

Page 32: ... 4 5 10 使用电视机 5 11 打开 关闭电视机或将其切换为待机 5 1 11 观看电视 5 2 11 收看通过有线接收机盒接收的频道 5 3 12 观看 DVD 5 4 12 充分利用电视机 6 13 遥控器概述 6 1 13 使用遥控器上的图文电视功能 6 2 13 使用设定菜单 6 3 14 更改画面和声音设置 6 4 15 使用 6 5 灵智模式 15 设置时钟 6 6 17 设置睡眠定时器 6 7 17 减少降噪 6 8 18 调节肤色 6 9 18 使用儿童锁 6 10 18 将电视机用作 PC 显示器 6 11 19 在 PC 模式下选择电视 6 12 19 连接设备 7 20 连接概述 7 1 20 选择连接质量 7 2 21 连接设备 7 3 22 术语表 8 24 故障排除 9 25 技术规格 9 1 26 索引 10 27 ...

Page 33: ... 摩擦或敲打 屏幕 因为这会对屏幕造成永久性损害 尽量避免屏幕长时间显示静止图像 如果必须 使用静止图像 请降低屏幕对比度和亮度 以防止损坏屏幕 环境保护 2 3 报废法令 回收 Philips 一向致力于生产环保产品 这款新 的电视机包含了多种可回收再利用的材料 报废 时 专业公司可以拆解并回收此装置 这将最大 限度地减少需要进行废弃处理的材料量 请确保 根据国家及当地的所有法规来处理此装置 回收包装 本产品的包装可回收利用 有关如何回收利用此 包装的信息 请与当地机构联系 处理废电池 提供的电池不含汞或镉 应根据当地法规妥善处 理提供的电池和其它废电池 功耗 此电视机在待机模式下仅消耗最低限度的电量 可最大限度地降低对环境的影响 有源功耗信息 显示在电视机背面 摆放规则公告 2 4 警告 B 为了减少发生火灾或触电的风险 请勿将此设 备暴露在雨中或潮湿环境中 不要将盛有液体 的物品 例...

Page 34: ...指示灯 5 侧面插口 HDMI 2 HDMI 1 CVI 1 CVI 2 AUDIO IN VGA PC IN 75 Ω L AUDIO OUT R 使用电视机侧面插口可连接各种移动设备 如相 机或游戏机 您还可以连接耳机 背面插口 HDMI 2 HDMI 1 CVI 1 CVI 2 AUDIO IN VGA PC IN 75 Ω L AUDIO OUT R Cable 使用电视机背面的插口可连接天线和永久性设 备 如高清影碟播放机或 DVD 播放机 注意 D 有关连接的更多信息 请参见第 7 节 连接设备 3 2 遥控器 1 2 3 4 5 6 7 8 9 待机 开启 1 信号源 2 选择 色彩按钮 3 画面格式 4 按钮 箭头按钮 5 频道选择 6 音量选择 7 菜单按钮 8 确认按钮 9 有关遥控器的更多信息 请参见遥控器概述 一节 ...

Page 35: ... 如果连接了 Kensington 防盗锁 未附带提供 请将电视机放在可与锁连接的固定物品的附近 4 2 电视机的壁挂安装 警告 B 电视机的壁挂安装应仅由合格的安装人员执 行 Koninklijke Philips Electronics N V 对由于 安装不当而造成的事故或人身伤害不负任何 责任 第 1 步 购买一个符合VESA 标准的壁挂托架 根据电视机屏幕尺寸 购买以下任一壁挂托架 电视机屏幕 尺寸 英寸 符合 VESA 标准的 壁挂托架类型 毫米 螺丝类型 32 英寸 200 x 200 毫米 公制 6 x 10 毫米 37 英寸 200 x 200 毫米 公制 6 x 10 毫米 42 英寸 400 x 200 毫米 公制 6 x 10 毫米 47 英寸 400 x 200 毫米 公制 6 x 10 毫米 第 2 步 卸下电视机座 注意 D 这些说明仅适用于安装了机座的电视机...

Page 36: ...AUDIO OUT R 在电视机背面找到 TV ANTENNA 电视天 1 线 插口 将天线 未附带提供 的一端插入 TV 2 ANTENNA 电视天线 插口 如果天线不 匹配 请使用适配器 将天线的另一端插入天线插座 确保天线两端 3 都已插紧 用力将机座从电视机底部拔下 将机座和螺钉 3 放到安全的地方以备以后重装 第 3 步 连接电缆 按照下面几节和第 7 节 连接设备 第 4 步 将符合VESA 标准的壁挂托架固定到电视 机上 警告 B 将符合VESA 标准的壁挂托架固定到电视机上 时 只能使用指定的螺钉 M6 x 10 毫米 指定的螺钉是根据此电视机的重量而设计的 注意 D 根据符合VESA 标准的壁挂托架的不同 您可 能需要从壁挂托架上卸下安装板以便于安装 有关说明 请参阅符合VESA 标准的壁挂托架 的文档 ...

Page 37: ...HDMI 1 CVI 1 CVI 2 AUDIO IN VGA PC IN 75 Ω L AUDIO OUT R HDMI 2 HDMI 1 CVI 1 CVI 2 AUDIO IN VGA PC IN 75 Ω L AUDIO OUT R Cable Receiver Box ANTENNA Cable Receiver Box ANTENNA HDMI 1 HDMI 2 AUDIO IN PC IN VGA CVI 1 Pb Pr L R Y Pb Pr L R Y CVI 2 75 Ω L AUDIO OUT R 连接交流电源线 警告 B 检查电压是否与电视机背面标注的电压相符 如果不符 请勿插入交流电源线 连接交流电源线 AC IN AC IN HDMI 1 HDMI 2 在电视机背面找到电源插口 1 电源插口的位置因电视机的型号而异 将交流电源线完全插入电视机电源插口 2 将交流...

Page 38: ...NEL MENU VOLUME 1 2 POWER CHANNEL 5 POWER 切换为待机模式 按遥控器上的 不使用遥控器 从待机状态切换为开启状态 按电视机侧面的 POWER 电源 可关闭 电视机 再次按 POWER 电源 可打开电视机 关闭电视机 按电视机侧面的 POWER 电源 5 2 观看电视 切换频道 按遥控器上的数字 1 至 9 或 频道 按 频道切换 可返回观看的上一个电视频道 注意 D 您也可以通过按电视机侧面的 CHANNEL 频道 来切换频道 调节音量 按遥控器上的 音量 按遥控器上的 静音 可静音 再次按 静音 或 按 音量 可恢复声音 注意 D 您也可以通过按电视机侧面的 VOLUME 音量 来调节音量 ...

Page 39: ...1 通过有线接收机盒接收的画面将自动显示在 屏幕上 使用有线接收机盒的遥控器选择频道 2 如果未显示画面 反复按 1 信号源 以选择连接的有线接收机盒 然后等待几秒钟 使画面显示 按 2 确认 键 使用有线接收机盒的遥控器选择频道 3 观看 DVD 5 4 在播放机中插入一张 DVD 光盘 1 按播放机遥控器上的 2 Play 通过有线接收机盒接收的画面将自动显示在 屏幕上 如果未显示画面 反复按 1 信号源 以选择正确的信号源 然后等 待几秒钟 使画面显示 按 2 确认 键 ...

Page 40: ...当地的广 播电视频道 画面格式 4 选择画面格式 请参见更改画面格式 一节 箭头按钮 5 Î ï Í Æ 用于浏览菜单 灵智模式 6 选择画面设置 频道 7 切换到下一个或上一个频道 数字按钮 8 选择频道 页面或设置 频道切换 9 返回之前观看的频道 屏显 退出 10 显示节目信息 如果有 音量 11 增大或减小音量 静音 12 静音或恢复声音 菜单 13 打开或关闭菜单 确认 14 按该按钮可启动某项设置 环绕立体声 15 增大电视机声音的深度和维度 睡眠时钟 16 将电视机设置为在特定的一段时间内自动 关闭 使用遥控器上的图文电视功能 6 2 1 打开 关闭图文电视 2 图文电视保持 冻结图文电视页面 3 显示 隐藏图文电视 在显示和隐藏模式间切换 4 放大图文电视 将上下文放大到以前的两倍 5 使用这四个彩色按钮 可以访问图文电视中以 相应颜色指示的项目或页面 注意 D 图文电视仅...

Page 41: ...自动搜寻功能设置频道 电视机可能无法正 常工作 运行自动搜寻后 请检查搜寻结果 按遥控器 上的 频道 查看您可以选择哪些频道 请记 住 必须首先将天线或有线电视信号线连接到 电视机上 人工搜寻 自动搜寻 启动自动搜寻频道频率 或按 数字键以显示所需的频道频率 节目号码 使用 Î 或 ï 可在人工搜寻菜 单中调整频道编号 微调 接收质量较差时对模拟频道进行手 动微调 储存 储存或设置人工搜寻菜单的设置 频道设置 频道编辑 设置您自己的包含喜爱的电视 频道的收藏列表 频道互换 交换频道 在 自 到 和 交换 之间切换 名称编辑 为没有名称的频道分配一个名 称或更改频道的名称 按 1 Î 或 ï 编辑名称 然后按 Æ 移至下 一个字符 按 2 Í 确认第一个字符 然后按 Æ 确认最 后一个字符 按 3 Æ 确认名称 频道排序 为频道排序或分组 复原设定 允许您将大部分画面和声音设置 重新设置为默...

Page 42: ...色温 屏幕格式 对比度 图像 灵智模式 画面设置摘要 可对下列画面设置进行配置 根据画面信号源 格式的不同 一些画面设置可能不可用 灵智模式 显示预定义画面和声音设置的 列表 对比度 设置画面中的白色级别 亮度 设置画面的亮度 色彩 设置饱和度级别 清晰度 设置细部的清晰度 色调 调整红色和绿色间的色彩平衡 色温 将色温设置为普通 暖色调或 冷色调 屏幕格式 更改画面的格式 使用 6 5 灵智模式 按遥控器上的 1 灵智模式 可将电视机设置为预 定义的画面和声音设置 按 2 Î 或 ï 可选择以下某种设置 个人设定 使用 图像 菜单定义的自定义设 置 鲜艳 适合高度动感画面的鲜艳画面设置和 清晰的声音 标准 用于以普通方式看电视 电影 可以实现电影体验的精彩画面设置 游戏 针对 PC 游戏机和游戏站优化的 设置 节能 用于减少耗电量的环保设置 ...

Page 43: ... 减小失真 4 3 显示传统的 4 3 格式 14 9 放大 将传统的 4 3 格式放大为 14 9 16 9 放大 将典型的 4 3 格式放大为 16 9 字幕16 9模式 全屏显示 4 3 画面 并且显示字幕 阔银幕 将传统的 4 3 格式拉伸为 16 9 注意 D 对亮度 色彩 对比度或清晰度的所作的 任何调整都将保存在灵智模式部分 的个人设 定中 对于 720p 1080i 1080p HD 和 HDMI 模式下 的默认画面格式将是阔银幕 并且 画面格式 功能将不可访问 对于 PC 模式 默认的画面格式将是全屏 且画面格式功能可以是可访问的 4 3 和全屏 格式 ...

Page 44: ...于来自所接收外部输入 的信号的更强空间声或环境声再现效果 选择 开启或关闭 自动音量调衡 减小突然性的音量变化 比 如插播广告期间或更换频道时 选择开启或 关闭 设置时钟 6 6 本节介绍如何设置时间 按遥控器上的 1 菜单 然后选择功能 时钟 时钟 主控 I 功能 定时器 开启时间 终止时间 睡眠定时 时钟 AM 按 2 Æ 进入列表 按 3 Î 或 ï 设置时间 小时 分钟 AM 或 PM 按 4 确认 键确认 设置 6 7 睡眠定时器 睡眠定时器会在定义的一段时间后将电视机切换 为待机状态 按遥控器上的 1 菜单 然后选择功能 睡眠定 时 睡眠定时 主控 I 功能 定时器 开启时间 终止时间 时钟 睡眠定时 按 2 Æ 进入 睡眠定时 条 按 3 Î 或 ï 在零到 180 分钟范围内设置睡眠时 间 如果设为零分钟 则睡眠定时器关闭 按 4 确认 键启动睡眠定时器或按遥控器上的睡 眠...

Page 45: ...绍如何调节肤色 按遥控器上的 1 菜单 然后选择功能 肤色 主控 功能 定时器 降噪 信号源列表 明亮 普通 鲜艳 儿童锁 肤色 肤色 按 2 Æ 进入列表 按 3 Î 或 ï 以选择 明亮 普通 或 鲜艳 按 4 菜单 退出 使用儿童锁 6 10 锁定电视频道 以防止孩子观看不适宜的节目 内容 设置或更改 PIN 按遥控器上的 1 菜单 然后选择功能 儿童 锁 儿童锁 更换密码 全部清除 主控 功能 定时器 降噪 信号源列表 上锁程序 儿童锁 主控 功能 定时器 降噪 信号源列表 密码 儿童锁 肤色 肤色 按 2 Æ 进入 按遥控器上的数字按钮 输入 4 位数的 PIN 3 如果您已有 PIN 请输入您当前的 PIN 如果您没有 PIN 请输入默认密码 0000 如果您丢失了 PIN 请输入主密码 0711 按 4 菜单 退出 ...

Page 46: ...如果别 2 人 例如孩子 更改了您的密码或者是您忘 记了自己的密码 则总是可以通过输入默认 码进入 将电视机用作 PC 显示器 6 11 使用 VGA 电缆将一台 PC 与您的电视连接起来 将电视用作 PC 显示器 小心 B 连接 PC 之前 请将 PC 显示器的刷新频率设 置为 60Hz 支持的 6 11 1 屏幕分辨率 PC 模式支持以下屏幕分辨率 分辨率 刷新率 640 x 480 800 x 600 1024 x 768 1280 x 720 1280 x 768 1360 x 768 1280 x 1024 60Hz 60Hz 60Hz 60Hz 60Hz 60Hz 60Hz 提示 E 1360 x 768 是建议的分辨率 在 PC 模式下选择电视 6 12 按遥控器上的 1 菜单 然后选择功能 信号源列表 选择 2 PC 然后按 确认 键确认选择 如有必要 按照 3 更改画面设...

Page 47: ...O OUT R VIDEO IN S VIDEO L AUDIO R SIDE AV 1 2 3 4 6 7 8 9 5 背面插口 HDMI 1 HDMI 2 1 用于 DVD 播放机 数字接收器 游戏机和其 它高清设备的 HDMI 输入插口 PC IN PC 输入 2 用于 PC 的 VGA 和音频插口 CVI 1 CVI 2 3 用于 DVD 播放机 数码接收器或游戏机等的 分量视频输入 Y Pb Pr 和音频左 右插口 AUDIO OUT L R 音频输出左 右 4 用于家庭影院或其它音频系统的声音输出 Cinch 插口 天线输入 75 5 Ω 侧面插口 耳机 6 立体声迷你插孔 AUDIO L R 音频左 右 7 用于复合设备和 S Video 设备的音频左 右输 入插口 VIDEO IN 视频输入 8 用于复合设备的视频输入 Cinch 插口 S VIDEO 9 用于 S Vid...

Page 48: ...white S video Composite audio video yellow red white Component video red gree blue Audio L R red white S video Composite audio video yellow red white 分量视频电缆 红色 绿色 蓝色 音频左 右电缆 红色 白色 S Video 7 2 3 优良品质 采用模拟连接的 S Video 可以提供比复合视频更好 的画面品质 将设备与 S Video 相连接时 请将 S Video 电缆插入电视机侧面的 S Video 插口 您 必须使用一条单独的音频左 右电缆将设备与电视 机侧面的红色和白色音频左 右插口连接起来 Component video red gree blue Audio L R red white S video Composite au...

Page 49: ...线电视 Cable Receiver Box TV CABLE IN TO TV AUDIO OUT L R VIDEO OUT S VIDEO A Pb Pr L R Y CVI 2 75 Ω L AUDIO OUT R Cable TV signal B OR 将有线接收机盒连接到音频 视频输出 Cable TV signal Cable Receiver Box A C TV CABLE IN AUDIO OUT L R VIDEO OUT S VIDEO B VIDEO IN S VIDEO L AUDIO R SIDE AV 将VCR DVD 播放机或其它设备连接到 RCA 插口 AV Player with A V Connectors TV AUDIO OUT L R VIDEO OUT S VIDEO B A VIDEO IN S VIDEO L AUDIO R SIDE ...

Page 50: ...ccessory Device Equipped with Component Video Outputs TV Y Pb Pr L AUDIO R A B 将 DVD 播放机连接到 HDMI 插口 HDMI 1 HDMI 2 AUDIO IN PC IN VGA CVI 1 Pb Pr L R Y Pb Pr L R Y CVI 2 75 Ω L AUDIO OUT R DVD Player TV A 将 PC 显示器 连接到VGA 插口 HDMI 1 HDMI 2 AUDIO IN PC IN VGA CVI 1 Pb Pr L R Y Pb Pr L R Y CVI 2 75 Ω L AUDIO OUT R Computer TV A B ...

Page 51: ... 型输入 YPbPr 三基色 红 绿 蓝 可以直接从有线接收机盒连接到电视机 使信号显示在屏幕上 高清晰度电视机 一般认为 高清晰度电视机的清晰度大约是目前 NTSC 电视机垂直和水平画面 分辨率的两倍 实际上就是画面清晰了两倍 高清晰度电视机的屏幕比例也是 16 9 而如今大多数的电视机屏幕比例则为 4 3 高清晰度电视机减少了运动伪影 即 重像 点蠕动 并提供了 CD 品质环绕立体声的 5 1 独立频道 又称 AC 3 逐行扫描 在逐行扫描中 可以同时对屏幕上所有水平扫描线进行扫描 数字电视和高清晰 度电视标准对隔行扫描与逐行扫描广播和显示方式都接受 分辨率 分辨率 对视频图像中可见的最微小细部的度量 电视机分辨率可以用图像中的 像素数来表示 更为常见的表示法是 用生成图像的总 水平扫描 行数来表 示 标准数字电视机分辨率 标准清晰度数字电视机 576i 画面为 704x576 像素 ...

Page 52: ...时 确保电视机上的指示灯闪烁 2 确保您使用的是电视机附带提供的摇控器 3 确保按照摇控器上的插图装入电池 且电池不需要更换 4 从电源插座上拔下交流电源线 60 秒后重新插上交流电源线 画面扭曲 画面被拉伸 侧边或顶部出现短而宽的 黑边 广播视频格式 1 按摇控器上的 画面格式 按钮 选择最佳画面格式 2 对于某些配套设备 画面格式须在配套设备中进行设置 画面大部分是红色和绿色 或者当电视机通过分量电缆 连接至配套设备时画面不显 示红色 连接不安全 不正确 1 确保所有的连接都是根据颜色代码进行的 2 将分量电缆插入电视机上的 YPbPr 插座中 电视机音箱没有声音 音量级设置为了零 1 提高音量 声音设置为静音 2 按摇控器上的 静音 按钮 连接了耳机 3 确保未将耳机插入电视机 未连接音频电缆 4 对于 AV 连接 确保音频左 右电缆是按照连接设备如果您使用的是分量电缆 确保未将红色...

Page 53: ...20p 1080i p AUDIO L R 音频左 右 输出 PC IN PC 输入 VGA PC 音频输入 侧面插口 1 个耳机 复合视频输入 音频左 右 S Video 重量和尺寸 产品重量 不含机座 11 kg 14 8 kg 18 1 kg 24 9 kg 产品重量 含机座 14 kg 19 3 kg 22 6 kg 31 5 kg 产品重量 含包装盒 16 7 kg 22 6 kg 22 1 kg 29 4 kg 产品尺寸 不含机座 高 x 宽 x 深 543 x 809 x 92mm 611 x 929 x 99mm 667 x 1033 x 92mm 733 x 1150 x 104mm 产品尺寸 含机座 高 x 宽 x 深 593 x 809 x 220mm 666 x 929 x 262mm 721 x 1033 x 262mm 793 x 1150 x 310mm 箱尺...

Page 54: ...打开电视机 10 电池 9 电缆 9 对比度 15 F 肤色 18 G 概述 电视 7 连接 20 遥控器 13 故障排除 25 壁挂安装 8 观看电视 11 H 画面格式 16 回收 6 J 技术规格 26 交流电源线 10 L 亮度 15 N 降噪 18 P PC 模式 19 PIN 码 18 频道 设定 14 屏幕分辨率 19 Q 清晰度 15 S 灵智模式 15 色温 15 色调 15 时钟 15 睡眠定时器 17 锁定节目 19 T 天线 9 Y 养护 屏幕 6 环境 6 遥控器 7 音量 11 ...

Page 55: ... 2008 Koninklijke Philips Electronics N V All rights reserved P41TN017813 1C ...

Reviews: