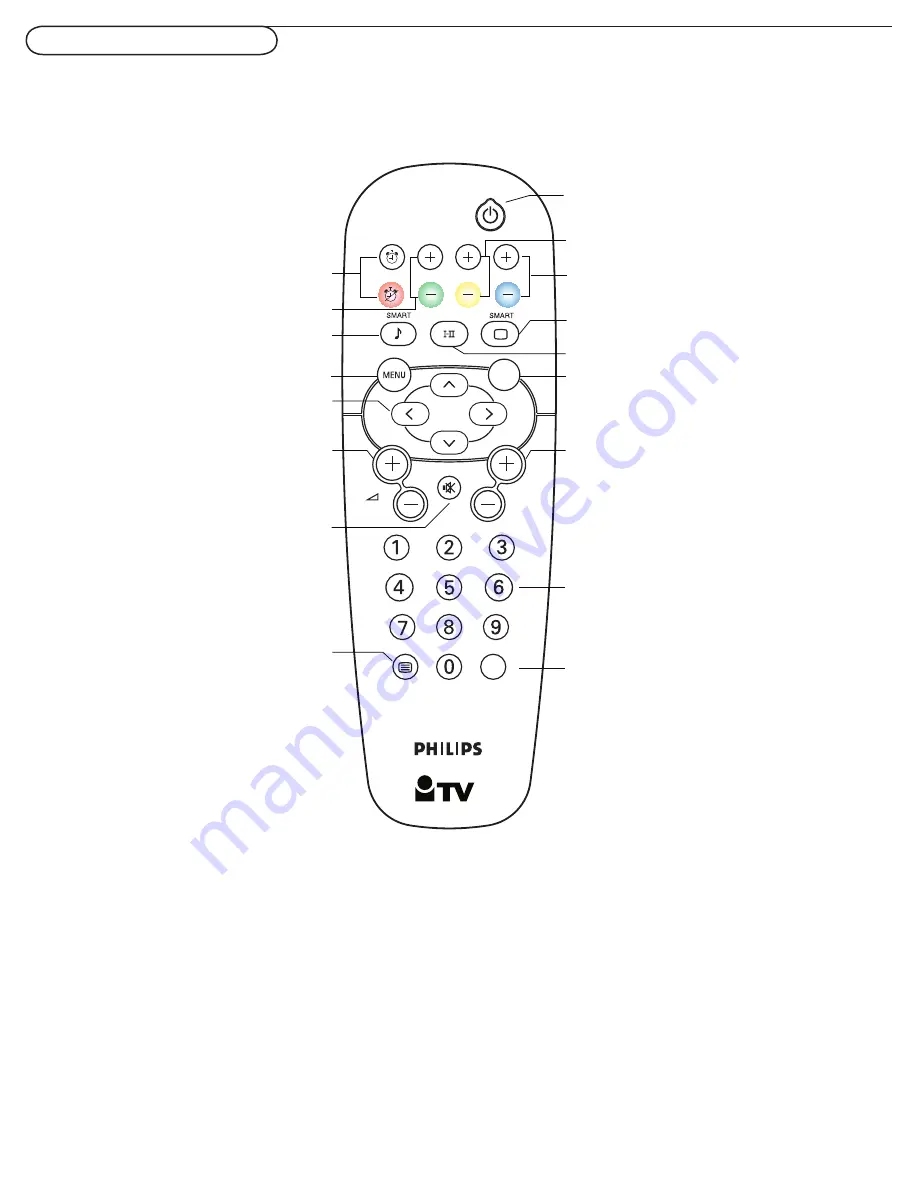
background image

13

Remote control keys

Note: Pressing most buttons once will activate the assigned function. Pressing a second time will de-activate it. 

When a button enables multiple options, a small list will be shown. Press repeatedly to select the next item in the list. 

The list will be removed automatically after six seconds or press 

MENU

 to remove immediately.

AV

TV

TEXT

RADIO

INFO

PAY TV

ON

OFF

ALARM

OK

(1)

(2)

(10)

(9)

(11)

(12)

(13)
(14)

(15)

(16)

(3)

(4)
(5)

(6)

(7)

(8)

(17)

(1) Alarm On / Off

No function.

(2) +Pay TV-

To move up or down a Pay TV channel. 

(3) Smart Sound button

Press repeatedly to select among the 4 

settings: PERSONAL, THEATRE, MUSIC, 

or VOICE.

(4)MENU

Press menu to activate on screen menu 

on/off.

(5) Cursor direction key

(6) VOL +/-

Press + or - to adjust the volume.

(7) Mute button

Press to eliminate or restore the LCD TV 

sound. Mute will appear on the screen 

when the sound is muted.

(8) Teletext  (p.14)

It is only available in /97 model.

(17) AV button

Press to select the video input source:

Tuner, AV, Side AV, CVI 1, CVI 2, PC-A,

HDMI 1 and HDMI 2,

(9) STANDBY

Press to switch the TV to standby mode.

(10) +INFO-

To move up or down an INFO channel.

(11) RADIO 

To move up or down a RADIO channel.

(12) Smart Picture button

Press repeatedly to select either RICH, 

NATURE, SOFT, or PERSONAL of 

picture setting.

(13) I-II button / Sound mode

To select 1st or 2nd language.

Note: Language availablility depends on 

the transmission.

(14) OK

To activate a setting.

(15) + TV -

To move up or down a TV channel.

(16) Number button

Press the number buttons for direct 

access to the TV channels.  For 2 digit 

channel, enter the 2nd digit after enter 1st 

digit.

Summary of Contents for 32HF7445

Page 1: ...P41TJ020813 1C 中文 English User Manual Quick Start Guide Inside 用戶手冊 內附快速使用指南 32HF7445 Model No Serial No ...

Page 2: ... 視頻 分离視頻 黃色 和音頻 紅色 白色 線 通過有線盒和其它設備提供基本連接 注意 音頻輸入的顏色可能不同 如紅色 白色或紅色 黑色 RF Provides a basic connection for antenna or cable Provides both audio and video RF 為天線或有線提供基本連接 提供音頻和視頻 Better Component Video input Provides superior picture quality by separating the green blue and red luminance signals Typically used with red white audio cables Best HDMI High Definition Multimedia Interface provides an uncom...

Page 3: ...I 1 HDMI 2 PC IN Audio input D SUB CVI Component YPbPr Audio L R input CV2 Component YPbPr Audio L R input AV Video input S video Audio L R input SPDIF output 8 MonoAudio out 75 RF SideAV S video Audio L R Video input Earphone DATA 1 DATA 2 AC IN HDMI 1 HDMI 2 PC IN 音頻輸入 D SUB CVI 分量 YPbPr 左 右音頻輸入 CV2 分量 YPbPr 左 右音頻輸入 AV 視頻輸入 S 視頻 左 右音頻輸入 SPDIF 輸出 8 音頻輸出 75 RF Side AV S 視頻 左 右音頻 視頻輸入 耳机 DATA1 DATA...

Page 4: ...he Auto store function to set up the TV for the broadcast or cable channels available in your area please go to page10 for detail 在設置之後 請進行自動搜尋功能在電視 上設置您所在區域的廣播或有線頻道 詳細信息 請參見第10頁 Use the AV button on the remote control to tune to the AV channel for the cable box signal Once tuned change channels at the cable box not the television D 使用遙控器上的AV按鈕調到分線盒信號的AV頻道 調整後 在分線盒 而不是電視 上更換頻道 室內或室外天線 VHF UHF組合 AV...

Page 5: ...t provide audio so audio cables must be connected to provide sound AV按鍵 AV Button C AV按鍵 AV Button 使用遙控器上的AV按鈕選擇AV 如果此連接方式使用 不同的插孔 還可選擇Side AV以觀看VCR內容 使用遙控器上的AV按鈕選擇CVI1或者 CVI2以觀看DVD 注意 Y Pb Pr插孔不提供音頻 必須連接音頻線才能提供聲音 Y Pb Pr R L AUDIO IN Y Pb Pr R L AUDIO IN CVI 1 CVI 2 DVD Player Or Other Video Devices With Component Video Connectors Component Video Input DVD播放機或其它帶有 Component視頻連接器 的視頻設備 B TV 電視 AV ...

Page 6: ...用作PC顯示器 DVD player AV按鍵 AV Button B Use AV button on the remote control to select HDMI 1 or HDMI 2 to watch DVD 使用遙控器上的AV按鈕選HDMI1或者HDMI2以觀看DVD Y Pb Pr R L AUDIO IN Y Pb Pr R L AUDIO IN CVI 1 CVI 2 D SUB PC IN AUDIO PC Monitor Connections PC 顯示器 連接 Y Pb Pr Y Pb Pr CVI 1 CVI 2 D SUB PC IN AUDIO HDMI 1 HDMI 2 A TV 電視 DVD Player With HDMI Connector HDMI 帶有HDMI 連接器的 DVD播放機 ...

Page 7: ...s WARNING To reduce the risk of fire or electric shock this apparatus should not be exposed to rain or moisture and objects filled with liquids such as vases should not be placed on this apparatus CAUTION To prevent electric shock match wide blade of plug to wide slot fully insert Congratulations on your purchase and welcome to the family Dear PHILIPS product owner Thank you for your confidence in PH...

Page 8: ...ust comply with recommended international global safety standards for tilt and stability properties of its cabinet design Do not compromise these design standards by applying excessive pull force to the front or top of the cabinet which could ultimately overturn the product Also do not endanger yourself or children by placing electronic equipment toys on the top of the cabinet Such items could uns...

Page 9: ...n left exposed for some time Be careful of condensation when temperature changes occur Condensation can cause damage to the LCD screen and electrically parts After condensation fades spots or blemishes will be present on the LCD screen POSITIONING THE LCD TELEVISION Place the LCD TV on a solid sturdy base or stand Be sure the stand is strong enough to handle the weight of the LCD TV Try to leave a...

Page 10: ... battery check Trouble shooting tips Glossary Care and cleaning Specification 1 2 3 4 5 5 5 6 7 7 7 8 8 9 10 10 11 11 12 12 13 14 15 16 17 18 19 20 21 Contents Care of the screen See Tips p 20 Philips has paid a lot of attention to producing an environmentally friendly product Your new TV contains several materials that can be recycled for new uses At the end of its life specialized companies can d...

Page 11: ...not attempt to do the work yourself Philips bears no responsibility for improper mounting or mounting that results in accident or injury Make sure that the wall mount is being fixed securely enough so that it meets safety standards 1 To connect accessory devices see Cover and Connection Refer to the bottom of the set Model label for the correct operation voltage Insert the power cord into the wall ...

Page 12: ...h the TV on or off the VOLUME button to adjust volume the PROGRAM buttons to select the TV channels or sources The MENU button can be used to display the Settings menu without the remote control MENU button can also Exit the menu Use the VOLUME buttons and the PROGRAM buttons to select menu items in the directions as shown the VOLUME button to confirm your selection ...

Page 13: ... Accessing the SETUP menu TEXT SMART SLEEP CC POWER RECALL GUIDE CH RESET 1 4 7 8 0 9 5 6 2 3 A B C D E F G CLOCK AV A CH M CH VOL GUEST DCM SETUP AV TV TEXT RADIO INFO PAYTV ON OFF ALARM OK RC2887 RC2573 Optional Navigation The current menu item can be selected by means of the Up Down keys Submenus can be accessed from menu items indicated with a symbol by pressing the Right key To exit any menu ...

Page 14: ...the colour code status of TV and RC just press the OK button on the RC for at least 4 seconds SETUP LANGUAGE COMMUNICATION NO OF CHANNELS CHANNEL INSTALL CONFIGURATION ENGLISH CONFIGURATION SWITCH ON OSD PICTURE SOUND SECURITY CONTROL FEATURES CHANNEL INSTALL CHANNEL INPUT SYSTEM FREQUENCY LABEL STORE FINE TUNE MUTE AUTO INSTALL TV PROTECTION TV 1 TUNER AUTO 184 2500 0 NONE NO COMMUNICATION COMMUN...

Page 15: ...es below 100 MHz You can also press the Right key to start the auto search LABEL This menu item will be used to add a label name for each program o Press the Left Right key to select the label digit press the Up Down key to insert alphanumeric characters o Press the MENU button to exit the Label menu item STORE The channel information is stored after pressing the Left Right key Press the MENU key ...

Page 16: ...FORCED ON LAST STATUS STANDBY and ON o FORCED ON TV will be automatically switched to ON mode whenever the mains power is turned ON or resumed after a power interruption Note that the remote control STANDBY key will no longer function when TV is set in this mode TV can only be switched OFF by means of the main switch or a set up remote control or by ESP function Energy Saving Programmability contr...

Page 17: ...ettings KEYBOARD LOCK The Keyboard Lock function disables the television s local keyboard for volume and program con trol SWITCH ON OSD WELCOME MESSAGE SWITCH ON CHANNEL SWITCH ON VOLUME SWITCH ON PIC FMT POWER ON VOLUME INDICATOR CHANNEL DISPLAY AV1 30 WIDESCREEN LAST STATUS YES ALL PICTURE SOUND BRIGHTNESS COLOUR CONTRAST SHARPNESS ACTIVE CONTROL TREBLE BASS AVL 50 50 50 50 YES 50 50 ON CONTROL ...

Page 18: ...control Right Left key to select the required period Note SLEEPTIMER option is not available when POWER ON is set to the FORCED ON mode PICTURE FORMAT It is not available in PC mode Use the remote control Right Left key to select the desired picture format The following options are available 4 3 ZOOM 14 9 ZOOM 16 9 SUBTITLE ZOOM WIDESCREEN SUPER WIDE Language For selecting Guest Menu language ENGL...

Page 19: ...ion key 6 VOL Press or to adjust the volume 7 Mute button Press to eliminate or restore the LCD TV sound Mute will appear on the screen when the sound is muted 8 Teletext p 14 It is only available in 97 model 17 AV button Press to select the video input source Tuner AV Side AV CVI 1 CVI 2 PC A HDMI 1 and HDMI 2 9 STANDBY Press to switch the TV to standby mode 10 INFO To move up or down an INFO cha...

Page 20: ...liar with the transmission language cable networks satellite channels etc Teletext Press i OK To switch Teletext ON OFF In Teletext mode press i OK To enter a 3 digit page number i OK For previous next page i OK For previous next page i OK Depending on indication of sreen coloured buttons are used to access the items or corresponding pages AV TV TEXT RADIO INFO PAYTV ON OFF ALARM OK ...

Page 21: ...ures that have black bands at the top and bottom letterbox format SUBTITLE ZOOM This mode is used to display 4 3 pictures using the full surface of the screen leaving the subtitles visible SUPER WIDE This mode is used to display 4 3 pictures using the full surface of the screen by enlarging the sides of the picture WIDESCREEN This mode restores the correct proportions of pictures transmitted in 16...

Page 22: ...e only once or the program of the Wireless Smart Loader would be overwritten Point the Wireless Smart Loader to the TV s infra red receiver distance around 5 to 30cm Press the MENU Key on the Wireless Smart Loader TV shows the following menu SMARTLOADER TO TV TV TO SMARTLOADER o Highlight TV TO SMARTLOADER o Press the right cursor key on the Wireless Smart Loader for wireless method or on the TV R...

Page 23: ... the LED on the Wireless Smart Loader is green when pressing any button and check if the batteries are in a good condition Replace batteries if necessary try to bring the Wireless Smart Loader more closer to the TV infra red receiver and try again Tips 1 Do not forget to write the software code and the type of relevant master TV on the sticker used on the back of the Wireless Smart Loader 2 The Wi...

Page 24: ...off the sound This is proper operation and does not indicate a malfunction Good sound but poor color or no picture Adjust the contrast color tint and brightness setting Try another auto picture setting Snowish picture and noise Check the antenna connection Television not responding to remote control Check whether the batteries are working Replace if necessary Clean the remote control sensor lens o...

Page 25: ... green and blue are connected from a set top box directly into the TV allowing for the signal to display on the screen HDTV The generally agreed upon definition of HDTV is approximately twice the vertical and horizontal picture resolution of today s NTSC TV which essentially makes the picture twice as sharp HDTV also has a screen ratio of 16 9 as compared with most of today s TV screens which have...

Page 26: ...aphics are less likely to damage the picture tube Stock market tickers may appear at the bottom of the TV screen if the TV programming covers this news Shopping channel logos pricing displays may be bright and may appear constantly during the show These usually appear in the same location on the TV screen TV Location To avoid cabinet warping cabinet color changes and an increased chance of TV fail...

Page 27: ... Mono Audio out 75Ω RF Side AV S video Audio L R input Video input Earphone DATA 1 DATA 2 WEIGHT DIMENSIONS Weight incl Packaging Weight excl Packaging Carton Dimension WxHxD Product Dimension WxHxD 22 kg 48 5 lbs 18 3 kg 40 34 lbs 1070 x 668 x 251 mm 42 12 x 26 30 x 9 88 791 x 604 x 251 5 mm 31 14 x 23 78 x 9 9 POWER Power Consumption Standby Power Consumption Mains Power 150W max 3W 100 240V 60 ...

Reviews: