background image

3

EN

Transfer

Make sure that you have installed the
Philips Device Plug-in from the bypacked
CD.Without installation of Philips Device
Plug-in, your pictures will not be
transferred to your player.

1

. Connect the player to your computer.

2

. Start 

Windows Media Player

.

3

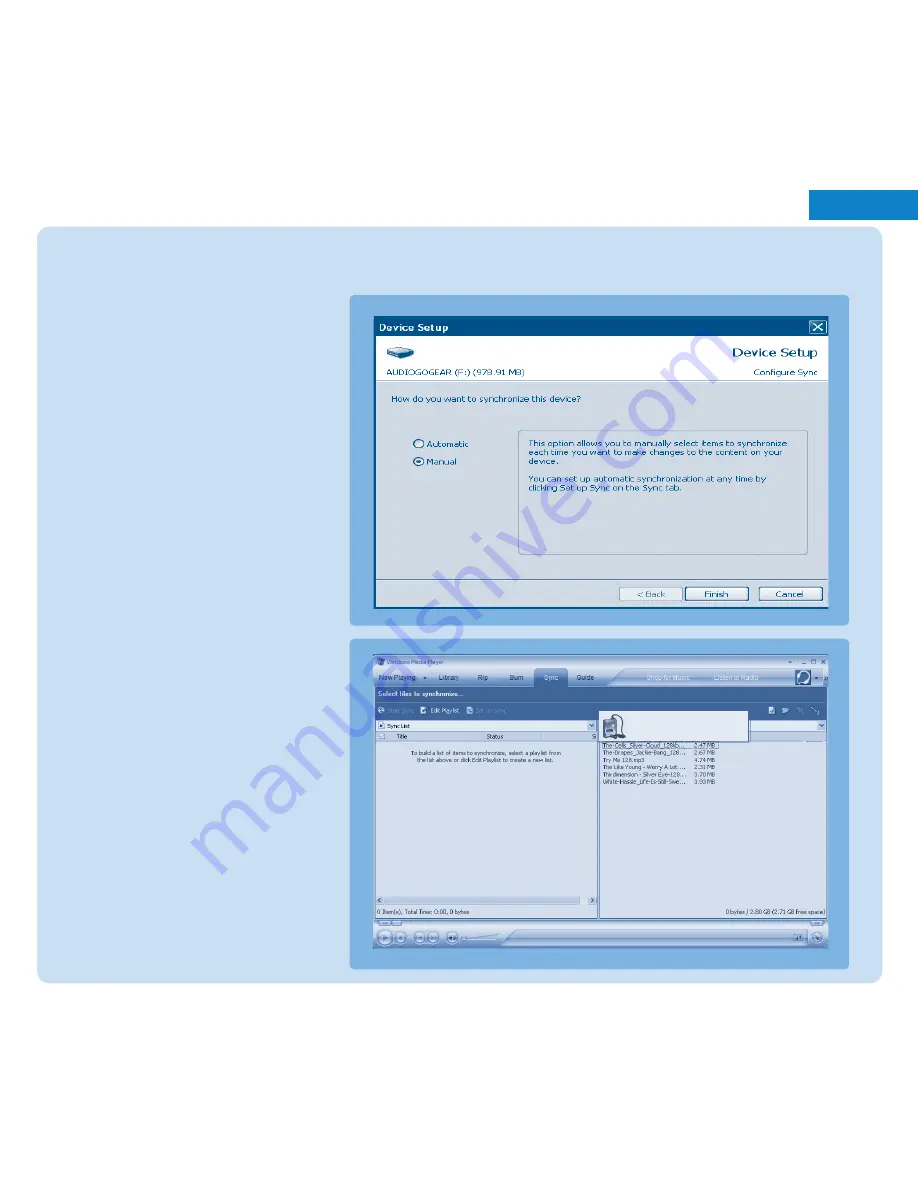
. If you see this screen, choose 

Manual.

(You can also do an automatic
synchronisation. Refer to the user
manual on the CD for instructions)

4

. Select 

Sync

tab. In the pull down menu

on the right pane, select 

Philips

or

Philips GoGear

as the destination. If

they are not in the list, click 

F5

to

refresh and try again.

Philips GoGear

Summary of Contents for 30GB-JUKEBOX HDD6330 -

Page 1: ...HDD6330 Quick start guide EN Guide de démarrage rapide FR Guía de inicio rápido ES Jukebox HDD6335 US_ARZ ...

Page 2: ... P L E H D E E E D I A g D N I O S E E F L I E I 3 N E G I T Ú N E A T A I D E M N I A D U Y A A T I S E C E ...

Page 3: ...E T I S I 6 E H C U S E R E T L U S N O T I S I 6 W W W R O P P U S M O C S P I L I H P T ...

Page 4: ... RANCOPHONE NGLISH 3PANISH ...

Page 5: ...gher 128 MB RAM 500 MB hard disk space USB port Internet connection Microsoft Internet Explorer 6 0 or later What else you ll need Power outlet Computer Digital Audio Player Headphones provided with 3 different sizes of rubber caps Combined charger USB cable Protective pouch Quick start guide For US ...

Page 6: ... Connect Install 1 0 2 12 Windows Explorer exe 3 mportant 4 5 Windows Media Player 3 5 Philips Device Manager 6 ...

Page 7: ...yer 1 Connect the player to your computer 2 Start Windows Media Player 3 If you see this screen choose Manual You can also do an automatic synchronisation Refer to the user manual on the CD for instructions 4 Select Sync tab In the pull down menu on the right pane select Philips or Philips GoGear as the destination If they are not in the list click F5 to refresh and try again Philips GoGear ...

Page 8: ...drop the song picture into the Sync List on the right pane Click the Start Sync button to start synchronisation The progress will be displayed 7 When the transfer is finished you can disconnect your player from the computer For more information and tips on transferring music and pictures with Windows Media Player please refer to the user manual on the supplied CD ...

Page 9: ...T TGEQTFKPI QWʼnF NKMG VQ RNC RTGUU 2 7UKPI VJG XGTVKECN VQWEJ UVTKR QWT RNC GT JCU VQWEJ UGPUKVKXG EQPVTQNU VJCV TGURQPF VQ VJG VQWEJ QH QWT HKPIGTU 6JG 8 46 617 564 2 UGG RKEVWTG KU WUGF VQ UETQNN VJTQWIJ NKUVU V TGURQPFU VQ VJG HQNNQYKPI HKPIGT OQXGOGPVU 4GEQTFKPI KETQRJQPG 1P 1HH QNF MG NQEM UNKFGT GHV CEM MG 4KIJV 5GNGEV MG GPW MG GCFRJQPG RNWI 8QNWOG WR FQYP MG U 2NC 2CWUG MG QTYCTF 0GZV MG 4...

Page 10: ...lect or play a track press MENU and select Add to Playlist on the go Delete track Delete track from your player through Windows Media Player Connect your player to the computer Select the songs that you would like to delete from your player in the items on device pane Press Delete key on your computer keyboard Pictures Start a slide show Press MENU select Start slide show and press 2 Stop a slide ...

Page 11: ...UME 7 How do I repair my device Philips Device Manager 8 Philips Device Manager Start 9 Programs 9 Philips Device Manager Repair Repair OK Updating firmware Need help User Manual 1 Online help Philips Helpdesk Register your product Country Helpdesk Tariff min Keep ready ...

Page 12: ... to change without notice Trademarks are the property of Koninklijke Philips Electronics N V or their respective owners 2005 Koninklijke Philips Electronics N V All rights reserved www philips com 8240 410 04112 Printed in China ...

Reviews: