background image

17

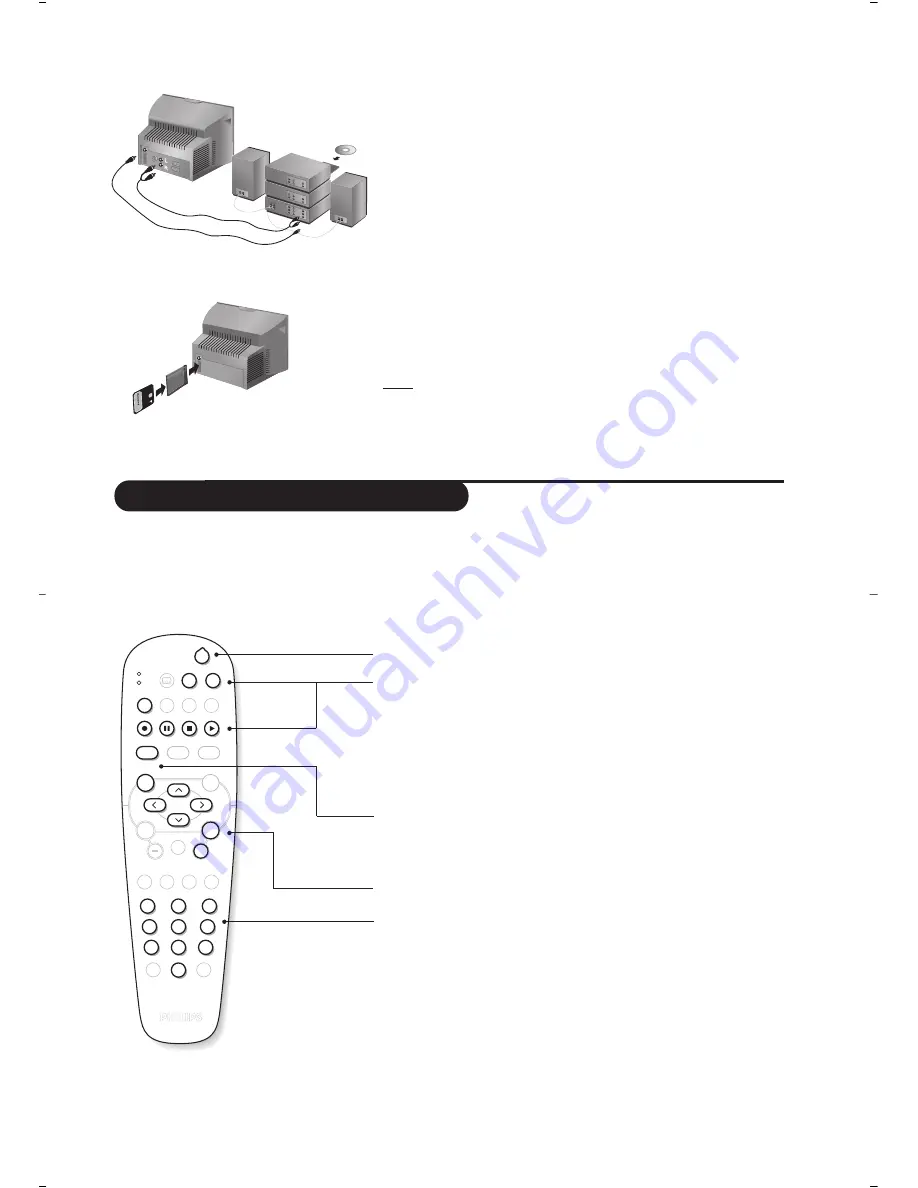
VCR / DVD mode selector

To connect to a hi-fi system, use an audio connection cable
and connect the “L” and “R” outputs on the TV set to the
“AUDIO IN” “L” and “R” input on your hi-fi amplifier.
Use a digital audio connecting cable and connect the
television’s “SPDIF”  output 

(only available on certain versions)

to

a “DIGITAL IN” input on the amplifier (amplifier with coaxial
digital input).

A common interface is available to connect a CAM
(conditional access module) and a smartcard. Please contact
your service provider to get more information about these
modules.

Note: the television should always be switched off before any module
is inserted in the common interface slot.

Amplifier

Common interface

standby

·

record *,

pause,

Ê

stop,

Æ

play,

¢

rewind,

fast forward,

bring up a menu *
select (

îÏ

) and set (

Ȭ

) *

u

confirm*

select programme,

enter a number

* Some programming functions are not available on all models

(cursors, menu, OK key, etc.).
The remote control is compatible with all the video recorders in our
range as well as models which use the RC5 signalling standard.

1

2

BACK

VCR

DVD

MENU

OK

A/D

P(age)

5

6

4

8

7

9

0

¢

Á

ª

-

3

-

+

+

.

DIGITAL

TV

[

OPTIONS

Ó

¤

Ÿ

Œ

Ë

MENU

SELECT

ù

SMART

SMART

Ø

MODE

CANCEL

The remote control allows you to control the main functions of your video recorder or DVD.

&

Press the 

MODE

key to select the required mode :

VCR

(video recorder) or 

DVD

.

A green indicator lights up to show the selected mode. It returns automatically (TV mode) after 
20 seconds without action.

é

Then press one of the following keys :

SPDIF

Summary of Contents for 28PW6720D

Page 1: ......

Page 2: ...eller baksidan av TV apparaten SF Lue myös television myyntipakkauksessa tai television takana olevat merkinnät ES Anote las referencias de su televisor que se encuentran en el embalaje o en la parte trasera del aparato PT Anote as referências do seu televisor localizadas na embalagem ou na parte de trás do aparelho GR ËÌÂÈÒÛÙÂ ÙÈ Ô ËÁ Â Ú ÛË ÙË ÙËÏÂfiÚ Û Û Ô Ú ÛÎÔÓÙ È ÛÙË Û ÛÎÂ Û ÛÙÔ Ûˆ Ì ÚÔ ÙË Û...

Page 3: ...1 2 BACK VCR DVD MENU OK A D P age 5 6 4 8 7 9 0 Ê Æ Á ª 3 DIGITAL TV OPTIONS Ó Ÿ Œ Ë MENU SELECT ù SMART SMART Ø MODE CANCEL min 1m 1 3 4 5 6 7 8 1 2 9 ...

Page 4: ... ...

Page 5: ...logue programmes 12 Picture settings 13 Sound adjustments 13 Feature settings 13 Analogue Teletext 14 Digital text 15 16 9 Formats 15 Connecting peripheral equipment 16 To select connected equipment 16 VCR DVD mode selector 17 Tips 18 Safety Information Electric Magnetic and Electromagnetic Fields 18 Centre Frequencies Table in KHz 19 DIGITA L MENUS English The digital menus of this product use th...

Page 6: ...he set must not be exposed to water é Connections Insert the aerial plug into the socket at the rear of the set Insert the mains plug into a wall socket 220 240V 50 Hz Remote control Insert the two R6 type batteries supplied making sure that they are the right way round The batteries supplied with this appliance do not contain mercury or nickel cadmium If you have access to a recycling facility pl...

Page 7: ...se between different languages Dual I Dual II When the sound mode is switched to Mono the indication is displayed in red Surround sound To activate deactivate the surround sound effect In stereo this gives the impression that the speakers are further apart In mono a stereo spatial effect is simulated To receive TV channels your television is equipped with 2 tuners One is for digital channels the o...

Page 8: ...hen displays the current programme The installation is now complete When you select a digital programme an information banner is displayed for a few seconds at the top of the screen You can also use the key of the remote control to display this banner A second press displays more information about the programme when available The banner contains information on the preset number channel name progra...

Page 9: ...t View new TV channels or Listen to new Radio station If new services are availables press to enter into the list and use the îÏ keys to move through the list Press the MENU key to leave the menu View or Listen to new services Setup Installation Manage service lists Close Service lists Service setup Test reception 11 46 Rearrange services View new TV channels Listen to new Radio stations Add new s...

Page 10: ...ect Test reception and press You obtain an indication of the actual programme frequency the network name the signal quality and strength You now have to enter the frequency of the digital channel you want to test YourTv magazine can provide the list of digital channel numbers Use the table on page 18 to get the frequency If the signal quality and strength is poor a message appears at the bottom of...

Page 11: ...he key to enter into the Set pin code protection menu Use the È keys to set to on and press u to exit You can then access the other adjustments Warning the moment you use any kind of access restriction you need to fill in the pin code when you schedule a program for recording Maturity rating select your prefered rating to lock the channel Maturity rating will only block certain programmes if the b...

Page 12: ...ion of new software From the digital mode press the MENU key to display the setup menu é Use the Ï key to select information and press twice The software version is displayed You can activate the menu to automatically accept any software update of your digital TV Normally the product will detect if an update is available while it is in standby mode Next time the television is turned on a banner wi...

Page 13: ...o display the TV guide A list of all the digital programmes in the currently selected favourite list is displayed é Use the Ï key to enter into the Preset service list or press to access Today list Use the îÏ keys to select a programme TheTV guide features are displayed at the bottom of the screen Use the coloured keys red green yellow blue or white to activate them Record red key this feature ena...

Page 14: ...d time enter the end time Audio language select your language and confirm with u Subtitle language make your selection and confirm with u Subtitles for hearing impaired select Yes or No and confirm with u Occurrence select Once Daily or Weekly and confirm with u Press the RED key to store your recording TheTV guide reappears You can press the GREEN key to display the list of recordings you have se...

Page 15: ...Sort menu to renumber them Some transmitters or cable networks broadcast their own sort parameters region language etc Where this is the case make your choice using the îÏ keys and confirm with To exit or interrupt the search press the WMENU key If no picture is found refer to the chapter entitled Tips on p 18 To exit from the menus press Press the WMENU key to display the main menu é With the cur...

Page 16: ...y try adjusting the frequency using the È keys è Store press The programme is stored Repeat steps to è for each programme to be stored ç To quit the menus press If required you can give a name to the analogue programmes and external connectors Press WMENU é With the cursor select the Install menu then Name Select the programme you wish to name using the keys 0 9 or P Note on installation the progr...

Page 17: ...this alters the high frequency sounds Bass this alters the low frequency sounds Balance this balances the sound on the left and right speakers DeltaVolume this is used to compensate any volume discrepancies between the different programs or EXT sockets This setting is available for programs 0 to 40 and the EXT sockets AVL AutomaticVolume Leveller this is used to limit increases in sound especially...

Page 18: ... Direct access to the items Coloured areas are displayed at the bottom of the screen The 4 coloured keys are used to access the items or corresponding pages The coloured areas flash when the item or the page is not yet available Contents This returns you to the contents page usually page 100 Stop sub page acquisition Certain pages contain sub pages which are automatically displayed successively Th...

Page 19: ... with P keys or follow the on screen instructions to return to picture 4 3 Mode The picture is reproduced in 4 3 format and a black band is displayed on either side of the picture With analogue programs only the picture may be progressively enlarged using the îÏ keys Zoom 14 9 The picture is enlarged to 14 9 format a thin black band remains on both sides of the picture With analogue programs the î...

Page 20: ...You will then be able to record scrambled transmissions Video recorder Satellite receiver decoder DVD games etc Carry out the connections featured opposite To optimise picture quality connect the equipment which produces the RGB signals digital decoder games etc to EXT1 and the equipment which produces the S VHS signals S VHS and Hi 8 video recorders certain DVD drives to EXT2 and all other equipm...

Page 21: ...n interface slot Amplifier Common interface standby record pause Ê stop Æ play rewind fast forward bring up a menu select îÏ and set È u confirm select programme enter a number Some programming functions are not available on all models cursors menu OK key etc The remote control is compatible with all the video recorders in our range as well as models which use the RC5 signalling standard 1 2 BACK ...

Page 22: ...control no longer works The TV set does not react to the remote control the indicator on the set no longer flashes when you use the remote control Replace the batteries Standby If the set receives no signal for 10 mins it automatically goes into standby mode In stand by mode your TV consumes less than 5W depending on model In order to be more environmentally friendly please use the on off power sw...

Page 23: ...00 35 586 000 36 594 000 37 602 000 38 610 000 39 618 000 40 626 000 41 634 000 42 642 000 43 650 000 44 658 000 45 666 000 Digital Frequency Nominal Centre Channel Frequency KHz 46 674 000 47 682 000 48 690 000 49 698 000 50 706 000 51 714 000 52 722 000 53 730 000 54 738 000 55 746 000 56 754 000 57 762 000 58 770 000 59 778 000 60 786 000 61 794 000 62 802 000 63 810 000 64 818 000 65 826 000 6...

Page 24: ...m radiators or other sources of heat Leave a space of at least 5 cm all around the TV for ventilation making sure that curtains cupboards etc cannot obstruct the air flow through the ventilation apertures The TV is intended for use in a domestic environment only and should never be operated or stored in excessively hot or humid atmospheres General Points Please take note of the section entitled Ti...

Page 25: ...English ...

Reviews: