background image

4 Use your TV

Switching on your TV and putting it in Standby
mode

Remote Control

TV

To Turn the TV On from Standby or Off to Standby

Press 

B

 on the Side of the Unit or the Remote Control.

Note(s)

Energy Consumption contributes to air and water pollution. When the AC Power Cord
is plugged in, your TV consumes energy with a very low standby Power Consumption.

Adjusting Volume

Remote Control

TV

To decrease or increase Volume

Press 

VOL


J


(-) /


K

(+) on the Side of the Unit or press 

VOL + / –

 on

the Remote Control.

VOL


J

(-) : Volume Down

VOL


K

(+) : Volume Up

To mute or unmute sound

Press 

V

 on the Remote Control to mute the sound.

Press 

V

 again or 

VOL + / –

 to recover the original sound.
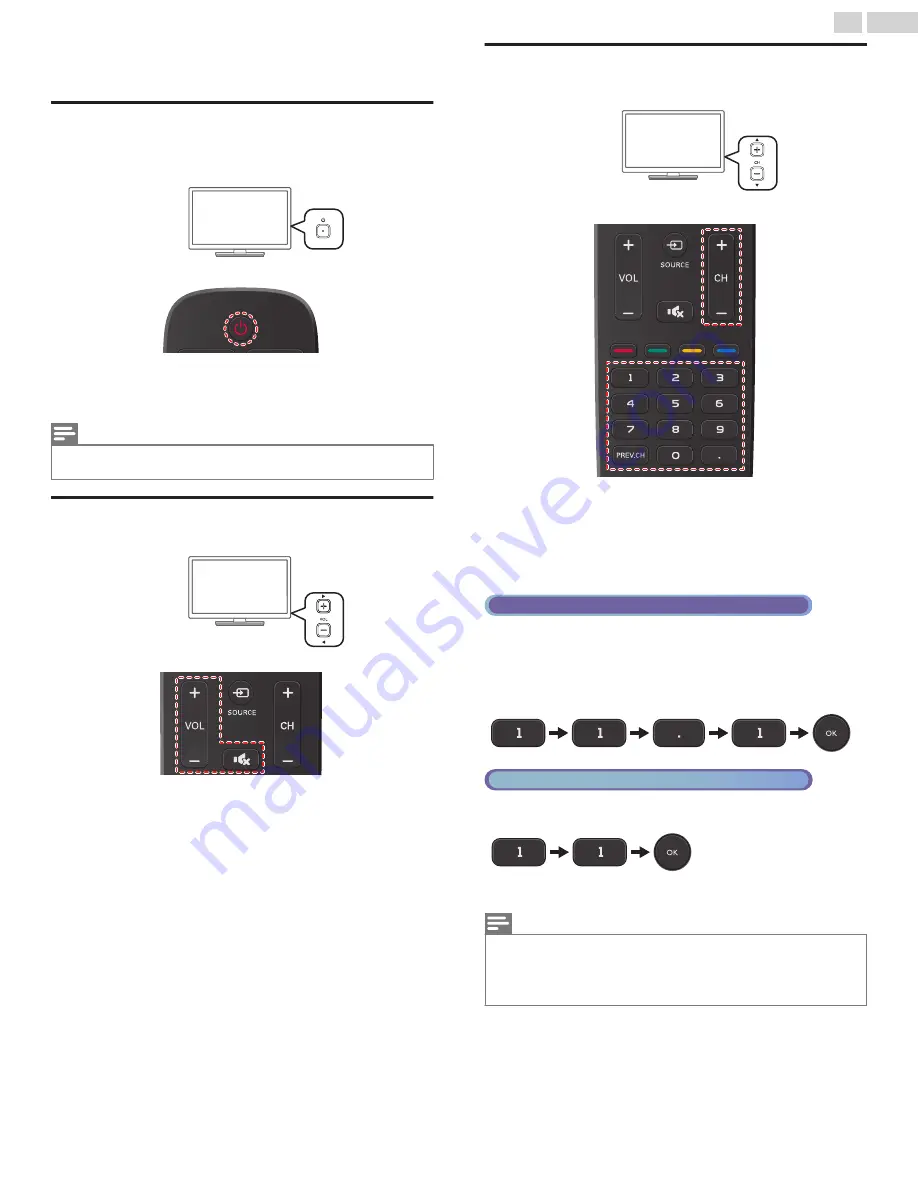
Switching Channels

Remote Control

TV

To select Channels by using CH

I

 / 

H

 or CH + / –

Press 

CH


I

(-) (Down) / 

H

(+) (Up) on the Side of the Unit or press

CH + / –

 on the Remote Control.

To select Channels by using the NUMBER keys

Digital TV  Operation

For Digital channels, press a number followed by a dot “

” and the

corresponding sub channel number.

When selecting Digital channel 11.1
Be sure to press 

 before entering the subchannel number.

Cable / NTSC (Analog) TV Operation

When selecting Cable or Analog channel 11

Press 

PREV.CH

 to return to the previously viewed channel.

Note(s)

To select the non-memorized channels, use 

the NUMBER keys

.

No signal

 will appear on the TV screen after the subchannel broadcast is over.

Audio only program

 message will appear on the TV screen, when you receive only a

sound signal.

18

.

English

Continued on next page.

Summary of Contents for 28PFL4509

Page 1: ...ras 01 800 122 6276 Panamá 800 052 1372 Venezuela 01 800 100 5399 ES Para obtener más información llame al servicio de soporte al cliente de su país Para obtener asistencia póngase en contacto con el CENTRO DE INFORMACION AL CLIENTE México D F y Área Metropolitana 58 87 97 36 Interior de la Republica 01 800 839 19 89 Colombia 01 800 952 0640 Costa Rica 0800 052 1564 Guatemala 1 800 835 0351 El Sal...

Page 2: ...ection 14 Digital Audio Output Connection 14 PC Connection 15 USB Memory Stick 15 Initial Setup 16 4 Use your TV 18 Switching on your TV and putting it in Standby mode 18 Adjusting Volume 18 Switching Channels 18 Watching Channels from an External Device 19 Sleep Timer 19 Switching Audio Mode 19 EasyLink options 20 Changing Picture Format 20 TV Screen information 21 5 Making more use with your TV ...

Page 3: ...hests carts etc may fall over resulting in injury TUNE IN TO SAFETY ALWAYS follow the manufacturer s recommendations for the safe installation of your television ALWAYS read and follow all instructions for proper use of your television NEVER allow children to climb on or play on the television or the furniture on which the television is placed NEVER place the television on furniture that can easil...

Page 4: ...r proper grounding and in particular specifies that the cable ground shall be connected to the grounding system of the building as close to the point of cable entry as practical Example of Antenna Grounding as per NEC National Electric Code ANTENNA LEAD IN WIRE GROUND CLAMP ANTENNA DISCHARGE UNIT NEC SECTION 810 20 ELECTRIC SERVICE EQUIPMENT GROUNDING CONDUCTORS NEC SECTION 810 21 POWER SERVICE GR...

Page 5: ...uctural property of the display within common industry standards and is not a malfunction Warranty No components are user serviceable Do not open or remove covers to the inside of the product Repairs may only be done by Service Centers and official repair shops Failure to do so shall void any warranty stated or implied Any operation expressly prohibited in this manual any adjustments or assembly p...

Page 6: ...etely turn off the Unit you must unplug the AC power cord Disconnect the AC plug to shut the Unit off when trouble is found or not in use The AC plug shall remain readily available AC plug Never use a gas duster on this TV The gas trapped inside of this Unit may cause ignition and explosion CAUTION Danger of explosion if battery is incorrectly replaced Replace only with the same or equivalent type...

Page 7: ...I Output jack use an HDMI DVI Conversion Cable to connect the Unit Component Video Input PC Input Input from a Computer AV Input Audio and Video Input from an External Device USB terminal The Picture JPEG and Video Motion JPEG files stored on a USB Memory Stick can be played back on this Unit Digital Audio Output Digital Audio Supporting Dolby Digital sent to Home Theaters and other Digital Audio ...

Page 8: ...the Unit to have it as a table top Unit Be sure the front and rear of the base match the proper direction For large screen TVs at least 2 people are required for these steps 55PFL4709 50PFL4709 49PFL4709 1 2 4 40PFL4709 1 3 M4 x 0 787 20mm 2 2 1 3 2 M4 x 0 393 10mm 4 8 English Continued on next page ...

Page 9: ...g in injuries as well as damage to the Unit To remove the base from this Unit unscrew the Phillips head screws by the reverse procedure Be careful not to drop the base when you remove it Installing the Remote Control Batteries 1 Slide the battery cover off the back of the Remote Control 2 Insert 2 Supplied Batteries AAA 1 5V Be sure the and ends of the Batteries line up with the markings inside th...

Page 10: ... U OPTIONS Opens EasyLink options menu Note s You must set On in the Master EasyLink L p 31 to operate the above functions h S SOURCE Selects Connected Devices i CH Selects a Channel in the Memorized Channel Ring Low to High or High to Low j COLOR keys Use these Keys according to the directions On screen k 0 9 NUMBER keys Used to enter a Channel Program number DOT Use with 0 9 to select Digital ch...

Page 11: ... for VIDEO Composite Video Input VIDEO jack is a shared jack with Component Video Input Y jack j Analog Audio L R Input jacks Connect Analog Audio Signals from HDMI DVI Analog Audio L R jacks Signal Component Video Analog Audio L R jacks Signal Composite Video Analog Audio L R jacks Signal PC Connection Analog Audio L R jacks Signal with Stereo Mini 3 5mm Plug Audio Cable on PC k Digital Audio Out...

Page 12: ...cables Video cables IN IN Audio L R cables Audio L R cables IN IN Component Y Pb Pr Video cables IN OUT Audio L R cables IN Connecting a Cable Satellite IPTV Box Blu ray Disc DVD Recorder via Composite Connectors and Analog Audio Do Not place your Recorder too close to the Screen because some Recorders can be susceptible to Signals from the TV RF cable RF cable OUT OUT OUT Audio L R Video cables I...

Page 13: ...HDMI Highest quality Supports high definition Digital signals and gives highest picture and sound quality Video and Audio signals are combined in one cable You must use HDMI for full high definition Video and to enable EasyLink HDMI CEC Note s Philips HDMI supports HDCP High bandwidth Digital Contents Protection HDCP is a form of Digital Rights Management that protects high definition content in B...

Page 14: ...ection Component Analog Video Connection offers Better Picture quality for Video Devices connected to the Unit If you connect to the Unit s Component Video Y Pb Pr Input jacks connect Analog Audio Cables to the Analog Audio L R Input jacks IN IN OUT OUT IN Blu ray Disc DVD Recorder or Set top Box Component Y Pb Pr Component Y Pb Pr Video cables Video cables Audio L R cables Audio L R cables Compon...

Page 15: ...h a ferrite core to the AC Power Cord of your PC Unplug the AC Power Cord and use the built in battery of your Portable Laptop PC Use an HDMI cable with the HDMI logo a certified HDMI cable High Speed HDMI cable is recommended for the Better compatibility The Unit accepts 480i 480p 720p 1080i and 1080p Video signals HDMI DVI Connection requires separate Audio Connections as well and the Audio sign...

Page 16: ...igital channels 0 complete Auto programming may take more than 20 minutes to Please wait while the system is scanning for channels Initial setup 4 Use H I to select the desired Location setting then press OK OK Select Home Retail Initial setup In the Retail Store mode all settings are fixed Location Home is recommended for normal home use Select Home the Unit is set to maximize the energy efficien...

Page 17: ...rom the Antenna terminal and no operation for several seconds after you Turn On the Unit Helpful hints appears Follow the instructions listed on the TV screen Skip OK Select Later Retry Initial setup the appropriate source input press SOURCE key on the remote control to select the input which you have connected to the box and If you are using a cable or satellite box please confirm installation pr...

Page 18: ...over the original sound Switching Channels Remote Control TV To select Channels by using CHI H or CH Press CH I Down H Up on the Side of the Unit or press CH on the Remote Control To select Channels by using the NUMBER keys DigitalTV Operation For Digital channels press a number followed by a dot and the corresponding sub channel number When selecting Digital channel 11 1 Be sure to press before e...

Page 19: ...s SLEEP Repeatedly to change the amount of time increases the time by 30 minutes up to 120 minutes Press SLEEP Once to call up the display for checking the remaining time To cancel Sleep Timer press SLEEP Repeatedly until Off is displayed 120min Sleep timer Switching Audio Mode DigitalTV Operation 1 Press SAP to display the currently selected Language and the number of available Languages 2 Press ...

Page 20: ...an HDMI Device is selected This picture format similarly displays like Normal Full HDMI Device only Wide Zoom Movie expand 4 3 Normal Normal Original size 4 3 Shortened horizontally Sidebars appear on both edges of the screen Movie expand Vertically stretched to fill the screen This only crops out the top of the picture Zoom Maximum size without changing its horizontal and vertical ratio Wide Hori...

Page 21: ...umber Switching channels L p 18 d Audio Language DTV Audio mode Analog TV Switching Audio Mode L p 19 e Program s image Aspect Ratio Changing Picture Format L p 20 f CC Not available if Closed Caption is set to Off Caption settings L p 26 g Child Lock rating Child and Ratings Lock L p 28 2 Press T INFO to hide the information Note s When the program guide consists of more than 4 lines use H I to s...

Page 22: ...e H I J K to determine the setting Adjusting the Picture Mode or customize the Picture quality as your preference Adjusting the Sound Mode Equalizer and some other Sound functions Scanning the Channels available in your area and see what the Antenna Signal levels are Adjusting the Closed Caption Parental Guide and some other useful functions You can choose English Spanish or French as your On scre...

Page 23: ...t Blocked You can set a Particular Picture Quality using Advanced settings Normal Gamma Dynamic contrast Black stretch Noise reduction Color alignment USB Language Features Setup Sound Picture On Gamma2 On On On Ambient light sensor Auto Film mode 120 PMR Off Color alignment Color temperature mode to set the picture color temperature to Personal Cool Normal or Warm When you adjust the following se...

Page 24: ...n keeps a constant loudness level between the TV commercials and the Programs Auto volume leveling Off to Remove the Auto volume leveling On to Reduce Volume Differences between the TV Commercials and the Programs You can select the Audio Output from the Unit s speakers or not If your amplifier is HDMI link function compatible and connected by an HDMI cable to this Unit some sound operations such ...

Page 25: ...t while the system is scanning for Autoprogram When the Scanning and Memorizing of Available Channels is Completed the Lowest Memorized Channel will be Displayed Note s After setting Autoprogram using CH skips unavailable channels Automatically If you are not receiving a signal from your Cable service contact the Cable provider If you press B or Q during Autoprogram the Setup of TV channels will b...

Page 26: ...re Note s If the channel is set to an Analog channel or External Input you cannot confirm the Antenna condition Features 1 Display Setup using Home Menu and use H I to select Features then press OK Home Software upgrade E sticker Location PC settings Child lock Caption settings USB Language Features Setup Sound Picture EasyLink 2 Adjust the following items Caption settings Closed Captions displays...

Page 27: ...n HDMI Connection Digital caption service that you can switch differs depending on the broadcast description Caption style will not have any effect if the User setting is set to Off The captions do not always use correct spelling and grammar Not all TV Programs and product commercials include Closed Caption information or All types of the Closed Captioning Refer to your area TV Program listings fo...

Page 28: ...E All ratings turn to E Automatically To Block any inappropriate programs set your limits in US movie ratings lock US TV ratings lock and Region ratings lock The Child Lock setting will be retained after a Power failure or after the Power is removed for longer than 10 seconds except the PIN code reverts to 0000 Child and Ratings Lock L p 28 Region ratings lock will be available when the Unit recei...

Page 29: ... All Children TV Y7 Appropriate for All Children 7 and Older G TV G General Audience PG TV PG Parental Guidance Suggested PG 13 Unsuitable for children under 13 TV 14 Unsuitable for children under 14 R Restricted under 17 Requires Accompanying Parent or Adult Guardian NC 17 No One under 17 Admitted X TV MA Mature Audience Only To set the Sub ratings As for TV Y7 TV PG TV 14 or TV MA you can furthe...

Page 30: ...IN code Enter PIN code again in Confirm PIN entry field Back PIN Code Confirm PIN Enter PIN USB Language Features Setup Sound Picture Note s Make sure to enter a PIN code and the confirm PIN code must be exactly the same If they are different the space is cleared to reenter the New PIN code When a Power failure occurs the PIN code will be erased and Unit returns to the default PIN code 0000 If you...

Page 31: ...cted EasyLink device Turns Off Automatically when the Unit goes into Standby mode This Unit will Turn On when the Power On Signal is sent from your connected EasyLink device Auto TV on Off This Unit stays in Standby mode even if you Turn On your connected EasyLink device On This Unit Turns On Automatically when you Turn On your connected EasyLink device You can operate some functions such as Disc ...

Page 32: ...Not Be Memorized after the Unit goes into Standby Mode E sticker When you set Location to Retail store E sticker Electronic Sticker is displayed E sticker can be Turned Off using procedure below 1 Use H I to select E sticker then press OK 2 Use H I to select Off then press OK Off You can Turn Off E sticker Top E sticker is displayed on top of the TV screen Bottom E sticker is displayed on bottom o...

Page 33: ...orted Only a Motion JPEG file with an avi extension is supported An extension mov is Not Supported During Motion JPEG Playback Pause Forward and Reverse Do Not Work on this Unit Picture JPEG 1 Use H I to select the desired file then press OK 1 2 3 4 Press OK key to play pause Thumbnails Image5 jpg Image4 jpg Image3 jpg Image2 jpg Image1 jpg Image1 jpg Picture Picture 1024 768 2009 04 02 17 42 06 I...

Page 34: ...related to your TV and Download the Latest Software Upgrade file to your PC 1 On your PC open a web browser and go to www philips com support 2 Enter the model number in the Type the Model Number field 3 Click the desired Software to be Downloaded Decompress the ZIP file 4 Copy the Upgrade file to the Empty root directory on the clean formatted USB Memory Stick Starting the Software Upgrade Warnin...

Page 35: ...t requires some kind of Antenna Input An indoor Antenna Digital or VHF UHF an External Antenna Digital or VHF UHF or an RF Coaxial Cable from your wall Cable Satellite Set top Box needs to be plugged into the Unit How come there is no image from the Connected External Devices Check if the correct Input mode is selected by pressing S SOURCE or using CH Refer to Watching Channels from an External De...

Page 36: ... jack of your device like Blu ray DVD Recorder View other TV channels The problem might be limited to the Broadcasting Station or Weak Signal Strength Unplug the AC Power Cord and wait for about 1 minute then Plug the AC Power Cord and turn On the Unit again Check whether the Connection of the Antenna or Cable Satellite Set top Box is connected correctly Make sure that the selected Input mode is c...

Page 37: ... Interface that supports All uncompressed Digital Audio Video formats including Set top Box Blu ray DVD Recorder or Digital television over a single cable HDTV High Definition TV Ultimate Digital format that produces high resolution and high picture quality PIN code A stored 4 digit number that allows access to Parental control features SAP Secondary Audio Program Second Audio channel delivered se...

Page 38: ... Motion JPEG 320 x 240 30 fps with file extension avi will Playback Channel Channel Coverage Terrestrial DTV ATSC VHF 2 13 UHF 14 69 Each Channel has e g 2 1 2 9 3 1 3 9 etc Terrestrial Analog NTSC VHF 2 13 UHF 14 69 CATV Analog NTSC 2 13 A W W 1 W 94 Analog W 1 W 84 A 5 A 1 5A Tuning System Channel Frequency Synthesized Tuning System Channel Access Direct Access Number Keyboard Programmable Scan ...

Page 39: ... C V Av La Palma No 6 Col San Fernando La Herradura Huixquilucan Edo de México C P 52787 Philips and Philips Shield are used under license of Koninklijke Philips N V A4GRAMA A4GUAMA A4G1AMA A4GPAMA A4G2EMA A4GFCMA A4GSAMA ...

Reviews: