background image

4

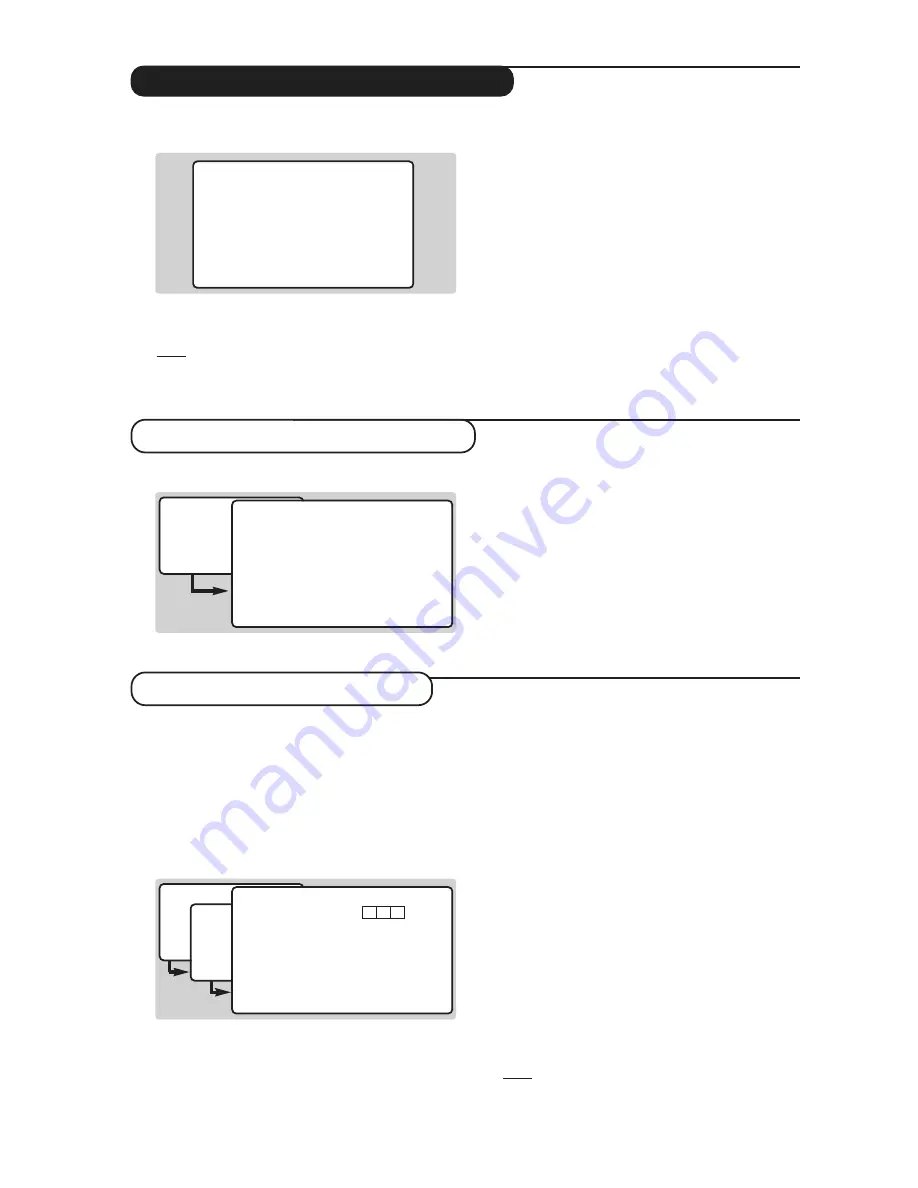
The first time the TV set is switched on, the

congratulation

message appears on the screen:

&

Press the 

u

key on the remote control to

activate.The main menu is displayed.

Note: not all sub menus will be accessible until the
installation is complete.

é

Press the 

5

key to get started.The 

store

channel

menu is displayed.All the digital and

analogue programmes are search for and
stored automatically.The operation takes
appproximatively 20 minutes.When the search
is complete, the 

digital channel list

menu is

automatically displayed.

You can check what digital channels have been
found by using the 

îÏ

keys.

Press the 

EXIT

key.The television then displays

the current programme being broadcast on
channel 1.The installation is now complete.

&

From digital mode, press the

MENU

key.

é

Press 

6

to select 

common interface menu

.

The name of the module which is connected is
indicated.

Press the 

EXIT

key to leave the menu.

&

From digital mode, press the

MENU

key.

é

Press 

7

to select 

technical informations

.

Press 

1

,

2

or 

3

to select 

signal strength

,

manufacturer date

or 

software download

.

Press the 

EXIT

key to leave the menu.

Signal strength

This menu allows you to check the strengh of
the signal you are receiving through your areal.

The number of diamonds indicates the signal
strength, the colour of the diamond indicates the
signal quality.

Manufacturer data

This screen shows informations about the digital
hardware and software your television contains.

Software download

This option can update the software used in
your digital TV.

Normally the product will detect

if an update is available while it is in standby
mode. Next time the television is turned on a
banner will appear at the bottom of the screen
indicating new software is available. Selecting 

u

activates the software download.The software
download menu will give a description of the
software together with the date and time of the
download.

This may update certain menus,

functions or add new features, but the general
way in which the TV operate will not change.

Once accepted the download will take place at
the designated time and date.

Note:The TV must be put into standby when the
download is due in order for it to take place.

Switch on for the first time

Common interface menu

Technical information

(only available in digital mode)

(only available in digital mode)

congratulations for selecting this Philips product

click ok to start enjoying your digital television

î Ï

È ¬

u

select

• main menu

1  setting the timer
2  choosing favourite channels
3  parental lock
4  digital TV and VCR settings
5  getting started

6  common interface menu

7  technical information

î Ï

u

select

• common interface menu

no module connected

·

back

• main menu

1  setting the timer
2  choosing favourite channels
3  parental lock
4  digital TV and VCR settings
5  getting started
6  common interface menu

7  technical information

î Ï

u

select

• technical information
1  signal strenght

2  manufacturer data
3  software download

î Ï

u

select

·

back

• signal strength

uhf channel number
signal strength

good

satisfactory

poor

·

back

21

38

69

Summary of Contents for 28DW6557

Page 1: ......

Page 2: ......

Page 3: ...favourite channels 6 Parental lock 7 Viewing preferences 7 Choosing a language and country 8 Automatic tuning of analogue programmes 8 Sorting analogue programmes 8 Manual tuning of analogue programmes 9 Naming analogue programmes 9 EasyLink function 9 Adjusting the picture 10 Adjusting the sound 10 Rotating the picture 10 Timer function 11 Locking the set 11 Analogue Teletext 12 Digital Teletext ...

Page 4: ...ot be exposed to water é Connections Insert the aerial plug into the socket at the rear of the set Insert the mains plug into a wall socket 220 240V 50 Hz Optional Surround loudspeakers To connect the optional surround loudspeakers see the detailed informations on page 18 Remote control Insert the two R6 type batteries supplied making sure that they are the right way round The batteries supplied w...

Page 5: ...ress P or 0 9 Programme list analogue mode or Programme guide digital mode Digital Menu To display or exit from the digital menus whenTV is in digital mode Analogue or Digital mode To switch the television into analogue or digital mode Cursor These 4 keys are used to move within the menus or to have direct access to the 16 9 formats p 13 Surround sound To activate deactivate theVirtual Dolby Surro...

Page 6: ...ur television contains Software download This option can update the software used in your digitalTV Normally the product will detect if an update is available while it is in standby mode Next time the television is turned on a banner will appear at the bottom of the screen indicating new software is available Selecting u activates the software download The software download menu will give a descri...

Page 7: ...umber of channels found is displayed When the search is complete the channel list menu appears You can check what channels have been found by using the îÏ keys Press the EXIT key to switch the menu off This menu allows you to store all the available digital channels From digital mode press the MENU key é Press 5 to select the getting started menu Press 4 to select the store channels menu Press u t...

Page 8: ...with the option of switching channels or continuing to watch the current channel ç You can also watch analogue channels while recording digital channels Press the v key to switch the TV to analogue mode If a key is pressed when you are in digital mode and a digital recording is in progress REC displayed on screen a message will be displayed asking if you wish to cancel the recording If you reply y...

Page 9: ...ck all This menu enables you to erase all the parental settings locked channels PIN number Press the MENU key then 3 followed by 3 é Enter the Mastercode 0711 to unlock all yours settings Press the EXIT key to leave the menu This menu enables you to adjust the digital settings From digital mode press the MENU key é Press 4 to select digital TV and VCR settings Press 1 or 2 to select digital TV set...

Page 10: ...number them Some transmitters or cable networks broadcast their own sort parameters region language etc Where this is the case make your choice using the îÏ keys and confirm with To exit or interrupt the search press the H key If no picture is found refer to the chapter entitled Tips on p 16 See also EasyLink function page 9 To exit from the menus press Press the WMENU key to display the main menu...

Page 11: ...ou wish to name using the keys 0 9 or P Note on installation the programmes are named automatically when the correct information is transmitted by the broadcaster Use the È keys to move within the name display area 5 characters and the îÏ keys to choose the characters When the name has been entered press W MENU The name is stored See also EasyLink function below Repeat steps to for each programme ...

Page 12: ... adjust Note the menu is a scroll down menu Keep the key Ï held down to access the settings hidden at the bottom of the screen Once the adjustments have been made select STORE and press to store them To exit from the menus press Description of the settings BRIGHTNESS alters the brightness of the image COLOUR alters the colour intensity CONTRAST alters the variation between light and dark tones SHA...

Page 13: ... 0711 then confirm by re entering 0711 The menu appears Press to go into the menu Use keys îÏ to select the required programme and confirm with The symbol is displayed alongside the programmes or sockets that have been locked è Press to exit To watch a programme which has been locked you will now need to enter the confidential code otherwise the screen will remain blank The INSTALL menu access is ...

Page 14: ...e item or the page is not yet available Contents This returns you to the contents page usually page 100 Direct selection of sub pages Certain pages contain sub pages For example if page 120 contains sub pages 1 3 2 3 and 3 3 the page number is displayed in green and preceded by the symbols Æ Í or Í Æ Use the keys È to directly access the sub pages of your choice Text overlaying double page text To...

Page 15: ...ys When you have finished watching teletext select a different channel with P keys or follow the on screen instructions to return to picture 4 3 Mode The picture is reproduced in 4 3 format and a black band is displayed on either side of the picture With analogue programs only the picture may be progressively enlarged using the îÏ keys ZOOM 14 9 The picture is enlarged to 14 9 format a thin black ...

Page 16: ...Video recorder Satellite receiver decoder DVD games etc Carry out the connections featured opposite To optimise picture quality connect the equipment which produces the RGB signals digital decoder games etc to EXT1 and the equipment which produces the S VHS signals S VHS and Hi 8 video recorders certain DVD drives to EXT2 and all other equipment to either EXT1 or EXT2 Carry out the connections fea...

Page 17: ...er a number Some programming functions are not available on all models cursors menu OK key etc For video recorders equipped with the Easylink function when the set is on standby pressing the Æ or WMENU key once switches it on automatically The remote control is compatible with all the video recorders in our range as well as models which use the RC5 signalling standard 1 2 EXIT MODE SMART SMART PIC...

Page 18: ...o the remote control the indicator on the set no longer flashes when you use the remote control Replace the batteries Standby When you switch theTV set on it remains in standby mode and the indication LOCKED is displayed when you use the keys on theTV set The CHILD LOCK function is switched on p 13 If the set receives no signal for 15 mins it automatically goes into standby mode To save power your...

Page 19: ...fall directly on the screen and at some distance away from radiators or other sources of heat Leave a space of at least 5 cm all around the TV for ventilation making sure that curtains cupboards etc cannot obstruct the air flow through the ventilation apertures The TV is intended for use in a domestic environment only and should never be operated or stored in excessively hot or humid atmospheres G...

Page 20: ...12 NC COVER 3111 255 6349 3 ß ...

Reviews: