


3
B
ATTERY
I
NSTALLATION
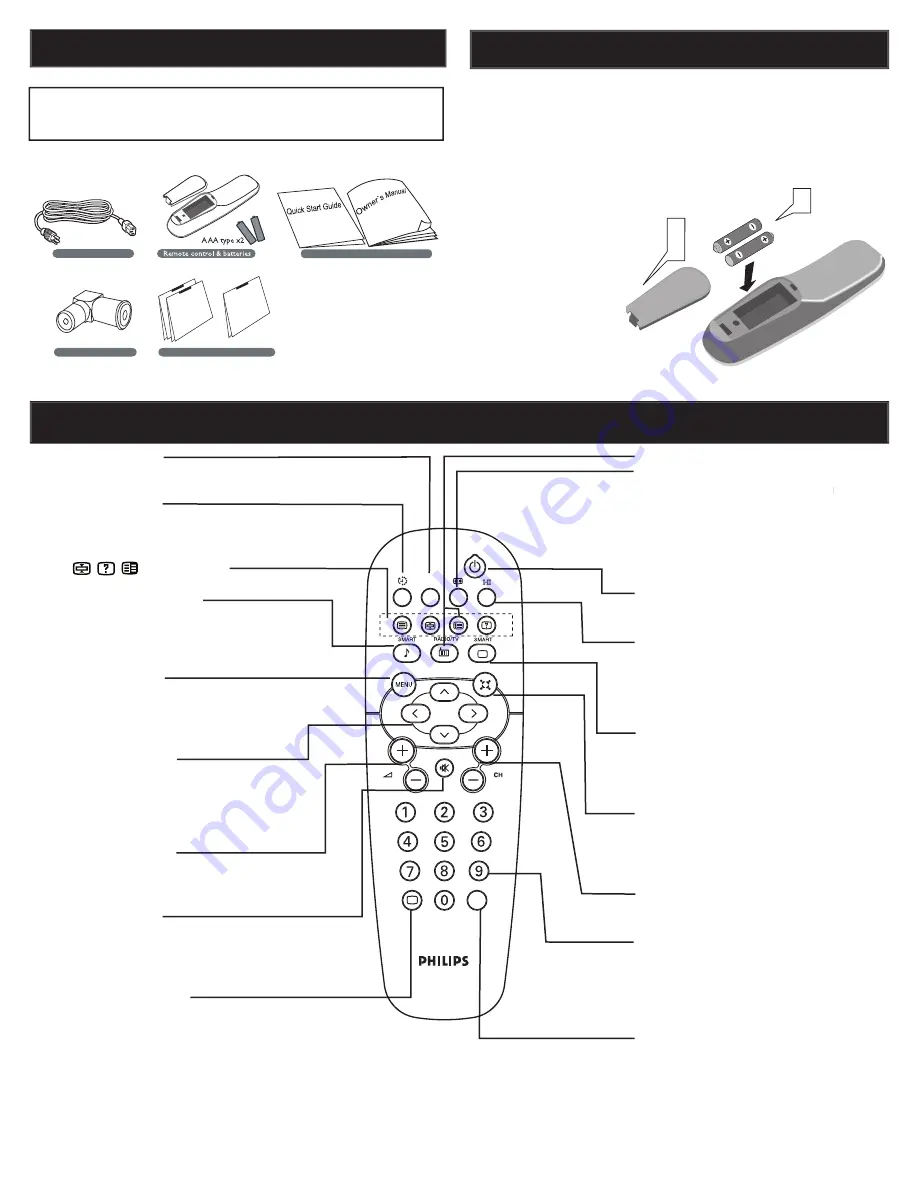
1
2
3
R
EMOTE
C
ONTROL
O
PERATION
A
CCESSORIES
When you unpack this unit, make sure it includes the
following:
Owner`s Manual & Quick Start Guide
Tuner L-Adapter
Warranty Card
Power cable
Warranty Card
Warranty Card
Guarantee Card
(/79)
(/98)
Owner`s Manual & Quick Start Guide
Tuner L-Adapter
Warranty Card
Power cable
Warranty Card
Warranty Card
Guarantee Card
(/79)
(/98)
Remove the battery compartment lid on
the bottom of the remote control.
Place two AA batteries in the remote.
Be sure the (+) and (-) ends of the
batteries line up as marked inside the
battery compartment.
Reattach the battery
compartment lid.
3
1
2
A/CH
AV
i
+
A/CH button
Press to go to previously selected channel.
Sleep button
Press to set the LCD TV to turn itself off
within a certain time.
Teletext keys
Smart Sound button
Press repeatedly to select among the
4 settings; Personal, Voice, Music, or
Theatre.
Menu button
Press to activate onscreen menu, back to
previous level inside the onscreen menu,
or press to exit the onscreen menu.
Cursor Buttons
(Left, Right, Up, Down)-
Press these buttons to highlight, select,
and adjust items on the TV’s on screen
menu.
Volume button
Press to increase or decrease the sound
level.
Mute button
Press to eliminate or restore the LCD TV
sound. Mute will appear on the screen
when the sound is muted.
Information button
Press to see the current channel number
on the TV screen.
Unused key
Picture Format button
Press the FORMAT button repeatedly to
Press the FORMAT button repeatedly
Press the FORMAT button repeatedly
toggle among the six screen format sizes;
WIDESCREEN, 4:3, ZOOM 14:9,
ZOOM 16:9, SUBTITLE ZOOM or
SUPERWIDE.
Power button
Press to turn the LCD TV on or off.
I-II button / Sound mode
Press repeatedly to select Mono,
Stereo, Dual I, Dual II, Nicam Mono,
Nicam Stereo, Nicam Dual I, Nicam Dual
II.
Smart Picture button
Press repeatedly to select either
Personal, Rich, Natural, Soft, or
Multimedia picture setting.
Virtual Surround button
Adds greater depth and dimension to TV
sound.
Select from Virtual Surround or OFF.
Channel button
Press to adjust the channel up or down.
Number buttons
Press the number buttons for direct
access to the TV channels. For a 2 digit
channel, enter the 2nd digit after enter
1st digit.
AV button
Press to select the video input source:
PC, DVI, TV, AV1, AV2, AV3, S-Video1,
S-Video2, Component, HD.


