Philips 26TA1000/93 Quick Use And Hookup Manual Download Page 4

4

A

NTENNA

 TV

A combination antenna receives normal broadcast channels (VHF 2–13 and UHF 14–69). Your connection is easy because there is only 
one 75 Ω (ohm) antenna jack on the side of your TV, and that’s where the antenna goes.

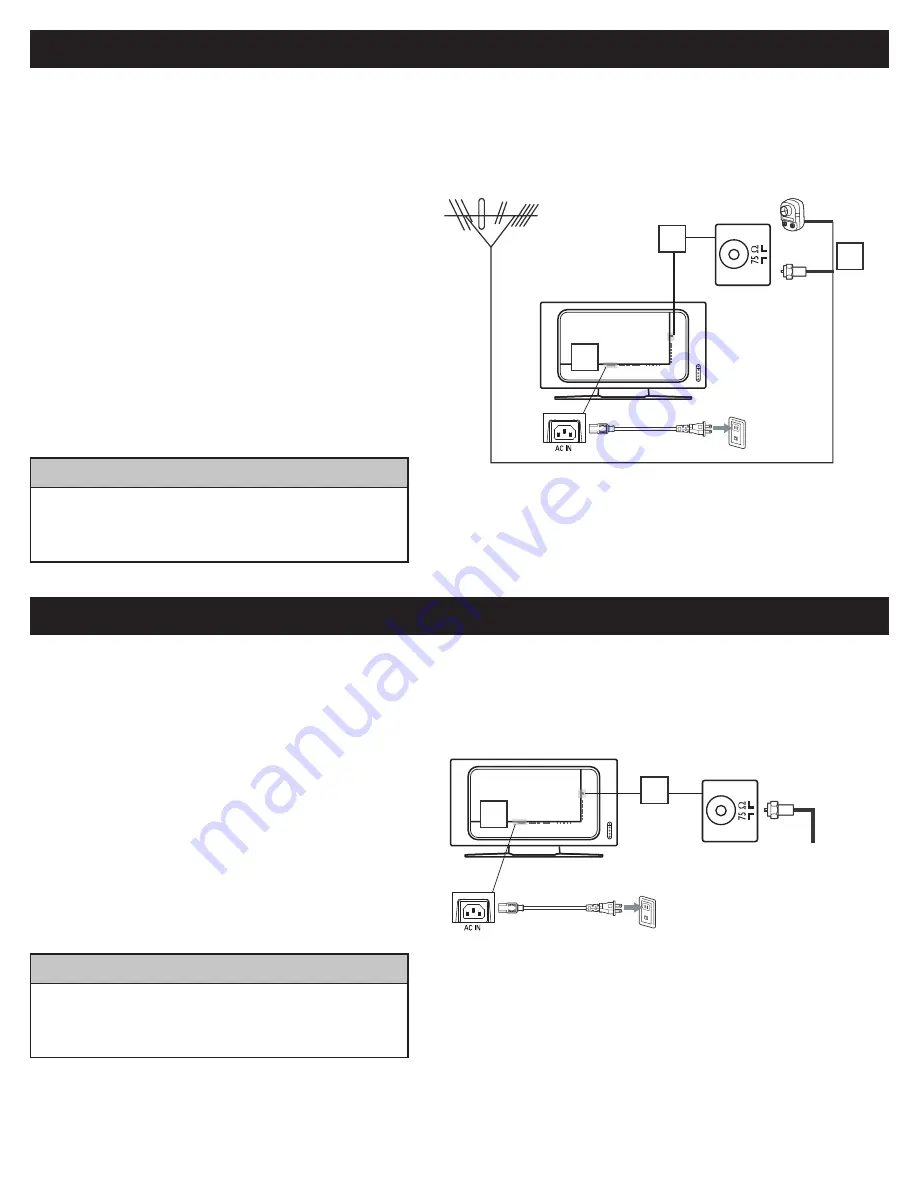
Outdoor or Indoor Antenna

(Combination VHF/UHF)

Twin-lead wire
to 300-75

adpter

or

Antenna

with 75

cable

1

2

Wall outlet

3

B

ASIC

  C

ABLE

 TV C

ONNECTION

Rear Jack panel of Television

The Cable TV singal

from Cable Company

75

coaxial cable

1

Wall outlet

2

If your antenna has a round cable (75 ohm) on the end, then 
you’re ready to connect it to the LCD TV. If your antenna 
has fl at, twin-lead wire (300 ohm), you fi rst need to attach 

the antenna wires to the screws on a 300- to 75-ohm 
adapter(not supplied). 

Connect the antenna (or adapter) to one end of the 
supplied L-Adapter as shown, and connect the other end of 

the L-Adapter to the TV jack on the side of the LCD TV.

Plug the power cable into AC inlet on LCD TV set. Plug the 

power cable into an outlet and switch TV set on.

Run the AUTO PROGRAM function to set up the TV for the 
broadcast or cable channels available in your area. If you do 
not run the auto program function to set up the channels , 
your television may not operate properly. 

1

2

3
4


•  Remember, an antenna or cable TV signal must fi rst be connected to  
  your LCD TV.

•  Please make sure that you have selected the TV mode with AV key  
  on your remote control, before installing TV channels.

H

ELPFUL

 H

INT

Your Cable TV input into your home may be a single (75 ohm) cable or use a cable box decoder. In either case the connection is very 
simple. Follow the steps below to connect your cable signal to your new television.

Direct cable connections:

Connect the Cable TV signal to one end of the supplied 
L-Adapter as shown, and connect the other end of the 
adapter to the TV jack on the LCD TV.

Plug the power cable into AC inlet on LCD TV set. Plug the 

power cable into an outlet and switch TV set on.

Run the AUTO PROGRAM function to set up the TV for the 
broadcast or cable channels available in your area. If you do 
not run the auto program function to set up the channels , 

your television may not operate properly. 

1
2
3


•  Remember, an antenna or cable TV signal must fi rst be connected to  
  your LCD TV.
•  Please make sure that you have selected the TV mode with AV key  

  on your remote control, before installing TV channels.

H

ELPFUL

 H

INT

Summary of Contents for 26TA1000/93

Page 1: ...IO VIDEO OUTPUTS 6 VCR DVD PLAYER OR OTHER DEVICES WITH RCA CONNECTORS 7 DVD PLAYER OR OTHER VIDEO DEVICES WITH COMPONENT VIDEO CONNECTORS 7 DIGITAL TV RECEIVER OR A DIGITAL SATELLITE RECEIVER WITH HD HIGH DEFINITION OUTPUT 8 PC MONITOR CONNECTIONS 8 DIGITAL SATELLITE RECEIVER WITH DVI CONNECTOR 9 AV OUTPUT 10 INSTALLING LCDTV ON THE WALL English Arabic 中文 Before you can install your LCD TV on the...

Page 2: ...just sound level CHANNEL To select programs MENU To access or close onscreen menu Power button LED light and infrared sensor To switch the TV on or off Aim remote control at infrared sensors to activate TV controls Rear connectors Remove the cable cover to access the connectors at the rear of the LCD TV Bottom connectors Located at the bottom of the set Please follow these steps to install TV chan...

Page 3: ...t select and adjust items on the TV s on screen menu Volume button Press to increase or decrease the sound level Mute button Press to eliminate or restore the LCD TV sound Mute will appear on the screen when the sound is muted Information button Press to see the current channel number on the TV screen Unused key Picture Format button Press the FORMAT button repeatedly to toggle among the six scree...

Page 4: ...els available in your area If you do not run the auto program function to set up the channels your television may not operate properly 1 2 3 4 Remember an antenna or cable TV signal must first be connected to your LCD TV Please make sure that you have selected the TV mode with AV key on your remote control before installing TV channels HELPFUL HINT Your Cable TV input into your home may be a single...

Page 5: ...nscreen menu Press the CURSOR DOWN button to highlight the INSTALL menu then press CURSOR RIGHT to enter Select the MANUAL STORE then press the CURSOR RIGHT button to activate auto search channel frequence or press number button to show your desired channel frequence After the channel frequence confirmed select PROGRAM NO by pressing CURSOR DOWN Press the number button or CURSOR RIGHT LEFT to give ...

Page 6: ...rly Please make sure that you have selected the TV mode with AV key on your remote control before installing TV channels HELPFUL HINT This connection will supply stereo sound to the LCD TV Connect the Cable TV signal to the IN jack or RF IN or CABLE IN on the Cable Box Using an RCA type video cable not supplied connect one end of the video cable to the Video Out jack of the Cable Box Connect the o...

Page 7: ...e S Video cable to connect the VCR s S Video Out jacks to the TV s S Video In jacks 2 When you watch programs using VCR it s recommended to select SOFT Mode via Auto picture 3 You can also use the Video and Audio jacks in AV IN 2 and AV IN 3 located on the rear of the TV to connect your VCR or other Video Devices 4 If your DVD Player is equipped with Component Y Pb Pr Output Jacks please refer to ...

Page 8: ... the power cable into AC inlet on LCD TV set Plug the power cable into an outlet and switch TV set on Use AV button on the remote control to select HD to watch DVD Note The Y Pb Pr jacks do not provide audio so audio cables must be connected to provide sound Computer 1 2 Wall outlet 3 A CH AV i 4 PC MONITOR CONNECTIONS This LCD TV can be used as a PC monitor Your computer will have to equipped wit...

Page 9: ...ny connections DVI is a specific digital input allowing encrypted transmission of uncompressed HD content DVI includes HDCP High Bandwidth Digital Content Protection which is supported by Hollywood satellite providers and most of the consumer electronics industry DVI is gaining monumentum and quickly becoming an industry standard for the consumer to view high definition material while keeping conten...

Page 10: ... to the AUDIO IN jack on the VCR Turn the VCR on insert a blank VHS tape and it s ready to record what s being viewed on the TV screen Note The Program recording is only possible when the input signal is TV AV1 AV2 AV3 T he AV Audio Video out jacks are great for recording with a VCR or used to connect an external audio system for better audio 1 2 For VCR Connection Recorder 3 2 1 3 VCR Disconnect ...

Reviews: