background image

23

4

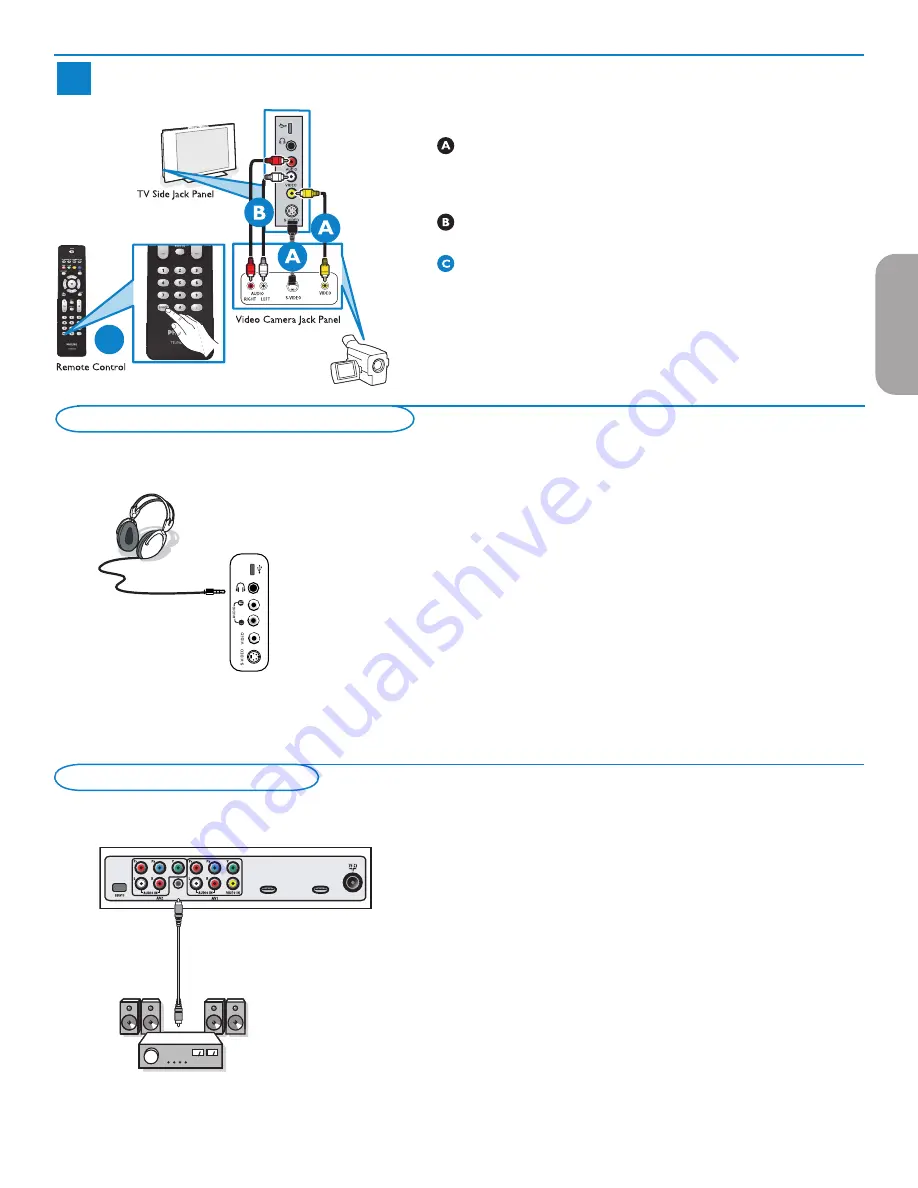
Video Camera/Games Console to TV

C


USB 

Source Button

Using Composite Audio/Video Input

 Connect the video cable (yellow) from the video output on camera (or 

other device) to the video input (yellow) located on the side of TV.


OR


Connect S-video cable to S-video input on side of TV and to the output.


 Connect audio cables (red/white) from audio outputs on device to audio 

inputs (red/white) on the side of the TV.


Tip: For mono devices, connect only white audio cable from device's audio  

output to white audio input on the side of TV.


Turn on the TV and the device. Press the 

SOURCE

 button on the 

remote control until SIDE appears on TV screen.


Press PLAY on the device to verify connection.


Note: Interference will occur when S-video and Composite audio/video are 

connected.

Headphone

&

 Insert the plug into the headphone socket 

L

 as shown.

é

 Press the 

MUTE

 button on the remote control to switch off the internal 

loudspeakers of the TV.


The headphone impedance must be between 8 and 4000 Ohm. The 

headphone socket has a 3.5 mm jack. 


In the Sound menu select 

Headphone volume

 to adjust the headphone 

volume.

Side connections - USB/Headphone

Viewing content from a USB device

Inserting a USB device

Note: USB devices are not supplied with this TV.

Insert a USB device in the 

USB

 connector at the side of the TV.

When a USB device is inserted, the Multimedia browser menu is displayed 

automatically, see further.

Removing the USB device

First switch off the menu. To do so, navigate to the Multimedia browser 

menu and press the 

MENU

 button to exit the menu.

é 

Remove the USB device.

entry 2005 side+usb.eps


USB 

The TV can output Digital audio via the 

AUDIO OUT (DIGITAL)


connector to an external amplifier or receiver.


If your amplifier or receiver has a matching connector for Digital Audio In, 

you can connect it with a single cable to the TV’s 

AUDIO OUT (DIGITAL)

.


See Connect Accessory Devices, p. 22.

Connect a Digital MultiChannel Surround receiver to the 

AUDIO OUT 

(DIGITAL)

 connector at the bottom of the TV.

Digital Surround receiver

file : conn us entry05 dig su

rr.eps

AUDIO OUT

(DIGITAL)


AUDIO OUT

 (DIGITAL)

CABLE / ANTENNA

Back of TV

HDMI 1

HDMI 2

English

Française

Español

Summary of Contents for 26HF5335D

Page 1: ...Rapide Incluse Guía de Uso Rápido Incluida Français English Español Guía del usuario Manuel de l utilisateur Philips vous remercie de votre confiance Besoin d une aide rapide Les Guide d utilisation rapide et Manuel de l utilisateur regorgent d astuces destinées à simplifier l utilisation de votre produit Philips Toutefois si vous ne parvenez pas à résoudre votre problème vous pouvez accéder à not...

Page 2: ...uído 32PFL5322D OPTION 26PFL5302D 32PFL5332D 26PFL5322D 32PFL5322D 26PFL5302D 32PFL5332D 26PFL5322D 37PFL5332D 42PFL5332D OPTION 50PFP5332D 50PFP5342D 42PFP5332D 42PFP5342D 37PFL5332D 42PFL5332D 50PFP5332D 50PFP5342D 42PFP5332D 42PFP5342D M6 18mm x 4 M5 25mm x 2 x 2 M6 18mm x 4 M5 25mm x 2 ...

Page 3: ...You must connect the Right Red and Left White audio connectors of AV1 of the TV to the audio output connectors of the device Better Component Video input Provides superior picture quality by separating the green blue and red luminance signals Typically used with red white audio cables Good S Video Supplies a better picture than RF and Composite connections Used with red white audio cables Basic Co...

Page 4: ...Para detalles consulte la pag 21 OR OU O 1b AE Set Top Box to TV FR Boîtier de décodage vers téléviseur ES De la caja superior o caja de cable al TV Details refer to page 21 Détails consultez le page 21 Para detalles consulte la pag 21 Component Video Input Entrée vidéo composant Entrada de video componente AUDIO OUT DIGITAL CABLE ANTENNA AUDIO OUT DIGITAL CABLE ANTENNA ...

Page 5: ...nt Video Input Entrée vidéo composant Entrada de video componente Details refer to page 22 Détails consultez le page 22 Para detalles consulte la pag 22 Add for DVD Recording AUDIO OUT DIGITAL CABLE ANTENNA Source Button Bouton Source Botón Source HDMI 1 HDMI 2 S VIDEO OUT OUT OUT L R AUDIO VIDEO COMP VIDEO Y Pb Pr C Source Button Bouton Source Botón Source Remote Control Télécommande Control remo...

Page 6: ...te Audio video Audio Vidéo composite Audio Video compuesto For First time Installation refer to page 5 For USB headphone and Digital Surround receiver details refer to page 23 Pour I Installation pour la première fois cosultez le page 5 Poru des détails d USB Audífono consultez le page 23 Para Instalación por primera vez vea pag 5 Para detalles de USB Audífono consulte la pag 23 Back of DVD VCR Ar...

Page 7: ...ch is locat ed on the rear of the cabinet Retain this information for future reference Model No __________________________ Serial No ________________________ Know these safetysymbols This bolt of lightning indicates unin sulated material within your unit may cause an electrical shock For the safety of everyone in your household please do not remove product covering The exclamation point calls atte...

Page 8: ...17 Tilt Stability All televisions must comply with recommended international global safety standards for tilt and stability properties of its cabinets design Do not compromise these design standards by applying excessive pull force to the front or top of the cabinet which could ultimately overturn the product Also do not endanger yourself or children by placing electronic equipment toys on the top...

Page 9: ...lizer 12 Volume 12 Balance 12 Digital Audio Language 12 Alternate audio 12 Mono Stereo 12 Sound mode 12 Headphone volume 12 AVL Automatic Volume Leveler 12 Delta volume 12 Auto surround 12 Features menu 13 Closed captions 13 Caption service 13 Digital caption service 13 Digital caption options 14 Sleeptimer 14 Favorite list 15 Child lock menu 14 Lock after 15 Channel lock 15 TV ratings lock 15 Mov...

Page 10: ... basic level of quality display and resolution for both analog and digital Transmission of SDTV can be in the traditional 4 3 or widescreen 16 9 format Enhanced Definition TV EDTV EDTV is better in picture quality than analog television The formats for EDTV are 480p widescreen 16 9 or traditional 4 3 EDTV is in the middle range quality between SDTV and HDTV High Definition TV HDTV HDTV has the hig...

Page 11: ...xial cable not supplied from the TO TV jack on the back of the cable box to the CABLE ANTENNA 75 Ωx jack 2 at the bottom of the TV Note Your cable box may have a different label for the TO TV jack such as OUTPUT or OUT Set the OUTPUT CH switch 3 of the cable box to CH 3 or 4 whichever is correct for your cable box then tune the TV to the corresponding channel Once tuned change channels at the cabl...

Page 12: ... boxes to decode their signals and send them to your digital TV set These boxes may include a digital TV tuner for off air DTV broadcasts Satellite broadcasters also provide major local channels depending on the market in which you live DBS also provides service in areas not covered by cable because they are in rural areas or other areas not passed by a cable line DBS also allows you to watch pay ...

Page 13: ...l for more details Note The newly installed channels maybe sorted in a different sequence on this TV Please key using the CH buttons to get to know the new channel Also you can use the OK key to see the list of channels è When the Set top box is connected to the television using one of the AV connections AV 1 AV 2 HDMI 1 HDMI 2 select that input source using the Source button to view the programs ...

Page 14: ...he volume MUTE Turn off or on sound SOURCE Press this button repeatedly to select the source AV 1 AV 2 HDMI 1 HDMI 2 SIDE or TV when in TV mode according to where you connected the accessory devices p 21 Cursor buttons Press the cursor buttons up down left right to navigate through the menus CH Channel selection To browse through the TV channels To select between Antenna or Cable TV channels first...

Page 15: ...her picture format Automatic Super Zoom 4 3 Movie expand 14 9 Movie expand 16 9 Wide screen Automatic makes the picture fill the screen as much as possible Super zoom removes the black bars on the sides of 4 3 programs with minimal distortion When in Movie expand 14 9 Movie expand 16 9 or Super zoom picture format you can make subtitles visible with the cursor up down Note With HD sources not all ...

Page 16: ...ard and press the cursor right A menu appears which allows you to select one of the standard settings for viewing and listening Current shows your current settings for viewing and listening Natural allows you to set your picture and sound settings to the recommended standard values In most cases this will give the best balanced viewing experience Vivid allows you to set your picture and sound sett...

Page 17: ...se the cursor right to enter the right panel The content of the right panel is moved to the left panel and the right panel shows the content of the newly highlighted item in the left panel Note In some cases it is important that the picture can be watched while adjusting the settings This means that when the highlight is on the right side panel the other menu items hide away When the cursor left i...

Page 18: ...ersonal preferences Select Cool to give the white colors a blue tint Normal to give the white colors a neutral Warm to give the white colors a red tint Custom color temperature only when Color temperature is set to Custom Fine tunes the white point WP and black level BL of the picture Select Custom color temperature and press the cursor right é Use the cursor buttons to select and adjust the setti...

Page 19: ...ens the transitions on digital content Select On or Off Color enhancement When activated this feature automatically controls green enhancement and blue stretch It makes the colors more vivid Press the cursor right é Select Off Minimum Medium or Maximum in order to activate de activate Color enhancement with the cursor right Active Control The TV continuously measures and corrects all incoming sign...

Page 20: ...sibility to swap between the Main and Second audio Program SAP when it is available Mono Stereo This selects per TV channel Mono or Stereo sound when analog stereo broadcasts are available Sound menu Sound mode This selects the modes for stereo or surround sound reproduction dependent on the broadcast signals or signals from external inputs received Headphone volume This controls the level of soun...

Page 21: ...on of a Closed Caption program See Closed Caption in the TV Features menu see above to turn the Caption service On or Off Note This television provides display of television closed captioning conforming with the EIA 608 standard and in accordance with Sections 15 119 of the FCC rules How to switch on To switch ON the closed caption feature go to feature closed caption and select On or On during mu...

Page 22: ...according to your own preference Select a color and one of the type options Features Digital caption options Reset to default Size TV menu Closed captions Sleeptimer Digital caption options Info Change PIN Style Text color Digital caption service Caption service On timer Child lock Text opacity Background color Background opacity Edge type Sleeptimer This sets a time period after which the TV auto...

Page 23: ...a some content based ratings are selected unselected English Française Español Age based Rating Content based Rating All none None none TV Y none TV Y7 FV Fantasy Violence TV G none TV PG D Dialog L Language S Sex V Violence TV 14 D Dialog L Language S Sex V Violence TV MA L Language S Sex V Violence When All has been selected all items in the age based and in the contents based lists are locked I...

Page 24: ...or children under the age of 17 Parental guidance or permission needed NC 17 even with parental permission forbidden under age 17 More offensive sex violence or bad language X movies which generally focus on sex violence and or bad language Also known as pornography English Française Español Region ratings lock This function allows you to control access to digital programs based on downloaded Regi...

Page 25: ...ton Finish and the TV returns to the Installation menu Press the MENU button on the remote control é Use the cursor down to select Installation in the TV menu Use the cursor right to enter the Installation menu Select Language and enter the list of available languages with the cursor right Select your language with the cursor up down and press the OK button to confirm you selection Proceed with th...

Page 26: ...t be renumbered Weak channel installation This enables you to do a weak ATSC digital channel installation This is only available for TV channels installed via an antenna connection see p 4 If a certain channel you expect to see is not tuned or is weak you can install it manually Call your local broadcasting station to know what channel its being transmitted on é Select that channel in the displaye...

Page 27: ...following priorities Low Medium High or Maximum The Emergency alert message with priority High or Maximum will always be presented Low or Medium will be present or ignored depending on the selected setting Important When the TV clock is undefined See Clock p 21 the Emergency Alerts will be ignored The Emergency Alert message display will contain following information The Emergency Alert text The s...

Page 28: ... mode TV menu Language Preferences Reset AV settings Clock Info Software upgrade Time Day Channels Connections Time zone Daylight saving English Française Español Connections This menu allows you to name label the accessory devices you have connected to the external inputs outputs Select Connections in the Installation menu é Press the cursor right to enter the list of types of devices connected t...

Page 29: ... some cases cable box will automatically tune to channel 3 or 4 Just change channels until picture appears Connect cable box to TV using HDMI cable Note If the accessory device has DVI output only use a DVI to HDMI adapter cable to connect to the HDMI connector You need to also connect the audio cable to L and R AUDIO jacks Next go to Menu TV menu Installation Connections Audio in L R AV1 Using RF...

Page 30: ...utput jacks on DVD player DVD recorder and audio AV inputs on TV Turn on TV and DVD Player DVD recorder Press AV on remote control until the connected source appears on TV screen Insert a pre recorded DVD into DVD player DVD recorder and press PLAY to verify correct connection 3 DVD Player DVD Recorder VCR to TV Back of DVD VCR C Source Button Remote Control Back of TV Add for DVD Recording AUDIO ...

Page 31: ... be between 8 and 4000 Ohm The headphone socket has a 3 5 mm jack In the Sound menu select Headphone volume to adjust the headphone volume Side connections USB Headphone Viewing content from a USB device Inserting a USB device Note USB devices are not supplied with this TV Insert a USB device in the USB connector at the side of the TV When a USB device is inserted the Multimedia browser menu is di...

Page 32: ...directory Note Press the green color button to display all the image files in the current directory as thumbnails when browsing pictures Press the green button again to display the image files in a list In case a file is selected press the OK button to display a picture file or to play an audio file In case a directory album or playlist is selected press the cursor right to enter the content or pr...

Page 33: ...nnector hoods to maintain compliance with FCC Rules and Regulations Canadian notice This Class B digital apparatus meets all requirements of the Canadian Interference Causing Equipment Regulations Avis Canadien Cet appareil numérique de la classe B respecte toutes les exigences du Règlement sur le matériel brouilleur du Canada Regulatory Notices Federal Communications Commission Notice Press the S...

Page 34: ...ant cable Try unplugging the HDMI cable and replugging it back Black bar on top and PC refresh rate too high Change PC refresh rate to 60 Hz bottom of screen in PC mode Picture position Slight differences in output When displaying a High Definition signal from the YPbPr inputs or HDMI input if adjustment signals from different brands necessary you can adjust the picture position to the center of t...

Page 35: ... with chemically treated cloths Do not touch the surface with bare hands or greasy cloth some cosmetics are detrimental to the screen Unplug the TV before cleaning the screen When the surface becomes dusty please wipe gently with absorbent cotton or other soft materials like chamois soaks Do not use acetone toluene and alcohol because they cause chemical damage Do not use liquid cleaners or aeroso...

Page 36: ...of 4 3 HDMI High Provides an uncompressed all digital audio video interface between the TV and any HDMI equipped audio video Definition Multi component such as set top box DVD player and A V receiver HDMI supports enhanced or high definition video plus media Interface two channeldigital audio System Television pictures are not broadcast in the same way in all countries There are different standards ...

Page 37: ...am Closed Captioning Full text Sleeptimer ON SCREEN DISPLAY English French Spanish LANGUAGES CONNECTIVITY Bottom AV1 Audio L R input Composite Video input CVBS Component Video input YPbPr AV2 Audio L R input Component Video input YPbPr HDMI 1 HDMI 2 SPDIF output Digital Only Side Headphone output Audio L R input Composite Video input CVBS S Video input USB WEIGHT DIMENSIONS Weight incl Packaging 3...

Page 38: ...ogram Closed Captioning Full text Sleeptimer ON SCREEN DISPLAY English French Spanish LANGUAGES CONNECTIVITY Bottom AV1 Audio L R input Composite Video input CVBS Component Video input YPbPr AV2 Audio L R input Component Video input YPbPr HDMI 1 HDMI 2 SPDIF output Digital Only Side Headphone output Audio L R input Composite Video input CVBS S Video input USB WEIGHT DIMENSIONS Weight incl Packagin...

Page 39: ...ported New software can be obtained from your dealer or can be downloaded from the www philips com usasupport website Go to www philips com usasupport using the web browser on your PC é Follow the procedure to find the information and the software related to your TV Select the latest software upgrade file and download it to your PC Decompress the ZIP file and copy the file autorun upg to the root ...

Page 40: ... procedure For an automatic software upgrade copy the autorun upg file in the root directory of the USB portable memory Power off your TV and remove all memory devices é Insert the USB portable memory that contains the downloaded software upgrade Switch on your TV with the power switch B at the right side of the TV At startup the TV will scan the USB portable memory until it finds the update conte...

Page 41: ...mory Select the slideshow file and press the OK button to start the slide show To stop a slide show press the button General Rules The slideshow will use plain ASCII XML syntax to allow the creation and editing of the slideshow files using simple tools All references to network content must be based on the global address of the content Content on a Portable Memory PM doesn t have a global address ...

Page 42: ...lication can force the use of one or multiple predefined display times Identifies the slides to show Identifies the URL of the individual slide Supported XML tags The following table gives a description of the XML syntax xml version 1 0 encoding ISO 885h9 1 philips slideshow version 1 0 title Philips AlbumFile title audio Music Nature mp3 audio slide duration 50 slide duration slides slide Images ...

Page 43: ... the TV isn t working you can try the solutions below to resolve your problem Make sure your digital camera is switched on and verify if the configuration of your digital camera is correct see the manual of your digital camera for more information Some digital cameras allow you to switch off the USB interface Make sure that the USB interface is switched on before connecting to the TV If you have a...

Page 44: ...on of programs data or other information is not covered under this Limited Warranty This warranty does not apply a to damage caused by accident abuse misuse misapplication or non Philips product b to damage caused by service performed by anyone other than Philips or Philips Authorized Service Location c to a product or a part that has been modified without the written permis sion of Philips or d i...

Page 45: ...3139 125 37763 ...

Page 46: ...rmal outcome of our quality assurance testing Y The benefits of BDS Mode This TV is specially designed to operate in BDS Mode BDS Mode offers the following benefits Access to the user menu can be blocked This prevents users e g guests from deleting or changing channel settings and or modifying picture and sound settings Picture and sound can only be controlled via pre programmed Smart Settings and...

Page 47: ...e TV set Off then back On BDS Mode Functions This paragraph describes the functionality of each item in the BDS Mode Setup menu BDS MODE ON This enables the BDS Mode When BDS Mode is ON The user menu is blocked All settings of the BDS Mode Setup menu are in effect OFF This disables the BDS Mode When BDS Mode is OFF The TV operates as a normal consumer TV INSTALL This option allows Auto Installatio...

Page 48: ... function allows the TV to enter a specific mode of operation On or Standby after the mains power is activated ON When set the TV will always turn ON after the mains power is enabled STANDBY When set the TV will always turn to STANDBY after mains power is enabled DISPLAY MESSAGE ON Enables display of the Welcome Message for 30 seconds after the TV set is turned on OFF Disables the display of the W...

Page 49: ...o Install before auto installation is triggered Note If CHANNEL TABLE OFF during TV channel installation it is possible that channels carrying Emergency Alert System EAS signals may not be installed The TV installer must verify that the EAS signal is available on any one or more of the channels that are successfully installed on the TV This TV supports the cloning of picture and configuration sett...

Reviews: