background image

L05 User’s Manual 


091105.1833 


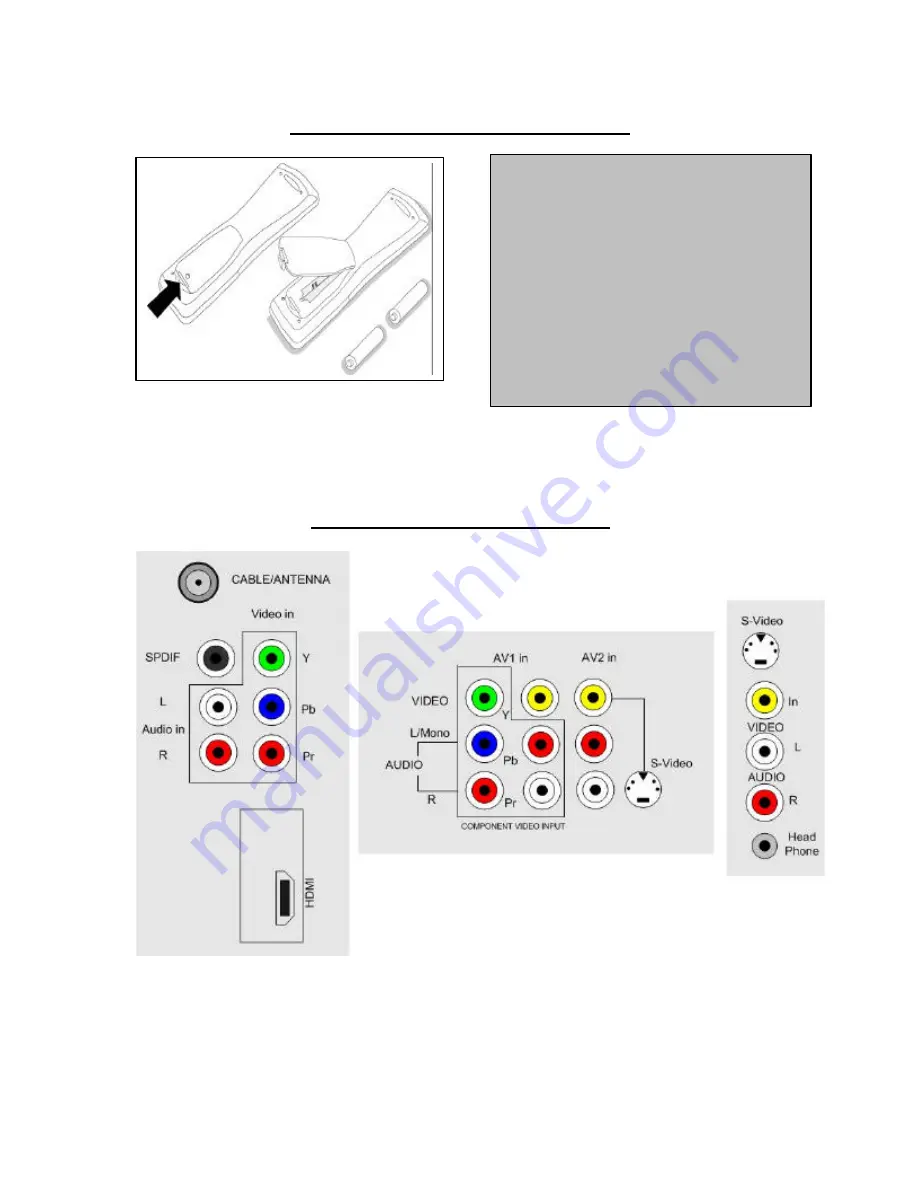
Use And Care of Remote Control 


Rear Jack Panel Connections 


To load the supplied batteries into the remote 
control: 

Remo ve the battery compartment lid 

from the back of the remote control. 

Insert the correct type of batteries into 

the compartment. 

Ensure that the (+) and ( -) ends of the 

batteries are placed in the correct positions. 

Re-attach the battery compartment lid. 

Note: Always remove the batteries from the 
remote control if it is not to be used for a long 
period.  This can help prevent damage to the 
remote from possible battery leakage. 

Summary of Contents for 26-REAL FLAT COMMERCIAL WIDESCREEN HDTV 26HW9100D

Page 1: ...L05 User s Manual 091105 1833 1 26HW9100D 30HW9100D User s Manual ...

Page 2: ...light or heat Leave at least 1 4 around each side of TV set for sufficient ventilation to avoid over heating Avoid placing set where it is likely to be exposed to rain or water e g near the window No objects filled with liquids should be placed on top the TV in order to avoid dripping or splashing of liquids into the set USEFUL TIPS Do not leave the television off in standby mode for a prolonged p...

Page 3: ...o the mains socket If there is still no power disconnect plug Wait for 60 seconds and re insert plug Switch on the TV again No picture Check antenna connection at rear of the TV Check CABLE TUNING setting NO YES Possible TV station problem Try another channel Picture ok no sound Try increasing the volume Check that the sound is not muted If it is muted press the Mute button on the remote control t...

Page 4: ...sconnect the television from the AC mains it toggles the TV s power mode between on and standby To completely remove AC mains power you must unplug the AC mains plug Switching on the Set Press the power button on the TV s front panel or on the remote control to switch on the set Note 1 If the TV is in commercial mode it might not respond to the front panel or the remote control depending upon the ...

Page 5: ... from the back of the remote control Insert the correct type of batteries into the compartment Ensure that the and ends of the batteries are placed in the correct positions Re attach the battery compartment lid Note Always remove the batteries from the remote control if it is not to be used for a long period This can help prevent damage to the remote from possible battery leakage ...

Page 6: ...GR for detailed information When you press RECALL on the RC2573GR setup remote control when it is in setup mode information similar to the following will appear on the TV screen This information describes the TV chassis firmware version diagnostic codes setup information and other service and technical data regarding the television configuration Line 10 indicates whether the TV is in CONSUMER or C...

Page 7: ...Activates the sleep timer Press repeatedly to increment the countdown time with 15 minutes Vol To adjust the volume Mute Interrupt the sound or restore it 0 9 Digit keys To select a TV channel For a two digit program number enter the second digit before the dash appears CH Channel Selection To move up or down a TV channel 16 9 Formats To adjust TV screen formats Alternate Channel To toggle between...

Page 8: ...nus With remote control RC2888 01 only when SECURITY in the TV SETUP menu is set to LOW To activate TV Setup menu 1 Select a channel number 2 Key in 3 1 9 7 5 3 3 Press The above sequence should be performed within 20 seconds and the TV SETUP menu will appear With remote control RC2573GR only in TV Commercial mode Part A To check the television s mode 1 Set the remote control selectable switch to ...

Page 9: ...5 3 Press M key and the TV Mode menu appears 4 Press or to select Commercial mode 5 Highlight STORE and press the 4 key to store the change TV will then go to standby mode 6 Press any numeric key to switch on the TV again and follow the procedure in Part B step 2 to activate the TV Setup menu ...

Page 10: ...POWER ON STANDARD FORCED RESTORED CHANNEL DISPLAY NONE NUMBER LABEL ALL KEYBOARD LOCK NO YES ESP OFF 1 HR 2 HR 99 HR AUDIO VIDEO MUTE OFF BLUE BLACK WELCOME MESSAGE CHANNEL GUIDE NO YES POWER ON REMINDER NO YES 3 DIGIT ENTRY NO YES A CH A V SWITCH NO YES CC OFF CC 1 CC 2 CC ON MUTE SAVE CC NO YES SOURCE MENU ITEM NO YES HDMI AUDIO SELECTION HDMI AV 1 AV 2 AV 3 V CHIP MENU ITEM NO YES SAVED V CHIP ...

Page 11: ...DIO MUTE NO YES CHANNEL o Select the channel or input you wish to configure INPUT o Select the input source that you wish to associate with the specified CHANNEL This feature enables you to map re assign a numeric channel number to a video input rather than to its normal RF TV channel i e ANTENNA In other words TV channel 2 could be used to select the AV 1 video input instead of RF ANTENNA channel...

Page 12: ...IO MUTE o Specify whether audio for the current channel is to be audible AUDIO MUTE NO or muted AUDIO MUTE YES Installing AV Inputs CHANNEL INSTALL CHANNEL AV 1 AV 2 SIDE S VIDEO CVI AV3YC HDMI HD CVI CHANNEL RING SAVED LABEL VIDEO BLANK NO YES AUDIO MUTE NO YES CHANNEL o Select the input you wish to configure LABEL o Input a maximum of 8 characters for the channel s label Cursor to the Right to s...

Page 13: ...AVED to or DELETED from the channel ring i e list of channels available for selection by means of a standard guest remote control LABEL o Input a maximum of 8 characters for the channel s label Cursor to the Right to start the first character Cursor left or right to navigate between character positions within the label field Cursor up or down to select characters from the list A to Z 0 to 9 or spa...

Page 14: ...ify whether the consumer digital version of the OSD is displayed when MENU is pressed from a digital channel ENTER DIGITAL MENU Cursor RIGHT will bring up the Consumer DIGITAL Menu below The primary use of this menu is to program the digital channels using the Auto Program function of the digital module in the television To program the digital channels cursor down to Install and Cursor Right This ...

Page 15: ...ight cursor SHARPNESS 0 100 Adjust the respective picture setting using left and right cursor TINT 31 31 Adjust the respective picture setting using left and right cursor ROTATION 0 100 Adjust the respective picture setting using left and right cursor DEFAULT FORMAT WIDESCREEN 4 3 ZOOM 14 9 ZOOM 16 9 SUBTITLE ZOOM SUPER ZOOM Set the default screen format of the television at Power On The pictures ...

Page 16: ...t and a black band is displayed on either side of the picture Zoom 14 9 The picture is enlarged to 14 9 format a thin black band remains on both sides of the picture Zoom 16 9 The picture is enlarged to 16 9 format This mode is recommended when displaying pictures that have black bands at the top and bottom letterbox format Subtitle Zoom This mode is used to display 4 3 pictures using the full sur...

Page 17: ... is set to YES and the current SOUND MODE is STEREO regardless of whether there is a stereo signal on the current channel the resultant effect will be imperceptible minimal or possibly degraded depending upon various factors ULTRA BASS NO YES When ULTRA BASS is set to YES the audio frequency equalization is modified such that the bass frequencies are significantly emphasized VOLUME BAR NO YES When...

Page 18: ...will always be the channel input at power on until SWITCH ON CHANNEL is changed POWER ON STANDARD FORCED RESTORED STANDARD The TV will be in standby mode when AC mains power is first applied after having been disconnected FORCED The TV will turn ON whenever AC mains power is applied This feature allows the TV s power status to be controlled for example from an AC mains breaker RESTORED When AC mai...

Page 19: ...YES This features configures the audio and video monitor outputs provided that AUDIO VIDEO OUT MUTE is not set to YES NO The signals that are present at the monitor outputs are the same as those of the currently selected channel or video input In other words the monitor outputs track what is viewed and heard on the TV YES The signals that are present at the monitor outputs are always the tuner out...

Page 20: ...ious line in the MESSAGE sub menu CLEAR Erase the entire message CHANNEL GUIDE NO YES POWER ON The channel guide feature provides an on screen summary listing of the RF tuner channels that are currently in the channel ring see CHANNEL INSTALL CHANNEL RING and have been assigned labels see CHANNEL INSTALL LABEL NO Channel guide is not displayed when CH GDE on remote is pressed and a NOT AVAILABLE m...

Page 21: ...channel see Note Note Successive digit commands must occur within two seconds or the TV will interpret the previously received digit s as constituting the intended channel and tune accordingly A CH A V SWITCH NO YES The A CH A V alternate channel A V switch feature provides the choice to use the remote control A CH command to either switch between the current and previously tuned channels inputs o...

Page 22: ... present in the FEATURES MENU that appears when the remote control SLEEP or CC command is issued or when a guest mode remote control RECALL command is issued Features Menu With SOURCE MENU ITEM YES NO The SOURCE line item is does not appear in the FEATURES MENU YES The SOURCE line item appears in the FEATURES MENU Note 1 When the SOURCE item is highlighted cursor right or left to step through the ...

Page 23: ...er the television is powered down NO The current V CHIP setup configuration reverts to defaults when the television is powered down YES The current V CHIP setup configuration remains in effect when the television is powered down V CHIP SETUP Configures the V CHIP program content viewing restriction feature Please consult the mainstream consumer product documentation for information about this feat...

Page 24: ...m a remote control or from the front panel Note 2 If the SLEEPTIMER is in progress the current SLEEPTIMER countdown timer value appears in the ITV commercial SETUP MENU as well as in the FEATURES MENU The SLEEPTIMER period can of course also be reset from either menu SLEEPTIMER Countdown In Progress example SECURITY STANDARD HIGH Special feature for commercial use only ...

Page 25: ...L05 User s Manual 091105 1833 25 26HW9100D Dimensions ...

Page 26: ...L05 User s Manual 091105 1833 26 30HW9100D Dimensions ...

Reviews: