background image

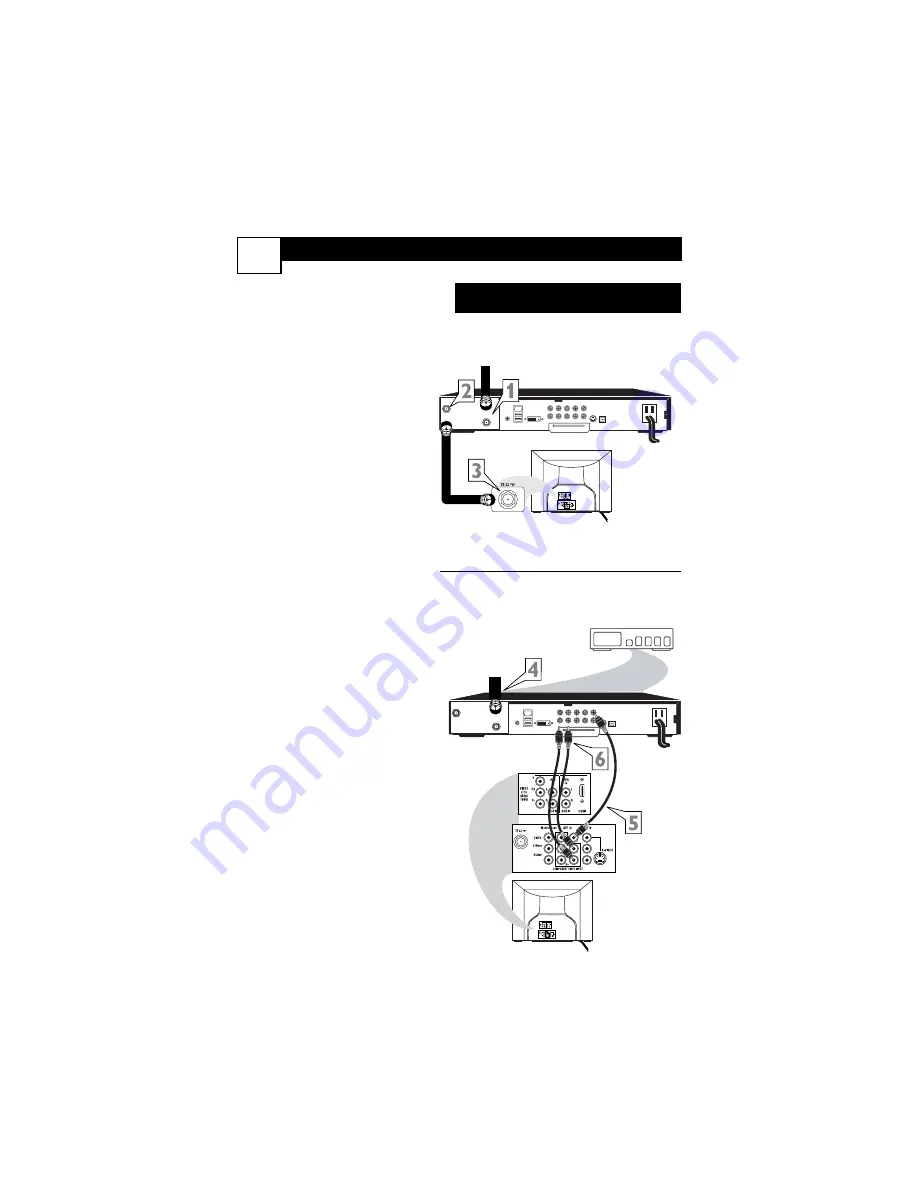
Cable Box (w/RF In/Outputs):

TO

TV/VCR

CABLE

IN

IR

USB

DVD-D OUT

AUDIO IN

SPDIF

VIDEO

IN         OUT

S-VIDEO

R                   L

AUDIO OUT

TV

PASSCARD

Y          Pb          Pr

OPTICAL

SPDIF

24

C

ABLE

B

OX

C

ONNECTIONS

5

I

f your cable signal uses a cable box

or decoder, follow the easy steps

below to complete the connection.

Cable Box (w/RF In/Outputs):

This connection will be mono.

1

Connect the Cable Company

supplied cable 

to the signal

IN(put) plug on the back of the

Cable Box.

2

Using a separate round coaxial

cable, 

connect one end to the

OUT(put)

(TO TV) plug on

the back of the Cable Box.

3

Connect the other end of the

round coaxial cable

to the 75

input on the back of the televi-

sion. Screw it down finger tight. 

NOTE:

If applicable, set the OUT-

PUT CHANNEL SWITCH on the

back of the cable box to CH 3 or 4.

Tune the TV to the same channel and

change channels at the cable box. In

some cases, the cable box will auto-

matically tune to either channel 3 or 4,

change channels until the picture

appears.  

Cable Box (w/Audio/Video

Outputs):

This connection will supply Stereo

sound.

4

Connect the Cable Company

supplied cable 

to the cable sig-

nal IN(put) plug on the back of

the Cable Box.

5

Using a RCA type Video Cable,

connect one end of the cable to

the Video 

(or ANT, 

your cable

box may be labeled differently

)

Out jack 

on the cable box and

the other end to the AV1 Video

Input on the TV.

6

Connect one end of the 

Audio

Left and Right Cable 

to the left

and right Audio Out L & R

jacks on the cable box. 

Connect

the other end to the AV1 Audio L

& R Input jacks on the TV.

NOTE:

Press the AV button or use the

CH+ or CH- on the TV remote control

to tune to the AV1 channel for the

cable box signal. Once tuned, change

channels at the cable box, not the tele-

vision.

TO

TV/VCR

CABLE

IN

IR

USB

DVD-D OUT

AUDIO IN

SPDIF

VIDEO

IN         OUT

S-VIDEO

R                   L

AUDIO OUT

TV

PASSCARD

Y          Pb          Pr

OPTICAL

SPDIF

Jack Panel Back of Cable Box

Cable Signal IN from the

Cable Company

Round 75

Coaxial Cable

Jack Panel Back of TV

Cable Signal IN

from the Cable

Company

Cable Box with

A/V Outputs

Jack Panel

Back of TV

Audio Cables 

L (White) & R (Red)

Video Cable

(Yellow)

Cable Box (w/Audio/Video Outputs):

Models 26PW8402/37 and 30PW850H

will not have HDMI Inputs.

Summary of Contents for 26-HDTV MONITOR WIDESCREEN TV 26PW8402

Page 1: ...TV TV Quick Use and Hookup Guide Guía Rápida de Uso y Configuración Guide d Utilisation Rapide 26PW8402 37 30PW8402 37 34PW8402 37 30PW8502 37 34PW8502 37 30PW850H 3121 233 46401 ...

Page 2: ... Operation 3 Cable Box Connection 5 Remote Batteries 3 Remote Button Descriptions 1 2 Descripcion Panel No Conexión Básica Antena Cable 16 Conexións de Audio Video Entrada AV1 y AV2 18 Entrada AV4 21 Entrada AV5 22 Entrada de Video Componente 20 Salida de Video Monitor 23 Entrada S Video 19 Entrada AV Latérales 24 Descripcion Panel No Operación Básica de el Control Remoto 13 14 Baterias del Contro...

Page 3: ... the left or right cursor buttons to adjust the picture format Menu Select Button Press for the onscreen menu to appear Pressing the menu button after menu selec tions are made will eliminate the menu from the dis play Volume or Buttons Press to adjust the TV sound level Number Buttons Press the number buttons to select TV channels When selecting single digit channels press the number of the desir...

Page 4: ...llow Blue Allows you to store and surf up to 10 channels you choose for each colored button Program List Button Press to display a list of chan nel numbers and their names See page 27 for proper setup Each channel will appear as a selectable menu item The current channel will be highlighted by default Only five channels will be shown onscreen at one time press the CURSORUPor CURSORDOWN button to s...

Page 5: ... UP or DOWN button to select TV channels 4Point the remote control toward the remote sensor window on the TV when operating the TV with the remote REMOTE CONTROL To load the supplied batteries into the remote 1 Remove the battery com partment lid on the back of the remote 2 Place the batteries 2 AA in the remote Be sure the and ends of the batteries line up cor rectly inside of case is marked 3 Re...

Page 6: ...verter Box Connect the OUT put plug from the Converter to the 75Ω plug on the TV 75 1 Back of TV Cable signal coming from Cable Company Jack Panel Back of TV 75 1 2 Antenna Connection 300 to 75Ω Adapter Combination VHF UHF Antenna Outdoor or Indoor Twin Lead Wire Round Cable 75Ω Back of TV Direct Cable Connection 75Ω Round Coaxial Cable 4 Your Cable TV input into your home may be a single 75 ohm c...

Page 7: ...Outputs This connection will supply Stereo sound 4Connect the Cable Company supplied cable to the cable sig nal IN put plug on the back of the Cable Box 5Using a RCA type Video Cable connect one end of the cable to the Video or ANT your cable box may be labeled differently Out jack on the cable box and the other end to the AV1 Video Input on the TV 6Connect one end of the Audio Left and Right Cabl...

Page 8: ...accessory device to the AV1 and AV2 IN Jacks located on the back of the TV 1Connect the VIDEO yellow cable to the VIDEO AV1 IN or AV2 IN jack on the back of the TV 2Connect the AUDIO red and white cables to the AUDIO left and right AV1 IN or AV2 in jacks on the rear of the TV 3Connect the VIDEO yellow cable to the VIDEO OUT jack on the back of the VCR either one or two or accessory device being us...

Page 9: ...r of the TV 2Connect other end of the S VIDEO CABLE to the S VHS S Video OUT jack on the back of the VCR Then connect the other ends of the AUDIO red and white CABLES to the AUDIO left and right OUT jacks on the rear of the VCR 3Turn the VCR and the TV ON 4Press the AV button or the CH or CH buttons on the remote to scroll the channels until AV2 appears in the upper left corner of the TV screen 5N...

Page 10: ...CH buttons to scroll the available channels until CVI appears in the upper left corner of the TV screen 5Insert a DVD disc into the DVD player and press the PLAY button on the DVD Player The description for the component video connectors may differ depending on the DVD player or accessory digital source equipment used for example Y Pb Pr Y B Y R Y Y Cr Cb Although abbrevia tions and terms may vary...

Page 11: ...the back of the TV 4Connect the Audio L eft and R ight cables from the AUDIO Outputs on the HD Receiver to the AV4 AUDIO Inputs on the back of the TV 5With both the HD Receiver and the television ON press the AV button on the remote to tune to the AV4 Channel and view the video input from the HDMI supplied signal AV AUDIO VIDEO 4 INPUT CONNECTION 9 OUT TO TV SATELLITE IN DIGITAL AUDIO OUTPUT VCR C...

Page 12: ...e AV button on the remote to tune to the AV5 channel 5Press the PLAY button on the DVD or digital accessory device to view the program on the television AV AUDIO VIDEO 5 INPUT CONNECTION 10 S VIDEO OUT OUT OUT L R AUDIO VIDEO COMP VIDEO Y Pb Pr AV5 1 3 5 OK 1 2 3 4 5 6 7 8 0 9 H Select SLEEP ACTIVE CONTROL CC AV CLOCK MENU EXIT PICTURE SOUND STATUS SELECT 4 QuadraSurf TM PROGRAM LIST TV VCR REC SA...

Page 13: ... to tune to the AV1 channel to view a pre recorded tape The following steps allow you to connect a second VCR to record the program while your watching it 3Connect one end of the yellow Video Cable to the Monitor Out VIDEO plug Connect the other end to the VIDEO IN plug on the second VCR 4Connect one end of the red and white Audio cable from the Monitor Out AUDIO L and R plugs on the TV to the AUD...

Page 14: ... from the Audio Out jack on the device to the Audio In white jack on the SIDE of the television 3Turn the TV and the accesso ry device ON 4Press the AV button or the CH or CH buttons on the remote control to tune the TV to the side input jacks Front will appear on the TV screen 5Press the PLAY button on the accessory device to view playback or to access the accessory device camera gaming unit etc ...

Page 15: ...NOTES ...

Page 16: ...r ítems en el menú en pantalla del TV También presionando los botones del cursor izquierda derecha se puede ajustar el formato de la pantalla Botón Menu Select Presione para que aparezca el menú en pantalla Al oprimir el botón de menú después hacer selecciones de menú se elimina el menú de la pan talla Botones de volumen o Presione para ajustar el nivel del sonido del TV Botones de número Presione...

Page 17: ...onido a su nivel anterior Botones Channel o Presione para cambiar el canal sintonizado Botón de cara enojada FROWNIE Le permite borrar los canales almacenados dentro de la lista Quadra Surf para los botones de color Botones QUADRASURF Rojo verde amarillo azul Le permiten almacenar y recorrer hasta 10 canales que usted escoge para cada botón de color Botón Program List presione para mostrar una lis...

Page 18: ... botón CHANNEL abajo o arriba para selec cionar canales de TV Use estos botones para hacer ajustes o selecciones en el menú en pan talla También hay un conjunto de enchufes de entrada de audio y vídeo ubicados al costado del gabinete del televisor CONTROL REMOTO Para cargar las baterías sumin istradas en el remoto 1Saque la puerta del compar timiento de las baterías en la parte posterior del remot...

Page 19: ...se por todos los canales almacenados en la memoria del televisor CONSEJO ÚTIL 75 1 75 1 2 16 Parte posterior del TV Cable coaxial redondo de 75Ω desde la antena Cable bifilar Adaptador de 300 a 75 ohmios Antena para interior o exterior Combinación VHF UHF Conexión de la antena Panel de conectores en la parte posterior del TV Conexión directa de cable Señal de cable que viene desde la compañía de c...

Page 20: ...al de cable IN entrada en la parte posterior de la caja de cable 5Conecte el cable VIDEO amarillo al enchufe VIDEO OUT en la parte posterior del la caja de cable y Video AV1 in en la parte posterior del TV 6Conecte los cables AUDIO rojo y blanco a los enchufes AUDIO en la parte posterior del la caja de cable y Audio AV1 in en la parte posterior del TV NOTA Si presiona repetidamente el botón AV del...

Page 21: ... positivo accessorio 4Conecte los cables AUDIO rojo y blanco a los enchufes AUDIO izquierdo y derecho OUT en la parte posterior del VCR dispositi vo accessorio 5Encienda el VCR dispositivo accesorio y el TV 6Presione el botón AV en el con trol remoto para seleccionar el canal AV1 o AV2 in AV1 o AV2 in aparecerá en la esquina superi or izquierda de la pantalla del TV 7Con el VCR o dispositivo acce ...

Page 22: ...2Conecte un extremo del CABLE S VIDEO al conector del S VIDEO en la parte posterior del VCR Luego conecte los otros extremos de los CABLES DE AUDIO rojo y blanco a los conectores AUDIO OUT izquierdo y derecho en la parte posterior del VCR 3Encienda el VCR y el TV 4Presione el botón AV en el con trol remoto para seleccionar el canal AV2 AV2 aparecerá en la esquina superior izquierda de la pantalla ...

Page 23: ...H para desplazarse por los canales disponibles hasta que aparezca CVI en la esquina superior izquierda de la pantalla del TV 5Inserte un disco DVD en el reproductor de DVD y presione el botón PLAY en el remoto La descripción de los conectores de vídeo componente puede diferir dependiendo del reproductor de DVD o equipo de fuente digi tal accesorio utilizados por ejemplo Y Pb Pr Y B Y R Y Y Cr Cb A...

Page 24: ...ntrada AV4 HDMI en la parte posterior del TV 4Conecte los cables de audio L izquierdo y R derecho desde las salidas AUDIO en el receptor HD a las entradas AV4 AUDIO en la parte posterior del TV 5Con el receptor HD y el tele visor encendidos presione el botón AV en el remoto para sintonizar al canal AV4 y ver la entrada de vídeo desde la señal suministrada por HDMI DE ENTRADA AV 4 21 OUT TO TV SATE...

Page 25: ...ivo accesorio digital 4Presione el botón AV en el control remoto para selec cionar el canal AV5 5Presione el botón PLAY en el DVD o dispositivo accesorio digital para ver el programa en el televisor DE ENTRADA AV 5 22 S VIDEO OUT OUT OUT L R AUDIO VIDEO COMP VIDEO Y Pb Pr AV5 2 1 3 5 OK 1 2 3 4 5 6 7 8 0 9 H Select SLEEP ACTIVE CONTROL CC AV CLOCK MENU EXIT PICTURE SOUND STATUS SELECT 4 ON OFF PIC...

Page 26: ...ga las instrucciones sobre el modo de sintonizar el canal AV1 para ver una cinta pregrabada 3Conecte un extremo del cable de vídeo amarillo al enchufe Monitor Out VIDEO Conecte el otro extremo al enchufe VIDEO IN en el segundo VCR 4Conecte un extremo del cable de audio rojo y blanco desde los enchufes Monitor Out AUDIO L y R en el TV a los enchufes AUDIO IN en el VCR 5Encienda el segundo VCR ON in...

Page 27: ... secundario AV3 aparecerá en la esquina superior izquierda de la pan talla del TV 5Con la cámara o dispositivo accesorio encendido y una cinta pregrabada CD DVD tarjeta de juego etc inser tada presione el botón PLAYpara ver la cinta en el televisor OK 1 2 3 4 5 6 7 8 0 9 H Select SLEEP ACTIVE CONTROL CC AV CLOCK MENU EXIT PICTURE SOUND STATUS SELECT 4 PIC SIZE MAIN FREEZE QuadraSurf TM PROGRAM LIS...

Page 28: ...NOTA ...

Page 29: ... menu à l écran Si vous appuyez sur le bouton de menu après avoir effectué vos sélections de menu cela aura pour effet d éliminer le menu à l écran Boutons Vol Appuyez sur ces boutons pour effectuer le réglage du niveau sonore du téléviseur Boutons numérotés Appuyez sur les boutons numérotés pour sélectionner les canaux de télévision Lorsque vous sélec tionnez des canaux à numéro unique appuyez su...

Page 30: ... nouveau pour retourner au niveau audio précédent Boutons CH canal ou Appuyez sur ces boutons pour changer de canal Bouton Émoticon triste Vous permet de supprimer les canaux en mémoire dans les listes Quadra Surf des boutons de couleur Boutons QUADRA SURF rouge vert jaune bleu Permet de mémoriser et de naviguer les 10 canaux que vous avez choisis pour chaque bouton de couleur Bouton Program List ...

Page 31: ...e pris es d entrée audio et vidéo sur le côté du poste de télévision Ce panneau de pris es contient également une prise S Vidéo ainsi qu une prise de casque d écoute Ces prises sont très utiles pour connecter un caméscope ou tout autre dispositif accessoire ne devant être connecté que de façon temporaire Télécommande Pour introduire les piles fournies dans la télécommande 1Enlevez le couvercle des...

Page 32: ...tenne est munie d un câble à deux conducteurs plat 300Ω vous devez d abord rac corder les fils de l antenne aux vis d un adaptateur 300 à 75 ohms 2Poussez l extrémité ronde de l adaptateur ou antenne dans la prise 75Ω ohms à l arrière du téléviseur Si l extrémité ronde du fil d antenne est filetée vis sez le avec les doigts sans trop serrer Après avoir utilisé la commande de programmation automati...

Page 33: ...urni par le service du câble au connecteur d entrée IN de signal de télédistribution à l arrière du boîtier du service du câble 2À l aide d un second câble coaxial rond raccordez une extrémité du câble au connecteur de sortie TO TV à l arrière du boîtier du serv ice du câble 3Connectez l autre extrémité du câble coaxial rondà l entrée 75Ω à l arrière du téléviseur Vissez le câble avec les doigts s...

Page 34: ...agnétoscope 4Connectez les câbles AUDIO rouge et blanc aux prises AUDIO OUT L gauche et R droite à l arrière du magnéto scope 5Allumez le magnétoscope ou dispositif externe ainsi que le téléviseur 6Appuyez sur le bouton AV de la télécommande pour sélection ner le canal AV1 ou AV2 AV1 ou AV2 est affiché dans le coin supérieur gauche de l écran du téléviseur 7Après avoir allumé votre mag nétoscope o...

Page 35: ...arrière du magnétoscope Raccordez ensuite les autres extrémités des câbles AUDIO rouge et blanc aux prises AUDIO OUT L et R à l arrière du magnéto scope 3Allumez le magnétoscope et le téléviseur 4Appuyez sur le bouton AV de la télécommande jusqu à ce que le canal AV2 ait été sélec tionné AV2 est affiché dans le coin supérieur gauche de l écran de télévision 5Appuyez sur le bouton de SELECT pour sé...

Page 36: ...défiler les canaux disponibles jusqu à ce que CVI soit affiché dans le coin supérieur gauche de l écran de télévision 5Insérez un disque DVD dans le lecteur DVD et appuyez sur le bouton PLAY de la télécom mande La description des connecteurs vidéo composant peut varier selon le lecteur DVD ou le matériel de source numérique externe utilisé par exemple Y Pb Pr Y B Y R Y Y Cr Cb Bien que les abrévia...

Page 37: ... et R des sorties AUDIO du récepteur HD aux entrées AUDIO AV4 in à l arrière du téléviseur 5Après avoir allumé le récepteur HD et le téléviseur appuyez sur le bouton AV de la télécom mande pour syntoniser le canal AV 4 et visionner l entrée vidéo du signal HDMI fourni D ENTRÉE AV 4 33 OUT TO TV SATELLITE IN DIGITAL AUDIO OUTPUT VCR CONTROL S VIDEO PHONE JACK VIDEO AUDIO L L R R ACCESS CARD ANTENNA...

Page 38: ...jusqu à ce que le canal AV5 soit sélectionné 5Appuyez sur le bouton PLAY du lecteur DVD ou dispositif externe numérique pour faire jouer le pro gramme sur le téléviseur D ENTRÉE AV 5 34 S VIDEO OUT OUT OUT L R AUDIO VIDEO COMP VIDEO Y Pb Pr AV5 1 3 5 OK 1 2 3 4 5 6 7 8 0 9 H Select SLEEP ACTIVE CONTROL CC AV CLOCK MENU EXIT PICTURE SOUND STATUS SELECT 4 ON OFF PIC SIZE MAIN FREEZE SOURCE QuadraSur...

Page 39: ...istrer un pro gramme en même temps que vous le regardez 3Connectez une extrémité du câble vidéo jaune au con necteur VIDEO Monitor Out Connectez l autre extrémité au connecteur VIDEO IN sur le second magnétoscope 4Connectez une extrémité du câble Audio rouge et blanc des connecteurs AUDIO Monitor Out L et R du téléviseur aux prises AUDIO IN du magnéto scope 5Allumez le second magnéto scope insérez...

Page 40: ...ieur gauche de l écran de télévision 5Après avoir allumé la caméra ou dispositif externe et inséré une cassette préenreg istrée CD DVD carte vidéo etc selon le type de disposi tif externe appuyez sur le bouton PLAYpour faire jouer la cassette sur le téléviseur OK 1 2 3 4 5 6 7 8 0 9 H Select SLEEP ACTIVE CONTROL CC AV CLOCK MENU EXIT PICTURE SOUND STATUS SELECT 4 PIC SIZE MAIN FREEZE QuadraSurf TM...

Page 41: ...REMARQUE ...

Page 42: ...NOTES NOTA REMARQUE ...

Reviews: