background image

SLEEP TIMER  :58

15 MIN

SLEEP

CAPTION
VOL. BAR
EXIT
SETUP
BRIGHTNESS

ST

ATUS

P

OWER

M

E

NU

MUT

E

SUR

F

-

CH

CH

VOL

     +

VOL

1

SMART

SLEEP

2

3

4

5

6

7

8

9

0

2

1

3

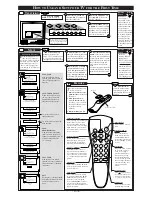
H

ave you ever fallen
asleep in front of the TV

only to have it wake you up
at two in the morning with a
test pattern screeching in
your ears?  Well, your TV
can save you all that trouble
by automatically turning
itself off.

S

LEEP

T

IMER

Press the SLEEP but-

ton on the remote.

Press the MENU (M) button
on the remote, then press the
CHANNEL

or

▼ 

(or press

the MENU 

or

▼ 

buttons on

the TV) to select the word
SLEEP with the TV’s on-
screen Arrow.

Press the SLEEP button

repeatedly to pick the amount
of time (15 minutes to 2 hours
ahead) before the TV will turn
itself off.

The VOLUME (+) or (-) but-
tons can also be used to set the
amount of time.

BEGIN

Remember.  If
you ever want to see how
many minutes are left
before the  TV shuts itself
off, press the STATUS
button on the remote.

If you want to stop a
SLEEP TIMER setting,
reset the timer back to
OFF. You could also turn
the TV off, and then back
on again, to cancel a set-
ting. 

Pressing any key on the
remote or TV in the last
60 seconds will cancel the
SLEEP TIMER setting.

S

MART

H

ELP

Press the STATUS button

to clear the screen after you
have set the time for the TV to
turn off.

An on-screen count down will
appear during the last minute
before the TV shuts itself off.

OR

S

LEEP

O

N

-S

CREEN

MENU C

ONTROLS

(

CONTINUED

)

BRIGHTNESS

PICTURE
COLOR
TINT
SHARPNESS
COLOR TEMP

ST

ATUS

P

OWER

M

E

NU

MUT

E

SUR

F

-

CH

CH

VOL

VOL

1

SMART

SLEEP

2

3

4

5

6

7

8

9

0

1

3

2

BRIGHTNESS

PICTURE

COLOR
TINT
SHARPNESS
COLOR TEMP

BRIGHTNESS
PICTURE

COLOR

TINT
SHARPNESS
COLOR TEMP

BRIGHTNESS
PICTURE
COLOR

TINT

SHARPNESS
COLOR TEMP

BRIGHTNESS
PICTURE
COLOR
TINT

SHARPNESS

COLOR TEMP

BRIGHTNESS
PICTURE
COLOR
TINT
SHARPNESS

COLOR TEMP

NORMAL

COOL

WARM

T

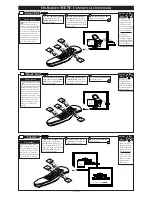
o adjust your TV picture

controls, select a channel

and follow the steps shown to
the right.

NOTE: The Smart Picture
control can automatically
adjust your TV's picture for a
variety of programs and
viewing conditions. See page
5 for details. 

P

ICTURE

A

DJUSTMENTS

Press the MENU (M)

button on the remote, then
press the CHANNEL

or

(or press MENU 

or

▼ 

but-

tonson the TV) until the desired
control shows on-screen.

Press the VOLUME (+)

and (-) to adjust the selected
picture control.

BEGIN

Press STATUS button (or

EXIT Menu) to clear the screen
when picture adjustments are
completed.

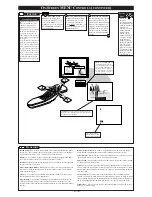
P

ICTURE

BRIGHTNESS Press (-) or (+) until darkest parts of the picture are
as bright as you prefer.

PICTURE Press  (-) or (+) until lightest parts of the picture show
good detail.

COLOR Press (-) or (+) to add or eliminate color.

TINT Press (-) or (+) to obtain natural skin tones.

SHARPNESS Press (-) or (+) to improve detail in the picture.

COLOR TEMP Press (-) or (+) to select NORMAL, COOL, or
WARM picture preferences. (NORMAL will keep the whites, white;
COOL will make the whites, bluish; and WARM will make the
whites, reddish.)

During the last minute of a SLEEP TIMER setting,
an on-screen count down will be displayed.

6 - IB7753 E001

Summary of Contents for 25TR15C

Page 1: ...istration Returning your Warranty Registration Card right away guarantees you ll receive all the information and special offers which you qualify for as the owner of your model P S Remember to get the most from your PHILIPS MAGNAVOX product you must return your Warranty Registration Card within 10 days So please mail it to us right now R E G I S T R A T I O N N E E D E D W I T H I N 1 0 D A Y S Hu...

Page 2: ...ther case the connection to the TV is very easy Just put the threaded end of the cable signal to the TV s antenna plug and screw it down tight CABLE TV CABLE INPUT CONVERTER OUT TO TV IN FROM ANT 75V ANT CABLE The basic Antenna or Cable TV to VCR to TV connection is shown to the right For more infor mation on other hookups possible when Cable Converter Descrambler boxes are included refer to your ...

Page 3: ...e through the list of controls Press the Volume buttons to adjust the MENU controls Volume and Buttons Press to adjust the TV sound level When used with the MENU button press to adjust the selected on screen MENU feature controls Number Buttons Press two number buttons to select TV channels For example to select channel 6 press 0 first then 6 Mute Button Press to turn the sound OFF on the TV Press...

Page 4: ...tton to clear the screen after adding or deleting all the channels you want CABLE CHANNEL To SAVE a channel above 100 use the CH buttons on the TV The remote number buttons only go up to channel 99 ALT CHN SURF SMART SND CABLE CHANNEL SLEEP CAPTION STAT U S PO W E R MEN U M U T E S U RF C H C H V O L V O L 1 SMART SLEEP 2 3 4 5 6 7 8 9 0 1 2 3 SURF Aseries of up to eight pre viously viewed channel...

Page 5: ...et by field and service technicians Pressing the SMART button repeatedly toggles between the Smart Picture and Smart Sound controls SMART HELP Press the STATUS but ton to clear the screen Are you tired of the sound of commercials following you into the next room or all through the house Smart Sound allows you to keep a desired volume level that the TV sound will not go above This makes for an even...

Page 6: ...NU CONTROLS CONTINUED BRIGHTNESS PICTURE COLOR TINT SHARPNESS COLOR TEMP STAT U S PO W E R MEN U M U T E S U RF C H C H V O L V O L 1 SMART SLEEP 2 3 4 5 6 7 8 9 0 1 3 2 BRIGHTNESS PICTURE COLOR TINT SHARPNESS COLOR TEMP BRIGHTNESS PICTURE COLOR TINT SHARPNESS COLOR TEMP BRIGHTNESS PICTURE COLOR TINT SHARPNESS COLOR TEMP BRIGHTNESS PICTURE COLOR TINT SHARPNESS COLOR TEMP BRIGHTNESS PICTURE COLOR T...

Page 7: ...utomatically switches the TV to the Closed Caption 1 mode whenever the MUTE button on the remote control is pressed The Closed Caption 1 mode will turn OFF when the TV sound is returned or unmuted Round Cable 75Ω A single solid antenna wire normally matched with a metal plug F type end connector that screws or pushes directly onto a 75 Ohm input found on the Television or VCR Also known as Coaxial...

Page 8: ... but you pay for all labor charges From one to two years from the day of purchase you pay for the replacement or repair of all parts except the picture tube and for all labor charges After two years from the day of purchase you pay for the replacement or repair of all parts and for all labor charges All parts including repaired and replaced parts are covered only for the original warranty period W...

Reviews: