background image

2

2

Preparation

n

3

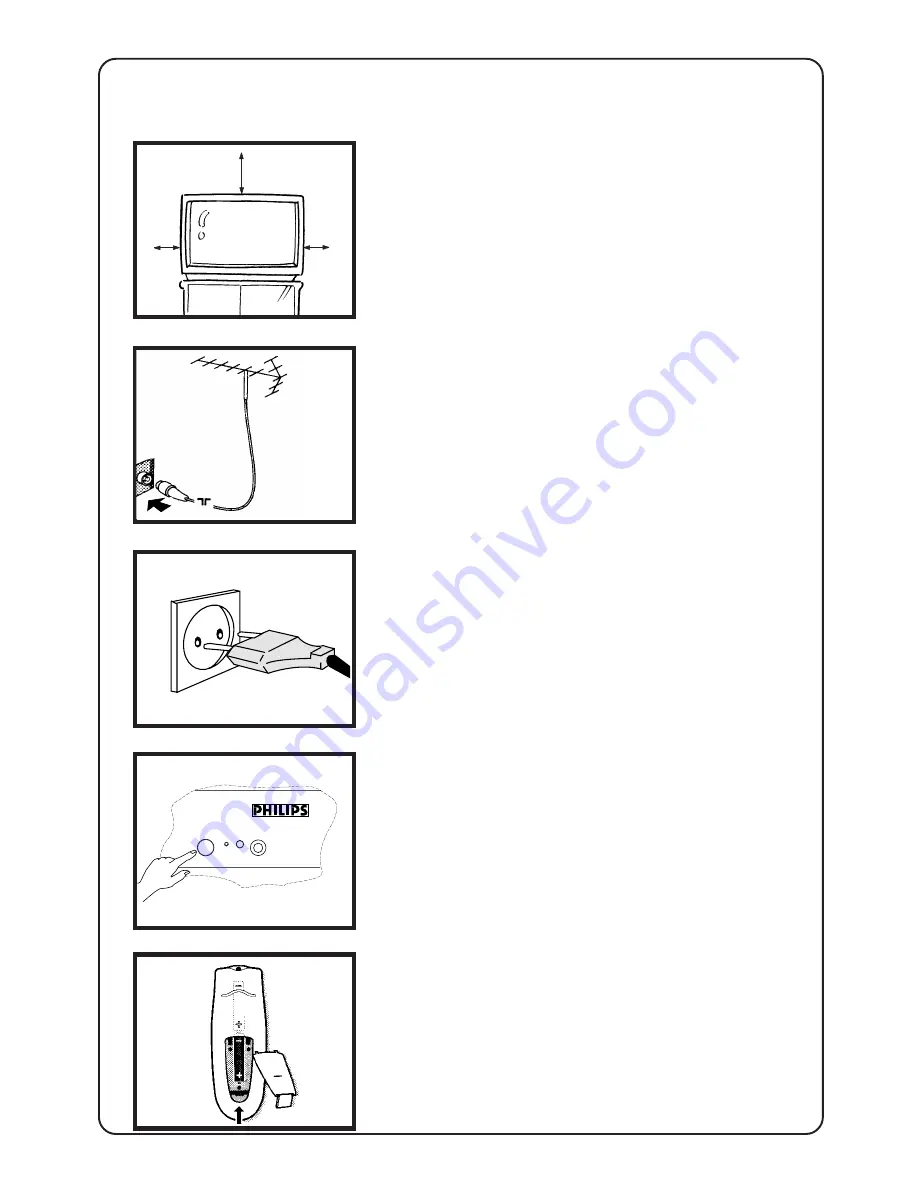
Installing the TV

Place your TV set on a stable and strong
base.

Leave at least a free space of 5 cm on both
sides and 10 cm from the top for good
ventilation of the TV set.

Do not place anything on the TV set which
might damage it e.g. plants or heat sources.

Connecting the aerial

Insert the aerial plug into the socket 

at

the back of the TV.

Connecting the mains

Insert the mains plug into the wall socket
and switch on.
Refer to the specification at the back of
the TV for the correct operating voltage.

(Picture is only a representation of the actual
plug and socket)

Switching on

Press the on/off button at the front of the
TV to switch it on.

If the indicator is red, press either the digit,
channel, A/CH, AV or 

B

 key.

Installing the remote control

Remove the cover at the back of the
remote control

Insert the correct type and size batteries
into the compartment, making sure that
they are the right way around.

10 cm

5 cm

5 cm

Summary of Contents for 25PT4623-57R

Page 1: ...S L L S L L S L L S L L S L L S LLS pm e 3139 125 26632 L L S L L S L L S L L S T e l e v i s i o n I n s t r u c t i o n M a n u a l T e l e v i s i o n I n s t r u c t i o n M a n u a l T e l e v i s i o n I n s t r u c t i o n M a n u a l ...

Page 2: ...ng the mains Insert the mains plug into the wall socket and switch on Refer to the specification at the back of the TV for the correct operating voltage Picture is only a representation of the actual plug and socket Switching on Press the on off button at the front of the TV to switch it on If the indicator is red press either the digit channel A CH AV or B key Installing the remote control Remove...

Page 3: ...y for a prolonged period Switch off your TV if not in use This will allow the TV to be demagnetised giving good picture Never repair the TV yourself get a skilled personnel Clean the TV s screen with a slightly damp soft cloth only when necessary Note Do not use abrasive solvent as it can damage the screen s coating ...

Page 4: ...d a TV channel by your TV if you connect via the aerial socket You must tune in to your VCR s test signal and assign the channel number 0 to it Refer to your VCR s instruction manual for more details connect the RF cable to the VCR s RF in and connect the RF out of the VCR to the aerial socket of the TV select channel 0 and tune in to to your VCR s signal to view the playback select channel 0 VCR ...

Page 5: ...you wish to record from to the corresponding sockets at either VIDEO in 1 or VIDEO in 2 connect the sockets of the receiving VCR to the corresponding sockets at MONITOR out 3 From the TV antenna connect the RF cable to the VCR s RF in and the RF out of the VCR to the aerial socket of the TV g Ω 75 VIDEO 2 in MONITOR out VIDEO 1 in AUDIO VIDEO L R n Connection for headphones connect the headphones ...

Page 6: ...e activated within the operating range of this sensor 4 Headphone socket For connection of headphones 5 Volume adjustment To adjust volume level Press these 2 keys simultaneously will call up the 1st level menu Press these 2 keys again will exit menu Works as cursor left VOLUME L or right VOLUME K in a menu 6 Channel selection To select a lower or higher channel number Works as cursor up CHANNEL 6...

Page 7: ...all up the main menu If there is an existing menu pressing this key will bring you back to the previous level menu If you are in the 1st level menu pressing this will exit the menu TV mode Select a higher or lower channel number In a menu Scroll up or down GAME VOL VOL CH CH SMART PICTURE SOUND MENU 2 OSD H AV 1 2 3 4 5 6 7 8 9 0 A CH h b e y f 4 SURF OSD 2 AV MENU H CH CH GAME VOL VOL CH CH SMART...

Page 8: ...Add or delete channel from the surf list View channel in the surf list A CH mode Return to the previous channel Refer to the section on Teletext Switch from stereo to mono sound for stereo transmission or choose between first lan guage or second language for bilingual transmission Select preset channels for games Select the presets for sound and picture using the remote control GAME VOL VOL CH CH ...

Page 9: ... h b e y f 4 SURF Menus 1st level BRIGHTNESS 44 COLOUR 28 CONTRAST 55 SHARPNESS 53 HUE 0 COLOUR TEMP COOL CONTRAST PLUS OFF VOLUME 19 BALANCE 0 TREBLE 50 BASS 50 INCREDIBLE ST OFF AVL OFF SLEEPTIMER OFF CHILD LOCK B SURF A CH INSTALLATION B 2nd level CODE CHANNEL 4 LOCK NO LANGUAGE ENG AUTO STORE B SWAP B SKIP B MANUAL B 3rd level FROM 3 TO 4 EXCHANGE B CHANNEL 7 SKIP NO SYSTEM AUTO SEARCH VHF1B F...

Page 10: ...SS 44 COLOUR 28 Tuning in the TV channels There are 2 ways to tune in channels automatically by AUTO STORE or manually by MANUAL menu Auto store Use to tune in channels automatically 1 Call up 1st level menu with the MENU key 2 Scroll up with the key to highlight INSTALLATION 3 Select INSTALLATION with the or key 4 Scroll down with the key to highlight AUTO STORE 5 Select AUTO STORE with the or ke...

Page 11: ...t INSTALLATION with the or key 4 Scroll down with the key to hightlight SWAP 5 Select SWAP with the or key FROM is highlighted 6 Select the channel you wish to change with the or or digit key 7 Scroll down with the key to highlight TO 8 Select the channel you wish to change to with the or or digit key 9 Scroll down with the key to highlight EXCHANGE 10 Press the or key to enter The word EXCHANGED ...

Page 12: ...ng stops once a channel is available If you decide to store the channel proceed to the next step If not press the key to start searching again 9 If you wish to fine tune the channel scroll down to highlight FINE TUNE Press the or key to fine tune 10 Scroll down with the key to high light CHANNEL and assign a channel number to the channel that you found 11 Scroll down with the key to high light STO...

Page 13: ... have bad reception or channels which you do not watched often Once a channel is skipped you will not be able to select it with the CH or CH keys 1 Scroll down with the key to highlight SKIP 2 Select with the or key CHANNEL is highlighted 3 Enter a channel number 4 Scroll down with the key to highlight SKIP 5 Select YES with the or key CHANNEL DELETED appears to confirm that the channel is skipped...

Page 14: ... either PAL DK or PAL I 1 Scroll down with the key to highlight MANUAL SYSTEM is highlighted 2 Press the or key to select a suitable system 3 Exit with the OSD key Fine tuning To fine tune the frequency of a channel 1 Scroll down with the key to highlight MANUAL 2 Press the or key to select MANUAL 3 Scroll down with the key to highlight CHANNEL Enter a channel number which you wish to fine tune 4 ...

Page 15: ...ARM CONTRAST PLUS OFF VOLUME 19 BALANCE 0 GAME VOL VOL CH CH SMART PICTURE SOUND MENU 2 OSD H AV 1 2 3 4 5 6 7 8 9 0 A CH h b e y f 4 SURF Personal settings You can do adjustment on BRIGHTNESS COLOUR CONTRAST SHARPNESS HUE COLOUR TEMP and CONTRAST PLUS of a picture via the 1st level menu This adjustment will automatically be stored in the PERSONAL mode of the SMART PICTURE feature for NTSC program...

Page 16: ...CH h b e y f 4 SURF Very vibrant colours Natural and original colours Smart Picture These are some picture presets on the TV for your viewing pleasure Press the SMART PICTURE key repeatedly to select RICH NATURAL SOFT or PERSONAL Warm colours and gives a cinema like effect when light is switched off Your personal picture settings ...

Page 17: ...REBLE 50 BASS 50 INCREDIBLE ST OFF Personal settings You can do adjustment on VOLUME BALANCE TREBLE and BASS of a picture via the 1st level menu Adjustment on treble and bass will auto matically be stored in the PERSONAL mode of the SMART SOUND feature How to do adjustment 1 Call up 1st level menu with the MENU key 2 Scroll up or down with the or key to highlight the item that you wish to adjust 3...

Page 18: ... LOCK B BASS 50 INCREDIBLE ST OFF AVL ON SLEEPTIMER OFF CHILD LOCK B GAME VOL VOL CH CH SMART PICTURE SOUND MENU 2 OSD H AV 1 2 3 4 5 6 7 8 9 0 A CH h b e y f 4 SURF VOICE MUSIC THEATRE PERSONAL sound settings Smart Sound These are some sound presets on the TV for your viewing pleasure Press the SMART SOUND key repeatedly to select VOICE MUSIC THEATRE or PERSONAL Note NORMAL for certain model Emph...

Page 19: ...e sound system in transmission Personal preference This built in feature of the TV automatically store the picture and sound set tings that you last made to a particular channel in the PERSONAL mode of Smart Picture or Smart Sound Personal preference settings Group 1 For channel number 0 to 11 each channel has its own personal preference Group 2 For channel number 12 to 99 one personal preference ...

Page 20: ... 6 keys on the TV there will be no picture and sound access to the INSTALLATION sub menu is disabled You can only call up channels with your remote control A message LOCKED and CODE appears on the screen each time you try to call up a channel with the controls on the TV To bypass the lock mode you will need to use your remote control to key in the 4 digit confidential code that you have entered wh...

Page 21: ...e selected channel s 8 Repeat steps 5 to 7 for other channels which you wish to lock Once you have completed proceed to the next step 9 Scroll up with the key to highlight CODE Key in your own 4 digit confidential code CONFIRM CODE appears 10 Key in the 4 digits again to confirm and use it whenever you want to access to locked channels 11 Exit with the OSD key SURF A CH INSTALLATION B BRIGHTNESS 4...

Page 22: ...n an incorrect code all items in the child lock menu can be selected but it is not possible to change any one of them If you key in a correct code CHANNEL will be automatically highlighted Tips If you forget your confidential code enter the universal code 8888 5 Key in a channel number which you wish to unlock 6 Scroll down with the key to highlight LOCK 7 Press or key to select NO to unlock the s...

Page 23: ...in the surf list 1 Press the A CH SURF key once and the TV will switch to the next channel which is on the surf list OR Press and hold the A CH SURF key to cycle through all the channels on the surf list SURF A CH INSTALLATION B BRIGHTNESS 44 COLOUR 28 CONTRAST 55 CHILD LOCK B SURF SURF INSTALLATION B BRIGHTNESS 44 5 ADDED 3 SURF 5 SURF There are 2 selectable functions 1 Surf Create a list of chan...

Page 24: ...nnels which you wish to delete from the surf list Selecting alternate channel A CH 1 Call up 1st level menu with the MENU key 2 Scroll up with the key to highlight SURF 3 Select A CH with the or key 4 Exit with the OSD key When you are viewing a channel e g channel number 6 and if you wish to go back to the previous channel e g channel number 3 press the A CH SURF key once If you wish to go back t...

Page 25: ...f the counter continue searching this means the page is not available Select another page Displays the previous or the next teletext page Press once will reveal hidden information solutions to puzzles riddles Press again to conceal In TV mode Press once to display clock on the top right corner Press again to switch off display In Teletext mode Call up a sub page only for teletext page with sub pag...

Page 26: ...se buildings or hills Check that the antenna at the back of the TV is properly connected Possible TV station problem Try another channel Increase the volume Check that the TV is not muted If it is press the H key on the remote control to cancel mute Adjust the contrast and brightness setting Check the antenna connection Switch off any nearby electrical appliances e g hairdryer vacuum cleaner etc a...

Page 27: ...k Note For operating voltage frequency power consumption and model and version number please refer to the type sticker at the back of the set Model type 25PT 29PT Picture Tube visible area 59 cm 68 cm Audio output 2 x 5 W 2 x 5 W Set dimensions Width 68 cm 76 cm Height 54 cm 58 cm Depth 47 cm 51 cm Nett weight approx only 26 kg 36 kg ...

Page 28: ...ent of difficulty please contact the Philips Information Centre in any country see enclosed addresses CONDICIONES DE GARANTIAS INTERNATIONALES Philips garantiza este producto durante 1 año a partir de la fecha de adquisición contra defectos debidos a una imperfecta fabricación o malos materiales Esta garantía cubre tanto las piezas de recambio como la mano de obra Las reparaciónes que pudieran pro...

Page 29: ...h Street 15 P O Box 3153 G 10210 Athens Phone 01 4894301 880 Fax 01 4894344 IRELAND Philips Electronics Ireland Ltd Newstead Clonskeagh Dublin 14 Phone 01 7640000 Fax 01 7640175 ITALY Philips S P A Servicio Consumatori Philips Piazza IV Novembre 3 I 20124 Milano Phone 167 820026 linea verde Fax 02 67522660 LUXEMBURG Philips Luxemburg S A 19 21 rte d Arlon L 8001 Strassen Phone 44 38 38 1 Fax 45 39...

Page 30: ...usters 4 Zeelandia P O Box 3523 3051 Willemstad Curacao Phone 09 612799 Fax 09 612772 CONSUMER INFORMATION CENTRES ARGENTINA Philips Argentina S A Centro de Información al Usuario Vedia 3892 1430 Buenos Aires Phone 01 5442047 Fax 01 5452928 BRASIL Philips da Amazona Indústria Electrônica Ltda Rua Jacerú 151 Brooklin 04705 000 Sao Paula SP Phone 800123123 Fax 011 5315973 CHILI Philips Chilena S A A...

Page 31: ...istic Centre 385 Hong Cao Road Shanghai 200233 Phone 021 4726839 Fax 021 4726843 Philips Authorized Service Centre 801 Dong Feng Road East Guangzhou 510080 Phone 020 7766990 Fax 020 7766990 Philips Authorized Service Centre Beijing Jing Pu Elec Service Station 6 F Guo Hu Department Store Xan Wu Men West Street Beijing 100053 Phone 01 3021589 Fax 01 3021589 Philips Authorized Service Centre 148 Fu ...

Page 32: ...walpindi Cantt Phone 051 580902 3 Fax 051 584944 PHILIPPINES Philips Electronics and Lighting Inc 106 Valero St Salcedo Village Makati Metro Manila Phone 02 8100161 Fax 02 8173474 SINGAPORE Philips Singapore Private Ltd Consumer Service Dept Lorong 1 Toa Payoh P O Box 340 Singapore 319762 Phone 3502000 Fax 2508037 TAIWAN Philips Taiwan Ltd Consumer Products Division 4F 1 5 Lane 768 Pateh Rd Sec 4 ...

Reviews: