background image

5

M

Mu

ussiic

c  M

Mo

od

de

e::  L

Liib

brra

arryy  O

Op

pttiio

on

nss  a

an

nd

d  F

Fa

asstt  S

Sc

crro

olllliin

ng

g

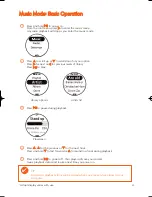
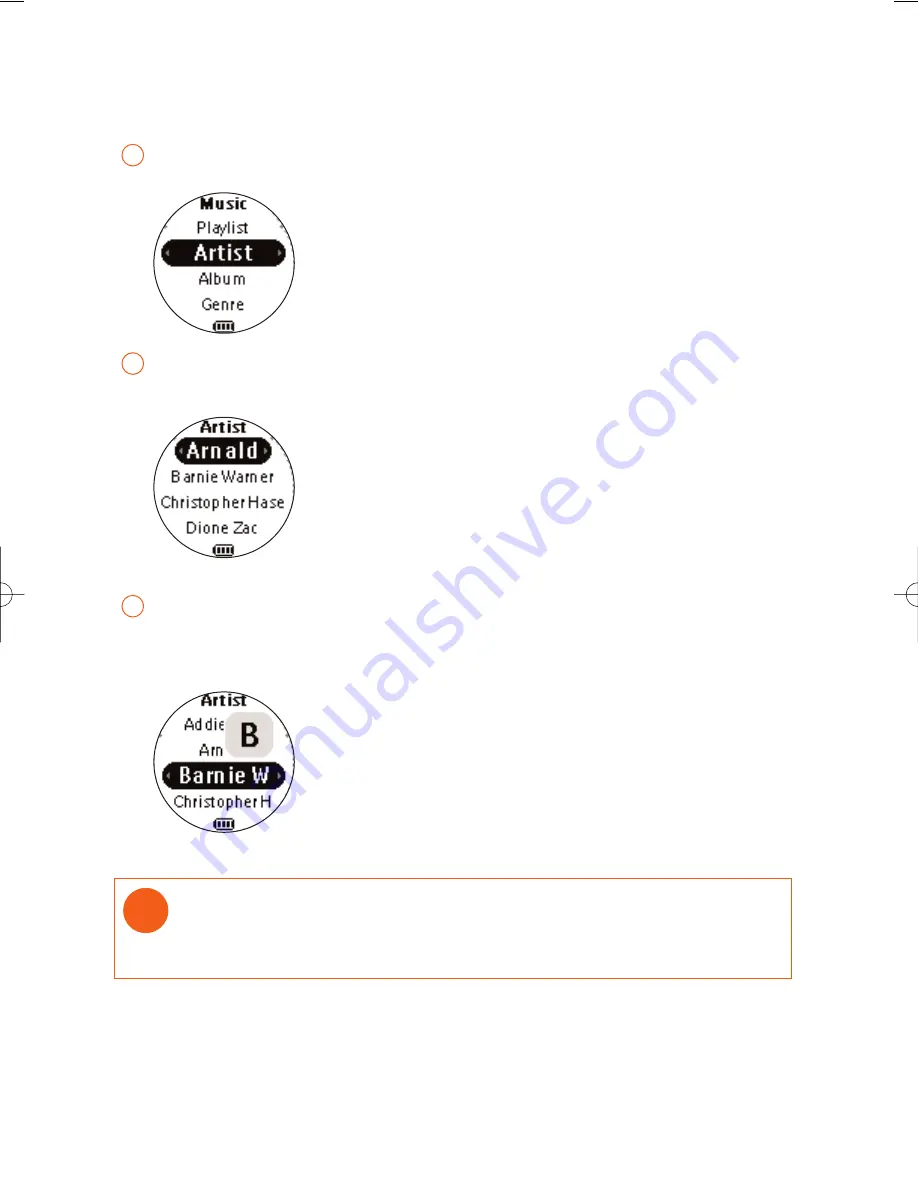
Press 

3

3

to scroll up or 

4

4

to scroll down for your library option.

Press 

2

2

on A

Arrttiisstt to display the artist library

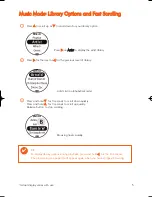
Press 

2

2

for the next or 

1

1

for the previous level of library.

2

Artists list in alphabetical order

Press and hold 

4

4

for 3 seconds to scroll down quickly.

Press and hold 

3

3

for 3 seconds to scroll up quickly.

Release button to stop scrolling.

3

Browsing tracks quickly.

1

TIP

To display library options during playback, press and hold 

1

1

for the root menu.

The playscreen (see page 4) will appear again when you have stopped browsing.

*Actual display varies with use

psa220_eng.qxd  2/6/04  14:54  Page 5

Summary of Contents for 256MB-SPORT AUDIO PLAYER PSA220

Page 1: ......

Page 2: ...e installation 1 O Or rg ga an niiz ze e a an nd d t tr ra an ns sf fe er r m mu us siic c v viia a D DM MM M Launch DMM on your PC from Windows desktop or S St ta ar rt t menu Use DMM to organize your music Transfer music files from your computer to your player 4 TIP Please refer to your computer s manual for the exact position of your USB port Look for the USB symbol on the processing unit of yo...

Page 3: ... Dynamically displays menu options and track information 7 Volume control press to decrease press to increase 8 H He ea ad dp ph ho on ne es s j ja ac ck k Connects headphones or waistband remote control 9 Stop watch press to start pause or reset stop watch 0 U US SB B p po or rt t Connects to computer charges your player C Ch ha ar rg giin ng g s so oc ck ke et t U US SB B c co ov ve er r Protect...

Page 4: ...t S Sh hu uf ff fl le e R Re ep pe ea at t D DB BB B E Eq qu ua al liiz ze er r B Ba ac ck kl liig gh ht t C Co on nt tr ra as st t L La an ng gu ua ag ge e F Fa ac ct to or ry y s se et tt tiin ng gs s Press and hold 2 2 to power on Press and hold 1 1 for the root menu See specific chapters for details of each setting 2 e g Playlist001 PlaylistXXX e g A Z Preset 1 Preset 10 Autostore 3 3 1 1 2 2 ...

Page 5: ...e e B Ba as siic c O Op pe er ra at tiio on n Library options Artists list Playscreen Press 3 3 3 3 for the previous or 4 4 for the next track Press and hold 4 4 to fast forward or 3 3 to rewind in a track during playback 4 Press and hold 2 2 to power off Your player will save your current music playback status and resume next time you power on 5 Press 2 2 to pause during playback 3 Actual display...

Page 6: ...s 2 2 for the next or 1 1 for the previous level of library 2 Artists list in alphabetical order Press and hold 4 4 for 3 seconds to scroll down quickly Press and hold 3 3 for 3 seconds to scroll up quickly Release button to stop scrolling 3 Browsing tracks quickly 1 TIP To display library options during playback press and hold 1 1 for the root menu The playscreen see page 4 will appear again when...

Page 7: ... A AU UT TO O S SE EA AR RC CH H Press 2 2 to automatically select the 10 strongest radio stations Press 1 1 to abort A AU UT TO O S SE EA AR RC CH H 2 Press 3 3 to scroll up or 4 4 to scroll down for your preset Press 2 2 to play the selected station 3 Radio mode no station stored Stations tuned Automatic tuning TIP No stations are tuned if you are using your player for the first time Actual disp...

Page 8: ...or 3 3 to fine tune tune step by step Press and hold 4 4 to search for the next available station Press and hold 3 3 for the previous available station Press 1 1 to abort searching Press 2 2 to save your setting 3 Manual tuning Station stored TIP If you want to discard the newly searched station press 1 1 to exit the radio menu Radio preset menu 2 Actual display varies with use ...

Page 9: ...or 1 1 for previous levels of options 2 Settings mode Repeat Shuffle Strobe light Equalizer Press 2 2 to confirm your selection 3 TIP To display player information select and highlight F Fa ac ct to or ry y s se et tt tiin ng gs s press and hold 2 2 for 2 seconds The information screen will tell you the model number and free space available on your player Actual display varies with use ...

Page 10: ...et tt tiin ng gs s S St tr ro ob be e l liig gh ht t D DB BB B E Eq qu ua al liiz ze er r S Sh hu uf ff fl le e R Re ep pe ea at t L La an ng gu ua ag ge e B Ba ac ck kl liig gh ht t C Co on nt tr ra as st t F Fa ac ct to or ry y s se et tt tiin ng gs s on o of ff f Rock Funk Techno o of ff f HipHop Shuffle Shuffle Repeat o of ff f E En ng gl li is sh h Italiano Español Repeat All Portugués França...

Page 11: ...P Music or radio playback is not affected when you start your stop watch Stop watch count will be displayed at the bottom of your music or radio screen S St tr ro ob be e L Liig gh ht t Strobe light is an illumination technology setting that allows the backlit LCD display to gradually radiate bursts of light enhancing visibility of the runner in low light conditions see p 9 for more information Ac...

Page 12: ... regions TIP Use armband and player holder to wear player on your arm Use armband waistband remote control and player holder to wear player on your waist Connect headphones Attach waistband Player holder Attach armband TIP The controls of your waistband remote control works just like those on your player during music playback ...

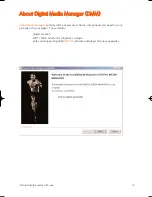
Page 13: ... Digital Media Manager contains all the necessary software components you need to work properly with your player These include playlist creation MP3 WMA transfer for playback on player paths and supporting link for DMM software and player firmware upgrades Actual display varies with use ...

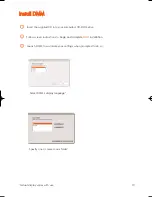
Page 14: ...into your computer s CD ROM drive 1 Follow screen instructions to begin and complete DMM installation 2 Launch DMM to customize your settings when prompted to do so 3 Select DMM s display language Specify one or more music folder Actual display varies with use ...

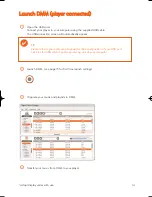
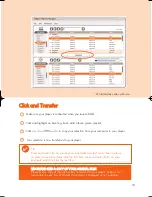
Page 15: ...SB connection screen will automatically appear 1 Launch DMM see page 15 for first time launch settings 2 Organize your music and playlists in DMM 3 Transfer your music from DMM to your player 4 TIP Please refer to your computer s manual for the exact position of your USB port Look for the USB symbol on the processing unit of your computer Actual display varies with use ...

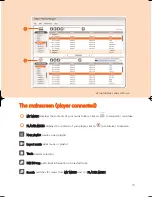
Page 16: ...displays the contents of your player click on to minimize maximize 2 N Ne ew w p pl la ay yl liis st t creates a new playlist I Im mp po or rt t m mu us siic c adds music or playlist T Tr ra as sh h deletes selection E Ed diit t I ID D3 3 t ta ag g edits track information of selected track S Se ea ar rc ch h searches for music from M MY Y M MU US SI IC C and or P PL LA AY YE ER R M MU US SI IC C A...

Page 17: ... P PL LA AY YE ER R M MU US SI IC C 2 1 2 5 6 8 9 3 4 7 S Sc cr ro ol ll l b ba ar r 3 P Pu ul ll l d do ow wn n m me en nu us s 4 T Te ex xt t a ar re ea a type your search criteria here 5 transfers highlighted tracks and or playlists 6 H He ea ad de er r s se ep pa ar ra at to or r resizes column width 7 P Pl la ay ye er r m me em mo or ry y iin nd diic ca at to or r shows available memory on yo...

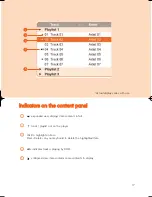
Page 18: ...d view displays item contents in full 1 track playlist not on the player 2 1 2 3 4 5 Click to highlight an item Press Delete on your keyboard to delete the highlighted item 3 indicates track is playing by DMM 4 collapsed view item contains more contents to display 5 Actual display varies with use ...

Page 19: ...M MP PO OR RT TA AN NT T K KE EE EP P A A C CO OP PY Y O OF F Y YO OU UR R O OR RI IG GI IN NA AL L F FI IL LE ES S Please keep a copy of the original files transferred to your player Philips is not responsible for any loss of content if the player is damaged or not readable Actual display varies with use TIP Press and hold Ctrl on your keyboard and click to select more than one item To select con...

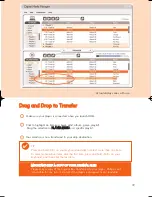
Page 20: ...p destination 3 I IM MP PO OR RT TA AN NT T K KE EE EP P A A C CO OP PY Y O OF F Y YO OU UR R O OR RI IG GI IN NA AL L F FI IL LE ES S Please keep a copy of the original files transferred to your player Philips is not responsible for any loss of content if the player is damaged or not readable Actual display varies with use TIP Press and hold Ctrl on your keyboard and click to select more than one...

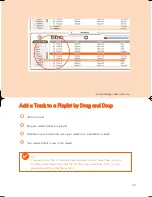
Page 21: ...a playlist 2 Hold the mouse button and move your selection to a destination playlist 3 Your selected track is now in the playlist 4 TIP Press and hold Ctrl on your keyboard and click to select more than one item To select consecutive items click the first item press and hold Shift on your keyboard and then click the last item Actual display varies with use ...

Page 22: ...ructions to save your new playlist You can now drag more tracks to the new playlist 3 Click on to import a playlist 1 Fill in the information in the pop up window 2 Follow screen instructions to import your new playlist You can now drag more tracks to the imported playlist 3 I Im mp po or rt t P Pl la ay yl liis st ts s Actual display varies with use ...

Page 23: ...lection to to delete 2 Alternatively press Delete on your keyboard to delete your selection 3 Actual display varies with use TIP Press and hold Ctrl on your keyboard and click to select more than one item To select consecutive items click the first item press and hold Shift on your keyboard and then click the last item ...

Page 24: ... E Ed diit to or r 2 Click on the text boxes of T Tr ra ac ck k n na am me e T Tr ra ac ck k n nu um mb be er r A Ar rt tiis st t A Al lb bu um m G Ge en nr re e Y Ye ea ar r C Co om mm me en nt ts s to edit relevant information 3 Click on O OK K to save the information Click C Ca an nc ce el l to discard changes made 4 Actual display varies with use ...

Page 25: ...earching 2 You will see tracks and or playlists that contain the search string 3 You can transfer delete or drag and drop these tracks as described in previous sections 4 TIP Deleting items from the searched results will delete them from your library Click on the S Se el le ec ct to or r p pa an ne el l to exit the search view 5 Actual display varies with use ...

Page 26: ...a an ng gu ua ag ge e For selecting a language for DMM M Mu us siic c f fo ol ld de er rs s For adding deleting or re arranging your Music folders T Tr ra an ns sf fe er r o op pt tiio on ns s For selecting transfer options P Pl la ay ye er r f fiir rm mw wa ar re e For checking upgrading and restoring player firmware U Up pg gr ra ad de e D DM MM M For checking and upgrading DMM H He el lp p D DM...

Page 27: ...R M MU US SI IC C When the content panel is reduced to a certain size the content panel will only show the section icon 2 D Dr ro op p Z Zo on ne e When P PL LA AY YE ER R M MU US SI IC C is minimized you will see a D Dr ro op p Z Zo on ne e You can drag selected items and drop them here Note that the D Dr ro op p Z Zo on ne e icon turns grey when player memory is full 3 DMM provides different vie...

Page 28: ...click on the contents header Track Artist Album Genre to arrange music tracks according to the order you selected 1 D De et ta aiil le ed d s su um mm ma ar ry y v viie ew w Click on the next to the contents header to turn on turn off detailed display of item contents 2 detailed view summary view ...

Page 29: ...a ad de e F Fiir rm mw wa ar re e This will give you further information on how to download and upgrade your player firmware 1 Follow screen instructions to complete firmware upgrade 2 TIP Because you are updating the program of your player please make sure your player is connected to your computer before you launch DMM Keep it connected during the firmware upgrade process D DM MM M U Up pg gr ra ...

Page 30: ...l applications including DMM 1 From the Start menu go to Control Panel Select Add Remove Programs Select DMM from your currently installed programs to uninstall 2 For further information on uninstalling programs please refer to Windows user manual 3 ...

Page 31: ...ot respond Player busy Press and hold VOLUME and 3 3 to reset Press and hold 2 2 for 2 seconds to power on again if the power on screen does not appear automatically Automatic power off Your player automatically powers if there is no operation and no music played within 20 seconds Press and hold 2 2 to power on 30 T Tr ro ou ub bl le es sh ho oo ot tiin ng g 1 1 If a fault occurs first check the p...

Page 32: ...ilips com register so we can inform you as soon as new free upgrades becom available Tracks were copied Your player will play tracks only if they from your computer are transferred using the by packed to your player using music management software drag and drop in Windows Explorer or Finder Tracks not shown in Track format not Ensure that all your music on your by packed music supported computer i...

Page 33: ...ose DMM while file transfer is in progress Operate using one file management system only When transferring files do not attempt to transfer files via Windows Explorer Finder whilst waiting for transfer to complete on DMM Do not delete any track via Windows Explorer Finder when file transfer is active in DMM If you wish to delete a file please only do so from either DMM or from Windows Explorer Fin...

Page 34: ...n the user is encouraged to try to correct the interference by one or more of the following measures 0 Relocate the receiving antenna 0 Increase the separation between the equipment and receiver 0 Connect the equipment into an outlet on a circuit different from that to which the receiver is connected 0 Consult the dealer or an experienced radio TV technician for help This Class B digital apparaatu...

Page 35: ... up pp po or rt t Album title genre title track title and artist name S St to or ra ag ge e M Me ed diia a Mass storage class 256MB NAND Flash psa 220 512MB NAND Flash psa 250 Music memory capacity psa 220 up to 60 MP3 tracks 128kbps or 120 WMA tracks 64kbps psa 250 up to 125 MP3 tracks 128kbps or 250 WMA tracks 64kbps Actual formatted capacity will be less T Tu un ne er r Frequency range 87 5 108...

Page 36: ...www nike philips com type number psa220 250 2004 Phillips Nike Inc All rights reserved Meet Philips Nike on the Internet http www nike philips com ...

Reviews: