background image

Language:

 using the left or right direction button to 

select your desired menu language.


Note: 

The available languages might differ depending 

  on the model.

Color System:


use the right direction or OK button 

to display the selectable options, then press the up or 
down direction button to select your desired color system
and press OK to confirm. 
(

Note: 

The available color system might differ depending

on the model.

Color system for india:PAL. 

)

Child Lock 

Press the right or OK button to enter,then

u

se the number buttons to input the password 

(The default is 0000). Then press the left or right direction 
button to select the limit time. To cancel the limit, select  
Off. And you can also change the password: select the  
PW Modify item and press the right direction or OK button 
to enter, then enter a new password twice.


Note:

 If you forget the password, enter 0432 to 

   override any existing codes.

Time Setting:

 Press the up or down direction button to 

select the Time Setting item, then press the right 
direction or OK button to enter.


Current Time: 

press the left, right, up, down  direction 

   button to set the current time.


Turn on Repeat: 

select the times to turn on the TV at a 

   specific time, press the left or right direction button to 
   toggle among Off, Once and EveryDay.
   (Note: if Off selected, the Turn on Time, Wake Source 
    and Wake Channel are not adjustable.)


Turn on Time: 

press the left, right, up, down direction 

   button to set the turn on time.


Wake Source: 

press the left or right direction 

   button to select the wake up signal source.


Wake Channel: 

press the left or right direction 

   button to select a wake up channel.
   (Note: Only when the wake up source is TV, this 
   function can be available.)


Turn off Repeat: 

select the times to turn on the TV at  

    a specific time, use the left or right direction button to 
    toggle among Off, Once and EveryDay.
    (Note: if Off selected, the Turn off Time is not adjustable.)

Current Time

Turn on Repeat

Turn on Time

Wake Source

Wake Channel

Turn off Repeat

Turn off Time

Sleep Time

--:--

Off

--:--

TV

1

Off

--:--

Off

Selecting a Signal Source or Look 
over the Layout of Terminals


Turn off Time: 

press the left, right, up, down direction  

    button to set the turn off time.


Sleep Time:

 sets a period of time after which the TV 

    set goes into standby mode, use the left or right 
    direction button to set the period (240 minutes maximum). 
    To disable this function, select Off. 

Restore to default:

 restores all the settings to defaulted 

settings in factory.

Press Menu to return or Exit to close the menu.

Note:

 For some models, the 

Motion Enhance

 option may 

be available.

Motion Enhance: 

This function is used to cancel motion 

judder. Select the 

Motion Enhance 

option, then use the 

left or right direction button set the Motion enhance effect: 

Low

Middle

High

 and 

Off

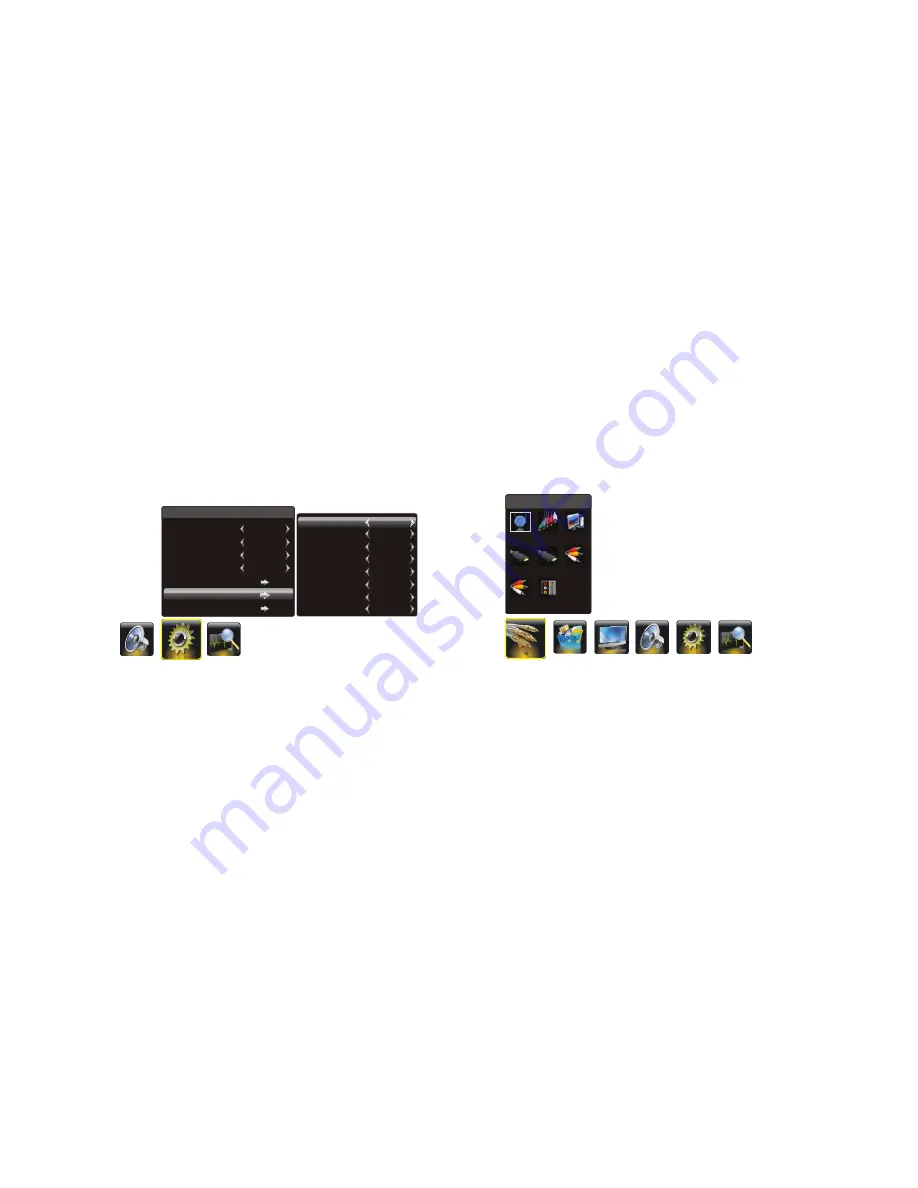
Display the menu by pressing the Menu button. Press the 
left or right direction button to select the Source icon 

and 

press the

 or down direction or OK button to display the 

Source menu.

1. Press the up, down, left or right direction button to 
    select your desired source.
    (

Note: The available source might differ depending 

     on the model.)

2. Press the OK button to confirm the selection.

1. Press the up, down, left or right direction button to select 
    Layout and press OK to display Interface Status.

2. Press the up, down, left or right direction button to look 
    over.

3. 

 up


Press Menu to return or Exit to close the menu.

Source

TV 

PC

HDMI1

HDMI2

AV 1

AV 2

YPbPr

Layout


Note: 

You can press the SOURCE button on the remote 

    control to switch the source. But if the SMART switch
    function is on, pressing the source button shall result in 
    switching between the connected sources only .

Selecting a Signal Source

Look over the Layout of Terminals

Setting

Smart Switch

Startup Setting

Language

Color System

Child Lock

Time Setting 

Restore to Default

Off

Default

English

Auto

  12  EN

Summary of Contents for 24PFL5555

Page 1: ...Register your product and get at www philips com welcome EN User manual 46PFL5755 V7 42PFL5555 V7 32PFL5355 V7 24PFL5555 V7 support ...

Page 2: ... 6 FAQ 8 8 9 9 9 10 11 11 12 13 13 14 14 14 10 Adjusting the Sound Function Settings Selecting a Signal Sourc or Look over the Layout of Terminalse Geometry Settings USB Functions 7 Other Information 15 Troubleshooting 15 16 16 8 16 16 Product information Supported display resolutions Multimedia Tuner Reception Transmission Remote control Power SupportedTV mounts Product 16 16 17 17 5 Sockets 9 9 ...

Page 3: ... the display within common industry standards and is not a malfunction Warranty No components are user serviceable Do not open or remove covers to the inside of the product Repairs may only be done by Philips Service Centres and official repair shops Failure to do so shall void any warranty stated or implied Any operation expressly prohibited in this manual any adjustments or assembly procedures n...

Page 4: ...he power outlet if the voltage is different Risk of injury or power cord damage Never place the TV or any objects on the power cord To disconnect the TV power cord easily from the power outlet ensure that you have full access to the power cord at all times 2 Important Read and understand all instructions before you use yourTV If damage is caused by failure to follow instructions the warranty does ...

Page 5: ...peratures below 5 until the TV temperature matches room temperature before connecting the TV to the power outlet Screen care Avoid stationary images as much as possible Stationary images are images that remain on screen for extended periods of time Examples include on screen menus black bars and time displays If you must use stationar y images reduce screen contrast and brightness to avoid screen ...

Page 6: ...the remote and adjust menu controls MENU button Brings up the main menu or press to return to the previous menu 3 2 VOLUME UP DOWN button Increases decreases the volume In the menu system they act like the right left direction buttons on the remote and adjust menu controls Note In some menus VOLUME UP also acts like the OK button on the remote 5 POWER button Turns the TV on or standby Note for som...

Page 7: ...ge of equipment including video recorders camcorders satellite receivers DVD players or games consoles AUDIO IN sockets or AUDIO in adapter are shared by VGAand YPbPr or CMP adapter sockets AV 1 RCA audio video sockets input orAV 1 in adapter socket Note AV 1 IN adapter The socket can be used to connect the attached AV adapter cable with VIDEO and AUDIO L R IN sockets R L AUDIO VIDEO AV 1 IN or AV...

Page 8: ...zes the picture EXIT Exits the menu system SCENEA Deletes the selected file in the playlist Note TELETEXT DEMO SCENEA DUAL MENU Brings up the menu system up down left and right direction buttons Highlights different items in the menu system and adjusts the menu controls OK Confirms your selection BACK A CH Returns to a previous screen Toggles between the current channel and the last viewed channel...

Page 9: ...ed on directly or be in standby Note For some models s If the power indicator lights up the TV set is in standby mode Press the button on the remote control or on the TV set to turn on the TV witch the TV on by pressing the power button 2 Connect the power cable FIRST to the television THEN to a mains socket Note If the power cable is connected to the television please only connect the power cable...

Page 10: ...below procedure if you find that some channels have not been stored after the automatic set up as well as the intelligent set up right left or right left or right left or right Press Menu to return or Exit to close the menu 1 Activate the Channel menu and p the Manual Tuning option 2 Press the direction or OK button to enter the Manual Tuning menu 3 Select the Current Channel option and press the ...

Page 11: ...can simply skip it The skipped channels can not be selected by pressing the CH buttons 1 select the Current Channel option and press the left or right Press the up or down direction button to 10 EN direction button to select the channel number to be skipped 2 Press the up or down direction button to select direction button to select Yes 3 the Skip option and press the left or right Press Menu to r...

Page 12: ...arm for a more red palette of picture colors Dynamic Contrast right Press Menu to return or Exit to close the menu Smart Switch Display press the left or right direction button to select a desired setting Switch Display and Off Switch if an equipment e g a DVD player has been connected to the sockets on the TV set and turned on e g AV1 sockets theTV set will switch to that signal source automatica...

Page 13: ...mong Off Once and EveryDay Note if Off selected the Turn off Time is not adjustable Current Time Turn on Repeat Turn on Time Wake Source Wake Channel Turn off Repeat Turn off Time Sleep Time Off TV 1 Off Off Selecting a Signal Source or Look over the Layout of Terminals Turn off Time press the left right up down direction button to set the turn off time Sleep Time sets a period of time after which...

Page 14: ...ct a movie file then press OK to play it 4 When playing a movie you can press the Menu button to display the play console For the play console press the left or right direction button to select an icon then press the OK button to confirm The play console includes 5 Select the Stop icon in play console and press OK or press Exit or to return Showing photo 1 Select Photo Show item then press the rig...

Page 15: ...ot be recognized Please change to use the standard device 2 JPEG BMP PNG H 264 RM RMVB XVID MPEG4 MPEG2 MPEG1 MP3 WMA 2 Press the left or right direction button to select the USB disk symbol and press the OK button to enter the selected disk 3 Press the up down left or right direction button to select your desired music file and press OK to play it 4 When playing music press the Menu button to dis...

Page 16: ...n VGA mode Perhaps the TV can not recognize the resolution set by the PC Suggest to change to the best resolution or other standard resolutions of the Windows system Snowy dots and interference If the antenna is located in the fringe area of a television signal where the signal is weak the picture may be marred by dots When the signal is extremely weak it may be necessary to install a special ante...

Page 17: ...e without notice For detailed product information go to www philips com support Supported display resolutions Computer formats HDMI Resolution refresh rate 640 x 480 60Hz 72Hz 75Hz 800 x 600 56Hz 60Hz 72Hz 75Hz 1024 x 768 60Hz 70Hz 75Hz 1280 x 768 60Hz 1280 x 960 60Hz 1280 x 1024 60Hz 70Hz 75Hz Computer formats VGA Resolution refresh rate 640 x 480 60Hz 72Hz 75Hz 800 x 600 56Hz 60Hz 72Hz 1024 x 76...

Page 18: ...TV TV screen size inches Required pitch mm Required mounting bolts Product specification Design and specifications are subject to change without notice 24PFL5555 V7 Without TV stand Dimension WxHxD 600 x 395 x 44 mm Weight 4 6 kg Without TV stand Dimension WxHxD 1040x 680 x 48 mm Weight 14 9 kg 46PFL5755 V7 Without TV stand Dimension WxHxD 1127x 731 x 48 mm Weight 16 3kg EN 17 24PFL5555 V7 32PFL53...

Page 19: ...ent of the technician deciding that set requires attention at the service station kindly arrange to deliver the set to the service station designated by technician for further attention Home calls by the technician would however be restricted within the municipal limits of the city town in which the set has been registered Type no _ Serial No _ Date of Purchase _ Purchased By Name _ Address _ T el...

Page 20: ...abnormal voltage Acts of God or while in transit to purchaser s residence This TV receiver is covered under warranty against any defect arising out of faulty or defective material or workman ship for a period of 12 months from the date of purchase Should a defect develop in this set during the period of warranty PE Electronics Limited undertakes to get the set repaired free of charge either From w...

Page 21: ......

Reviews: