background image

18

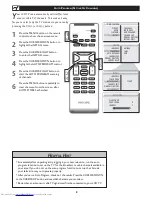
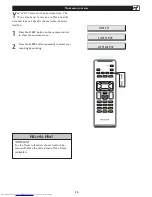
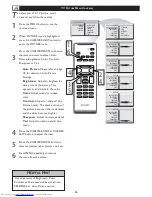
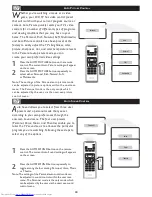
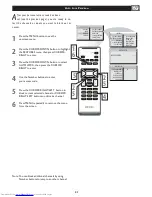
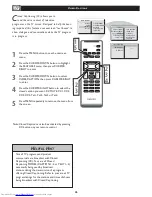
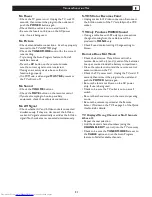
Press the AUTO PICTURE button on the remote 
control. The current Auto Picture setting will appear 

on the screen.
Press the AUTO PICTURE button repeatedly to 

select either Personal, Rich, Natural, Soft,  
or Multimedia.

A

UTO

 P

ICTURE

 C

ONTROL

W

hether you’re watching a movie or a video 
game, your LCD TV has video control preset 

that will match with your current program source or 
content. Auto Picture quickly resets your TV’s video 
controls for a number of different types of programs 
and viewing conditions that you may have in your 
home. The Personal, Rich, Natural, Soft, Multimedia, 
and Auto Picture controls have been preset at the 
factory to easily adjust the TV’s brightness, color, 
picture, sharpness, tint, and color temperature levels. 
In the Personal auto picture mode you can  
create your own preferred video settings.

Note: The settings of the Personal auto picture mode 
can be adjusted in picture options within the onscreen 
menu. The Personal mode is the only mode which 
can be adjusted by the user via the onscreen picture 
control menu.

A

uto Sound allows you to select from three user 
presets and a personal mode that you set  

according to your own preferences through the  
onscreen Sound menu. The four user presets 
(Personal, Voice, Music, and Theatre) enable you to 
tailor the TV sound so as to enhance the particular 
program you are watching. Following these steps to 
select any of the options.

1

2

Note: The settings of the Personal auto sound mode can  
 

be adjusted in sound control within the onscreen  


menu. The Personal  mode is the only mode which  


can be adjusted by the user via the onscreen sound  


control menu.

Personal

Rich

Natural

Soft

Multimedia

Personal

Voice

Music

Theatre

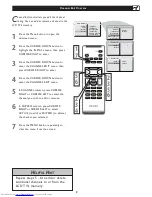
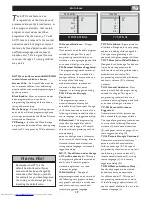
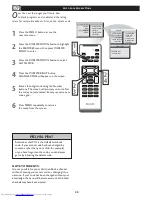
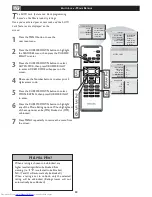
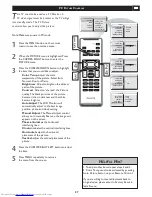
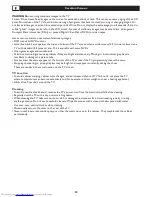
Press the AUTO SOUND button on the remote 
control. The current Auto Sound setting will appears 
on the screen.

Press the AUTO SOUND button repeatedly to 
toggle among the four setting: Personal, Voice, Music, 
or Theatre.

A

UTO

 S

OUND

 C

ONTROL

1
2

Summary of Contents for 23PF5320

Page 1: ...oduct more enjoyable If you have read your instructions and still need assistance you may access our online help at www usasupport philips com or call 1 888 PHILIPS 744 5477 while with your product and Model Serial number 23PF5320 LCD TV User s Manual Thank you for choosing Philips Need help fast English Français Espãnol Português ...

Page 2: ...ng the enclosed card guarantees that your date of purchase will be on file so no additional paperwork will be required from you to obtain warranty service Product Safety Notification By registering your product you ll receive notification directly from the manufacturer in the rare case of a product recall or safety defect AdditionalBenefitsof ProductOwnership Registering your product guarantees that ...

Page 3: ...he appliance has been dropped or the enclosure damaged Tilt Stability All televisions must comply with recommended international global safety standards for tilt and stability properties of its cabinet design Do not compromise these design standards by applying excessive pull force to the front or top of the cabinet which could ultimately overturn the product Also do not endanger yourself or child...

Page 4: ...ation when temperature changes occur Condensation can cause damage to the LCD screen and electrically parts After condensation fades spots or blemishes will be present on the LCD screen CAUTION information is located on the inside of the VESA cover see diagram below To read information open the VESA cover POSITIONING THE LCD TELEVISON Place the LCD TV on a solid sturdy base or stand Be sure the st...

Page 5: ...ls 16 Sound Menu TV Sound Menu Controls 17 Features Menu Auto Lock 19 Auto Picture Control 18 Auto Sound Control 18 Auto Lock Access Code 20 Auto Lock Program 21 Auto Lock Movie Ratings 22 Auto Lock TV Ratings 23 Using The Picture Format 24 SURF Control 25 Closed Captions 26 PC Mode PC Picture Controls 27 PC Audio Controls 28 Using PC PIP Picture In Picture Feature 29 Setting Up The PC Mode 30 Gen...

Page 6: ...he CURSOR RIGHT to confirm Press the MENU button repeatedly to clear the menu from the screen 1 2 3 4 5 Remember the LANGUAGE control makes only the TV s onscreen MENU items appear in English French Spanish or Portuguese text It does not change the other onscreen text features such as Closed Captioning CC with TV shows MAIN CONTROLS PICTURE AUDIO FEATURES INSTALL LANGUAGE TUNER MODE AUTO PROGRAM CH...

Page 7: ...NU button repeatedly to clear the menu from the screen 1 2 3 4 5 6 MAIN CONTROLS PICTURE AUDIO FEATURES INSTALL LANGUAGE TUNER MODE AUTO PROGRAM CHANNEL EDIT FACTORY RESET MANUAL FINE TUNE INSTALL LANGUAGE TUNER MODE AUTO PROGRAM CHANNEL EDIT FACTORY RESET MANUAL FINE TUNE 1 6 2 4 5 ANTENNA CABLE AUTO When CABLE is selected channels 2 125 are available When ANTENNA is selected channels 2 69 are av...

Page 8: ...RE PLEASE WAIT PROG FOUND 0 CHANNEL 3 INSTALL LANGUAGE TUNER MODE AUTO PROGRAM CHANNEL EDIT FACTORY RESET INSTALL LANGUAGE TUNER MODE AUTO PROGRAM CHANNEL EDIT FACTORY RESET START MANUAL FINE TUNE MANUAL FINE TUNE MAIN CONTROLS PICTURE AUDIO FEATURES INSTALL LANGUAGE TUNER MODE AUTO PROGRAM CHANNEL EDIT FACTORY RESET MANUAL FINE TUNE ANTENNA CABLE AUTO 1 Immediately after unpacking and plugging in...

Page 9: ...utton to enter the CHANNEL EDIT menu then press CURSOR RIGHT to enter Press the CURSOR DOWN button to enter the CHANNEL EDIT menu In CHANNEL column press CURSOR RIGHT or CURSOR LEFT to select the channel you wish to add or remove In SKIPPED column press CURSOR RIGHT or CURSOR LEFT to select ACTIVE to add or SKIPPED to delete the channel you selected Press the MENU button repeatedly to clear the me...

Page 10: ...et the original factory settings Press the MENU button repeatedly to clear the menu from the screen 1 2 3 4 5 MAIN CONTROLS PICTURE AUDIO FEATURES INSTALL LANGUAGE TUNER MODE AUTO PROGRAM CHANNEL EDIT FACTORY RESET INSTALL LANGUAGE TUNER MODE AUTO PROGRAM CHANNEL EDIT FACTORY RESET YES NO MANUAL FINE TUNE MANUAL FINE TUNE If you reset the TV to the factory settings all your present setting on pict...

Page 11: ...er cord DVI IN HDCP Connect to your DVD player or other video equip ment with DVI HDCP output connectors PC IN Connect to your PC with VGA type video output Component HD SD Connect to the Digital Satellite Receiver or other video equipments that supports YPbPr HD High Definition video format 2 3 4 1 5 6 7 8 Positioning the LCD TV Place the LCD TV on a solid stable surface Be sure the surface is st...

Page 12: ...TV on the wall please consult a professional technician for proper installing The manufacture accepts no liability for installations not performed by professional technician 100x100mm The manufacturer accepts no liability for improper installations or installations not performed in accordance with these instructions ...

Page 13: ...s Point the remote control toward on the front of the LCD TV when operating the LCD TV with the remote control Remove the battery compartment lid on the button of the remote control Place lithium cell in the remote control Be sure the and ends of the batteries line up as marked inside the battery CR2025 compartment Reattach the battery compartment lid BASICTV AND REMOTE CONTROL OPERATIONS BATTERY ...

Page 14: ...ress to select the video input source PC DVI TV AV1 AV2 Component S Video HD Power button Press to turn the LCD TV on or off CC button Press the CC button to select CC on or CC off Sleep button Press to set the LCD TV to turn itself off within a certain time PIP button Press repeatedly to change the size of PIP window in PC mode A CH Button Press to go to previously selected channel Menu button Pr...

Page 15: ...c channel when it powers itself on Press the SLEEP button on the remote control to show the onscreen menu Press the SLEEP button repeatedly to select your requiring sleep timing 1 2 SLEEP 240 MIN SLEEP 15 MIN SLEEP OFF IMPORTANT For the Timer to function the set must not be turned off Once the set is turned off the Timer is disabled HELPFUL HINT ...

Page 16: ...ck portions of the picture become richer in darkness and the white become brighter Sharpness Adjust to improve detail Tint Adjust to obtain natural skin tones TV PICTURE MENU CONTROLS To adjust your LCD TV picture select a channel and follow these steps 1 2 3 4 5 6 MAIN CONTROLS PICTURE AUDIO FEATURES INSTALL AUTO PICTURE BRIGHTNESS COLOR CONTRAST TINT SHARPNESS PICTURE AUTO PICTURE BRIGHTNESS COL...

Page 17: ... occur during commercial breaks or channel changes Press the CURSOR RIGHT or CURSOR LEFT button to adjust the item Press the CURSOR DOWN button to select and adjust other sound controls Press MENU repeatedly to remove the menu from the screen 1 2 3 4 5 6 7 Any adjustment of Treble and Bass will be stored into PERSONAL at Auto sound If Stereo is not presented on a selected show and the TV is placed...

Page 18: ...icture mode can be adjusted in picture options within the onscreen menu The Personal mode is the only mode which can be adjusted by the user via the onscreen picture control menu Auto Sound allows you to select from three user presets and a personal mode that you set according to your own preferences through the onscreen Sound menu The four user presets Personal Voice Music and Theatre enable you ...

Page 19: ...r a very young audience including children ages 2 6 This type of programming is not expected to frighten younger children TV Y7 Directed to Older Children Designed for children age 7 and above It may be more appropriate for children who can distinguish between make believe and reality This programming may include mild fantasy and comic violence FV or fantasy violence TV G General Audience Most par...

Page 20: ...om the screen Remember that 0711 is the default AutoLock code If your access code has been changed by someone other than you a child for example or you have forgotten the code you can always get in by inputting the default code 1 2 3 4 5 6 MAIN CONTROL PICTURE AUDIO FEATURES INSTALL PICTURE FORMAT AUTOLOCK CLOSED CAPTION FEATURES PICTURE FORMAT AUTOLOCK CLOSED CAPTION LOCK PROGRAM CHANG CODE CLEAR...

Page 21: ...e Press the CURSOR RIGHT LEFT button to block current selected channel or CURSOR RIGHT LEFT button to unblock a channel Press MENU repeatedly to remove the menu from the screen 1 2 3 4 5 6 Note You can block additional channels by using Number buttons to jump to another channel AUTOLOCK LOCK PROGRAM CHANGE CODE CLEAR ALL BLOCK OPTION MOVIE RATING TV RATING 18 AUTOLOCK ACCESS CODE 1 MAIN CONTROL PI...

Page 22: ... options When highlighted all these options can be ON blocked or OFF unblocked Press MENU repeatedly to remove the menu from the screen 1 2 3 4 5 6 7 AUTOLOCK LOCK PROGRAM CHANGE CODE CLEAR ALL BLOCK OPTION MOVIE RATING TV RATING G PG PG13 R NC17 X MOVIE RATING G PG PG13 R X NC17 AUTOLOCK ACCESS CODE 1 MAIN CONTROL PICTURE AUDIO FEATURES INSTALL PICTURE FORMAT AUTOLOCK CLOSED CAPTION FEATURES PICT...

Page 23: ... any of the TV Rating options When highlighted all these options can be ON blocked or OFF unblocked 1 2 3 4 5 6 7 8 AUTOLOCK LOCK PROGRAM CHANGE CODE CLEAR ALL BLOCK OPTION MOVIE RATING TV RATING Y Y7 G PG 14 MA TV RATING G Y Y7 PG MA 14 AUTOLOCK ACCESS CODE 1 OFF ON MAIN CONTROL PICTURE AUDIO FEATURES INSTALL PICTURE FORMAT AUTOLOCK CLOSED CAPTION FEATURES PICTURE FORMAT AUTOLOCK CLOSED CAPTION L...

Page 24: ...EEN 4 3 COLOR TEMP PICTURE FORMAT COLOR TEMP ZOOM 14 9 ZOOM 16 9 SUBTITLE ZOOM SUPER WIDE PICTURE ALIGNMENT 4 3 WIDESCREEN ZOOM 14 9 SUBTITLE ZOOM ZOOM 16 9 SUPERWIDE Note 1 You can directly change the picture format by pressing the FORMAT button on your remote control 2 The Picture Format Function is not accessible in PC MODE 3 In HD and DVI MODE the Picture Format Function is only accessible whe...

Page 25: ...ls up to 8 to the SURF list 1 2 3 4 Alist or series of previously viewed channels can be selected with the SURF button on your remote control With this feature you can easily switch between different TV channels that currently interest you The SURF control allows you to set up to 8 channels in its quick viewing list SURF EDIT 1 22 ADD SURF LIST EMPTY SURF EDIT SURF EDIT SURF EDIT 1 22 Delete 1 22 ...

Page 26: ...tedly to remove the menu from the screen 1 2 3 4 5 Note Closed Caption can also be activated by pressing CC button on your remote control Not all TV programs and product commercials are broadcast with Closed Captioning CC Nor are all Closed Captioning MODES CAPTION 1 4 or TEXT 1 4 necessarily being used by broadcast stations during the transmission of a program offering Closed Captioning Refer to ...

Page 27: ...on the screen Phase eliminates the horizontal interfering lines Clock eliminates the vertical interfering lines Horizontal adjust the horizontal placement of the picture Vertical adjust the vertical placement of the picture Press the CURSOR RIGHT LEFT button to adjust the item Press MENU repeatedly to remove the menu from the screen 1 2 3 4 5 PICTURE COLOR TEMP BRIGHTNESS CONTRAST AUTO ADJUST MANU...

Page 28: ...nly function in TV mode Incredible Sound Adds greater depth and dimension to PC sound AVL Auto Volume Leveler When ON AVL will level out the sound being heard when sudden changes in volume occur during commercial breaks or channel changes Press CURSOR RIGHT to enter the item you would like to adjust Press the CURSOR RIGHT or CURSOR LEFT button to adjust Press MENU repeatedly to remove the menu fro...

Page 29: ...hat you would like to adjust SIZE Turn off and set the size of PIP You can choose your preferred size of small large or PBP Picture Beside Picture Video Select video source of PIP from TV AV1 AV2 S Video or Component Audio Select audio source of PIP or PC Display Select which corner of the position of PIP 1 2 3 4 5 MAIN CONTROLS FEATURES INSTALL PICTURE AUDIO PICTURE FORMAT PIP FEATURES FULLSCREEN...

Page 30: ...tion Mode V Frequency Hz H Frequency kHz 1 640 x 480 VGA VESA 60 59 940 31 469 2 800 x 600 SVGA VESA 56 56 250 35 156 3 SVGA VESA 60 60 317 37 897 4 1024 x 768 XGA VESA 60 60 004 48 363 5 1280 x 720 VESA CVT 59 855 44 772 6 1280 x 768 VESA CVT 60 000 47 700 Recommended Resolution ...

Page 31: ... simultaneously S VHS Color Becomes Faint Unplug socket for S Video connection Reconnect the S Video socket of the TV carefully to the VCR socket TV Only Produces MONO Sound If using a cable box with RF only type connections the signal coming from the cable box will be produced in MONO only Check Sound control setting Change setting to Stereo Remote Does Not Work Check the batteries Place lithium ...

Page 32: ...g or low contrast graphics are less likely to damage the picture tube Stock market tickers may appear at the bottom of the TV screen if the TV programming covers this news Shopping channel logos pricing displays may be bright and may appear constantly during the show These are usually in the same location on the TV screen TV Location To avoid cabinet warping cabinet color changes and an increased ...

Page 33: ... Edit 9 31 Closed Captions 10 26 Color 4 16 18 26 27 31 32 F Factory Reset 11 27 I Index 5 33 L Language 6 18 19 Limited Warranty 5 36 M Mono 14 17 28 31 R Regulatory 34 S Sound 14 17 18 28 31 Sound Mode 14 18 Stereo 14 17 28 31 T Table of Contents 5 Tint 16 18 Treble 17 28 Troubleshooting 31 TV Operation Basic 13 W Warranty 2 5 34 Welcome 5 ...

Page 34: ... installation If this equipment does cause harmful interference to radio or television reception which can be determined by turning the equipment off and on the user is encouraged to try to correct the interference by one or more of the following measures Use only RF shielded cable with ferrite core when connecting this monitor to a computer device Reorient or relocate the receiving antenna Increa...

Page 35: ...enna systems outside of the product Product repair and or part replacement because of improper installation connections to improper voltage supply abuse neglect misuse accident unauthorized repair or other cause not within the control of Philips A product that requires modification or adaptation to enable it to operate in any country other than the country for which it was designed manufactured app...

Reviews: