


230E LCD
15
Electrical instructions
F/W upload instruction
Configuration and procedure (ISP Tool)
"ISP Tool" software is provided by NOVATEK to upgrade
the firmware of Scaler IC. It is a windows-based program,
which cannot be run in MS-DOS.
System and equipment requirements:
1. An i486 (or above) personal computer or compatible.
2. Microsoft operation system Windows 98/2000/XP.
3. ISP software " EasyUSB Writer V4.0 ".
(Need to install, it can not be performed directly.Double
press“EasyUSB Writer V4.0.exe”to start installing,then
chose the path that you want to install ,then it will perform
automatically.)
4. Firmware uploading tool, as shown in Fig1.
Fig1
* Connect the firmware uploading tool as Fig.1 shown.
* Before the servicer perform the ISP Tool program, the
Communicating connection must be well done.The USB
port connects to the computer. VGA port connects to the
Monitor
.
* When the connection fixed, power on the monitor.
Setup and perform the ISP Tool program
1. Save the software in your PC, and create a shortcut
on the desktop.
2. Double click the ISP Tool. exe icon at the desktop then
appears window as shown in Fig. 2.
Fig. 2
3. Press the “Load File”button then select the path that
save hex file , then chose file type as “Bank
Switch(128K,256K)”as shown
:
Fig3
4. Double press the “H00” file or “H01 file” ,then it acquires
the hex file automatically, and a message will be showed in
the dialog box to notice the operator. At this moment,
please verify the checksum of the hex file with the firmware
control table to make sure the suitable file will be used.
Mentioned firmware control table will be provided by
suppliers shown in Fig. 4.
Fig4
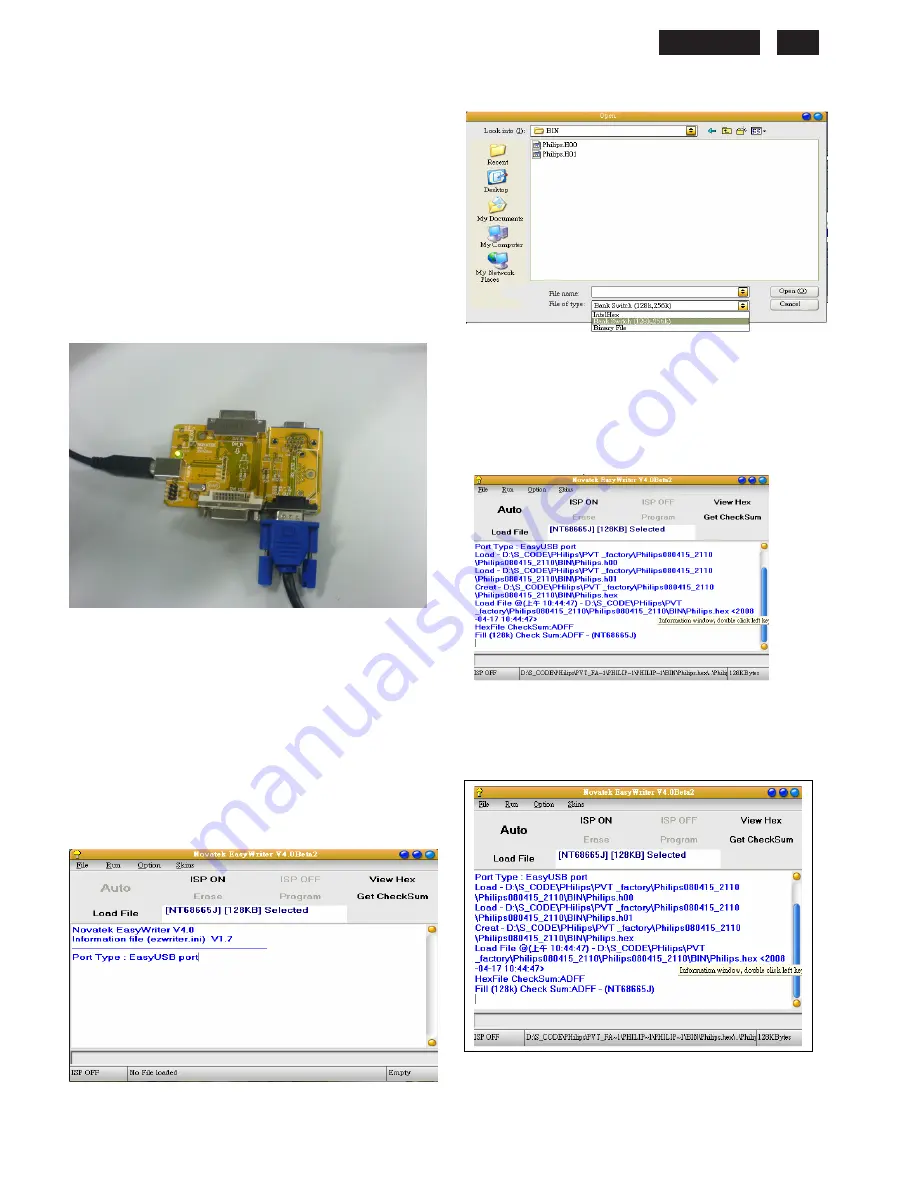
5. Press the “ISP ON” button ,then the dialog box will has the
information “ISP ON”,else has the information “ISP Fail”.If the
information is“ISP Fail ,check the connectivity ,then try it
again as shown in Fig. 5.
Fig. 5.
6. Press “
Auto
”button of the toolbox. Program will perform
the loading process automatically. When the loading process
completed, and the dialog box appeared the message of
Programing Success. If Program perform fail ,resume step 5.
Summary of Contents for 230E1HSB
Page 12: ...230E1 LCD 12 Wiring diagram ...
Page 28: ...230E1 LCD 28 Schematic Diagram Scaler Board Power ...
Page 29: ...230E LCD 29 220EW9 LCD 29 Schematic Diagram VGA Input ...
Page 30: ...230E1 LCD 30 Schematic Diagram DVI Input ...
Page 31: ...230E LCD 31 220EW9 LCD 31 Schematic Diagram HDMI Input ...
Page 32: ...230E1 LCD 32 Schematic Diagram Scaler Board Scaler ...
Page 33: ...230E LCD 33 220EW9 LCD 33 Schematic Diagram HDMI Audio Board ...
Page 34: ...230E1 LCD 34 Schematic Diagram Power Board ...
Page 35: ...230E LCD 35 220EW9 LCD 35 Layout side View Scaler Board 1 ...
Page 36: ...230E1 LCD 36 Layout side View Scaler Board 2 ...
Page 37: ...230E LCD 37 220EW9 LCD 37 Layout side View Power Board ...
Page 38: ...230E1 LCD 38 Exploded View ...
Page 46: ...230E1 LCD 46 General Trouble Shooting Guide ...
Page 48: ...230E1 LCD 48 General Trouble Shooting Guide Continued 1 ...
Page 50: ...230E1 LCD 50 General Trouble Shooting Guide ...
Page 51: ...230E LCD 51 General Trouble Shooting Guide 5 ...
Page 52: ...230E1 LCD 52 General Trouble Shooting Guide 6 ...
Page 53: ...230E LCD 53 General Trouble Shooting Guide 7 ...
Page 54: ...230E1 LCD 54 General Trouble Shooting Guide 8 ...
Page 55: ...230E LCD 55 General Trouble Shooting Guide 9 ...
Page 56: ...230E1 LCD 56 General Trouble Shooting Guide 10 ...
Page 57: ...230E LCD 57 General Trouble Shooting Guide 11 ...
Page 58: ...230E1 LCD 58 General Trouble Shooting Guide 12 ...
Page 59: ...230E LCD 59 General Trouble Shooting Guide 13 ...
Page 76: ...230E1 LCD 76 END ...