background image

18

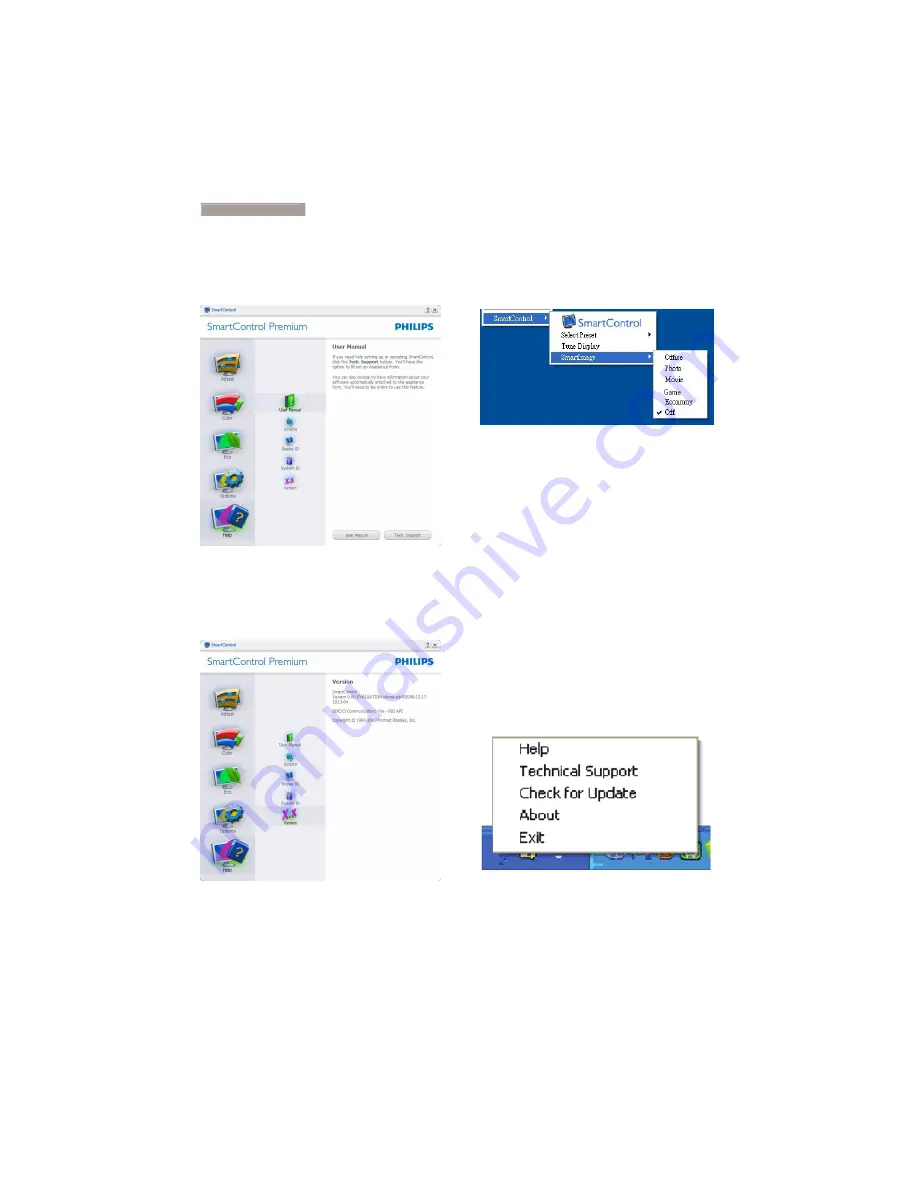
Help>User Manual

 - Will only be active when 

selecting User Manual from the drop-down 
Help menu. On a non-supported display 
capable of DDC/CI, only the Help and Options 
tabs are available.

Help>Version

 - Will only be active when 

selecting Version from the drop- down Help 
menu. On a non-supported display capable of 
DDC/CI, only the Help and Options tabs are 
available.

Context Sensitive menu

The Context Sensitive menu is Enabled by 
default. If Enable Context Menu has been 
checked in the Options>Preferences pane, then 
the menu will be visible.

The Context Menu has four entries:

‡

SmartControl Premium

 - When selected 

the About Screen is displayed. 

‡

Select Preset

 - Provides a hierarchical 

menu of saved presets for immediate 
use. A check mark shows the currently 
selected preset. Facoty Preset can also be 
called from the drop down menu. 

‡

Tune Display

 - Opens the SmartControl 

Premium control panel. 

‡

SmartImage

 - Check current settings, Of-

fice, Photo, Movie, Game, Economy, Off.

Task Tray Menu Enabled

The task tray menu can be displayed by right-
clicking on the SmartControl Premium icon 
from the task tray. Left Click will launch the 
application.

3. Image Optimization

Summary of Contents for 221B3LPCB

Page 1: ...www philips com welcome EN User manual 1 Customer care and warranty 36 Troubleshooting FAQs 50 221B3 ...

Page 2: ...0 3 2 SmartContrast 11 3 3 Philips SmartControl Premium 12 3 4 SmartDesktop Guide 19 4 Power Sensor 24 5 Technical Specifications 26 5 1 Resolution Preset Modes 28 6 Power Managementt 29 6 1 Automatic PowerSaving 29 7 Regulatory Information 30 8 Customer care and warranty 36 8 1 Philips Flat Panel Monitors Pixel Defect Policy 36 8 2 Customer Care Warranty 38 9 Troubleshooting FAQs 50 9 1 Troublesh...

Page 3: ...ed power cord provided by Philips all the time If your power cord is missing please contact with your local service center Please refer to Customer Care Consumer Information Center Do not subject the monitor to severe vibration or high impact conditions during operation Do not knock or drop the monitor during operation or transportation Maintenance To protect your monitor from possible damage do n...

Page 4: ... to the chapter of Consumer Information Center For transportation information please refer to Technical Specifications Do not leave your monitor in a car trunk under direct sun light Note Consult a service technician if the monitor does not operate normally or you are not sure what procedure to take when the operating instructions given in this manual have been followed 1 2 Notational Descriptions...

Page 5: ...hat serves your household or the store at which you purchased the product Your new monitor contains materials that can be recycled and reused Specialized companies can recycle your product to increase the amount of reusable materials and to minimize the amount to be disposed of All redundant packing material has been omitted We have done our utmost to make the packaging easily separable into mono ...

Page 6: ...nstallation Package contents Register your product and get support at www philips com welcome Quick Start VGA optional DVI optional 221B3 2 0 1 1 K o n i n k l i j k e P h i l i p s E l e c t r o n i c s N V A l l r i g h ts reserved Unauthorized duplication is a violation of applicable laws Made and printed in Chi n a V e r s i o n M 3 2 2 1 B E 1 T Q 7 0 G 2 2 C 1 8 1 3 1 0 A Install base stand ...

Page 7: ...y AC power outlet 5 Connect the USB upstream port on the monitor and the USB port on your computer with a USB cable The USB downstream port is now ready for any USB device to plug in 6 Turn on your computer and monitor If the monitor displays images the installation is done 2 2 Operating the monitor Front view product description To access the OSD menu Return to previous OSD level Power sensor To ...

Page 8: ...the structure of the On Screen Display You can use this as a reference when you want to work your way around the different adjustments later on Main menu Sub menu Auto Input VGA DVI PowerSensor On 0 1 2 3 4 Off Audio Stand Alone On Off On Off Mute Picture Wide Screen 4 3 0 100 0 100 On Off 1 8 2 0 2 2 2 4 2 6 Picture Format Brightness Contrast SmartContrast Gamma OSD Settings 0 100 0 100 Off 1 2 3...

Page 9: ...is displayed on screen Use 1920 x 1080 at 60 Hz for best results Display of the native resolution alert can be switched off from Setup in the OSD On Screen Display menu Physical Function Tilt Swivel 65 65 Height adjustment 70mm Note Remove the height adjustment pin lock before adjusting the height Insert the height adjustment pin lock before lifting the monitor 2 Setting up the monitor ...

Page 10: ...he monitor base to its maximum height 70mm 2 Place the monitor face down on a smooth surface taking care to avoid scratching or damaging the screen Then lift the monitor stand 3 Release the lock of base stand then pull the base stand away from the base column Remove the Base Condition ForVESA standard mounting applications 1 Remove the 8 screw covers 2 Setting up the monitor ...

Page 11: ...9 2 Remove the 4 screws and then remove the base from the monitor Note This monitor accepts a 100mm x 100mm VESA Compliant mounting interface 100mm 100mm 2 Setting up the monitor ...

Page 12: ...screen Based on a scenario you select SmartImage dynamically enhances the contrast color saturation and sharpness of images to enhance the contents being displayed all in real time with the press of a single button How to enable SmartImage 1 Press to launch the SmartImage on screen display 2 Keep pressing to toggle between Office Photo Movie Game Economy and Off 3 The SmartImage on screen display ...

Page 13: ...ss contrast are adjusted and backlighting finetuned for just right display of everyday office applications and lower power consumption v Off No optimization by SmartImage 3 2 SmartContrast What is it Unique technology that dynamically analyzes displayed content and automatically optimizes a Monitor s contrast ratio for maximum visual clarity and viewing enjoyment stepping up backlighting for clear...

Page 14: ...n v Follow the instruction and complete the installation v You can launch after installation is completed v If you want to launch later you can either click the shortcut on desktop or toolbar First launch Wizard The first time after installation of Smart Control Premium it will automatically go to Wizard for first time launch The wizard will guide you through adjust ment your monitor performance s...

Page 15: ...ack Level White Point Color Calibra tion and SmartImage Please refer to SmartImage section You can follow the instruction and do the adjustment Refer to below table for sub menu item base on your input Example for Color Calibration 3 Image Optimization ...

Page 16: ...calibration by default is on If unchecked does not allow for color calibration to happen dimes out start and quick view buttons 6 Must have patent info in calibration screen First color Calibration Screen Previous button is disabled until the sec ond color screen Next goes to the succeeding target 6 targets Finally go to file Presets pane Cancel closes the UI and returns to the plug in page 3 Imag...

Page 17: ... the drop down Plug Ins menu To enableTheft Deterrence clicking Enable Theft Deterrence Mode button brings up the following screen User can enter PIN between 4 and 9 digits numbers only After entering PIN Accept button takes user to the pop up dialog box on the fol lowing page Minimum minutes set to 5 Slider set to 5 by default Does not require the display be attached to a different host to go int...

Page 18: ...ol Premium se lections for Select Preset and Tune Display in the desktop right click context menu Disabled removes SmartControl Premium from the right click context menu Enable Task Tray icon is checked On by default Enable context menu shows the task tray menu for SmartControl Pre mium A right click on the task tray icon displays the menu options for Help Tech nical Support Check for Update About...

Page 19: ...her SmartControl Premium tabs are not available Display the Source instruction pane and current input source setting On single input displays this pane will not be visible Options Audio Will only be active when selecting Audio from the drop down Options menu On a non supported display capable of DDC CI only the Help and Options tabs are available Option Auto Pivot 3 Image Optimization ...

Page 20: ...ecked in the Options Preferences pane then the menu will be visible The Context Menu has four entries SmartControl Premium When selected the About Screen is displayed Select Preset Provides a hierarchical menu of saved presets for immediate use A check mark shows the currently selected preset Facoty Preset can also be called from the drop down menu Tune Display Opens the SmartControl Premium contr...

Page 21: ... desktop PC icon or restart the system Task Tray Menu Disabled When theTaskTray is disabled in the preference folder only the EXIT selection is available To completely remove SmartControl Premium from the task tray disable Run at Startup in Options Preferences 3 4 SmartDesktop Guide SmartDesktop SmartDesktop is in SmartControl Premium Install SmartControl Premium and select SmartDesktop from Optio...

Page 22: ...re color options Click Effects button check Show window contents while dragging XP Display Properties Appearance Effects check Show window contents while dragging Win 7 No other alternative path available Title Bar Options Desktop partition can be accessed from the title bar of the active window This provides a quick and easy way to manage the desktop as well as sending any window to any partition...

Page 23: ...ut having to drag and drop Releasing the mouse will send the window to the highlighted partition Task Tray Right Click The task tray also contains most of the features supported in the title bar with the exception of automatically sending a window to any partition Find Windows In some cases the user may have sent multiple windows to the same partition Find Window will show all open windows and mov...

Page 24: ...ion 2 horizontal center Partition 3 horizontal bottom For 270 Partition 3 horizontal top Partition 2 horizontal center Partition 1 horizontal bottom Vertical Split Left Assesses the screen resolution and divides the display into two vertical regions the left hand side is a single region the right hand side is split into two evenly sized regions For 90 Partition 1 on top Partition 2 3 on bottom For...

Page 25: ...eft sideVertical Partition 2 3 on right sideVertical Horizontal Split Bottom Assesses the screen resolution and divides the display into two evenly sized horizontal regions the bottom region is single the top region is spilt into two evenly sized regions For 90 Partition 1 2 on right sideVertical Partition 3 on left sideVertical For 270 Partition 1 2 on left sideVertical Partition 3 on right sideV...

Page 26: ...is in front of the monitor the monitor operates normally at the predetermined settings that the user has set i e Brightness contrast color etc v Assuming that the monitor was set to 100 of brightness for example when the user leaves his seat and is no longer in front of the monitor the monitor automatically reduces the power consumption up to 80 Power consumption as illustrated above is for refere...

Page 27: ...nal strength when wearing black or other dark garb v You can return to the default mode at any time setting 3 Sensor distance Hot key 1 2 3 4 0 1 0 2 3 4 Power Sensor 3 How to adjust settings If PowerSensor is not operating correctly inside or outside the default range here s how to fine tune detection v Press the PowerSensor hot key v You will find the default position 3 on the adjustment bar v A...

Page 28: ... DVI digital VGA analog Input Signal Separate Sync Sync on Green Convenience User Convenience Smartimage Volume Power On Off Sensor back Menu OK OSD Languages English French German Italian Russian Spanish Simplified Chinese Portuguese Plug Play Compatibility DDC CI sRGB Windows 7 Vista XP Mac OSX Linux Stand Tilt 5 20 Swivel 65 65 Height adjustment 70mm 221B3LP Power On mode 20 1 W typ 30 W max On...

Page 29: ...kg Product with packaging 6 67 kg Operating Condition Temperature range operation 0 C to 40 C Temperature range Non operation 20 C to 60 C Relative humidity 20 to 80 Altitude Operation 12 000 ft 3 658 m Non operation 40 000 ft 12 192 m MTBF 50 000hrs CCFL 30 000hrs LED Environmental ROHS YES EPEAT Gold www epeat net Packaging 100 recyclable Compliance and standards Regulatory Approvals BSMI CE Mar...

Page 30: ...00 640x480 66 67 37 86 640x480 72 81 37 50 640x480 75 00 37 88 800x600 60 32 46 88 800x600 75 00 48 36 1024x768 60 00 60 02 1024x768 75 03 63 89 1280x1024 60 02 79 98 1280x1024 75 03 55 94 1440x900 59 89 70 64 1440x900 74 98 65 29 1680x1050 59 95 67 50 1920x1080 60 00 Note Please notice that your display works best at native resolution of 1920 X 1080 60Hz For best display quality please follow thi...

Page 31: ...power consumption and signaling of this automatic power saving feature 221B3LP Power Management Definition VESA Mode Video H sync V sync Power Used LED color Active ON Yes Yes 20 1 W typ White Sleep Standby OFF No No 0 1 W typ White blinking Switch Off OFF 0 W typ AC switch OFF The following setup is used to measure power consumption on this monitor v Native resolution 1920 x 1080 v Contrast 50 v ...

Page 32: ...contrast resolution black level gamma curve colour and luminance uniformity and colour rendering 7 Regulatory Information v Products are tested according to rigorous safety standards at impartial laboratories v Electric and magnetic fields emissions as low as normal household background levels v Low acoustic noise emissions when applicable Some of the Environmental features of the TCO Certified fo...

Page 33: ...duct is in conformity with the following standards v EN60950 1 2006 Safety requirement of Information Technology Equipment v EN55022 2006 Radio Disturbance requirement of Information Technology Equipment v EN55024 1998 A1 2001 A2 2003 Immunity requirement of Information Technology Equipment 7 Regulatory Information v EN61000 3 2 2006 Limits for Harmonic Current Emission v EN61000 3 3 1995 A1 2001 ...

Page 34: ...the separation between the equipment and receiver v Connect the equipment into an outlet on a circuit different from that to which the receiver is connected v Consult the dealer or an experienced radio TV technician for help Changes or modifications not expressly approved by the party responsible for compliance could void the user s authority to operate the equipment Use only RF shielded cable tha...

Page 35: ...reçu l approbation des services compétents en matière de conformité est susceptible d interdire à l utilisateur l usage du présent équipement N utiliser que des câbles RF armés pour les connections avec des ordinateurs ou périphériques CET APPAREIL NUMERIQUE DE LA CLASSE B RESPECTETOUTES LES EXIGENCES DU REGLEMENT SUR LE MATERIEL BROUILLEUR DU CANADA EN 55022 Compliance Czech Republic Only Polish ...

Page 36: ... den Schutz vor Schäden durch Röntgenstrahlen festgelegten Vorschriften Auf der Rückwand des Gerätes befindet sich ein Aufkleber der auf die Unbedenklichkeit der Inbetriebnahme hinweist da dieVorschriften über die Bauart von Störstrahlern nach Anlage i EV GHU 5ÜQWJHQYHURUGQXQJ HUIâOOW VLQG Damit Ihr Monitor immer den in der Zulassung geforderten Werten entspricht ist darauf zu achten daß 1 Reparat...

Page 37: ...ement Methods for Controlling Pollution by Electronic Information Products or commonly referred to as China RoHS All products including CRT and Monitor which are produced and sold for China market have to meet China RoHS request CCFL LED ʳ㩾অࠌ ش ཚૻʳ ڼ 䰬兘ਐཚૻʻԼ ڣ ʼʿ䶣 ॾஒ䣈 խܶ ڶ ऱ ڶ ڶ ୭ढ凝ࢨցై إڇ ൄࠌ ش ऱ㦕ٙ Հլ㢸䦡 س इࢨડ䦣ʿʳ䶣 ॾஒ䣈 ش 㡬 ࠌ ش 具䶣 ॾஒ䣈 լ㢸㢑㩾ቼທ ګ 䢘ૹ ۆ ࢨ㢑ࠡԳߪΕʳ凗䣈ທ ګ 䢘ૹ䮦୭ऱཚ ૻΗ 7 Regulatory Information ...

Page 38: ...ds for certain types or combinations of pixel defects that are more noticeable than others This policy is valid worldwide Pixels and Sub pixels A pixel or picture element is composed of three sub pixels in the primary colors of red green and blue Many pixels together form an image When all sub pixels of a pixel are lit the three colored sub pixels together appear as a single white pixel When all a...

Page 39: ... pixel defects during the warranty period aTFT Monitor panel in a Philips flat panel monitor must have pixel or sub pixel defects exceeding the tolerances listed in the following tables 8 Customer care and warranty BRIGHT DOT DEFECTS ACCEPTABLE LEVEL 1 lit subpixel 3 2 adjacent lit subpixels 1 3 adjacent lit subpixels one white pixel 0 Distance between two bright dot defects 15mm Total bright dot ...

Page 40: ...thin these countries Warranty coverage begins as from the day you buy your monitor and be serviced in case of defects provided for under the warranty coverage for a warranty period of 24 months for Philips C E T V and X models and for models B P and S we give 36 months Your original purchase document is your proof for the purchase day so keep this carefully stored and available when a warranty ser...

Page 41: ...Warranty may not apply if v 7KH GRFXPHQWV KDYH EHHQ DOWHUHG LQ DQ way or made illegible v 7KH PRGHO RU SURGXFWLRQ QXPEHU RQ WKH product has been altered deleted removed or made illegible v 5HSDLUV RU SURGXFW PRGLILFDWLRQV DQG alterations have been executed by unauthorized service organizations or persons v DPDJH LV FDXVHG E DFFLGHQWV LQFOXGLQJ EXW not limited to lightning water or fire misuse or n...

Page 42: ...xembourg 352 26 84 30 00 Local call tariff Portugal 351 2 1359 1440 Local call tariff Switzerland 41 02 2310 2116 Local call tariff v 3 HQYLURQPHQW 3URFHVVRU o CPU and Graphic card name and driver version o Operating system o Application being used v 2WKHU FDUGV LQVWDOOHG Having the following information available will also help speed up the process v RXU SURRI RI SXUFKDVH LQGLFDWLQJ GDWH RI SXUFK...

Page 43: ...If no Repair can be fulfilled within 10 working days after the unit is picked up then a replacement monitor of at least an equivalent monitor will be given to you The replacement monitor remains yours and Philips keeps the defective original monitor For the replacement monitor the warranty period remains equal to that of your original monitor What is excluded The Philips guarantee applies provided...

Page 44: ... directly the Philips Service and Consumer Information Centers Website http www philips com support Eastern Europe BELARUS IBA Technical Center of JV IBA M Bogdanovich str 155 BY 220040 Minsk Tel 375 17 217 33 86 Service BY Petrus Brovky st 19 101 B 220072 Minsk Belarus BULGARIA LAN Service 140 Mimi Balkanska Str Office centerTranslog 1540 Sofia Bulgaria Tel 359 2 960 2360 www lan service bg CZECH...

Page 45: ...urkey Tecpro Telsizler Mah 10 Kagithana Istanbul Turkey Tel 90 212 444 4 832 UKRAINE Comel Shevchenko street 32 UA 49030 Dnepropetrovsk Tel 380 562320045 www csp comel com LLCTopaz Company Topaz Service Company Mishina str 3 Kiev Ukraine 03151 Tel 38 044 245 73 31 In order to avoid unnecessary inconvenience we advise you to read the operating instructions carefully before contacting your dealer If...

Page 46: ...wai Chung N T Hong Kong Tel 852 2619 9639 Fax 852 2148 3123 E mail service smartpixels com hk Service hours Mon To Fri 9 00am 6 00pm Sat 9 00am 1 00pm Macau Company Smart PixelsTechnology Ltd Address RUA DO PE ANT ROLIZ NO 2H R C SL A HONG FOK KOK MACAU 䭔㕙 㸫匏 䭷Ѡ㰳 㟪 Tel 853 0800 987 Fax 853 2855 2228 E mail service smartpixels com hk Service hours Mon To Fri 9 00am 6 00pm Sat 9 00am 1 00pm China TO...

Page 47: ...M 6 00PM Sat 9 00AM 1 00PM Malaysia Company After Market Solutions CE Sdn Bhd Address Lot 6 Jalan 225 51A 46100 Petaling Jaya Selangor DE Malaysia Phone 603 7953 3370 Philips Info Line 1 800 880 180 Fax 603 7953 3338 E mail pceinfo my philips com Service Hours Mon Fri 8 15am 5 15pm Sat 9 00am 1 00pm Pakistan Philips Consumer Service Address Mubarak manzil 39 Garden Road Saddar Karachi 74400 Tel 92...

Page 48: ...Mon To Fri 8 00am 12 00pm 1 30pm 5 30pm Sat 8 00am 12 00pm 3 Can tho Province Company FPT Service Informatic Company Ltd CanTho Office Address 71 4Tran Phu Street Ninh Kieu District Can tho City Tel 84 5113 562666 Fax 84 5113 562662 E mail nhieptv fpt com vn Service hours Mon To Fri 8 00am 12 00pm 1 30pm 5 30pm Sat 8 00am 12 00pm Africa South Africa Company name SylvaraTechnologies Pty Ltd Address...

Page 49: ... After three years from the day of purchase you pay for the replacement or repair of all parts and for all labor charges All parts including repaired and replaced parts are covered only for the original warranty period When the warranty on the original product expires the warranty on all replaced and repaired products and parts also expires WHAT IS EXCLUDED Your warranty does not cover Labor charg...

Page 50: ...luding any implied warranties of merchantability or fitness for a particular purpose Philips is not liable under any circumstances for any direct indirect special incidental or consequential damages howsoever incurred even if notified of the possibility of such damages REMEMBER Please record the model and serial numbers found on the product below MODEL ______________________________ SERIAL _______...

Page 51: ...r made illegible v UHSDLUV RU SURGXFW PRGLILFDWLRQV DQG alterations have been executed by unauthorized service organizations or persons v GDPDJH LV FDXVHG E DFFLGHQWV LQFOXGLQJ EXW not limited to lightning water or fire misuse or neglect Please note that the product is not defective under this guarantee in the case where modifications become necessary in order for the product to comply with local ...

Page 52: ...onitor cable is properly connected to your computer Also refer to the Quick Start Guide v Check to see if the monitor cable has bent pins v Make sure the computer is turned on AUTO button doesn t function v The auto function is applicable only in VGA Analog mode If the result is not satisfactory you can do manual adjustments via the OSD menu Note The Auto Function is not applicable in DVI Digital ...

Page 53: ...ing will disappear gradually over a period of time after the power has been switched off v Always activate a moving screen saver program when you leave your monitor unattended v Always activate a periodic screen refresh application if your Monitor will display unchanging static content v Severe burn in or after image or ghost image symptoms will not disappear and cannot be repaired The damage ment...

Page 54: ... on SmartControl Premium tab nothing shows up after a while or a failure message shows what happened Ans It might be your graphic adaptor is not compatible with the SmartControl Premium If your graphic adaptor is one of the above mentioned brands try to download the most updated graphic adaptor driver from corresponding companies web site Install the driver Remove SmartControl Premium and re insta...

Page 55: ...ivers inf and icm files or a driver disk when you first install your monitor Follow the instructions to insert the companion CD ROM included in this package Monitor drivers inf and icm files will be installed automatically Q4 How do I adjust the resolution Ans Your video card graphic driver and monitor together determine the available resolutions You can select the desired resolution under Windows...

Page 56: ...ntative for more information Q10 Are Philips Monitors Plug and Play Ans Yes the monitors are Plug and Play compatible with Windows 7 Vista XP NT Mac OSX Linux Q11 What is Image Sticking or Image Burn in or After Image or Ghost Image in Monitor panels Ans Uninterrupted display of still or static images over an extended period may cause burn in also known as after imaging or ghost imaging on your sc...

Page 57: ...hts reserved Philips and the Philips Shield Emblem are registered trademarks of Koninklijke Philips Electronics N V and are used under license from Koninklijke Philips Electronics N V Specifcations are subject to change without notice Version M3221BE1T ...

Reviews: