background image

9

Change picture and sound 

settings

Change picture and sound settings to suit your 

preferences. You can apply pre-defined settings 

or change settings manually.

Use smart picture

Use smart picture to apply pre-defined 

picture settings.


1

  Press 

 SMART

 repeatedly to cycle 

through the four settings.

• 

[Personal]

Settings are set to your 

preference.

• 

[Soft]

Emphasizes warm colours. This 

setting is suitable for dimly lit rooms.

• 

[Natural]

Emphasizes original colors.

• 

[Rich]

Emphasizes vibrant colours. 

This setting is the optimal setting 

when you are viewing TV 

programmes in a brightly lit room.

2

  Press   to exit.

Manually adjust picture settings

1

  Press 

MENU

.

2

  Press the navigation buttons to enter the 

[Picture]

 menu.

3

  Press 

 to select from the following 

settings and adjust:

• 

[Brightness]

Adjusts the intensity and 

details of dark areas.

• 

[Color]

Adjusts color saturation.

• 

[Contrast]

Adjusts the intensity of 

bright areas, keeping dark areas 

unchanged.

• 

[Sharpness]

Adjusts the level of 

sharpness in image details.

6  Use more of 

your product

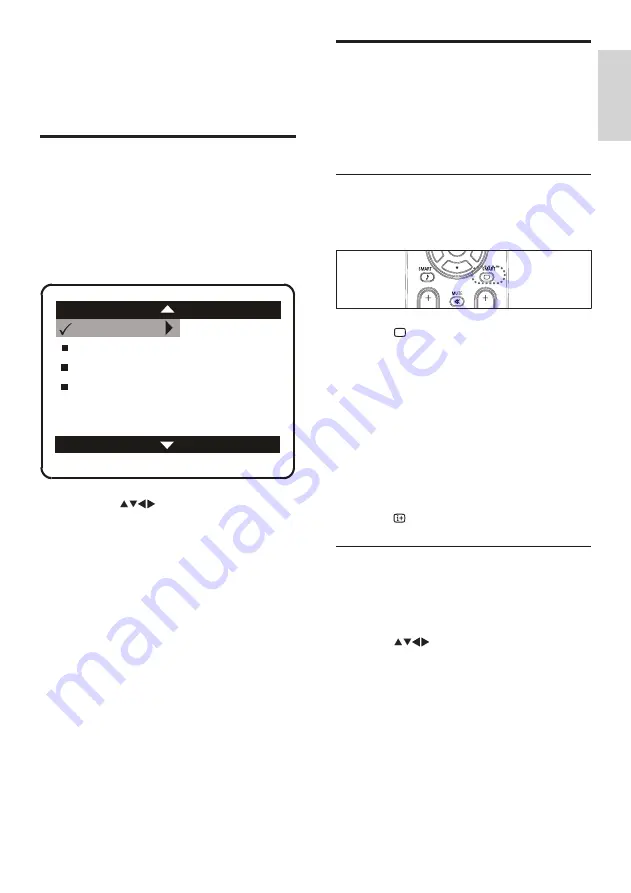
Access TV menus

Menus help you to install channels, change 

picture and sound settings and access other 

features.

1

  Press 

MENU

.


»

The menu screen appears.


2

  Press the 

 to select and navigate 

through one of the following menus.

• 

[Picture]

Adjusts the picture setting 

for optimal viewing.

• 

[Sound]

Adjusts the sound setting.

• 

[Features]

Accesses features.

• 

[Install]

Selects the channel 

installation menu.

3

  Press 

OK

 to confirm your choice.

Co

Brightness

MAIN

Install

Picture

Features

Sound

Color
Contrast
Sharpness
Color Temp

En

gl

is

h

EN

Summary of Contents for 21PT9460

Page 1: ...Register your product and get support at www philips com welcome EN User manual 21PT9460 44 21PT9460 55 ...

Page 2: ...able Disconnect the TV from the power outlet and antenna before lightning storms During lightning storms never touch any part of the TV power cord or antenna cable 1 Important Read and understand all instructions before you use yourTV If damage is caused by failure to follow instructions the warranty does not apply Safety Risk of electric shock or fire Never expose the TV to rain or water Never pl...

Page 3: ...he European Directive 2006 66 EC which cannot be disposed with normal household waste Please inform yourself about the local rules on separate collection of batteries because correct disposal helps to prevent negative consequences for the environmental and human health Screen care Avoid stationary images as much as possible Stationary images are images that remain on screen for extended periods of...

Page 4: ... or restores audio output k CH Channel Switches to the next or previous channel l 0 9 Numeric buttons Selects a channel or setting m Not used n Not used o OSD Displays program information if available p VOL Volume Increases or decreases volume q SMART Smart Sound Cycles through pre defined sound settings r Not used 2 Your product Congratulations on your purchase and welcome to Philips To fully ben...

Page 5: ...onent Video Input YPbPr Video input from analog devices such as DVD receiver game console etc This connector is used with audio input s SLEEP Sets a delay after which the TV switches to standby t TIMER Sets the timers u Not used v SAP Selects Secondary Audio Program SAP stereo or mono Controls and indicators a Switches the product on or off b Standby indicator c Remote control sensor d VOLUME Incr...

Page 6: ...5 Side connectors a VIDEO IN Composite video input from analog devices such as VCRs b AUDIO IN L R Audio input from analog devices connected to VIDEO Eng lis h EN ...

Page 7: ...ontrol batteries 3 Get started Connect devices This section describes how to connect various devices with different connectors Note Different types of connectors may be used to connect a device to your TV depending on availability and your needs Connect devices Connect a video player EN ...

Page 8: ... This section describes how to search and store analogTV channels manually Note Make sure the TV is in TV mode 1 Press MENU 2 Select Install Manual Channel No 3 Press or the numeric buttons to key in the channel number 4 Press to select Color System Press to select your desired color system 5 Press to select Fine Tune Press to adjust 6 Press to select Store Press to select Stored 7 Press to select...

Page 9: ...helps you perform basic operations see Use more of your product on page 9 Switch your TV on off or to standby To switch on If the standby indicator is off press at the front of the TV If the standby indicator is red press on the remote control To switch to standby Press on the remote control The standby indicator switches to red To switch off Press at the front of the TV The standby indicator swit...

Page 10: ...buttons to enter the Picture menu 3 Press to select from the following settings and adjust Brightness Adjusts the intensity and details of dark areas Color Adjusts color saturation Contrast Adjusts the intensity of bright areas keeping dark areas unchanged Sharpness Adjusts the level of sharpness in image details 6 Use more of your product Access TV menus Menus help you to install channels change ...

Page 11: ... the timer 4 Press to exit Color Temp Introduces more orange tones or blue tones to the picture Contrast Optimizes the total contrast for improved picture quality Use smart sound Use smart sound to apply pre defined sound settings 1 Press SMART repeatedly to cycle through the four settings Personal Settings are set to your preference Voice Emphasizes high tones treble boosted Theater Emphasizes se...

Page 12: ...his section describes commonly encountered issues and accompanying solutions General TV issues The TV does not switch on Disconnect the power cable from the power outlet Wait for one minute then reconnect it Check that the power cable is securely connected The remote control is not working properly Check that the remote control batteries are correctly inserted according to the orientation Replace ...

Page 13: ... only Verify that sound balance is set to the center Contact us If you cannot resolve your problem refer to the FAQs for this TV at www philips com support If the problem remains unresolved contact Philips Consumer Care in your country Warning Do not attempt to repair the TV yourself This may cause severe injury irreparable damage to your TV or void your warranty Note Make a note of your TV model ...

Page 14: ...gonal screen size 53cm Visible diagonal screen size 51cm Tuner Reception Transmission Antenna input 75ohm coaxial TV system PAL M PAL N NTSC M Video playback NTSC PAL Remote control Batteries 2 x AAA LR03 type Connections CVI CVBS In Monitor Out Antenna Side CVBS In Power Mains power AC 110 240V 50 60Hz Power consumption 74W Standby power 3W Eng lis h EN ...

Page 15: ...ations are subject to change without notice Trademarks are the property of Koninklijke Philips Electronics N V or their respective owners Philips reserves the right to change products at any time without being obliged to adjust earlier supplies accordingly The material in this manual is believed adequate for the intended use of the system If the product or its individual modules or procedures are ...

Page 16: ... 2010 Koninklijke Philips Electronics N V All rights reserved Document order number 0700 21U0E000 00 ...

Reviews: