background image

Installation

                                Operating manual-21PT2324/71    

 3

Positioning the television set

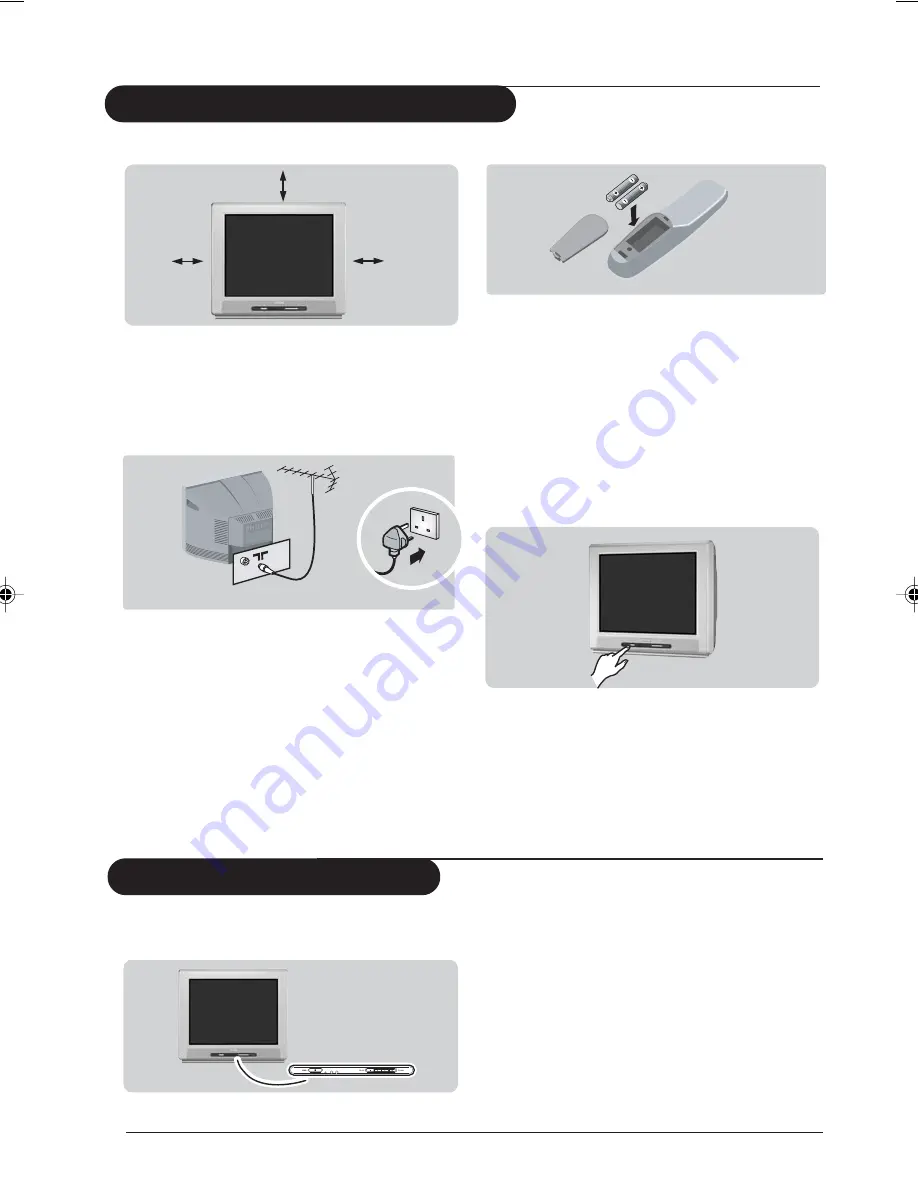
Installing your television set

Place your TV on a solid, stable surface,
leaving a space of at least 10 cm around the
appliance.

Connections

10 cm

10 cm

10 cm

Insert the aerial plug into the x socket at
the rear of the set.

If you are using an indoor aerial, reception
may be difficult in certain conditions.  You
can improve reception by rotating the
aerial. If the reception remains poor, you
will need to use an external aerial.

Insert the mains plug into a wall socket.

Diagram may differ from the actual plug.

Remote control

Insert the two R6-type batteries (supplied)
making sure that they are the right way
round.

The batteries supplied with this appliance do
not contain mercury or nickel cadmium.
If you have access to a recycling facility, please do
not discard your used batteries (if in doubt,
consult your dealer).

Switching on

To switch on the set, press the on/off key.

A red indicator means that the television is on
standby mode. Refer to the next page on ‘Remote
Control keys’ for the various keys that you could
use to switch on the set An indicator light will
flash when it is receiving signal from the remote
control.

The keys on the TV set

 The television set has 4 keys which are
located at the front.

The VOLUME – or + key is used to adjust the
sound levels. The CHANNEL ^ or v key is

used to select channels.
To access or exit the main menu,
press down the VOLUME – and + keys,
simultaneously.
To select an item in the main menu,
press the  CHANNEL ^ or v key.

To select an adjustment, press down the
VOLUME – or + key.

p3-6_21PT2324_71

03/26/04, 2:03 PM

3

Summary of Contents for 21PT2324

Page 1: ...Colour television Operating instruction 21PT2324 21PT2324 ...

Page 2: ...local Philips website 4 Please refer to the TroubleshootingTips on page 11 before calling for service 5 In case of a need to call for service we recommend you to call from your room where your TV is located and have on hand your remote control warranty card TV model and serial number 6 Do not discard packaging materials without thorough inspection for parts and that accessories that may be packed ...

Page 3: ...eys on the TV set 3 Remote control keys 4 Language 5 Tuner Mode 5 Auto Store 6 Channel Edit 6 Operation Picture settings 7 Sound settings 7 Feature settings 7 Format 8 Signal Strength 8 Active Control 9 Personal Zapping 9 Peripherals Video recorder 10 Practical information Tips 11 Glossary 12 Specification 13 ...

Page 4: ...t under direct sunlight or heat Leave at least 10 cm around each side of TV set to allow for proper ventilation Avoid placing your set e g near the window where it is likely to be exposed to rain or water No objects filled with liquids should be placed on top the TV so as to avoid dripping or splashing of liquids on the set Useful information Do not leave your set on standby mode for a prolonged p...

Page 5: ... The batteries supplied with this appliance do not contain mercury or nickel cadmium If you have access to a recycling facility please do not discard your used batteries if in doubt consult your dealer Switching on To switch on the set press the on off key A red indicator means that the television is on standby mode Refer to the next page on Remote Control keys for the various keys that you could ...

Page 6: ...ever you select a new channel On screen display To display clear the on screen information Press the key for 5 seconds to activate permanent display of channel number This key is also used to exit from the menu Sleeptimer Selects a period of time after which the TV will go into standby mode automatically Add Personal Zapping list Adds and stores channels into Personal Zapping list p 9 Smart Sound ...

Page 7: ...sed to change the display language for menus Press the key é With the cursor select the Install menu and follow by the Language Use the key to select a language of your choice To quit the menus press Tuner Mode You can select t Auto Antenna or Cable modes with this menu Press the key é With the cursor select the Install menu and follow by the Tuner Mode Use the key to select either Auto Antenna or...

Page 8: ...ped Use the key to select On Repeat steps and for each channel you wish to skip To quit the menus press To restore skipped channels Repeat steps to above é Use the key to select Skipped and the key to select Off Repeat steps and é for each channel you wish to skip To quit the menus press This menu is used to store all available channels automatically Press the key é With the cursor select the Inst...

Page 9: ...lack é Use the or keys to select a setting and the or keys to adjust Note during the picture adjustment only the selected line remains displayed Press or to display the menu again Press to exit Sound settings Press select Sound and press The Sound menu is displayed é Use the or key to select a setting and the or key to adjust Press to exit ge Description of the adjustments Treble Boost this alters...

Page 10: ...a conventional picture using the full surface of the screen Expand 4 3 select this format if you want to expand pictures transmitted in a letterbox format black horizontal bars at the top and bottom of the screen to fill up the entire screen 4 3 Letterbox Expand 4 3 Signal Strength This feature display the signal strength level at the bottom of the screen Select the option ON to activate the displ...

Page 11: ...itoring screen when channels are changed Display On an Active Control monitoring screen will be shown for a few seconds whenever a channel is changed Active Control Monitoring Screen To delete channels Select and press a colour key that has stored channels repeatedly to select the channel you want to delete éPress to display list Press to remove channel Repeat steps to delete more channels Press t...

Page 12: ...nect the TV s white AUDIO IN jacks to the corresponding AUDIO OUT jacks on the player Match the cable colour to the jacks colour The white jack is the Left Mono audio channel Turn on the TV andVCR player Set the TV to AV1 You can now play your video cassette tape Connection is also possible via the aerial cable You will therefore need to tune in your video recorder s test signal and assign a chann...

Page 13: ...s before switching on again Good picture but no sound Try to increase the volume level Check that the sound is not set to mute If it is press the key to restore the sound Good sound but poor colour or no picture Try to increase the contrast and brightness setting Snowish picture and noise Check antenna connection at the rear of the TV Horizontal dotted lines Possible electrical interference e g ha...

Page 14: ...ctive control system which measures and analyzes the incoming analog signal 60 times per second to automatically adjust settings for optimal picture quality It also uses a sensor to adjust for ambient room light when the room gets brighter so does the picture Contrast enhances the darker portions of the picture to improve its picture quality Personal Zapping A Philips trade marked feature which al...

Page 15: ...range Smart Sound Modes Auto volume Leveller Reception Tuning system PLL digital tuning Tuner UV S and Hyperband Channel Selection 125 presets Full cable Aerial input 75 ohm coaxial TV System NTSC M 3 58 4 5 Video playback NTSC 3 58 NTSC 4 43 NTSC Palyback PAL 60 Connectors Rear Stereo Audio Video input x 2 Stereo Audio Video output x 1 ComponentVideo Input S Video input Ease of use Multi language...

Page 16: ...3141 055 22931 ...

Reviews: