background image

T

IMER 

F

UNCTION

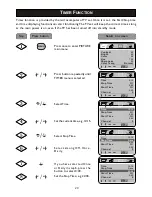
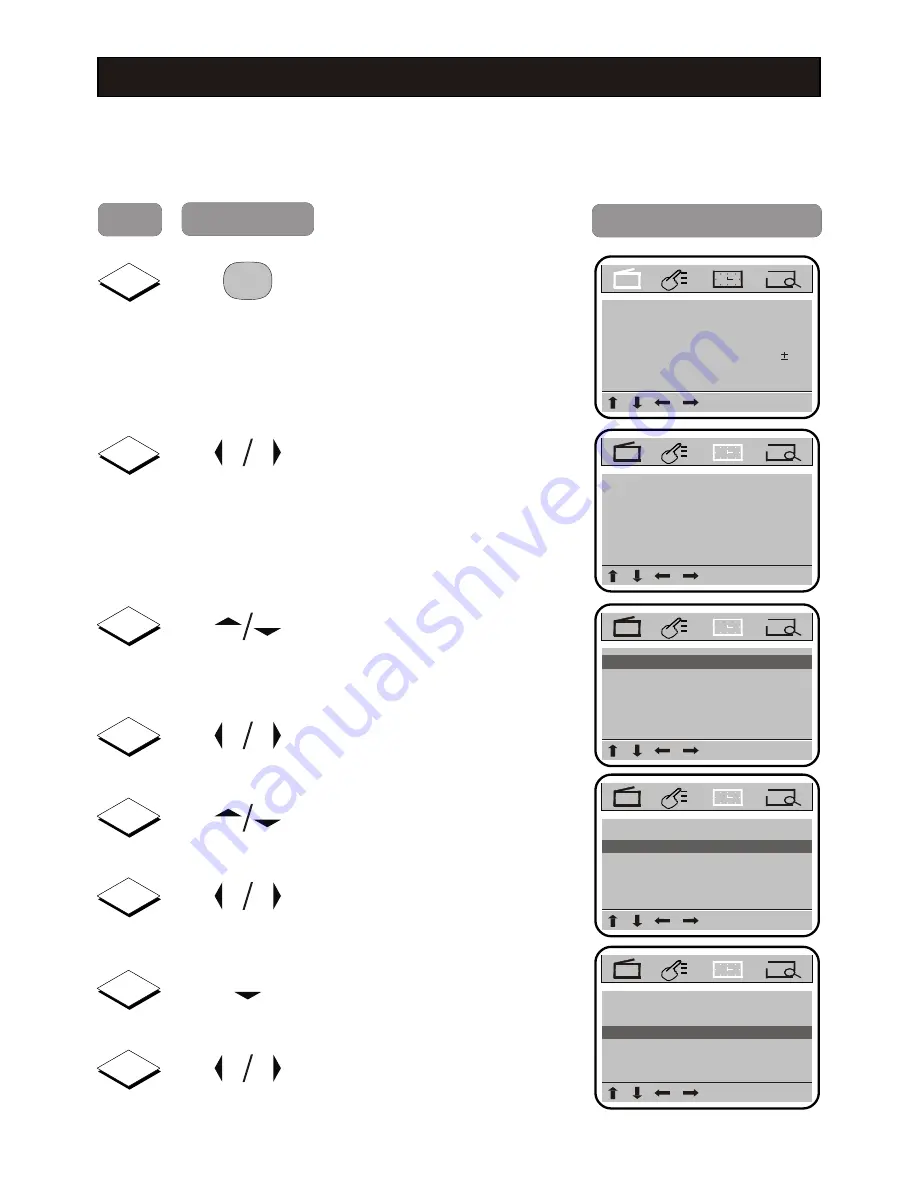
Timer function is  provided by the microcomputer of TV set. Once it is set,  the Start/Stop time

and time displaying functions can start functioning. The TV set will keep the correct time as long

as the main power is on, even if the TV has been turned off into standby mode.  

MENU

0:00

Off

Stop Time

Start Time

Off

0:13

0:00

Channel

0

Time

Press 

button

Result 

on screen

Step

3

C+

C-

Select Time.

MENU

0:00

Off

Stop Time

Start Time

Off

0:00

Channel

0

12:15

Time

4

V-

V+

Set the current time, e.g. 12:15.

5

C+

C-

Select Stop Time.

MENU

0:00

0:00

Channel

0

12:15

Time

Off

Start Time

6

V-

V+

S e l e c t  a m o n g  O f f ,  O n c e , 
D a i l y .

7

C-

I f   yo u   h av e  s e l e c t e d   O n c e 
or Daily in step 6, press the
button to select 0:00.

MENU

Stop Time

Once

Channel

0

12:15

Time

Off

Start Time

8

V-

V+

Set the Stop Time, e.g. 22:00.

0:00

Stop Time

Once

22:00

20

Press 

once 

to 

enter 

PICTURE

main menu.

1

MENU

2

V-

V+

Press button repeatedly until
TIMER menu is selected.

MENU

50
00

Bright.
Color
Hue
Sharpness

65

90

50

Color Temp

Normal

Contrast

Summary of Contents for 21PT2110

Page 1: ...Colour television Operating Instructions 14PT2110 21PT2110 14PT2110 21PT2110 ...

Page 2: ...m to the environment the batteries supplied with the TV set do not contain mercury or nickel cadmium If possible when disposing of batteries use recycling means available to you Your TV set uses materials which are reusable or which can be recycled To minimise the amount of waste in the environment specialist companies recover used sets for dismantling and collection of reusable materials contact ...

Page 3: ...t Leave at least 5 cm around each side of TV set to allow for proper ventilation Avoid placing your set e g near the window where it is likely to be exposed to rain or water No objects filled with liquids should be placed on top the TV so as to avoid dripping or splashing of liquids on the set UsefulTips Do not leave your set on standby mode for a prolonged period of time Switch off set to allow i...

Page 4: ...icture but no sound Good sound but poor colour or no picture Try increasing the contrast colour and brightness setting Snowish picture and noise Check antenna connection at the rear of the TV Horizontal dotted lines Possible electrical interference e g hairdryer vacuum cleaner etc Switch off appliances Double images or Ghost images Possible poor positioning of antenna Using a highly directional an...

Page 5: ...set Consult your dealer if mains supply is different Note This diagram is not representative of the actual plug and socket Switch on the set Press the main power button to switch on off the TV If the set is on standby indicator is red press the Power button on the remote control to switch on set Insert the correct type of batteries into the compartment Ensure the batteries are placed in the right ...

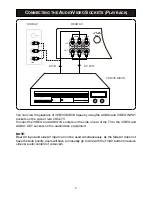
Page 6: ...de or rear of the TV Connect the VIDEO and AUDIO IN sockets on the side or rear of the TV to the VIDEO and AUDIO OUT sockets on the audio video equipment SIDE AV REAR AV AV IN AV OUT VCR VCD DVD NOTE Rear AV input and side AV input can not be used simultaneously As the Side AV does not have the Auto priority users will have to manually go to AV2 with the TV AV button to receive video audio content...

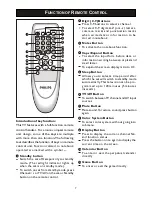
Page 7: ...pand Button To select the input form before data or information writing between capital and small letter To expand the screen display ratio to 4 3 7 9 8 5 6 Sleep Button Allows you to select a time period after which the set will switch to standby mode automatically This television can be pro grammed up to 120 minutes 5 minutes intervals TV AV Button To switch betweenTV channel andAV input sources...

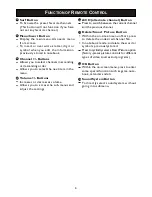
Page 8: ...ses or decreases volume Allows you to access the sub menus and adjust the settings A CH alternate channel Button Press to switch between the current channel and the previous channel 16 18 19 17 Delete Smart Picture Button Within the on screen menu of Sort press to delete the undesired channel No In notebook mode to delete the word or symbols previously stored Press to cyclically select a Smart Pic...

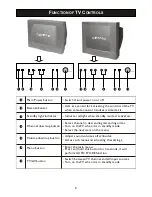
Page 9: ...ate red light when standby mode is activated Select channel in descending ascending order Turn on theTV when it is in standby mode Select the next item on the menu Enter the main menu Switch betweenTV channel and AV input sources Turn on theTV when it is in standby mode 1 2 3 4 5 Adjust sound volume softer louder Access sub menu and adjusting the settings 6 7 7 6 5 4 3 2 1 7 6 5 4 3 2 1 14PT2110 2...

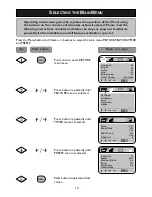
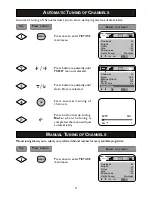
Page 10: ...and PRESET Press once to enter PICTURE main menu Press button Result on screen SELECTING THE MAIN MENU 1 2 3 4 Step 5 MENU CH Swap Sort Calendar Game MENU 0 00 Off Stop Time Start Time Off 0 13 0 00 Channel 0 MENU Up Off Band Manual Store Skip Fine Tune UHF 30 Up Auto Store Time Channel MENU 50 00 Bright Color Hue Sharpness 65 90 50 Color Temp Normal Contrast Settings MENU MENU V V Press button re...
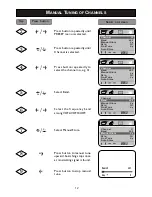
Page 11: ... button to stop tuning Note when the tuning is completed the menu will quit automatically 11 Press once to enter PICTURE main menu 1 MENU 2 V V Press button repeatedlyuntil PRESET menu is selected MANUAL TUNING OF CHANNELS Manual tuning allows you to select your preferred channel number for every available programme Press once to enter PICTURE main menu 1 MENU Press button Result on screen Step ME...

Page 12: ...Up Manual Store 8 Press button to manual tune upward Searching stops once a transmitting signal is found Search UHF 31 Stop V 9 Press button to stop manual tune V 12 3 MENU Up Off Band Manual Store Skip Fine Tune UHF Up C C Press button repeatedlyuntil Channel is selected Auto Store 30 Channel 2 V V Press button repeatedlyuntil PRESET menu is selected 4 V V Press button repeatedly to select the ch...

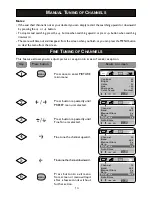
Page 13: ...el Auto Store Fine Tune Up MENU Up Off Band Manual Store Skip UHF 30 Channel Auto Store Fine Tune Down 13 MANUAL TUNING OF CHANNELS Notes If the searched channel is not as your desired you can simply restart the searching upward or downward by pressing the button To stop manual searching press the button when searching upward or press button when searching downward The menu will time out and disap...

Page 14: ...want to change e g 30 MENU Exchange From Off 30 7 C C SelectTo 8 V V Select the channel no to be replaced e g 40 that means to replace channel 40 by channel 30 To 40 MENU From 30 9 C C Select Exchange 10 Press button to finish the setting To 40 Exchange On OK 11 Press button to exit menu from screen or menu will quit after a few seconds without further action MENU 14 Press once to enter PICTURE ma...

Page 15: ... C Select Skip MENU Up Band Manual Store UHF Auto Store Fine Tune Up 30 Channel On Skip 7 6 Press button to select On Off to remove restore channel 30 MENU Up Band Manual Store UHF Auto Store Fine Tune Up 30 Channel Off Skip Press button to exit menu from screen or menu will quit after a few seconds without further action MENU 15 Press once to enter PICTURE main menu 1 MENU 2 V V Press button repe...

Page 16: ... V V Select the channel no you want to store into this position e g 08 DEL MENU FAV CH2 FAV CH1 02 08 FAV CH3 03 FAV CH4 FAV CH5 FAV CH6 7 Repeat step 5 and 6 to set other favorite channels 8 Press button to exit menu from screen or menu will quit after a few seconds without further action MENU Notes You can delete the undesired channel no by pressing the DELETE button when this channel is highlig...

Page 17: ...uemute On BG English ColorSys PAL Notes he above procedures are also applicable to the following functions T Bluemute sets this function on or off When Bluemute is selected to On mode it will display a solid blue screen when a channel is selected that has no signal TheTV set will turn itself off after 10 minutes without signal Snd Sys sets the sound system among BG DK and I by pressing the or butt...

Page 18: ...er a few seconds without further action MENU Picture menu items Contrast Bright Color Hue for NTSC only this item is not selectable for other signal Color Temp Activities Increase or decrease contrast level Increase or decrease brightness level Increase or decrease color level Sharpness Increase or decrease sharpness level to improve detail in picture Increase or decrease color tone of NTSC pictur...

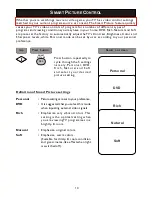
Page 19: ...onal preference Press button repeatedly to cycle through the 5 settings n a m e l y P e r s o n a l D V D R i c h N a t u r a l a n d S o f t and select your desired picture setting 1 Definition of Smart Picture settings Rich Emphasize very vibrant colors This setting is the optimal setting when you are viewingTV programmes in a brightly lit room Natural Emphasize original colors Soft Emphasize wa...

Page 20: ...ectTime MENU 0 00 Off Stop Time Start Time Off 0 00 Channel 0 12 15 Time 4 V V Set the current time e g 12 15 5 C C Select StopTime MENU 0 00 0 00 Channel 0 12 15 Time Off Start Time 6 V V Select among Off Once Daily 7 C If you have selected Once or Daily in step 6 press the button to select 0 00 MENU Stop Time Once Channel 0 12 15 Time Off Start Time 8 V V Set the StopTime e g 22 00 0 00 Stop Tim...

Page 21: ...ct 0 00 MENU 22 00 Stop Time Once Channel 0 12 15 Time Once Start Time 12 V V Set the StartTime e g 22 59 22 59 Notes Off The Start StopTimer is set to off and will not operate Once The Start StopTimer is set to turn on off theTV at that time only one time Daily The Start StopTimer is set to turn on off theTV at that time everyday until otherwise adjusted Channel This is the channel theTV will dis...

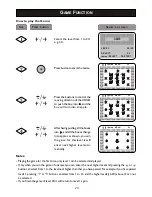
Page 22: ...K START 1 20 1 Press button Result on screen Step Menu operation MENU Sort Calendar OK Settings 3 C C Press button repeatedlyuntil Game is selected CH Swap Game 4 OK GAME LEVEL SELECT SELECT OK START 1 20 1 Press button to enter the Game 22 Press once to enter PICTURE main menu 1 MENU 2 V V Press button repeatedlyuntil FEATUREmenu is selected MENU 50 00 Bright Color Hue Sharpness 65 90 50 Color Te...

Page 23: ... matically C C V V Notes Playing the game for the first time only level 1 can be selected and played V V Only when you win the game of one level you can enter the next higher level and pressing the or button can select from 1 to the level next higher than that you have passed For example if you have passed level11 pressing or button can select from 1 to 12 and the higher levels 13 20 above 12 can ...

Page 24: ... 25 26 27 28 29 30 31 Press button Result on screen Step Menu operation MENU CH Swap Sort Game OK 3 C C Press button repeatedlyuntil Calendar is selected Settings 4 OK Press button to enter the Calendar Calendar DEC 2002 SU MO TU WE TH FR SA 1 2 3 4 5 6 7 8 9 10 11 12 13 14 15 16 17 18 19 20 21 22 23 24 25 26 27 28 29 30 31 24 Press once to enter PICTURE main menu 1 MENU 2 V V Press button repeate...

Page 25: ... 2 a b and c The same procedure is applicable to input other digits or small letters NOTE BOOK a SAVE Note book a 2abc SAVE Press again to turn on the capital function and the color of CAPS on the screen will turn into red 4 CAPS ABC 2 5 Press three times to input the letter B Note Pressing this button repeatedly can cyclically input 2 A B and C The same procedure is applicable to input other digi...

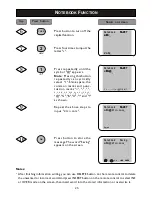
Page 26: ...SAVE Notes After finishing information writing you can use DELETE button on the remote control to delete the unwanted or incorrect word And press INSERT button on the remote control to select INS or OVER mode on the screen then insert word into the stored information or overwrite it 10 OK Press button to store the message The word Saving appears on the screen Bc a Note book Saving INS CAPS Off INS...

Page 27: ...rsor to select the sign C C V V 2 OK Press button to turn into as shown Press button Result on screen Step If you want to display the message at a specified time 1 Move the cursor to select the sign C C V V 2 OK Press button to turnOff into 0 00 NOTE BOOK Meet aunty Li at airport tonight INS CAPS 17 40 Note book Meet aunty Li at airport tonight INS CAPS 17 40 3 C C Set your desired time e g 17 40 ...

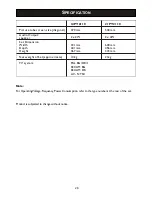
Page 28: ...weight of Set approximate TV system 14PT2110 370mm 2 x 2W 10kg PAL BG DK I SECAM BG SECAM DK AV NTSC 331mm 441mm 367mm 21PT2110 540mm 2 x 4W 21kg 600mm 456mm 372mm Note For OperatingVoltage Frequency Power Consumption refer to the type number at the rear of the set Product is subjected to change without notice ...

Reviews: