background image

C

ONNECTING THE

TV/DVD 

TO OTHER

S

YSTEMS

3

Y

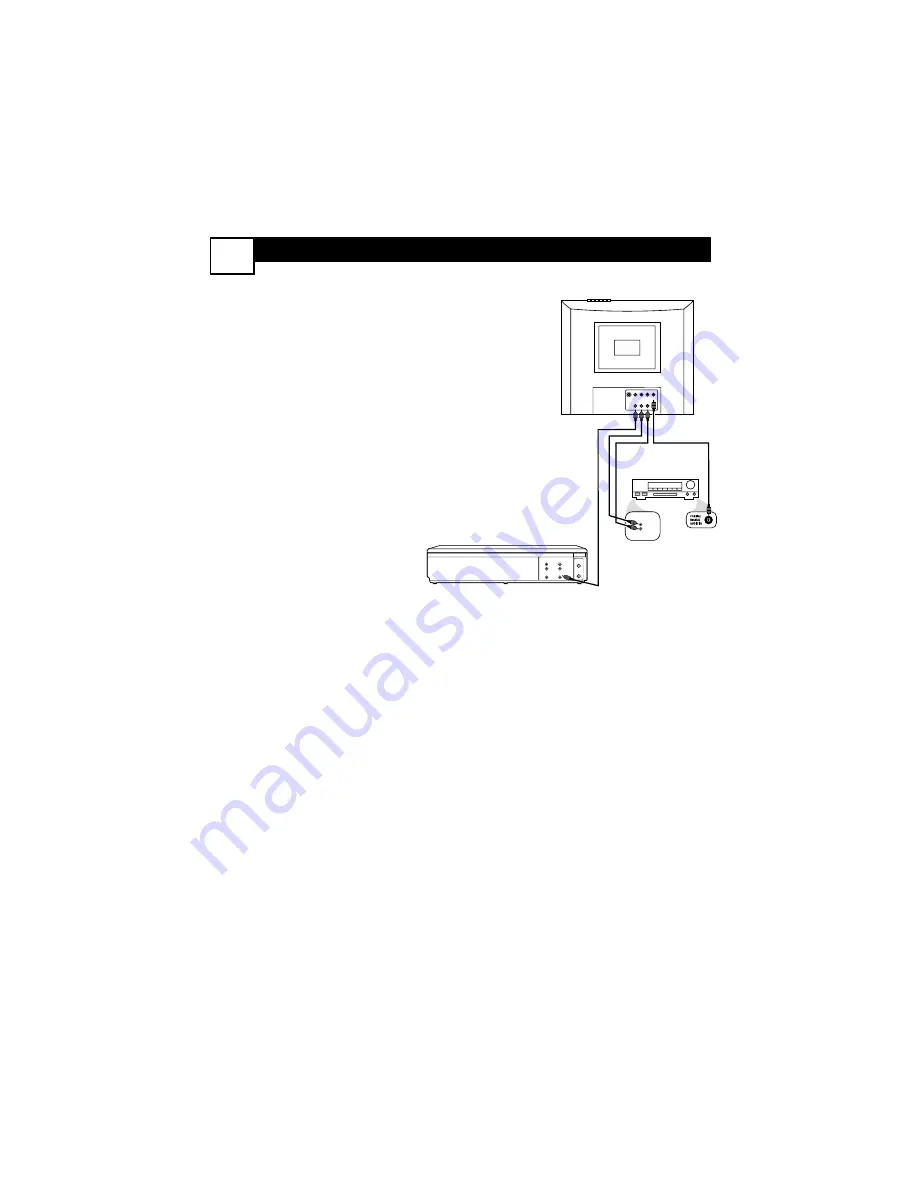
ou may want to connect the TV/DVD
to other devices such as a VCR or a

Stereo. For example, you can record a TV
program from the TV/DVD to a VCR, or
hear the sound from the TV/DVD on a
Stereo. You will use the AV OUTPUTs on
the back of the TV/DVD to send the pic-
ture and/or sound to another device.

1

Two different audio connec-
tions are possible - analog or
digital.

If the VCR, Stereo, etc., has red
and white Audio In jacks, this is
an analog connection.

Connect

audio cables to the red and
white AUDIO AV  OUTPUT
jacks on the TV/DVD and to
the AUDIO IN jacks on the
Stereo,VCR, etc.

These cables are not supplied
with the TV/DVD, but may come
with the other equipment. Use
RCA-style cables, matching cable
colors to jack colors.

Or,

if your Stereo has a Coaxial

Digital Audio In jack, you can
make a digital connection.

Use a

coaxial digital audio cable
(not supplied) to connect the
TV/DVD’s DVD DIGITAL
OUTPUT COAXIAL jack to
the Stereo’s Coaxial Digital
Audio In jack.

2

If you are connecting to a
VCR or other video device,
also connect a video cable
from  the TV/DVD’s VIDEO
AV OUTPUT jack (yellow)
to the VCR’s VIDEO IN jack.

There is no video connection to
a stereo.

3

Set the Stereo,VCR, etc., to
its Auxiliary  In, Audio/Video
In, or Source mode.

See its

owner’s manual for details.

ANTENNA

IN

L

R

AUDIO

OUT

L

R

AUDIO

IN

ANTENNA

OUT

VIDEO

IN

VIDEO

OUT

L

R

AUDIO

IN

OR

75 OHM

ANTENNA

INPUT

VIDEO

AUDIO-R

AV INPUT

L

(MONO)

AV OUTPUT

COAXIAL

DVD DIGITAL

OUTPUT

L

From VIDEO and AUDIO A/V OUTPUT jacks on
TV/DVD to AUDIO IN jacks on Stereo or VCR
and VIDEO IN jacks  on VCR

VCR

STEREO

TV/DVD

Summary of Contents for 20-REAL FLAT TV-DVD COMBI 20DV6942

Page 1: ...ad your User Manual first for quick tips that make using your Philips product more enjoyable If you have read your instructions and still need assistance you may access our online help at www p4c philips com or call 1 800 531 0039 while with your product 8670 000 20966 Model No Serial No ...

Page 2: ...ic Features 6 Programming TV Channels 7 Skipping Channels Favorite Channels 8 Language Clock 9 On Time Off Time 10 Picture SmartTimer 11 Sound MTS 12 Closed Captions SleepTimer 13 Picture Sound Effects 14 AutoLockTM Secret Code 15 Subject Panel No CH Lock 16 Master Enable MPAA Ratings 17 TV Parental Guidelines 18 Canadian English or French Ratings 19 General Disc Information 20 DVD Features 21 23 ...

Page 3: ...so don t miss out Complete and return your Product Registration Card at once to ensure Know these safetysymbols This bolt of lightning indicates uninsulated material within your unit may cause an electrical shock For the safety of everyone in your household please do not remove product covering The exclamation point calls attention to features for which you should read the enclosed literature clos...

Page 4: ...s or the Electronic Industries Alliance www eiae org 16 Damage Requiring Service The appliance should be serviced by qualified service personnel when A The power supply cord or the plug has been dam aged or B Objects have fallen or liquid has been spilled into the appliance or C The appliance has been exposed to rain or D The appliance does not appear to operate normally or exhibits a marked chang...

Page 5: ...ter you use Auto Search to select channels 1 Using Cable TV service or an Indoor or Outdoor Antenna Connect a Cable TV signal or an antenna to the 75 OHM ANTENNA INPUT on the rear of the TV DVD Using a Cable Box or Satellite Receiver 1 Connect the Cable TV or Satellite signal to the IN Jack on the Cable Box Satellite Receiver 2 Connect an RF coaxial cable not supplied to the OUT Jack on the Cable ...

Page 6: ...Press TV AV DVD on the remote to set the TV DVD to the VIDEO channel VIDEO will appear in the top left corner of the TV screen 5Play the tape game etc as usual on the other equipment You will watch and hear it at the TV DVD If the other equipment has only a single AUDIO OUT jack usually white connect it to only the white left AUDIO AV INPUT jack on the TV DVD The sound will come from a single chan...

Page 7: ...e RCA style cables matching cable colors to jack colors Or if your Stereo has a Coaxial Digital Audio In jack you can make a digital connection Use a coaxial digital audio cable not supplied to connect the TV DVD s DVD DIGITAL OUTPUT COAXIAL jack to the Stereo s Coaxial Digital Audio In jack 2If you are connecting to a VCR or other video device also connect a video cable from the TV DVD s VIDEO AV...

Page 8: ...T A B Button Press to play a specific Disc segment repeatedly POWER y y Button Press to turn the unit on or off SLEEP Button Press to have the TV DVD turn itself off after a set amount of time CLOCK Button In TV mode press to go directly to the Timer menu to set up clock or timer fea tures S EFFECT Button Press to choose a sound effect Personal Voice Music or Theatre MTS Button Press to choose an ...

Page 9: ...s Press to fast forward or fast reverse a Disc during play SLOW Buttons Press to play a Disc forward or backward in slow motion LANGUAGE Button Press to select a language for the audio of a DVD ANGLE Button Press to select a different camera angle or perspective during DVD play DISPLAY Button Press to see the current TV channel number or time or to see Disc information PICTURE DEL Button Press to ...

Page 10: ...r ring of the Disc 6 Press OPEN CLOSE again to close the tray Play may begin automatically If not press PLAY PAUSE M Remote Control Batteries 1 Remove the battery compart ment lid on the back of the remote by sliding the lid down and off 2 Insert two AAA batteries Install them as marked inside the com partment 3 Replace the compartment lid POWER button HEADPHONE jack Connect headphones not supplie...

Page 11: ...H p to select Tuner Mode 3 Press 2 or 3 to choose Antenna or Cable Choose Cable if you have Cable TV serv ice Channels 1 125 will be possi ble Choose Antenna if you con nected an indoor or outdoor antenna to the TV DVD Channels 2 69 will be possible 4 Press CH o or CH p to select Auto Search 5 Press 3 to start scanning chan nels The channels will count up on the screen during the search When finis...

Page 12: ... o or CH p to choose a slot 1 5 then use 2 or 3 to choose the channel you want in that slot Antenna or Cable will indicate whether you are using an antenna or Cable TV service to receive your TV channels 4 While watching TV press FAV DVD 10 repeatedly to scan through your five favorite channels continuously FAVORITE CHANNELS Tuner Mode Cable Channel 3 Skipped Off Manual Up Auto Search Favorite lis...

Page 13: ... or CH p to select Clock 3 Press 2 or 3 to change the time minute by minute Press and hold 2 or 3 to change the time quickly in 10 minute incre ments The clock is only available in military time no AM or PM also known as 24 hour time Off Time Off 11 30 On Time Off 0 00 Channel 6 Tuner Mode Antenna Clock 13 05 POWER SLEEP CLOCK VOL PICTURE DEL S EFFECT VOL MTS MENU TV AV DVD DISPLAY R L SKIP SEARCH...

Page 14: ... hold 2 or 3 to change the time quickly in 10 minute increments 4 Press CH o or CH p to select Channel Press 2 or 3 to select the channel you want when the power comes on Make sure Tuner Mode is correct whether you have an Antenna or Cable TV service 5 Turn off the TV DVD It will turn on at the time you set Off Time Off 11 30 On Time Off 0 00 Channel 6 Tuner Mode Antenna Clock 13 05 Off Time Off 1...

Page 15: ...icture quality Black areas of the picture become richer in darkness and white areas become brighter C Temp Color Temperature Select Normal Cool or Warm Normal whitens the whites Cool adds blue to the whites Warm adds red to the whites Activate SmartTimer to have the unit turn off after four hours of non use 1 Press MENU Press 2 or 3 to choose the Features menu 2 Press CH o or CH p to select SmartT...

Page 16: ... to choose MONO STEREO SAP or MONO SAP MONO distributes the sound via one audio channel STEREO pro duces sound through left and right audio channels SAP means the program has a second audio or language available Choose MONO SAP to hear both the original audio and the second audio at the same time To use MTS the volume cannot be muted and the TV station must have different audio options available 1...

Page 17: ...the SLEEP display appears 2 Press SLEEP repeatedly to pick the amount of time 10 120 min utes in 10 minute increments before the TV will turn off An on screen count down will appear during the last minute before the TV shuts itself off Pressing SLEEP during this time cancels the Sleep Timer Sleep 60 Min SLEEPTIMER POWER SLEEP CLOCK VOL PICTURE DEL S EFFECT VOL MTS MENU TV AV DVD DISPLAY R L SKIP S...

Page 18: ...ature allows the listen er to select between four different facto ry set sound options 1 Press S EFFECT repeatedly to choose Personal Voice Music or Theatre Personal Uses the specific settings for Bass Treble and Balance as you define in the Sound menu Voice Use if a program is mostly dialog Music Use for musical program ming with little dialog Theatre Enhances the sound when watching movies Perso...

Page 19: ...f you enter an incorrect code Incorrect Secret Code will appear Press MENU to return to the Features menu POWER SLEEP CLOCK VOL PICTURE DEL S EFFECT VOL MTS MENU TV AV DVD DISPLAY R L SKIP SEARCH MODE SUBTITLE ZOOM STOP PLAY PAUSE 9 6 3 MUTE RECALL OPEN CLOSE TITLE MENU PBC SETUP SCAN REPEAT LANGUAGE ANGLE REPEAT A B ENTER 2 1 FAV 8 7 5 4 0 SLOW DVD10 CH CH 1 1 2 3 Language English C Capt Off Auto...

Page 20: ...to select Lock then press 2 or 3 to choose On block the channel from viewing or Off enable viewing 5 Repeat steps 3 4 as necessary to block other channels 6 Press CH o or CH p to select CH lock then press 2 or 3 to turn it On or Off Choose On to actually block all the channels you selected Choose Off to allow viewing for now When CH lock is On you cannot access the Preset menu CH lock On Tuner Mod...

Page 21: ... PG PG 13 R NC 17 or X 3 Press CH o or CH p to choose a rating Each rating can be turned ON or checked which will block viewing or OFF which will allow viewing 4 Use ENTER to turn the rating ON checked or OFF When a rating is blocked any higher level will also be blocked from viewing For example if R is blocked NC 17 and X will be blocked automatically N A Not active all ratings are viewable G Gen...

Page 22: ...ose CONTENT then press ENTER 4 Press CH o or CH p to choose a rating TV PG etc then press 3 5 Press CH o or CH p to choose a sub rating Violence etc Press ENTER repeatedly to Block or View it Press 2 to go back and choose another rating for which you want to specifically adjust the sub ratings Repeat steps 4 5 as necessary to block or view all the ratings and sub ratings None View all ratings TV Y...

Page 23: ...es viewing C Child appropriate programming C8 Appropriate for children 8 or older G General programming suitable for all audiences PG Parental Guidance suggested 14 Viewers should be 14 or older 18 Viewers should be 18 or older Canadian French Ratings E Exémptees G Général 8 ans Général Déconseillé aux jeunes enfants 13 ans Gette émission peut convenir aux enfants de moins de 13 ans 16 ans Gette é...

Page 24: ...ns or for Region 1 in order to play Look for the symbols at right on your DVDs Color Systems DVDs are recorded in different color systems The most common are NTSC for the United States and North America PAL and SECAM This TV DVD will play NTSC and PAL Discs Set TV TYPE according to the DVDs you play most often Cleaning a Disc Use a soft dry cloth to wipe Discs Wipe Discs in a straight line from th...

Page 25: ... information on the VCD as each will be different Selecting Tracks Chapters Titles Press a Number but ton during play to select a Track or Chapter Use the Number buttons when play is stopped to select a new Title To select a double digit item use FAV DVD10 For example to select chapter 12 press FAV DVD10 then 2 For Track 28 press FAV DVD10 twice then 8 Displays Press DISPLAY repeatedly to see the ...

Page 26: ...urrent Track or Chapter Quickly press it repeatedly to go to previous Tracks or Chapters Zoom Reduce Press ZOOM repeat edly during DVD or Video CD play to enlarge or reduce the picture The blue box that appears inside a gray box during zoomed play indicates the loca tion of the zoomed area within the overall picture Press CH o or CH p to move around in the zoomed picture POWER SLEEP CLOCK VOL PICT...

Page 27: ... different angles record ed If it does not will show in the screen s top left corner Repeat Play Press REPEAT contin uously to play a Track Chapter Title or Disc repeatedly Choose Off to cancel Repeat play Your Repeat setting will appear in the screen s top left corner Repeat a Segment To play a portion of a Disc over and over press REPEAT A B during play at the beginning of the seg ment At the en...

Page 28: ...highlighted use the Number buttons to enter the Track or Time you want Rotate a JPEG image During play press 2 or 3 to rotate an image Use CH o or CH p to flip an image vertically or horizontally Repeat Play Press REPEAT to choose SINGLE play will stop after the current File or Track plays FOLDER plays all files in the Folder once REPEAT ONE plays a single Track or image repeatedly REPEAT FOLDER p...

Page 29: ...elapsed playing time in hours minutes and seconds of a DVD Title TT or Title Total DVD Chapter CH Video CD Track orVideo CD Disc Play will skip to that point on the Disc REPEAT Press CH o or CH p to play a Chapter Title Track or Disc ALL repeatedly Select OFF to disable Repeat play Then press ENTER ForVCDs PBC must be OFF TIME DISP Press CH o or CH p to choose whether you want to see the elapsed o...

Page 30: ... a DVD Press ANGLE on the remote to choose a different perspective or angle OSD LANG The Setup menus on screen displays can be in English French or Spanish CAPTIONS Choose ON to see captions for Discs Different than subtitles captions show sound effects in addition to spoken text Captions must be available on the Disc Closed Captions must be on inTV mode LAST MEMORY Choose ON if you want a DVD to ...

Page 31: ...AUDIO SETUP PAGE SET STEREO DOWNMIX POWER SLEEP CLOCK VOL PICTURE DEL S EFFECT VOL MTS MENU TV AV DVD DISPLAY 9 6 3 MUTE RECALL OPEN CLOSE TITLE MENU PBC SETUP ENTER 2 1 FAV 8 7 5 4 0 DVD10 CH CH 1 3 1 4 TV TYPE PAL MULTI NTSC VIDEO SETUP PAGE SET TV STANDARD 1 Press SETUP then press 2 or 3 to go to the VIDEO SETUP PAGE 2 Press CH p to select TV TYPE then press 3 3 Press CH o or CH p to choose PAL...

Page 32: ...en 1 8 and FULL or choose OFF SPDIF OUTPUT Sony Philips Digital Interface Choose SPDIF OFF if the TV DVD is connected to a Stereo using the red white AUDIO OUTPUT jacks Choose SPDIF RAW if it s con nected to an audio system using the DVD DIGITAL OUTPUT COAXIAL jack Discs are recorded in a certain sampling rate The higher the rate the better the sound quality Choose PCM 96K if you play Discs record...

Page 33: ...that is not shown in this list choose OTH ERS DEFAULT With RESET select ed press ENTER This restores all the DVD Player s settings to their factory defaults The settings you have made will be erased 4 Press SETUP to remove the menu AUDIO FRENCH SUBTITLE SPANISH DISC MENU CHINESE PARENTAL JAPANESE PASSWORD KOREAN DEFAULT RUSSIAN THAI OTHERS PREFERENCE PAGE PREFERRED AUDIO LANGUAGE POWER SLEEP CLOCK...

Page 34: ...igit password then press ENTER again to confirm your setting If a DVD is rated higher than the level you select play will be prohib ited You must either change the Disc or enter your password Choose OFF to disable this feature and watch all DVDs regardless of their rating 4 Press SETUP to remove the menu PARENTAL RATINGS 1 KID SAF Safe viewing for children 2 G General Audience 3 PG Parental Guidan...

Page 35: ...h AAA Heavy Duty Zinc Chloride or Alkaline batteries Press TV AV DVD to put the unit in TV DVD or Video mode TV features only work with the unit in TV mode DVD menus are only available in DVD mode etc Point the remote control toward the front of the TV DVD not at other equipment Disc will not play Insert a playable Disc You may play DVDs Audio CDs MP3 JPEG files on a finalized CD R CD RW or Pictur...

Page 36: ...roper voltage supply abuse neglect mis use accident unauthorized repair or other cause not within the control of Philips A product that requires modification or adap tation to enable it to operate in any country other than the country for which it was designed manufactured approved and or authorized or repair of products damaged by these modifications Damage occurring to product during shipping wh...

Reviews: