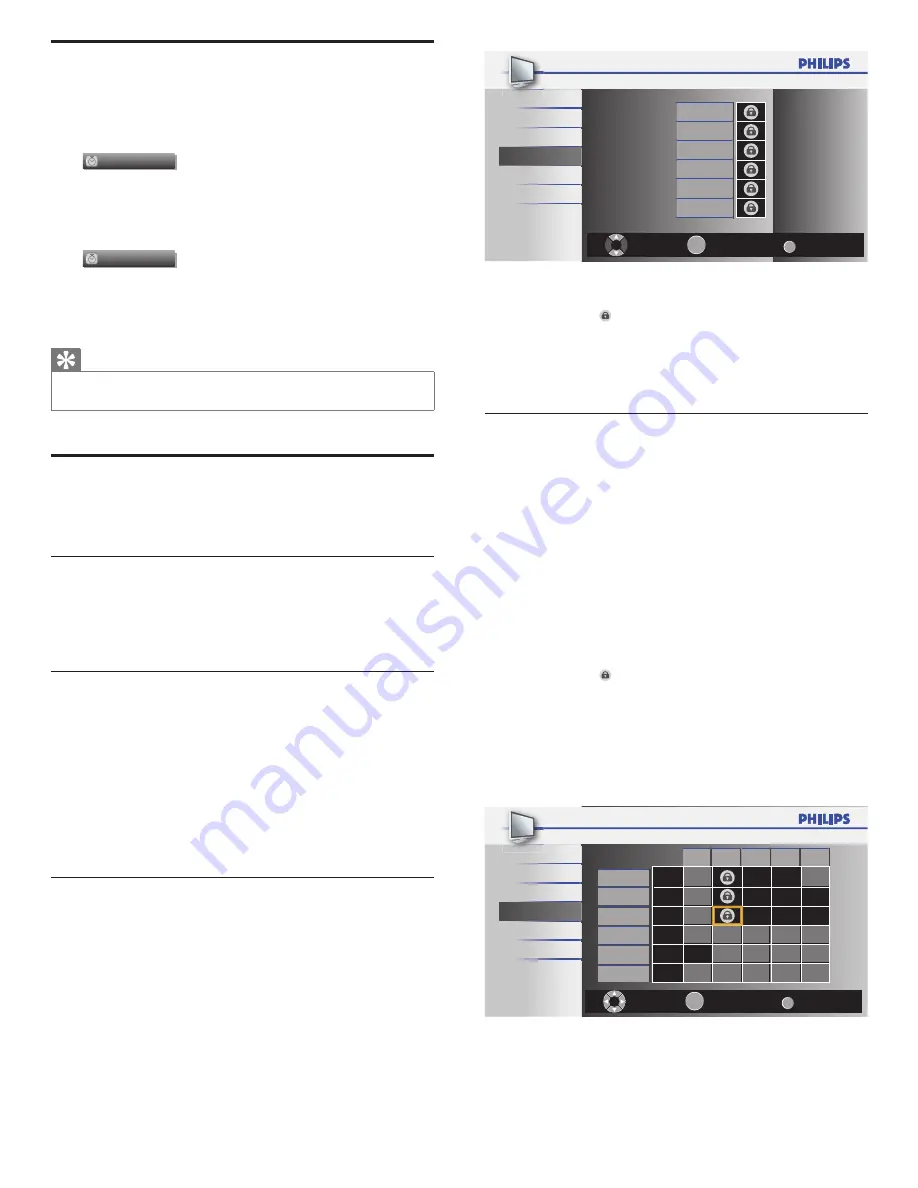
background image

18

Back

BACK

View / Block

Select

Video 2 

Video 1 

Component

HDMI 1

HDMI 2

HDMI 3

OK

Picture

Sound

Setup

Features

Language

USB

3

 Press 

Î

 or 

ï

 and then press 

OK

 repeatedly to switch between 

blocked and not blocked.
•  A box with   indicates that the channel or input source is 

blocked.

•  An empty box indicates that the channel or input source is 

not blocked.

4

 Press 

MENU

 to exit.

 Using the TV ratings lock

Your TV is equipped with a V-chip that allows you to control access to 
individual programs based on their age rating and content rating. The 
program content advisory data are sent by the broadcaster or by the 
program provider.
If you receive channels through a set-top box or cable box connected 
by HDMI, you cannot use the TV ratings lock. Your set-top box or cable 
box must be connected through RF or AV connectors. 

1

 Press 

MENU

 on the remote control and select 

[Features]

 > 

[Child Lock]

 > 

[US TV ratings lock]

.

2

 Press 

Î

 or 

ï

 or 

Í 

or


Æ 

and then press 

OK

 repeatedly to switch 

between blocked and not blocked.
Each rating has a box-graphic in front of it to indicate whether 
programs carrying that rating are locked:
•  A box with   indicates that all items in the content ratings list 

are blocked.

•  An empty box indicates that no items in the content ratings 

list are blocked.

•  An empty box indicates that some content ratings are 

deselected. For example, for rating TV-14, you can deselect 
one or more of the following content ratings: 

[D] (Dialog)

,

[L] (Language)

[S] (Sex)

, or 

[V] (Violence)

.

Back

BACK

View / Block

Select

FV

V

S

L

D

TV-MA

TV-14

TV-PG

TV-G

TV-Y7

TV-Y

OK

Picture

Sound

Setup

Language

USB

Features

•  When you block a rating, all ratings in the younger age 

categories are automatically blocked.

3

 Press 

MENU

 to exit.

Sleeptimer

You can always put your TV in standby mode earlier or reset the 

sleeptimer during the countdown.

Press 

SLEEP

 to set the sleep timer.

Sleep

Off

Sleep timer display appears on the TV screen.

Press 

SLEEP

 repeatedly to change the amount of time (in increments of 

30 minutes up to 120 minutes).

Sleep

120min.

•  Each press of 

SLEEP

 will increase the time by 30 minutes.

•  After setup, the sleep timer display can be called up for 

checking by pressing 

SLEEP

.

 Tip

To Cancel the Sleep Timer


 Press 

SLEEP

 repeatedly until “Sleep Off ” is displayed on the TV screen.

 Child and rating locks

You can prevent your children from watching certain programs or 
certain channels by locking the TV controls and by using ratings. 

   Setting your PIN

1

 Press 

MENU

 on the remote control and select 

[Features]

 > 

[Child Lock]

.

2

  Enter a 4-digit 

PIN

 on the 

Number buttons

, of the remote control.

•  If you have not set up your 

PIN

, enter 

0000

.

Changing your PIN

1

 Press 

MENU

 on the remote control and select 

[Features]

 > 

[Child Lock]

 > 

[Change PIN]

.

2

  Enter a 4-digit 

PIN

 on the 

Number buttons

 of the remote control.

•  If you have a 

PIN

, enter your current 

PIN

.

•  If you do not have a 

PIN,

 enter 

0000

.

•  If you have forgotten your 

PIN

, unplug the AC power cord for 

10 seconds to restore the 

PIN

 to 

0000

.

3

 Enter 

your 

PIN

 again to con

fi

 rm.

4

 Press 

MENU

 to exit.

 Locking a channel or input source

This section describes how to lock input sources or speci

fi

 ed channels. 

The channels can be selected but the screen is blanked out and the 

audio is muted.

1

 Press 

MENU

 on the remote control and select 

[Features]

 > 

[Child Lock]

 > 

[Channel Lock]

.

2

 Enter 

your 

PIN

 (see ‘Setting your PIN’ on page 18).

EN

Summary of Contents for 1EMN26039A

Page 1: ...tre pays Pour obtenir de l aide aux États Unis au Canada à Puerto Rico ou aux ÎlesVierges américaines communiquez avec le centre de service à la clientèle Philips au 1 866 309 0841 Pour obtenir l aide au Mexique entrez en contact avec le centre de soin de client de Philips à 01 800 504 62 00 Entrer ci dessous le modèle et le numéro de série situés dérrière à droite sur le dos du téléviseur ES Para...

Page 2: ...3 Watching a Blu ray disc 14 Switching audio mode 14 6 Use more of your TV 15 Changing picture and sound settings 15 Sleeptimer 18 Child and rating locks 18 Closed caption 20 EasyLink 21 Energy saving mode 21 Set your location to home 21 View photos and play music on a USB device 22 7 Install channels 24 Selecting your menu language 24 Autoprogram 24 Channel list 25 Add channels 25 Optimizing the ...

Page 3: ... ________________________ This bolt of lightning indicates unin sulated material within your unit may cause an electrical shock For the safety of everyone in your household please do not remove product covering The exclamation point calls attention to features for which you should read the enclosed literature closely to prevent operating and maintenance problems WARNING To reduce the risk of fire ...

Page 4: ...damaged 17 Tilt Stability All televisions must comply with recommended international global safety standards for tilt and stability properties of its cabinets design Do not compromise these design standards by applying excessive pull force to the front or top of the cabinet which could ultimately overturn the product Also do not endanger yourself or children by placing electronic equipment toys on...

Page 5: ...those specified herein confirmation of their validity and suitability must be obtained Philips warrants that the material itself does not infringe any United States patents No further warranty is expressed or implied Philips cannot be held responsible neither for any errors in the content of this document nor for any problems as a result of the content in this document Errors reported to Philips w...

Page 6: ...gistering your model with Philips makes you eligible for all of the valuable benefits listed below so don t miss out Complete and return your Product Registration Card at once or register online at www philips com welcome to ensure Proof of Purchase Returning the enclosed card guarantees that your date of purchase is on file so no additional paperwork is required from you to obtain warranty servic...

Page 7: ... b a Standby indicator remote control sensor b Ambient light sensor When in Home mode thisTV will automatically adjust the brightness based on the ambient light If there is a sudden change inTV brightness it may be due to changes in the room lighting conditions sunshine lamps or an object blocking the light sensor on the front of theTV Please ensure the room lighting is stable and the light sensor...

Page 8: ...caster You might see a difference in broadcast time if the broadcast is from a different time zone i CH Switches to the next or previous channel j MUTE Mutes or unmutes audio k Number buttons Select a channel page or setting l Dot Press the dot for digital channels m PREV CH Returns to the previously viewed channel n VOL Increases or decreases volume o MENU EXIT Turns the menu on or off p BACK Ret...

Page 9: ... the screen Connect your devices before you position theTV Using a Kensington lock There is a Kensington security slot on the back of theTV Prevent theft by looping a Kensington lock between the slot and a permanent object such as a heavy table AC IN Installing the remote control batteries 1 Slide the battery cover off the back of the remote control 2 Insert the 2 supplied batteries AAA 1 5V Be su...

Page 10: ...ing from analog to digitalTV This means that a given broadcaster can have channels available either in analog or in digital or both analog and digital at the same time TheTV produces stereo sound only if a stereo signal is broadcast If you connect to a cable When yourTV is connected to the cable socket you might receive free digital and high definition programs depending on your cable provider The...

Page 11: ...tlet Ensure that the cord is tightly secured at both ends AC IN ANT IN b a Disconnect the TV from the power outlet Caution Pull the AC power cord by the plug do not pull on the AC power cord 1 Unplug the AC power cord from the power outlet 2 Unplug the AC power cord from the power connector at the back of theTV Managing cables Route your antenna cable and all other cables through the cable managem...

Page 12: ...creen appears the first time you turn on theTV Initial Setup Initial Setup Select your menu language Seleccione el idioma para el menú Sélectionnez la langue du menu Français Español Select Skip MENU OK OK English Follow the on screen instructions to select your language and complete yourTV setup Installation takes approximately 10 minutes Press Í or Æ to select the desired mode for energy saving ...

Page 13: ...channel 5 Use your TV This section helps you perform basicTV operations Switching on your TV and putting it in standby mode To switch on Press POWER at the side of theTV or press standby On on the remote control To switch to standby Press POWER at the side of theTV or press standby On on the remote control again Note Energy consumption contributes to air and water pollution When the AC power cord ...

Page 14: ...he picture does not appear 1 Press SOURCE repeatedly to select the set top box and wait a few seconds for the picture to appear 2 Use the remote control of your set top box to select channels Watching connected devices To watch connected devices 1 Switch on the connected device The picture from your connected device might appear automatically on theTV screen 2 Use the remote control of the device ...

Page 15: ...y selected audio mode While receiving an MTS broadcast press repeatedly to cycle through the available audio channel 11 1 English 1 3 11 SAP STEREO When all audio are available SAP STEREO SAP MONO SAP STEREO SAP STEREO SAP STEREO SAP MONO When stereo and monaural audio are available MONO STEREO MONO STEREO MONO STEREO MONO STEREO When SAP and monaural audio are available MONO STEREO MONO STEREO SA...

Page 16: ...c experience Game Optimized for PCs games consoles and playstations 6 Use more of your TV Changing picture and sound settings You must set Home in Location refer to page 21 Otherwise personalized picture and sound settings will not be memorized after the unit goes to standby mode Changing picture settings 1 Press MENU on the remote control 2 Press OK to enter the Picture Sound Setup Features Langu...

Page 17: ...of the screen Full Display a picture that is stretched out of proportion to fill the screen Dot By Dot Display a picture in its original size Changing picture format 1 Press FORMAT on the remote control 2 Press Î or ï to select a picture format and press OK to confirm your choice Summary of picture formats 5 types of display modes can be selected when the broadcasting station is sending 16 9 or 4 ...

Page 18: ...d continue to output sound Changing auto sound mode 1 Press AUTO SOUND to set yourTV to a predefined sound setting 2 Press Î or ï to select one of the following settings Personal The customized settings you defined by using the Sound menu Standard For normalTV viewing Movie Realistic sound settings for a cinematic experience Music Emphasize high and low freq for instrument sound News Clear sound s...

Page 19: ...p Language USB Features When you block a rating all ratings in the younger age categories are automatically blocked 3 Press MENU to exit Sleeptimer You can always put yourTV in standby mode earlier or reset the sleeptimer during the countdown Press SLEEP to set the sleep timer Sleep Off Sleep timer display appears on theTV screen Press SLEEP repeatedly to change the amount of time in increments of...

Page 20: ...en 16 and up with strong violence strong language and strong sexual content 18ans Only to be viewed by adults and contains extreme violence and graphic sexual content pornography Summary of TV ratings Age rating Content rating TV Y Appropriate for children of all ages with themes and elements suitable for children aged 2 6 None TV Y7 Programs designed for children age 7 and older FV FantasyViolenc...

Page 21: ...he captions do not always use correct spelling and grammar Not allTV programs and product commercials include closed caption information Refer to your areaTV program listings for theTV channels and times of closed caption shows The captioned programs are usually noted in theTV listings with service marks such as CC DTV Selecting DTV caption services 1 Select a caption service for digital channels ...

Page 22: ...onnected via a HDMI cable 1 Press MENU on the remote control and select Features EasyLink Auto Device Off Auto TV On On On On Device List Master EasyLink Sound Setup Language USB Features Picture 2 Press Î or ï to highlight the desired setting and press OK to select the setting 3 Adjust the following items Master EasyLink Set the EasyLink On or Off The following additional settings will be grayed ...

Page 23: ...ourTV is fitted with a USB connection that enables you to view photos or listen to music stored on a USB device Supported formats Not supported formats JPEG Progressive JPEG files MP3 File name exceeding 128 characters FAT DOS formatted memory devices File names containing a dot character It is recommended that files to be played back in this unit are recorded under the following specifications MP...

Page 24: ...ions Start show Stop show Starts or stops a slide show Listen to music on a USB device 1 Connect your USB device to theTV 2 Press OK to enter the USB menu 3 Select Music 4 Press OK to enter the music folder 1 2 3 4 folder Track1 MP3 Title Artist Album Duration Year Track1 Sentiment 00 02 53 Music Music Track1 MP3 Press the OK button to play pause 5 Press Î or ï to select a song Press the Number bu...

Page 25: ...cable It searches for NTSC ATSC and QAM modulated channels available in your area Picture Sound Setup Features Language USB Antenna Cable Back Autoprogram will rescan all channels Auto programming may take more than 20 minutes to complete Select your signal source Antenna Cable Or ANT IN When autoprogramming is complete the lowest memorized channel will be displayed 4 Follow the on screen instruct...

Page 26: ...e contact your local service provider Installing digital channels using Add channels might not work for direct cable connections and if the digital signal is too weak for theTV to process Optimizing the signal quality from your antenna You can optimize your signal quality by tuning in ATSC channels with weak signals and adjusting the antenna 1 Press MENU on the remote control and select Setup Ante...

Page 27: ...d from our website at www philips com using the model number of yourTV e g 46PFL3705D to find information Checking your current software version 1 Press MENU on the remote control and select Features Current Software Info The version and a description of the current software is displayed then press OK Release Version XXXXXXX_XXX_X_XXXX Picture Sound Setup Language USB Features Back Picture 2 Press...

Page 28: ... DVD receiver game console etc This connector is used with audio input g audio input jack for HDMI 1 h analog audio output jack Audio cable connection for an external device i digital audio output jack Digital audio output to home theaters and other digital audio systems j HDMI 3 input jack Third HDMI in connector k USB terminal Data input from USB storage devices only Do not connect any device to...

Page 29: ...nd audio signals are combined in one cable You must use HDMI for full high definition video and to enable Philips EasyLink Tip To connect to a PC without an HDMI connector use a HDMI DVI adaptor and a separate audio cable Note Philips HDMI supports HDCP High bandwidth Digital Contents Protection HDCP is a form of Digital Rights Management that protects high definition content in DVD or Blu ray Dis...

Page 30: ...R input jacks Note When you use an S Video connector do not connect any device to the Composite video jack Only the left loudspeaker reproduces sound for mono equipment Use a mono to stereo adapter not supplied for sound reproduction via all internal loudspeakers When you connect cables match the cable colors to the connectors on theTV Connecting your devices This section describes how to connect ...

Page 31: ... OUT OUT OUT OUT OUT OUT AUDIO L R Cable Cable Set top box Set top box Note When you use an S Video connector do not connect any device to the Composite video jack Only the left loudspeaker reproduces sound for mono equipment Use a mono to stereo adapter not supplied for sound reproduction via all internal loudspeakers When you connect cables match the cable colors to the connectors on theTV Conne...

Page 32: ...ing us These numbers are available on the back and side of yourTV as well as on the packaging 10 Troubleshooting Problem Possible cause and solution No power or indicator light TheTV is not connected to the power Press POWER at the side of theTV or on the remote control Ensure that the AC power cord is connected tightly to theTV power connector and to the power socket outlet Remove the AC power co...

Page 33: ...f a USB connection between your digital camera and theTV isn t working you can try the solutions below to resolve your problem Make sure your digital camera is switched on and verify if the configuration of your digital camera is correct see the manual of your digital camera for more information Some digital cameras allow you to switch off the USB interface Make sure that the USB interface is swit...

Page 34: ...cifications Note Specifications are subject to change without prior notice Picture enhancement Type 46PFL3705D 40PFL3705D Full HD 1920 x 1080 pixels 120Hz 46PFL3505D 40PFL3505D Full HD 1920 x 1080 pixels 60Hz Aspect ratio 16 9 Viewing angles 176 V by 176 H Built in digital tuner ATSC QAM Sound enhancement Mono Stereo Mono Stereo Virtual Surround Sound Power output RMS watts 20 W Equalizer 5 band E...

Page 35: ...er information is not covered under this Limited Warranty This warranty does not apply a to damage caused by accident abuse misuse neglect misapplication or non supplied product b to damage caused by service performed by anyone other than company approved Authorized Service Location c to a product or a part that has been modified without written company per mission or d if any serial number has be...

Page 36: ...mental care 5 Equalizer 17 H Home mode 11 21 I Initial setup 11 L Location retail or home 11 21 M Master EasyLink 21 Mounting stand onto TV 8 P Picture format 16 17 Picture settings 15 R Ratings 18 19 Remote control insert batteries 8 overview 6 7 Retail mode 11 21 S Settings assistant 11 Signal quality 25 Sleeptimer 18 Software upgrade 26 version 26 Sound settings 17 Speakers EasyLink 17 Specific...

Page 37: ...1 60cm 101 60cm 120V 60Hz 205W 46PFL3505D F7 46 116 84cm 116 81cm 120V 60Hz 228W 40PFL3505D F7 40 101 60cm 101 60cm 120V 60Hz 205W Comercializado por P F MEXICANA S A DE C V IMPORTADOR SOJITZ MEXICANA S A DE C V Av Paseo de las Palmas No 239 302 Col Lomas de Chapultepec C P 11000 México D F Tel 52 55 5202 7222 EXPORTADOR FUNAI ELECTRIC CO LTD ENSAMBLADO EN MEXICO GARANTIA INCLUIDA EN EL INSTRUCTIV...

Reviews: