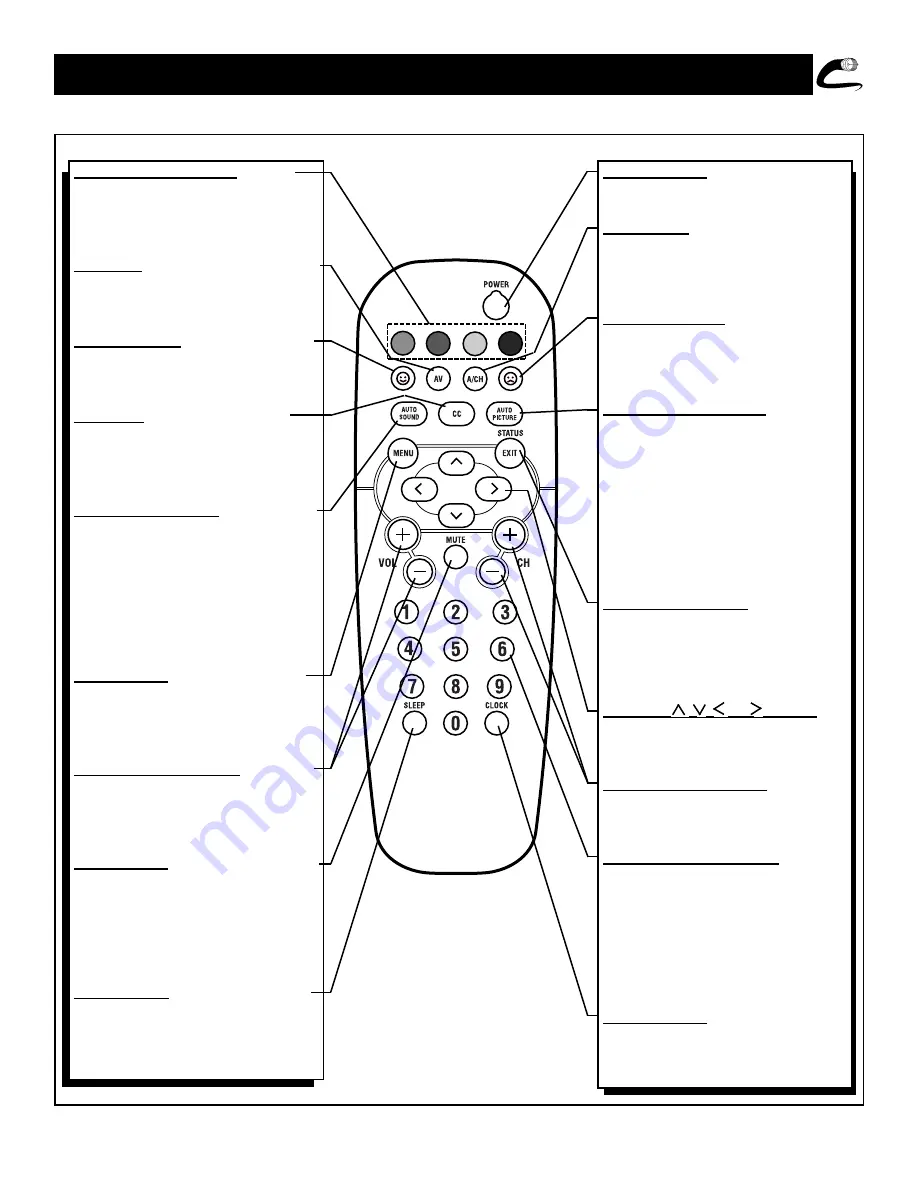
background image

9

D

ESCRIPTION OF

R

EMOTE

C

ONTROL

B

UTTONS

VOL

QUADRA SURF Buttons - (Red,
Green, Yellow, Blue) 
Allows you to
store and surf up to 10 channels you
choose for each colored button.

AV Button - Press to select an accesso-
ry signal input from the front AV
Inputs.

SMILEY Button - Press to add chan-
nels in the “Quadra Surf” lists. Works
with all colored buttons.

CC Button - Press to activate the
Closed Captioning options. Repeatedly
press the CC button will scroll the
options available on the TV screen.

AUTO SOUND Button - Press repeat-
edly to choose from different factory
pre-defined sound settings. Choose from
Personal (how you set the Sound Menu
options), Voice (for programming with
speaking only), Music (for musical type
programs such as concerts), or Theatre
(used when watching movies).

MENU Button - Press to display the
on-screen menu. Also can be used to
back out of the on-screen menu until it
disappears from the TV’s screen.

VOL(ume) + or – Buttons - Press the
VOL + button to increase the TV’s
sound level. Press the VOL – button to
decrease the TV’s sound level.

MUTE Button - Press the mute button
to eliminate the sound being heard
from the TV. “MUTE” will be dis-
played on the TV’s screen. Press again
to restore the TV’s volume to it’s previ-
ous level.

SLEEP Button - Press the Sleep but-
ton to set the TV to automatically turn
itself off after a set period of time.
Press repeatedly to select 15, 30, 45,
60, 90, 120, 180, or 240 minutes.

POWER button - Press the Power but-
ton to turn the TV on or off.

A/CH Button - (Alternate Channel)
Press to toggle between the last view
channel and the channel presently
being viewed.

FROWNIE Button - Allows you to
delete stored channels within the
“Quadra Surf” lists for the colored but-
tons.

AUTO PICTURE Button - Press
repeatedly to choose from 5 different
factory pre-defined picture settings.
Choose from Personal (how you set the
Picture Menu adjustment controls),
Movies (when watching movies),
Sports (for any sporting event), Weak
Signal (used when the signal being
received is not the best), or Multi
Media (for use with video gaming).

STATUS/EXIT Button - Press to dis-
play the current channel number. If the
on-screen menu is displayed, press the
Status/Exit button will remove it from
the TV’s screen.

CURSOR 

,  , 

, or  Buttons -

Press to navigate, select and adjust con-
trols within the on-screen menu.

CH(annel) + or – Buttons - Press to
select channels in ascending or
descending order. 

NUMBERED (0-9) Buttons - Press
the numbered buttons to select TV
channels or to enter certain values
within the on-screen menu. For single
channel entries, press the numbered
button for the channel you desire. the
TV will pause for a second or two
before changing to the chosen channel. 

CLOCK Button - Press to display the
“Timer” menu. Within this menu set
the time, set the TV to tune to a certain
channel at a certain time once, or daily.

Summary of Contents for 19PR11C199

Page 1: ...need to get started If you have any problems Philips Representatives can help you get the most from your new product by explaining Hookups First Time Setup and Feature Operation Do not attempt to return this product to the store For fast help call us first 1 800 531 0039 Thank you for making Philips a part of your home ...

Page 2: ...electri cal shock For the safety of everyone in your household please do not remove product covering s The exclamation point calls attention to features for which you should read the enclosed literature closely to prevent operating and maintenance problems WARNING TO PREVENT FIRE OR SHOCK HAZARD DO NOT EXPOSE THIS EQUIPMENT TO RAIN OR MOISTURE CAUTION To prevent electric shock match wide blade of ...

Page 3: ... have fallen or liquid has been spilled into the appliance or C The appliance has been exposed to rain or D The appliance does not appear to operate normally or exhibits a marked change in performance or E The appliance has been dropped or the enclosure damaged 17 Tilt Stability All televisions must comply with recommend ed international global safety standards for tilt and stability properties of...

Page 4: ...tioning Control 28 Remote Control Use Setting up the Sleeptimer Option 29 Setting the Auto Picture Control 30 Setting the Auto Sound Control 31 Using the Quadra Surf Buttons Alternate Channel 32 33 General Information Troubleshooting Tips 34 Glossary of Terms 35 Index 36 Factory Service Location 37 38 Notes 39 Warranty 40 Let s Look Inside Here are a few of the special features built into this new...

Page 5: ... on the Converter Connect the Cable TV cable to the 75Ω plug on the TV If you have a Cable Converter Box Connect the OUT put plug from the Converter to the 75Ω plug on the TV Remember Set the TV for the type signal you ve just connected see the Tuner Mode section on page 11 of this manual To select only the channel numbers on your Cable system see Auto Program page 12 If you use a Cable Converter ...

Page 6: ...he 75Ω plug on the rear of the TV If the round end of the antenna wire is threaded screw it down finger tight Remember Be sure to set the TV for the type signal you ve connected see the Tuner Mode sec tion on page 11 of this manual To set the TV to select only the channel numbers in your area see how to Program or Add channels in the TV s memory on page 12 Auto Program section To order any optiona...

Page 7: ...dapter Cable TV signal Back of TV VOLUME CHANNEL INSTALL MENU AUDIO VIDEO VOLUME CHANNEL INSTALL MENU AUDIO VIDEO ANTENNA OUT ANTENNA IN VIDEO AUDIO IN IN OUT OUT 1 2 Audio and Video Front Mono inputs are available for a quick connection of a VCR or to playback video from a camera Use the AV button on the remote to tune to the Front A V Inputs Connect the yellow video cable from the Video output o...

Page 8: ...E button to lower the sound level Pressing both buttons at the same time will display the on screen menu Once in the menu use these button to make adjustments or selections Press the CHANNEL UP or DOWN button to select TV chan nels Point the remote control toward the remote sensor window on the TV when operating the TV with the remote To load the supplied batteries into the remote 1 Remove the bat...

Page 9: ...turn itself off after a set period of time Press repeatedly to select 15 30 45 60 90 120 180 or 240 minutes POWER button Press the Power but ton to turn the TV on or off A CH Button Alternate Channel Press to toggle between the last view channel and the channel presently being viewed FROWNIE Button Allows you to delete stored channels within the Quadra Surf lists for the colored but tons AUTO PICT...

Page 10: ...nish Press the MENU button on the remote to show the on screen menu Press the CURSOR UP or DOWN buttons to scroll through the on screen menu until the word INSTALL is highlighted Press the CURSOR RIGHT button to display the INSTALL menu features Press CURSOR UP or DOWN buttons to scroll the Install features until the word LANGUAGE is high lighted Press the CURSOR RIGHT button repeatedly to select ...

Page 11: ...e AUTO PROGRAM feature is activated the TV will automatically choose the correct mode Press the MENU button on the remote to show the on screen menu Press the CURSOR UP or DOWN buttons to scroll through the on screen menu until the word INSTALL is highlighted Press the CURSOR RIGHT button to display the INSTALL menu features Press CURSOR UP or DOWN buttons to scroll the Install features until the ...

Page 12: ...on the remote to show the on screen menu Press the CURSOR UP or DOWN buttons to scroll through the on screen menu until the word INSTALL is highlighted Press the CURSOR RIGHT button to display the INSTALL menu features Press CURSOR UP or DOWN buttons to scroll the Install features until the words AUTO PROGRAM are highlighted Press the CURSOR RIGHT button to start the Auto Program scan ning of chan...

Page 13: ...rd INSTALL is highlighted Press the CURSOR RIGHT button to display the INSTALL menu features Press the CURSOR UP or DOWN buttons to scroll the Install features until the words CHANNEL EDIT are highlighted Press the CURSOR RIGHT button to display the CHANNEL EDIT options With the CHANNEL EDIT options displayed and CHANNEL NO highlighted enter the channel number with the NUMBERED or the CH or button...

Page 14: ...splay the PICTURE menu features Press CURSOR UP or DOWN buttons to scroll the Picture features and highlight the control you wish to adjust Brightness Color Picture Sharpness Tint or Color Temp Press the CURSOR RIGHT or the CURSOR LEFT buttons to adjust the selected control or to make selections for the Color Temp control Normal Warm or Cool Press the CURSOR UP or DOWN buttons to select and adjust...

Page 15: ...improve the quality of the picture Press the MENU button on the remote to display the on screen menu Press the CURSOR UP or CURSOR DOWN button until the word PICTURE is highlighted Press the CURSOR RIGHT button to display the PICTURE menu features Press the CURSOR UP or CURSOR DOWN button to scroll the Picture menu features until the word DNR is highlighted Press the CURSOR RIGHT button turn the D...

Page 16: ... con trol helps to sharpen the picture quality The black portions of the pic ture become richer in darkness and the whites become brighter Press the MENU button on the remote to display the on screen menu Press the CURSOR UP or CUR SOR DOWN button until the word PICTURE is highlighted Press the CURSOR RIGHT button to display the PICTURE menu features Press the CURSOR UP or CURSOR DOWN button to sc...

Page 17: ...n trol your TV also has Bass and Treble Boost sound controls The TRE BLE Boost effects only the high fre quency sound coming from the TV enhancing the highs while the BASS Boost effects only the low frequency sound coming from the TV enhancing the lows Press the MENU button on the remote to display the on screen menu Press the CURSOR UP or CUR SOR DOWN button until the word SOUND is highlighted Pr...

Page 18: ...you can have the TV level out sound that is being heard This makes for a more consistent sound by reducing the peaks and valleys that occur during program changes or com mercial breaks To turn the AVL ON follow these steps Press the MENU button on the remote to display the on screen menu Press the CURSOR UP or CUR SOR DOWN button until the word SOUND is highlighted Press the CURSOR RIGHT button to...

Page 19: ...ols you wish to set Time Start Time Stop Time Channel Activate or Display Press the CURSOR RIGHT button to adjust the selected option TIME Enter the current time with the numbered buttons Use the Cursor Right button to move to the AM PM area and use the Cursor Left or Right buttons to toggle AM or PM START TIME Use the numbered buttons to enter a start up time for the TV to turn on or to tune a sp...

Page 20: ...le for younger children This type of pro gramming contains one or more of the follow ing Moderate violence V some sexual situa tions S infrequent coarse language L or some suggestive dialogue D TV 14 Parents Strongly Cautioned This program contains some material that many parents would find unsuitable for children under 14 years of age This type of programming contains one or more of the following...

Page 21: ... First let s start by learning how to set a personal access code Press the MENU button on the remote to display the on screen menu Press the CURSOR UP or DOWN button until the word FEA TURES is highlighted Press the CURSOR RIGHT button to display the FEATURES menu options Press the CURSOR UP or DOWN button until the words AUTOLOCK are highlighted Press the CURSOR RIGHT button The screen will read ...

Page 22: ...show the on screen menu Press the CURSOR UP or DOWN button until the word FEATURES is highlighted Press the CURSOR RIGHT button to display the FEATURES menu options Press the CURSOR UP or DOWN button until the words AutoLock are highlighted Press the CURSOR RIGHT button Enter the correct access code number XXXX shows on the Access Code display as you press the NUMBERED buttons AutoLock menu option...

Page 23: ...r DOWN button until the word FEATURES is highlighted Press the CURSOR RIGHT button to display the FEATURES menu options Press the CURSOR UP or DOWN button until the words AutoLock are highlighted Press the CURSOR RIGHT button Enter the correct access code number XXXX shows on the Access Code display as you press the NUMBERED buttons AutoLock menu options will be displayed Press the CURSOR UP or DO...

Page 24: ... Press the CURSOR UP or DOWN button until the word FEA TURES is highlighted Press the CURSOR RIGHT button to display the FEATURES menu options Press the CURSOR UP or DOWN button until the words AutoLock are highlighted Press the CURSOR RIGHT button Enter the correct access code number XXXX shows on the Access Code display as you press the NUMBERED buttons AutoLock menu options will be displayed Pr...

Page 25: ...FEA TURES is highlighted Press the CURSOR RIGHT button to display the FEATURES menu options Press the CURSOR UP or DOWN button until AutoLock is highlighted Press the CURSOR RIGHT button The screen will prompt you for your Access Code Using the NUMBERED buttons on the remote enter your 4 digit Access Code The AutoLock menu options will be displayed Press the CURSOR UP or DOWN button to highlight t...

Page 26: ...or FV Press the CURSOR RIGHT button on the remote to turn the option ON or OFF To view a program blocked by the TV Rating options enter your 4 digit access code This will disable all blocked TV Ratings until the TV is powered off and on again Then the blocking options will be restored TV Y All children This program is designed to be appropriate for all children Designed for a very young audience i...

Page 27: ...ptions Press the CURSOR UP or DOWN button until the words AutoLock are highlighted Press the CURSOR RIGHT button Enter the correct access code number XXXX shows on the Access Code display as you press the NUMBERED buttons AutoLock menu options will be displayed Press the CURSOR UP or DOWN buttons until the words BLOCKING OPTIONS are highlight ed Press the CURSOR RIGHT button to display the Blockin...

Page 28: ...l appear on screen if the tuned pro gram is broadcasting CC information When finished press the STATUS EXIT button to remove the menu from the TV s screen or let the option time out and disappear from the TV screen Not all TV programs and product commercials are made with Closed Caption CC information included Neither are all Closed Caption modes CC1 or CC2 necessarily being used during the transm...

Page 29: ...5 30 45 60 90 120 180 or 240 minutes before the TV will turn itself off An on screen count down will appear during the last minute before the TV shuts itself off The on screen menu will time out and disappear from the screen when you finish or you can press the STATUS EXIT button to clear the menu from the screen After setting the Sleeptimer pressing the STATUS EXIT button will display the time re...

Page 30: ...ess the AUTO PICTURE button on the remote control The current Auto Picture setting will appear in the middle of the screen Press the AUTO PICTURE button repeatedly to select either PERSONAL MOVIES SPORTS WEAK SIGNAL or MULTI MEDIA picture settings Note The PERSONAL setting is the setting that you setup using the PIC TURE options within the on screen menu This is the only Auto Picture set ting that...

Page 31: ...ontrols To select any of the options follow the directions below Press the AUTO SOUND button on the remote control The current Auto Sound setting will appear in the middle of the screen Press the AUTO SOUND button repeatedly to toggle between the four settings Note Only the PERSONAL control can be changed by the viewer This changes the settings in the main on screen menu s sound controls THEATRE P...

Page 32: ...orresponding COL ORED Red Green Yellow or Blue button to add the channel to that button s Surf list Up to ten channels per button can be stored Repeat steps 1 through 3 to add addi tional channels up to 10 to each of the the SURF lists To remove a channel from one of the SURF lists Press the COLORED Quadra Surf button until the desired channel appears The screen will display the channel number wit...

Page 33: ...ote Red Green Yellow or Blue The screen will display a smiley face with the first programmed channel for that surf list While the colored smiley face still appears on the screen press the same COLORED button on the remote to tune the second channel programmed for that specific surf list Repeatedly pressing the same COL ORED button while the smiley face appears will tune all the programmed channels...

Page 34: ...the TV is unplugged from the electrical outlet before cleaning When cleaning the TV screen take care not to scratch or damage the screen surface avoid wearing jewelry or using anything abrasive Wipe the front screen with a clean cloth dampened with water Use even easy vertical strokes when cleaning Gently wipe the cabinet surfaces with a clean cloth or sponge dampened in a solution of cool clear w...

Page 35: ... or mes sages generated by the television or VCR to help the user with specific feature controls color adjustment programming etc Menu An on screen listing of feature controls shown on the Television screen that are made available for user adjustments Remote Sensor Window A window or opening found on the Television control panel through which infrared remote control command signals are received Qu...

Page 36: ...5 Channel Edit Control 13 Closed Caption Control 28 Color Control 14 Color Temperature Control 14 Contrast Control 16 Dynamic Noise Reduction DNR Control 15 Front A V Inputs 7 Glossary of Terms 35 Index 36 Language Control 10 Picture Control 14 Remote Control Buttons 9 Remote Control Operation Basic 8 Safety Instructions 3 Sharpness Control 14 Sleeptimer Control 29 Surf Quadra Surf Controls 32 33 ...

Page 37: ...RENEWED 90 DAY LIMITED WARRANTY ...

Reviews: