HUDSON 9
10
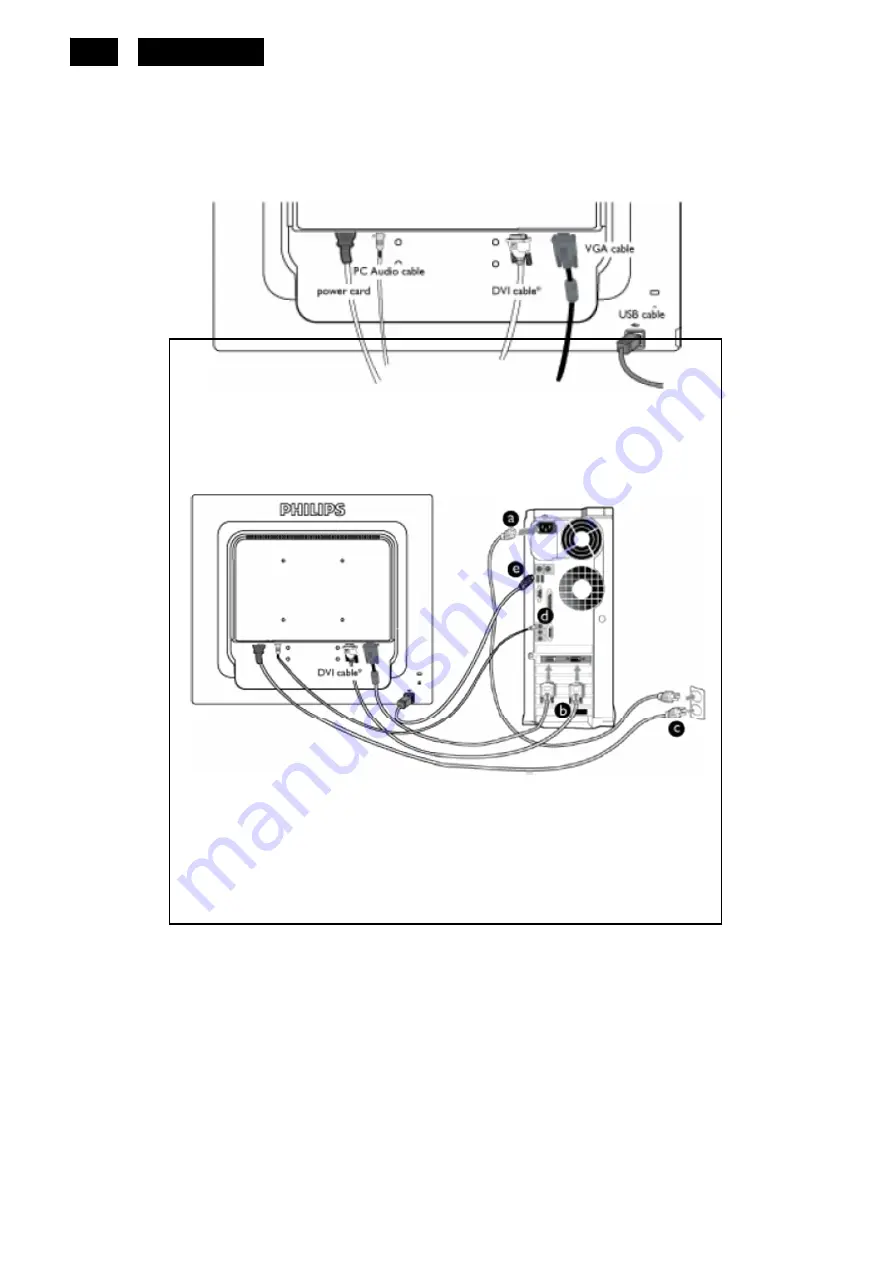
3.4 Connecting to the PC
1)
Connect the power cord to the back of the monitor firmly. (Philips has pre-connected VGA cable for the first
installation.)
Available for selective models
Available for selective models
2)
Connect to PC
(a) Turn off your computer and unplug its power cable.
(b) Connect the monitor signal cable to the video connector on the back of your computer.
(c) Plug the power cord of your computer and your monitor into a nearby outlet.
(d) Connect the PC audio cable to the audio connector on the back of your computer.
(e) USB plug
(1) Connect USB upstream port on monitor and the USB port on PC with a USB cable.
(2) The USB downstream port is now ready for any USB device to plug in.
(f) Turn on your computer and monitor. If the monitor displays an image, installation is complete.
Note: The USB plug is a pass through connection whether it can support USB 1.1 or USB 2.0 depends on your
PC's specification.
Summary of Contents for 190B9CB/00
Page 4: ...HUDSON 9 4 Monitor Specifications h t t p w w w w j e l n e t ...
Page 7: ...HUDSON 9 7 Rear View h t t p w w w w j e l n e t ...
Page 12: ...HUDSON 9 12 4 2 Factory Preset Display Modes h t t p w w w w j e l n e t ...
Page 13: ...HUDSON 9 13 4 3 Pixel Defect Policy h t t p w w w w j e l n e t ...
Page 14: ...HUDSON 9 14 h t t p w w w w j e l n e t ...
Page 15: ...HUDSON 9 15 h t t p w w w w j e l n e t ...
Page 33: ...HUDSON 9 33 h t t p w w w w j e l n e t ...
Page 36: ...HUDSON 9 36 7 3 USB Board 715G3114 1 7 4 Key Board 715G3111 1 h t t p w w w w j e l n e t ...
Page 40: ...HUDSON 9 40 3 Remove bezel and rear cover as Fig3 Fig4 Fig3 Fig4 h t t p w w w w j e l n e t ...
Page 44: ...HUDSON 9 44 h t t p w w w w j e l n e t ...
Page 52: ...HUDSON 9 52 h t t p w w w w j e l n e t ...
Page 59: ...HUDSON 9 59 h t t p w w w w j e l n e t ...
Page 60: ...HUDSON 9 60 h t t p w w w w j e l n e t ...
Page 70: ...HUDSON 9 70 16 Monitor Exploded View h t t p w w w w j e l n e t ...


