background image

7

DISPLAY

SLEEP

SKIP

NORMAL

STANDBY

MUTE

TV/AV

C

C

F

UNCTION

 of R

EMOTE

 C

ONTROL

n

o

p
q
r
s

v

t

u

w

v

n

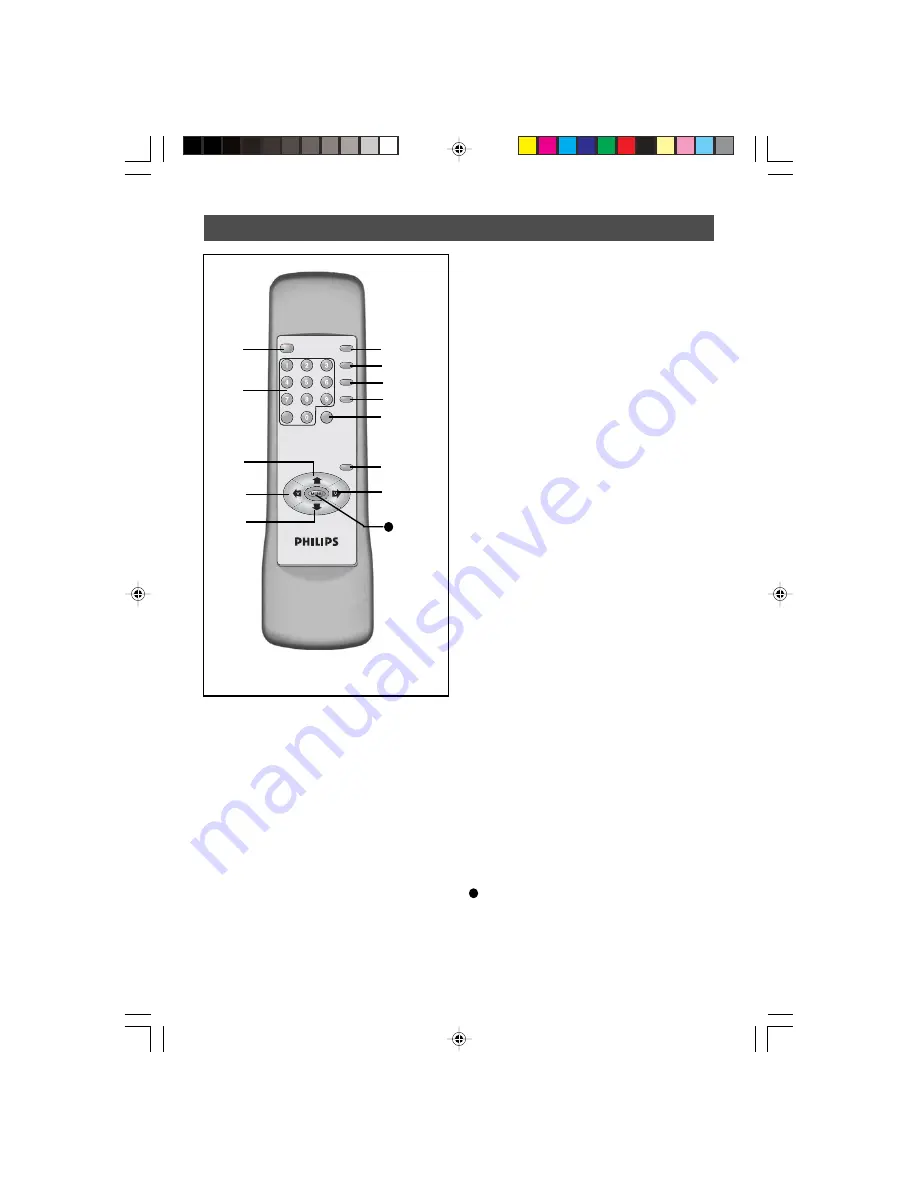
 Standby button


Switch the set off temporarily to standby mode.

(The red light indicator lights up when the set
is on standby mode).


To switch on set from standby mode, press
C/- , or TV/AV,  Standby button.

o

 Digit (0-9) / -/-- Buttons


 Press 0-9 buttons to select a channel. For a 2-

digit channel number, press -/-- button fol-
low by the required digits.

p

 Mute Buttons


Mute sound. To restore sound, press button

again.

q

 Display Button


Press to display the current channel NO. ,

colour and sound system.

r

 Sleep Button

Allows you to select a time period after which
the set will switch to standby mode
automatically. This television can be programmed
up to 120 minutes (10 minutes intervals).

s

 Skip Button

Select an unwanted channel NO., press button
to skip. The channel number will be displayed
in red. 

Note

:To restore the skipped channel,

press digit button or -/-- button to recall the
skipped channel NO., then press Skip button
to change the channel NO. from red to green
colour.

u

 TV/AV  Button

To switch between TV channel and AV input
sources.

v

 /- Buttons


Increases or decreases volume.


Allows you to access the sub-menus and

adjust the settings.

w

 C/- Buttons


Allows you to select channels in ascending

or descending order.


Allows you to select the next item in the

menu.

    Menu Button

Display the main menu. Also exits menu from
screen.

w

11

t

 Normal Button

To switch between the 4 picture settings:
DYNAMIC, STANDARD, MILD and MEMORY.

11

˵Ã÷Êé.p65

02-7-2, 17:46

7

Summary of Contents for 14PT2010

Page 1: ...1 14PT2010 21PT2010 14PT2010 21PT2010 ...

Page 2: ...tem 13 Adjusting the TV Picture 14 Smart Picture Control 15 TV Installation Basic Installation Function General Specification 16 Recycling Directive _ To minimise harm to the environment the batteries supplied with the TV set do not contain mercury or nickel cadmium If possible when disposing of batteries use recycling means available to you Your TV set uses materials which are reusable or which c...

Page 3: ...east 5 cm around each side of TV set to allow for proper ventilation Avoid placing your set e g near the window where it is likely to be exposed to rain or water No objects filled with liquids should be placed on top the TV so as to avoid dripping or splashing of liquids on the set UsefulTips Do not leave your set on standby mode for a prolonged period of time Switch off set to allow it to be dema...

Page 4: ...problem Try another channel Try increasing the volume Check that the sound is not muted If it is muted press the Mute button on the remote control to restore sound No picture Good picture but no sound Good sound but poor colour or no picture Try increasing the contrast colour and brightness setting Snowish picture and noise Check antenna connection at the rear of the TV Horizontal dotted lines Pos...

Page 5: ...t the rear of the TV set Consult your dealer if mains supply is different Note This diagram is not representative of the actual plug and socket Switch on the set Press the main power button to switch on off the TV If the set is on standby indicator is red press the Power button on the remote control to switch on set Insert the correct type of batteries into the compartment Ensure the batteries are...

Page 6: ...f the TV Connect the VIDEO and AUDIO IN sockets on the side or rear of the TV to the VIDEO and AUDIO OUT sockets on the audio video equipment Note For S VIDEO IN and VIDEO 1 IN share the same channel therefore can not be used stimultaneously S VIDEO offers superior colour and detail reproduction over conventional video connections ˵à Êé p65 02 7 2 17 44 6 ...

Page 7: ...o standby mode automatically This television can be programmed up to 120 minutes 10 minutes intervals s Skip Button Select an unwanted channel NO press button to skip The channel number will be displayed in red Note To restore the skipped channel press digit button or button to recall the skipped channel NO then press Skip button to change the channel NO from red to green colour uTV AV Button To s...

Page 8: ... Select channel in descending ascending order Turn on theTV when it is in standby mode Select the next item on the menu r Volume down up button Adjust sound volume softer louder Access sub menu and adjusting the settings s Menu button Enter the main menu t TV AV button Switch between TV channel and AV input sources Turn on theTV when it is in standby mode CH Ø q Channel down up button 14PT2010 Ø C...

Page 9: ... in your set Press the Menu button repeatedly to select the main menu PICTURE MEMORY and SYSTEM Press once to enter PICTURE main menu Press twice to enter MEMORY main menu Press three times to enter SYSTEM main menu PICTURE COLOR 50 BRIGHT 50 CONT 100 SHARP 50 SELECTÇÈ ADJUSTÅÆ V MEMORY AUTO SEARCH MANUAL STORE FINE TUNE SELECTÇÈ CONFIRMÅÆ V SYSTEM COLOR AUTO SOUND BG LANGUAGE B B ON SELECTÇÈ ADJU...

Page 10: ...n to stop tuning Note when the tuning is completed the menu will quit automatically MANUAL TUNING OF CHANNELS Manual tuning allows you to select your preferred channel number for every available programme Press button repeatedly until Manual Store is selected MEMORY AUTO SEARCH MANUAL STORE FINE TUNE SELECTÇÈ CONFIRMÅÆ V Press twice to enter MEMORY main menu MEMORY AUTO SEARCH MANUAL STORE FINE TU...

Page 11: ...MANUAL SEARCH DOWN STORE OK POSITION 02 SELECTÇÈ CONFIRMÅÆ V Press button to confirm Notes When a channel is found it can be stored into any channel position number as your desired Manual searching direction can be both upward or downward This can be choosen by pressing the VOLUME orVOLUME button to start the searching To stop manual tuning press VOLUME button when searching upward or press VOLUME...

Page 12: ...nnel downward MEMORY AUTO SEARCH MANUAL STORE FINE TUNE SELECTÇÈ CONFIRMÅÆ V VHFH FINE TUNE UP EXIT MENU ADJUST Å Æ VHFH FINE TUNE DOWN EXIT MENU ADJUST Å Æ Press button to exit menu from screen or menu will quit after a few seconds without further action Press button repeatedly until Fine Tune is selected Press twice to enter MEMORY main menu Step Press button Result on screen MENU MENU ˵à Êé p6...

Page 13: ...until COLOR is selected Press three times to enter SYSTEM main menu SYSTEM COLOR AUTO SOUND BG LANGUAGE B B ON SELECTÇÈ ADJUSTÅÆ V SYSTEM COLOR PAL SOUND BG LANGUAGE B B ON SELECTÇÈ ADJUSTÅÆ V SYSTEM COLOR PAL SOUND BG LANGUAGE B B ON SELECTÇÈ ADJUSTÅÆ V SYSTEM COLOR PAL SOUND DK LANGUAGE B B ON SELECTÇÈ ADJUSTÅÆ V Select the desired sound sys tem BG or DK Note the above procedures are also applic...

Page 14: ... 50 SELECTÇÈ ADJUSTÅÆ V Picture menu items Activities COLOR Increase or decrease colour level BRIGHT Increase or decrease brightness level CONT Increase or decrease contrast level SHARP Increase or decrease sharpness level to improve detail in picture PICTURE COLOR 50 BRIGHT 50 CONT 100 SHARP 50 TINT 50 SELECTÇÈ ADJUSTÅÆ V PICTURE COLOR 50 BRIGHT 30 CONT 100 SHARP 50 TINT 50 SELECTÇÈ ADJUSTÅÆ V TI...

Page 15: ...tness Colour Picture and Sharpness levels Press button repeatedly to cycle through the 4 settings namely MEMORY DYNAMIC STANDARD MILD and select your desired picture setting Definition of Picture settings MEMORY picture settings are set to your preference DYNAMIC Emphasize very vibrant colours This set ting is the optimal setting when you are viewing TV programmes in a brightly lit room STANDARD E...

Page 16: ...G PAL DK SECAM BG SECAM DK Playback System NTSC3 58 NTSC4 43 Set Dimension Width Depth Height 331 441 367 Net weight of Set approximate 10kg Note For OperatingVoltage Frequency Power Conumption refer to the type number at the rear of the set 21PT2010 54cm 2 x 4W 600 456 372 21kg ˵à Êé ºÏ p65 02 7 4 13 07 16 ...

Reviews: