Philips 1445RS User Manual Download Page 9

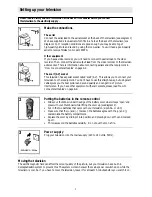
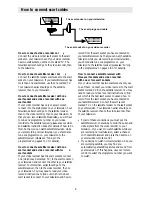
The scart socket on your video recorder

The scart socket on your television

The scart plugs and cable

How to connect a video recorder onl

y

Connect the video recorder scart socket to the scart
socket on your television set. If your video recorder
has two scart sockets, use the one marked TV. The
television aerial should go to the video recorder, then
to the television.

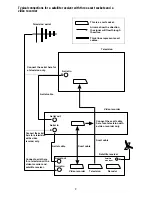
How to connect a satellite receiver onl

y

Connect the satellite receiver scart socket to the scart
socket on your television. If your satellite receiver has
more than one scart socket, use the one marked TV.
Your television aerial should go to the satellite
receiver, then to your television.

How to connect a satellite receiver with one
scart socket and a video recorder with one
scart socket

If your video recorder has only one scart socket,
connect it to the scart socket on your television. Your
television aerial should go to the satellite receiver,
then to the video recorder, then to your television. So
that you can record satellite broadcasts, you will have
to tune one programme number on your video
recorder to the satellite receiver (please see your video
and satellite instruction books for details of how to do
this). So that you can watch satellite television while
you are recording normal television, you should also
tune one programme on your television to the
satellite receiver (please see ‘ Tuning in the
programmes’ on pages 2 to 3 for details),

How to connect a satellite receiver with one
scart socket and a video recorder with tw

o

scart sockets

If your video recorder has two scart sockets, connect
one (which may be marked TV) to the scart socket on
your television and connect the other to your satellite
receiver. Your television aerial should go to the
satellite receiver, then to the video recorder, then to
your television. You may need to read your video
recorder instructions to find out which is the best
scart socket to connect to your television and how to

record from the scart socket you have connected to
your satellite receiver. So that you can watch satellite
television while you are recording normal television,
you should also tune one programme on your
television to the satellite receiver (please see ‘Tuning
in the programmes’ on pages 2 to 3 for details).

How to connect a satellite receiver with
three scart sockets and a video recorder
with one or two scart sockets

If your video recorder has two scart sockets, only use
one of them. Connect your video recorder to the scart
socket marked VCR on the satellite receiver. You may
need to read your video recorder instructions to find
out which is the best scart socket to use and how to
record from the scart socket you have connected to
your satellite receiver. Connect the scart socket
marked TV on the satellite receiver to the scart socket
on your television. Your television aerial should go to
the satellite receiver, then to the video recorder, then
to your television.

• For all of these connections you must put the

satellite receiver on stand-by to send the audio and
video signals from the video recorder to your
television. If you want to watch satellite while you
are recording normal television, select a channel
on the satellite receiver and press the 0 button on
your television remote control.

• If you decide to watch normal television while you

are recording satellite, you may find you
automatically get satellite pictures and sound from
your television. If this happens, use your remote

control to select the programme number you want
to watch.

8

How to connect scart cables

Summary of Contents for 1445RS

Page 1: ...menu adjustments volume brightness contrast sharpness colour and 24 hour timer storing menu adjustments PP button screen information 5 6 Teletext turning teletext on and off selecting a teletext page moving to the previous or next page newsflash and sub title pages page headings the red green yellow and blue buttons sub pages page hold large character display reveal answer 6 7 The scart socket to ...

Page 2: ...e this straight away but using scart cables gives you the best picture and sound quality and can get rid of picture interference If you have other equipment with scart sockets please read How to connect scart cables on page 8 9 Putting the batteries in the remote control Slide your thumbnail under the edge of the battery cover where it says open and press with your thumbnail while lifting the cove...

Page 3: ... off when the television is on stand by when you switch the television back on with the main power switch the television will stay on stand by Please see Stand by mode above for how to switch the television on Automatic po wer saving featur e If no signal is received through the aerial cable after about five minutes the television will automatically turn to stand by mode see Stand by mode above 2 ...

Page 4: ...equency so start searching again by pressing the menu button again The best signals are usually in a group one after the other When your television has found a good signal decide which programme number you want it on for example programme 1 for BBC1 Make sure you can recognise the test picture from any other pieces of equipment if you have them connected While the programme number is flashing pres...

Page 5: ... a little at a time or in 8MHz steps and keep checking all your programmes When there are no wavy lines or other interference on any of the pictures re tune the programme number that you have chosen for your equipment see Tuning in the programmes on pages 2 to 3 Do the same for each piece of equipment but after you ve finished with each one leave it switched on while you check the next piece of eq...

Page 6: ...of the control panel and keep more or less straight in front of it If you press the button once the sound will go off and cwill appear on the screen If you press the button again the sound will come back on and c will disappear Standb y Pr ogramme selection Numbered k eys Volume Mute 9 Scart socket Aerial socket 5 The timer When the timer symbol is displayed during menu adjustments you can set the...

Page 7: ...xt by pressing the L button and try another programme 3 To turn teletext off press the L button again Choosing a teletext pa ge 1 Use the number buttons on the remote control to enter the page number you want to see You must enter the page number as a complete three figure number The page number you have chosen is displayed on the top left hand side of the screen As soon as you enter the third num...

Page 8: ...ack of the television is a convenient way of connecting audio and video AV signals to and from the television As the signals are in a more basic form than the signal at the aerial socket they are less likely to be affected by interference and other things that can reduce picture quality To select the scart channel Press the 0 button on the remote control AV will be displayed for a few seconds and ...

Page 9: ...ther to your satellite receiver Your television aerial should go to the satellite receiver then to the video recorder then to your television You may need to read your video recorder instructions to find out which is the best scart socket to connect to your television and how to record from the scart socket you have connected to your satellite receiver So that you can watch satellite television wh...

Page 10: ...ion only Aerial in Aerial cable Video recorder Connect the scart cable here for a television with a video recorder only Aerial cable Scart cable Aerial out Aerial in Aerial out Aerial in Scart cable Satellite receiver Satellite dish input Television aerial Video recorder Television Decoder Television Connect aerial here for a television with a video recorder and satellite receiver 9 Connect the ae...

Page 11: ...me as pin 6 With auto store tuning your television can automatically find and store all the television channels you can receive Afterwards you can choose the ones you want to keep and move them to the programme numbers you like to use 1 Press the N and Q buttons at the same time to select the installation menu 2 Press the menu button to make autostore appear on the screen 3 Press the menu button t...

Page 12: ...t hotel mode is working To turn off hotel mode Repeat steps 3 to 6 above In step 4 H is displayed to confirm that the hotel mode is going to be turned off Tuning and personal preference control settings are described under Tuning in the programmes on page 3 and Using the remote control on page 6 Hotel mode Please check through the guide below before contacting Comet Service or your Comet store If ...

Page 13: ...icture ghosts Spots or streaks on the picture No picture Jumbled teletext characters Possible causes The outside aerial has moved or is damaged or has been disconnected Your video recorder could be faulty The aerial is receiving reflected signals from hills or buildings Interference from electric motors motor vehicles welding equipment neon signs radar installations and so on Brightness and contra...

Page 14: ... buy a special adapter locally If the moulded plug is cut off remove the fuse from the plug and get rid of it safely If you put it into a 13A socket it would be dangerous Never use the moulded plug without the fuse cover fitted If the cover is lost you must replace the plug Mains plug wiring The colours of the wires in the mains lead of this television may not match the coloured markings of the ma...

Page 15: ...use chemical solvents or strong detergents as these may damage the cabinet finish Read these instructions carefully before you try to use the television Protect the mains lead You must make sure the mains lead cannot be walked on crushed chafed cut or so on Changing the mains plug If you have to change the plug or remove it or if the fuse in the mains plug needs changing read the instructions abou...

Page 16: ...rage Programme presets Diagonal screen siz e Dimensions Approximate weight FM 6 MHz intercarrier Scart with AV input AV output and RGB 220 to 240 volts ac 50Hz Stand by 5W normal 35W 1 watt RMS 75 ohms UHF broadcast channels 21 69 70 34 cm nominal W 362 x H 351 x D 365 millimetres 8 3 kg These specifications may change 15 Specifications ...

Page 17: ...L6 3111 256 1680 1 Printed on recycled paper ß ...

Reviews: