background image

5

Congratulations on your purchase,
and welcome to the “family!”

Dear Philips Magnavox product owner:

Thank you for your confidence in Philips Magnavox.You’ve selected one of the
best-built, best-backed products available today.And we’ll do everything in our
power to keep you happy with your purchase for many years to come.

As a member of the Philips Magnavox “family,” you’re entitled to
protection by one of the most comprehensive warranties and outstanding
service networks in the industry.

What’s more, your purchase guarantees you’ll receive all the information
and special offers for which you qualify, plus easy access to accessories
from our convenient home shopping network.

And most importantly you can count on our uncompromising commitment
to your total satisfaction.

All of this is our way of saying welcome–and thanks for investing in a
Philips Magnavox product.

Sincerely,

Robert Minkhorst
President and Chief Executive Officer

P.S. Remember, to get the most from your Philips Magnavox

product, you must return your Warranty Registration Card
within 10 days. So please mail it to us right now!

R

E

G

I S

T R

A T I O N

N

E

E

D
E

D

W

IT

HI

N

10

D

A

Y

S

Hurry!

 Visit our World Wide Web Site at http://www.magnavox.com

Summary of Contents for AZ1200

Page 1: ...CD Radio Cassette Recorder AZ1200 AZ1201 AZ1205 Toll Free Help Line Ligne d assistance en service libre Linea de ayuada telefónica sin cargo 800 531 0039 ...

Page 2: ...ers which you qualify for as the owner of your model t This bolt of lightning indicates uninsulated material within your unit may cause an electrical shock For the safety of everyone in your household please do not remove product covering s The exclamation point calls attention to features for which you should read the enclosed literature closely to prevent operating and maintenance problems WARNI...

Page 3: ...4 35 Fuente de alimentación 36 Funciones básicas 37 Radio 37 Reproductor CD 38 40 Grabadora 41 42 Información general 43 Localización de averías 44 Garantia limitada 45 English Français Español English This digital apparatus does not exceed the Class B limits for radio noise emis sions from digital apparatus as set out in the Radio Interference Regulations of the Cana dian Department of Communicat...
Page 4: ... including amplifiers that produce heat 10 Power Sources The appliance should be connected to a power supply only of the type described in the operating instructions or as marked on the appliance 11 Grounding or Polarization Precautions should be taken so that the grounding or polarization means of an appliance is not defeated CAUTION To prevent electric shock match the wide blade of this plug to ...

Page 5: ...rchase guarantees you ll receive all the information and special offers for which you qualify plus easy access to accessories from our convenient home shopping network And most importantly you can count on our uncompromising commitment to your total satisfaction All of this is our way of saying welcome and thanks for investing in a Philips Magnavox product Sincerely Robert Minkhorst President and ...

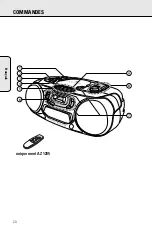
Page 6: ...RD ING STOP PLAY PA US E REP EAT SHU FFLE REM OTE SEN SOR VOLUME BA SS REFLEX SPEAK ER SYSTEM SE AR CH kHz kHz 92 96 100 104 MHz 155 530 175 630 200 800 225 1000 255 1300 1 600 275 108 88 MW LW FM PR OGR AM 1 2 3 4 5 9 8 7 6 RE PE AT SE AR CH VO LUM E ST OP SHUF FLE SEA RCH AZ 1205 only ...

Page 7: ...lays CD tracks in random order REPEAT repeats a track the entire CD or the program 8RADIO TUNING tunes to radio stations BAND selects the wave band 9CASSETTE RECORDER PAUSE interrupts recording or playback STOP OPEN 9 stops the tape and opens the cassette compartment SEARCH 6 rewinds the tape SEARCH 5 fast forwards the tape PLAY 1 starts playback RECORD 0 starts recording REMOTE CONTROL AZ 1205 on...

Page 8: ... the bottom of the set 2 If the set is equipped with a VOLTAGE selector X set this selector to the local voltage 3 Connect the AC power cord to the AC MAINS socket and to the wall socket This switches on the AC power supply The AC power cord is inside the battery compartment The battery supply will be switched off when the set is connected to the AC power To change to battery supply disconnect the...

Page 9: ... to TUNER 2 Select the wave band using the BAND selector 3 Tune to the desired radio station by using the TUNING knob Improving RADIO reception For FM stations pull out the telescopic antenna To improve the signal incline and turn the antenna Reduce its length if the signal is too strong very close to a transmitter For AM stations direct the built in antenna by turning the whole set The telescopic...

Page 10: ...e CD compartment the end of the CD is reached or you move the POWER control to TUNER or TAPE If you make a mistake when operating the CD player or if the CD player cannot read the CD the display shows E or no See TROUBLESHOOTING If you press PLAY PAUSE 2 and there is no CD inserted the display shows no CD CD CD STOP PLAY PA US E SE AR CH CD BAND TUNING FM MW LW 1600 275 255 1300 kHz kHz MHz 100 10...

Page 11: ... or program in random order SHUFFLE REPEAT ALL Selecting another track Briefly press the SEARCH or button once several times to skip to the beginning of the current previous or subsequent track s During play CD play continues automatically with the selected track When playback is stopped Press PLAY PAUSE 2 to start CD play Display indication the selected track number Searching for a passage during...

Page 12: ...pressing the PROGRAM button for more than 2 seconds The display shows all stored track numbers in sequence If you try to store more than 20 tracks the display shows F If you have selected the tracks while playback is stopped press PLAY PAUSE 2 If you have selected the tracks during CD play first press STOP 9 then press PLAY PAUSE 2 From the stop position press STOP 9 no lights up briefly PROGRAM d...

Page 13: ...C type I This deck is not suitable for recording on cassettes of the type CHROME IEC type II or METAL IEC type IV The recording level is set automatically The controls VOLUME and DBB do not affect the recording At the very beginning and end of the tape no recording will take place in the 7 seconds during which the leader tape passes the recorder heads Protecting tapes from accidental erasure Keep ...

Page 14: ...n be started from different positions if the CD player is in pause mode recording will start from this very position use SEARCH or if the CD player is in stop mode recording will start from the beginning of the CD or program 1 Set the POWER control to TUNER 2 Tune to the desired radio station see RADIO 3 Press STOP OPEN 9 to open the cassette compartment 4 Insert a blank unprotected cassette and c...

Page 15: ...leaning tape once The lens X of the CD player should never be touched Always keep the CD compartment closed to avoid dust on the lens The lens may cloud over when the set is suddenly moved from cold to warm surroundings Playing a CD is not possible then Leave the CD player in a warm environment until the moisture evaporates To take the CD out of its box easily press the center spindle while liftin...

Page 16: ...rt a CD The CD is inserted upside down Insert CD with label facing up The laser lens is steamed up Wait until the lens has cleared The CD skips tracks The CD is damaged or dirty Replace or clean the CD SHUFFLE or PROGRAM is active Switch off SHUFFLE or PROGRAM Poor cassette Dust and dirt on the heads capstans or Clean heads capstans and pressure sound quality pressure rollers rollers Use of unsuit...

Page 17: ... a delay if the appropriate product is not readily available BEFORE REQUESTING EXCHANGE Please check your owner s manual before requesting an exchange Adjustments of the controls discussed there may save you a trip EXCHANGING A PRODUCT IN U S A PUERTO RICO OR U S VIRGIN ISLANDS Contact your dealer to arrange an exchange Or ship the product insured and freight prepaid and with proof of purchase enc...

Page 18: ...èche indique qu un matériau non isolé situé à l intérieur de l unité risque de provoquer un choc électrique Pour la sécurité de chacun nous vous prions de ne pas retirer le boîtier de ce produit s Le point d exclamation attire votre attention sur des sujets risquant de provoquer des problèmes de fonctionnement et d entretien si vous ne lisez pas les informations s y reportant DANGER NE PAS EXPOSER...

Page 19: ...plificateurs qui produisent de la chaleur 10 Sources d électricité Il faut relier l appareil uniquement à une source d électricité du type décrit dans les instructions d opération ou indiqué à même l appareil 11 Mise à terre ou polarisation Précautions à prendre de manière à ce que la mise à terre et la po larisation de l appareil soient res pectées ATTENTION Pour prévenir les chocs électriques in...

Page 20: ...D ING STOP PLAY PA US E REP EAT SHU FFLE REM OTE SEN SOR VOLUME BA SS REFLEX SPEAK ER SYSTEM SE AR CH kHz kHz 92 96 100 104 MHz 155 530 175 630 200 800 225 1000 255 1300 1 600 275 108 88 MW LW FM PR OGR AM 1 2 3 4 5 9 8 7 6 RE PE AT SE AR CH VO LUM E ST OP SHUF FLE SEA RCH uniquement AZ 1205 ...

Page 21: ...éatoire REPEAT répétition d un morceau du la totalité du CD ou du programme 8RADIO TUNING réglage des stations radio BAND sélection de la bande de fréquence 9PLATINE CASSETTE PAUSE interrompt l enregistrement ou la lecture STOP OPEN 9 arrête la bande et ouvre le compartiment cassette SEARCH 6 rebobinage de la bande SEARCH 5 avance rapide de la bande PLAY 1 démarre la lecture RECORD 0 démarre l enr...

Page 22: ...rouve à la base de l appareil 2 Si l appareil est équipé d un sélecteur de tension VOLTAGE X réglez ce sélecteur sur la tension locale 3 Raccordez le cordon d alimentation à la prise AC MAINS de l appareil et à la prise de courant L alimentation est ainsi établie Le cordon d alimentation se trouve à l intérieur du compartiment à piles L alimentation sur piles est désactivée lorsque l appareil est ...

Page 23: ...1 Réglez le commutateur coulissant POWER sur TUNER 2 Sélectionnez la bande de fréquence au moyen du sélecteur BAND 3 Réglez la station radio voulue au moyen du bouton TUNER Améliorer la réception radio Pour les stations FM déployez l antenne télescopique Pour améliorer le signal orientez et inclinez l antenne Réduisez sa longueur si le signal est trop puissant transmetteur très proche Pour les sta...

Page 24: ... si vous amenez le commutateur POWER en position TUNER ou TAPE Si vous faites une erreur lors de l utilisation du lecteur de CD ou que le lecteur est incapable de lire le CD l affichage indique E ou no voir chapitre RECHERCHE DE PANNES Si vous appuyez sur PLAY PAUSE 2 alors que le compartiment ne contient pas de CD l affichage indique no CD CD CD STOP PLAY PA US E SE AR CH CD BAND TUNING FM MW LW ...

Page 25: ...lité du CD ou du programme dans un ordre aléatoire SHUFFLE REPEAT ALL Sélection d un autre morceau Appuyez brièvement sur la touche SEARCH ou à une ou plusieurs reprises pour sauter au début du morceau en cours précédent suivant En cours de lecture La lecture continue automatiquement avec le morceau choisi Lorsque la lecture CD est arrêtée Appuyez sur PLAY PAUSE 2 pour démarrer la lecture CD Affic...

Page 26: ...s L affichage indique dans l ordre tous les numéros de morceaux en mémoire Si vous tentez d enregistrer plus de 20 morceaux l affichage indique F Si vous avez sélectionné les morceaux pendant que le lecteur était à l arrêt appuyez sur PLAY PAUSE 2 Si vous avez sélectionné les morceaux en cours de lecture CD appuyez d abord sur STOP 9 puis sur PLAY PAUSE 2 En position d arrêt appuyez sur STOP 9 no ...

Page 27: ...e IEC I La platine n est pas prévue pour l enregistrement de cassettes de type CHROME type IEC II ou METAL type IEC IV Le niveau d enregistrement se règle automatiquement Les régulateurs VOLUME et DBB restent sans effet sur l enregistrement Tout à fait au début et à la fin de la bande il n y a pas d enregistrement pendant 7 secondes le temps pour la bande amorce de défiler par les têtes d enregist...

Page 28: ...démarré à partir de différentes positions si le lecteur de CD est en mode pause l enregistrement démarrera à partir de cette position précise utilisez SEARCH ou si le lecteur CD est à l arrêt l enregistrement démarrera au début du CD ou du programme 1 Réglez le commutateur coulissant POWER sur TUNER 2 Réglez la station radio voulue voir chapitre RADIO 3 Appuyez sur la touche STOP OPEN 9 pour ouvri...

Page 29: ...ge Ne touchez jamais la lentille X du lecteur de CD Gardez toujours le compartiment CD fermé pour éviter le dépôt de poussière sur la lentille La lentille peut s embuer si elle passe soudainement d un milieu froid en milieu chaud Il n est alors pas possible de lire un CD Laissez le lecteur de CD dans un environnement chaud jusqu à ce que l humidité se soit évaporée Pour retirer sans peine le CD de...

Page 30: ...haut La lentille laser est embuée Attendez que la buée disparaisse Le lecteur CD saute Le CD est endommagé ou sale Remplacez ou nettoyez le CD certains morceaux SHUFFLE ou PROGRAM est activé Désactivez le mode SHUFFLE ou PROGRAM Mauvaise qualité de Poussière ou saleté sur les têtes Nettoyez les têtes les cabestans son de la cassette les cabestans ou les galets et les galets Utilisation de cassette...

Page 31: ...s le produit l organisme local de service Philips tentera de fournir un produit de remplacement mais il pourra y avoir des retards si le bon produit n est pas facilement disponible AVANT DE DEMANDER UNE ÉCHANGE Veuillez consulter le manuel d instructions avant de demander un produit d échange Un petit réglage d une des commandes expliqué dans le manuel d instructions pourrait éviter de faire un tr...

Page 32: ...el rayo indica que algún material no aislado dentro de su unidad podría resultar en una sacudida eléctrica Para la seguridad de todos favor de no remover la cubierta del producto s El signo de exclamación le llama la atención a características sobre las que Ud debe leer la información adjunta detenidamente para evitar problemas de funcionamiento y mantenimiento ADVERTENCIA PARA EVITAR EL RIESGO DE...

Page 33: ...res que puedan producir calor 10 Fuentes de potencia El aparato debe conectarse a una fuente de energía únicamente del tipo descrito en las instrucciones de funcionamiento o según lo indicado en el aparato 11 Puesta a tierra o polarización Tome las precauciónes utilizando los medios de puesta a tierra o de polarización de un aparato que no estén estropeados AVISO Para prevenir un choque eléctrico ...

Page 34: ... ING STOP PLAY PA US E REP EAT SHU FFLE REM OTE SEN SOR VOLUME BA SS REFLEX SPEAK ER SYSTEM SE AR CH kHz kHz 92 96 100 104 MHz 155 530 175 630 200 800 225 1000 255 1300 1 600 275 108 88 MW LW FM PR OGR AM 1 2 3 4 5 9 8 7 6 RE PE AT SE AR CH VO LUM E ST OP SHUF FLE SEA RCH sólo en el AZ 1205 ...

Page 35: ...s pistas del CD en orden aleatorio REPEAT repite una pista el CD entero o el programa 8RADIO TUNING sintoniza las diferentes estaciones de radio BAND selecciona una banda de señal 9GRABADORA PAUSE interrumpe la grabación o la reproducción STOP OPEN 9 detiene la cinta y abre el compartimento del casete SEARCH 6 rebobina la cinta hacia atrás SEARCH 5 rebobina la cinta hacia adelante PLAY 1 inicia la...

Page 36: ...uipo se encuentra equipado con un selector de tensión VOLTAGE selector X colocar este selector al valor de la tensión de red local 3 Conectar el cable de alimentación a la entrada de AC MAINS y a la toma de red de la pared Con ello la alimentación de red queda conectada El cable de alimentación se encuentra situado en el interior del compartimento de las pilas El suministro mediante pilas quedará ...

Page 37: ...r suficiente espacio alrededor de la unidad para su ventilación 1 Colocar el interruptor POWER en la posición TUNER 2 Seleccionar la banda de señal utilizando el selector BAND 3 Sintonizar la emisora deseada utilizando el mando TUNING Mejora de la recepción de RADIO Para las emisoras de FM extienda la antena telescópica Para mejorar la señal incline y gire la antena Reduzca la longitud si la señal...

Page 38: ...compartimento del CD se llega al final del CD o se coloca el interruptor POWER en las posiciones TUNER o TAPE Si se lleva a cabo alguna operación errónea durante el funcionamiento del reproductor de CD o si éste no puede llevar a cabo la lectura del CD la pantalla muestra la indicación E or no Ver el capítulo referente a LOCALIZACIÓN DE AVERÍAS Si se pulsa PLAY PAUSE 2 fi sin haberse introducido n...

Page 39: ... el programa en orden aleatorio SHUFFLE REPEAT ALL Selección de otra pista Pulsar brevemente el botón SEARCH ó una varias veces para saltar al principio de la pista actual anterior o a alguna de las siguientes Durante la reproducción La reproducción del CD continúa automáticamente con la pista seleccionada Cuando se detiene la reproducción del CD Pulsar PLAY PAUSE 2 para poner en marcha la reprodu...

Page 40: ...ndos La pantalla muestra todos los números de pistas almacenadas presentados por orden secuencial Si se intenta almacenar más de 20 pistas la pantalla muestra la indicación F Si se han seleccionado las pistas en la posición de parada pulsar PLAY PAUSE 2 Si se han selecionado las pistas durante la reproducción del CD pulsar en primer lugar STOP 9 pulsando a continuación PLAY PAUSE 2 Desde la posici...

Page 41: ...platina no es apta para grabación en casetes de tipo CHROME IEC tipo II o METAL IEC tipo IV El nivel de grabación queda ajustado de forma automática Los controles de VOLUME y DBB no afectan a la grabación Al principio y al final de cada cinta no tiene lugar grabación alguna durante los 7 segundos de duración en los que la cabecera de cinta pasa por los cabezales de grabación Protección de las cint...

Page 42: ...iciarse desde diferentes posiciones si el reproductor de CD se encuentra en modo de pausa la grabación se iniciará desde esa misma posición utilizar SEARCH ó si el reproductor de CD se encuentra en modo de parada la grabación se iniciará desde el principio del CD o del programa 1 Colocar el interruptor POWER en la posición TUNER 2 Sintonizar la emisora de radio deseada ver el capítulo RADIO 3 Puls...

Page 43: ...impiadora La lente X del reproductor de CD no debe tocarse en ningún caso Mantenga siempre cerrado el compartimento del CD para evitar el polvo en la lente La lente puede quedar turbia cuando el equipo se traslade de forma rápida de un ambiente frío a un ambiente templado La reproducción de un CD no es entonces posible Dejar el reproductor CD en un ambiente templado hasta que la humedad se evapore...

Page 44: ...on la cara impresa hacia arriba La lente láser está turbia Esperar hasta que haya desaparecido el vapor condensado de la lente El CD salta pistas El CD se encuentra dañado o está sucio Sustituir o limpiar el CD SHUFFLE o PROGRAM se encuentra n activado s Desconectar la reproducción SHUFFLE o PROGRAM Deficiente calidad Polvo y suciedad en los cabezales rodillos Limpiar los cabezales rodillos de de ...

Page 45: ...to apropiado no está fácilmente disponible ANTES DE PEDIR UN CAMBIO Favor de consultar el manual de instrucciones antes de pedir un cambio Algunos ajustes de los controles según las indicaciones en el manual podrían ahorrarle un viaje PARA CAMBIAR UN PRODUCTO EN LOS EE UU PUERTO RICO O LAS ISLAS VIRGENES Comuníquese con su distribuidor para concertar el cambio También usted puede enviar el product...

Page 46: ...46 ...

Page 47: ...47 ...

Page 48: ...añol 3140 115 2627 1 Printed in Hong Kong IB7961T001 VieUrs9848 W PHILIPS CONSUMER ELECTRONICS COMPANY A Division of Philips Electronics North America Corporation Knoxville Tennessee 37914 1810 U S A CLASS 1 LASER PRODUCT ...

Reviews: