background image

Tank-Monitor VTM 


REV 1A – FEB 2020 - Software Version 1.0 

page 6 

4. Setup  

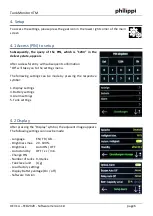
To access the settings, please press the gear icon in the lower right corner of the main 
screen 
 

4.1 Access (PIN) to setup  

Subsequently,  the  query  of  the  PIN,  which  is  "1234"  in  the 
delivery state, appears

 
After successful entry with subsequent confirmation 
"OK" will take you to the settings menu. 
 
The  following  settings  can  be  made  by  pressing  the  respective 
symbol: 
 
1. Display settings 
3. Battery settings 
4. Alarm settings 
5. Tank settings 


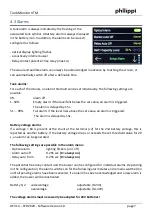
4.2 Display 

After pressing the "Display" symbol, the adjacent image appears. 
The following settings can now be made: 
 
- Language  

EN / FR / GB ... 

- Brightness max.   20 - 100% 
- Brightness  

Auto ON / OFF 

- Auto stand by  

OFF / x s / min. 

- Change PIN 
- Number of tanks  0-4 tanks 
- Tank level unit   (L/g) 
- Load factory settings 
- Display Battery voltage (On / off) 
- Software Version 


Summary of Contents for 071004010

Page 1: ... you for buying the Tank Monitor VTM This digital unit is state of the art in Tank monitoring On the large illuminated display you can read the voltage of up to 2 additional batteries the current filling levels of up to 4 tanks and have the opportunity You recognize at a glance to set an alarm threshold for each tank full or empty alarm to set an alarm threshold for each voltage low and high level...

Page 2: ...ater only Please use for deeper tanks up to 200 cm and very precise measurements the pressure sensor TDS200 water diesel grey black water or TDN200 water However these sensors are not included in the scope of delivery Sensors from other manufacturers can also be connected The Monitor is configured In SETUP to the connected sensors It is also possible to adapt it to the tank geometry in order to di...

Page 3: ...quids spilled into the device or oxidation due to condensation Lightning strike Not covered by the warranty are consequential costs and natural wear When asserting claims under warranty and warranty a detailed description of the defect is essential Detailed instructions facilitate and speed up the processing Please understand that we cannot accept shipments that are not free 1 4 Disclaimer Both th...

Page 4: ...ting instructions are part of the component delivery It must well important for subsequent maintenance well kept and passed on to any subsequent owners of the device 3 Installation 3 1 Monitor Install the monitor in a protected dry and well visible place so that it can be read at any time The cut out is 85 x 85 mm the required minimum depth is 35mm On the back side there is a 3 pin terminal for th...

Page 5: ...ng at port TG 1 for example with 2 tankers only ports TG 1 and TG 2 will be used Resistive sensors e g TGT TGW and active tank sensors e g TDS pressure probes may be connected in mixed form The connection is made according to the adjacent diagram A DFS flow sensor can only be connected to DFS DFS Minus DFS S ATTENTION If the power supply red line of the ultrasonic sensor or the pressure sensor TDS...

Page 6: ...mation OK will take you to the settings menu The following settings can be made by pressing the respective symbol 1 Display settings 3 Battery settings 4 Alarm settings 5 Tank settings 4 2 Display After pressing the Display symbol the adjacent image appears The following settings can now be made Language EN FR GB Brightness max 20 100 Brightness Auto ON OFF Auto stand by OFF x s min Change PIN Num...

Page 7: ...f the level rises above the set value an alarm is triggered The alarm is delayed by 15s Battery voltage alarms If a voltage 8V is present at the shunt at the terminal 2 for the 2nd battery voltage this is reported as another battery If the battery voltage drops or exceeds the set threshold value for 20 s an alarm can be generated The following settings are possible in the alarm menu Optical alarm ...

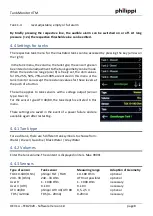
Page 8: ... the resistance values for these levels at the push of a button The same applies to tank sensors with a voltage output sensor type User U For the sensor type UTV 40 80 the tank depth is entered in this menu These settings are saved in the event of a power failure and are available again after restarting 4 4 1 Tank type For each tank there are 5 different tank symbols to choose from Water Diesel Ga...

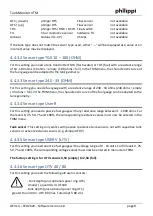
Page 9: ...s empty 33 ohms full In the TRIM menu the characteristic curve of the fuel gauge can be adapted to the tank geometry 4 4 3 4 Sensor type User R For this setting you need a passive fuel gauge with any resistance range between 1 1000 ohms For the levels 0 25 50 75 and 100 the corresponding resistance values must now be entered in the TRIM menu Tank sensor This setting only works with passive resista...

Page 10: ...respective tank in the main menu Since this sensor can not detect whether the tank is being filled you must enter the fill level manually By pressing the assigned key you can go directly to the tank menu and adjust the level accordingly If water flows through the flow sensor DFS this is indicated by the rotating symbol The DFS with arrow down empties the corresponding tank in the display 4 4 3 9 S...

Page 11: ...easured value and enter it in the field Level 100 To get the values for 25 50 and 75 you must first divide the difference between the values 0 and 100 by 4 Add this value to the value at 0 this gives you the input value for 25 By further additions you get the values for 50 and 75 These values can be entered in the settings for 25 50 and 75 Method 3 You know the values for 0 25 50 75 and 100 Then e...

Page 12: ... that new software has been detected and installed automatically During the update process the progress is displayed If the monitor starts normally after inserting the SD card no SD card has been detected or the software is up to date 8 Technical data Supply voltage DC 8 32 V Current consumption monitor Without tank sensor connected 83 mA at max display brightness 7 mA in sleep mode Measuring rang...

Reviews: