background image

DVD Functions

– 18 –

EN

1

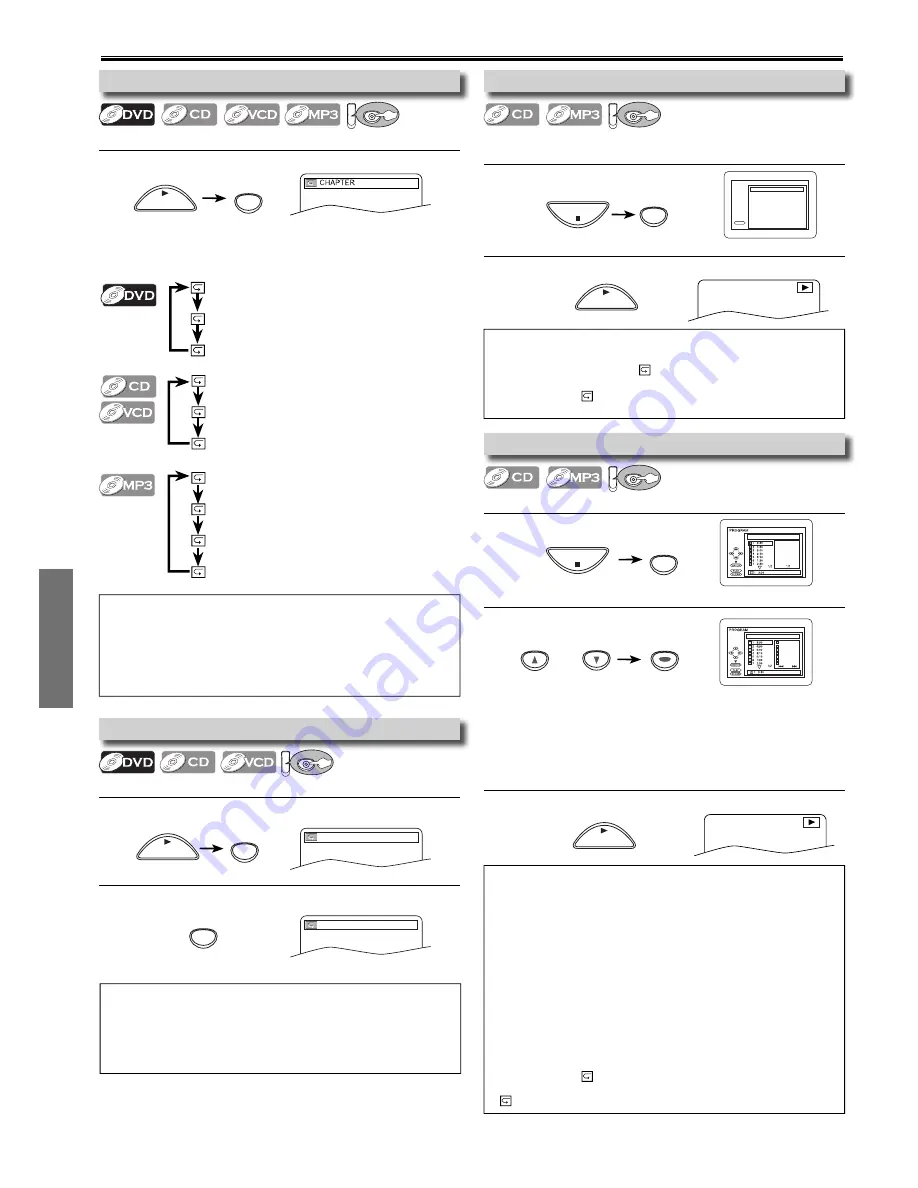
Press 

[MODE]

 once.

2

Using 

[

K

/

L

]

 to select desired track. 

Press 

[ENTER]

.

3

Press 

[PLAY 

B

]

 to start Programmed Playback.

1

Press 

[MODE]

 twice.

2

 Press 

[PLAY 

B

to start Random Playback

.

1

Press 

[A-B]

 at your desired starting point (A).

2

Press 

[A-B] 

at your desired ending point (B).

1

Press 

[REPEAT]

 during playback.

Repeat / Random / Programmed Playback

A-

A-B

STOP

MODE

PLAY

CD-DA                        TOTAL 0:45:55

RANDOM PROGRAM

--no indication--

RANDOM

CD-DA                  TOTAL 0:00:00

CD-DA                  TOTAL 1:03:30

2/3

  1   3:30
  5   5:10
10   4:20
11   3:00
12   3:20
17   4:10
22   2:50

• Point B should be in the same title or track as point A.

• Up to 99 tracks can be ordered.
• If eight or more tracks were in a program, use 

[SKIP/CH. 

/ G/

/

  H/

/

L

]

 to see all the tracks.

• While an MP3 folder is open:
 – 

Press 

[

B

]

 when you want to go to the next hierarchy.

 – 

Press 

[

s

]

 when you want to go back to the previous 

hierarchy (except for the top hierarchy).

Hint

• Repeat setting (except “ALL”) will be cleared when moving to 

another title, chapter, track or group.

• Repeat playback are not available with some discs or during repeat 

A-B playback.

• Repeat playback is not available when you play the Video CD with 

PBC function.

Hint

• Press 

[CLEAR/C.RESET]

 at step 2 to erase the most recently 

entered track.

• To erase all programmed tracks at once, select “ALL CLEAR’’ and 

press 

[ENTER]

 at step 2.

• While a program is being played back, 

[STOP 

C

]

 works as follows; 


⇒  

Press 

[STOP 

C

]

 and 

[PLAY 

B

]

 next, so that the programmed 

playback restarts. (CD playback restarts from the current point. 
MP3 playback restarts from the beginning of the current track.)


⇒  

Press 

[STOP 

C

]

 twice and 

[PLAY 

B

]

 next, so that playback 

restarts from the first track in the original order. However, your 
programmed playback can be restarted when you follow the 
above steps. (Your programs are still stored until either the disc 
tray is open or power is turned off.) 

• To repeat the current track in the program, press 

[REPEAT]


repeatedly until “

 TRACK’’ appears during playback.

• To repeat the entire program, press 

[REPEAT]

 repeatedly until 

 ALL’’ appears during playback.

Hint

• To repeat the current track in the random selections, press 

[REPEAT]

 repeatedly until “

 TRACK” appears during playback. 

• To repeat the entire random selections, press 

[REPEAT]


repeatedly until “

 ALL” appears during playback.

• During random playback, you cannot go back to the previous track.

A-B

or

ENTER

ENTER

ENTER

PLAY

MODE

STOP

Hint

• To exit the sequence, press 

[A-B]

 so that “OFF” appears.

• To cancel point A, press 

[CLEAR/C.RESET]

 at step 1

.

• This function does not work in the other repeat modes.
• The A-B Repeat section can only be set within the current title (for 

DVDs), or current track (for Audio CDs, Video CDs).

PLAY

REPEAT

PLAY

A-B

PLAY

Repeat Playback


DV

DVD

Repeat function is available only during playback.

Programmed Playback


DV

DVD

You may determine the order in which tracks will play.

Random Playback


DV

DVD

This function shuffles the playing order of tracks instead 
of playback in sequence.

Repeat A-B Playback


DV

DVD

Repeat function is available only during playback.


OFF


CHAPTER


TITLE

Each time you press 

[REPEAT]

 repeat function changes as 

example below.


OFF


TRACK


ALL

(repeat 

off

)

(

current chapter 

repeat)

(

current title 

repeat)

(repeat 

off

)

(

current track 

repeat)

(

entire disc 

repeat)

<Example : DVD>


OFF 

(repeat 

off

)


TRACK 

(

current track 

repeat)


GROUP 

(

current group 

repeat)


ALL 

(

entire disc 

repeat)

<Example : CD>

<Example : CD>

Summary of Contents for PVD2000

Page 1: ...iscs 5 Unplayable Discs 5 Setup Connections 6 RF Output Channel 6 Hint for Cable Box or Satellite Box 6 Connection to an Audio System 6 Connection to a TV 7 Preparation for Use 8 Turn on the Unit for...

Page 2: ...ate or use radio frequency energy Changes or modifications to this equipment may cause harmful interference unless the modifications are expressly approved in the manual The user could lose the author...

Page 3: ...Grounding If an outside antenna or cable system is connected to the video product be sure the antenna or cable system is grounded so as to provide some protection against voltage surges and built up...

Page 4: ...ith 525 progressive scan output it is recommended that the user switch the connection to the standard definition output If there are questions regarding your TV set compat ibility with this 525p DVD p...

Page 5: ...ure or sound may not be smooth etc In this case you need to finalize the disc with the DVD recorder Refer to the manual accompanying the DVD recorder 8 Only the discs recorded in the video format and...

Page 6: ...yback picture When a picture does not appear on the TV screen repeat step 4 6 Press STOP C to stop playback RF Output Channel Connections Hint The RF output channel does not change when you adjust tra...

Page 7: ...rectly to the TV If the Audio Video cables are connected to a VCR pictures may be distorted due to the copy protection system The COAXIAL DVD AUDIO OUT S VIDEO OUT and COMPONENT VIDEO OUT jacks are on...

Page 8: ...r failure or this unit has been unplugged for more than 30 seconds No Please wait for a few minutes After scanning The tuner stops on the lowest memorized channel You can select only the channels memo...

Page 9: ...e remote control You MUST select the correct mode on the remote control VCR DVD Switching Front Panel Indicator VIDEO STANDBY ON REW AUDIO VIDEO F FWD STOP EJECT PLAY RECORD REC TIMER IR OPEN CLOSE VC...

Page 10: ...or and determine its position To move the cursor and determine its position To select an item on the VCR Menu To advance to the next VCR Menu To go back one step during clock and timer setting MENU To...

Page 11: ...Marks should be greater than 1 minute for SP mode 2 minutes for LP mode and 3 minutes for SLP mode To rewind To fast forward Hint for Index Search Time Search These functions are not available during...

Page 12: ...ly canceled after 5 minutes to prevent damage to the tape and the video head Recording OTR One Touch Recording M E N U TIMER PROGRAMMING B AUTO REPEAT ON CHANNEL SET UP CLOCK SET LANGUAGE SELECT Auto...

Page 13: ...s up To use the VCR as usual until the time for the recording press SUBTITLE T SET so that TIMER indicator light turns off Press VCR TV to choose the VCR position Select either VCR or DVD mode then co...

Page 14: ...L1 or L2 position on the recording unit To use the input jacks on the back of this unit select L1 position by pressing 0 0 1 on the remote control or CHANNEL K L on this unit To use the input jacks o...

Page 15: ...wo layered disc pictures may stop for a moment This happens while the 1st layer is being switched to the 2nd layer This is not a malfunction Hint Set STILL MODE to FIELD in the DISPLAY menu if picture...

Page 16: ...nt repeat setting if active T Track repeat A All Tracks repeat A B A B repeat ALL Current track number Total tracks TRACK 01 1 36 0 01 15 T The name of the file currently in play will be displayed Cur...

Page 17: ...marker to be cleared at step 2 in the section To set a marker or To return to the marker later and then press CLEAR C RESET Opening the disc tray or turning off the power will erase all markers Select...

Page 18: ...PLAY B next so that playback restarts from the first track in the original order However your programmed playback can be restarted when you follow the above steps Your programs are still stored until...

Page 19: ...only allow you to change the subtitle from the disc menu Refer to the manual accompanying the discs for details Hint Virtual Surround will not be effective if the sound mode is set to something other...

Page 20: ...UICK SETUP menu quickly ENTER ENTER ENTER AUDIO ORIGINAL ENGLISH FRENCH SUBTITLE OFF ENGLISH FRENCH DISC MENU ENGLISH FRENCH SPANISH PLAYER MENU ENGLISH FRAN AIS ESPA OL LANGUAGE menu P20 A Step 5 P21...

Page 21: ...BITSTREAM Hint DRC This function is available only on the discs which are recorded in the Dolby Digital format DOWN SAMPLING When playing back a 96kHz disc with the copy right protection or when Virtu...

Page 22: ...ntal Level allows you to set the rating levels of your DVD discs Playback will stop if the ratings exceed the levels you set Follow steps 1 to 3 in the CUSTOM Menu section on page 20 To Change the Pas...

Page 23: ...king control for a better picture by pressing CHANNELL K on the unit or SKIP CH G K H L on the remote control Cannot view a tape but the audio is OK Head cleaning may be necessary Refer to AUTO HEAD C...

Page 24: ...for one 1 year from the date of original retail purchase Certain parts are excluded from this warranty LABOR FUNAI CORP will provide the labor without charge for a period of ninety 90 days from the da...

Page 25: ...E AUTO en la pantalla de TV verifique las conexiones de cable Presione nuevamente B Si Pulse MENU para salir Conecta el cable de la caja de canales de cable o la caja de sat lite en la toma ANT IN de...

Page 26: ...so durante el ajuste del reloj y temporizador MENU Para llamar el menu en un disco Para llamar la lista de archivo MP3 Para llamar el men de la grabadora de v deo MODE Para activar desactivar el nivel...

Page 27: ...e control Verify that the DVD SOURCE light is lit No Please wait for a few minutes After scanning The tuner stops on the lowest memorized channel You can select only the channels memorized in this uni...

Page 28: ...R To move the cursor and determine its position To move the cursor and determine its position To select an item on the VCR Menu To advance to the next VCR Menu To go back one step during clock and tim...

Reviews: