PheeNet WAS-103R Quick Installation Manual Download Page 6

Quick Installation Guide

WAS-103R Wireless Hotspot Gateway
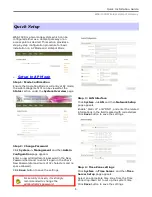
Quick Setup

WAS-103R is a two mode system which can be 

configured either as a Hotspot gateway or an 
access point as desired. This section provides a 

step-by-step configuration procedure for basic 
installation on  AP Mode and  Hotspot Mode 

Setup In AP Mode


Step 1 : Mode Confirmation

Ensure the Operating Mode is currently at AP mode; 

the web management UI can be viewed at the 

Status

 section under the 

System Overview

 page.

Step 2 : Change Password  

Click 

System -> Management

 and then 

Admin

Configuration

 page appears. 

Enter a new administrator's password in the 

New 

Password

 field, and re-enter it again in the 

Check 

New


Password

(a maximum of 32 characters and no 

space allowed).
Click 

Save

 button to save the settings.

For security concern, it is strongly 
recommended to change the 

administrator's password

Step 3 : LAN Interface

Click 

System -> LAN

, and then 

Network


Setup 

page appears.
Enable “Static IP” and “DNS”, and enter the related 

informations in the field marked with red asterisks. 
Click 

Save

 button to save the settings.

Step 4 : Time Zone settings

Click 

System -> Time Server

, and then 

Time 

Server Setup

 page appears.

Select an appropriate time zone from the 

Time 

Zone

 drop-down list to set up the system time.

Click 

Save

 button to save the settings.

6

Summary of Contents for WAS-103R

Page 1: ...Wireless Hot Spot Gateway WAS 103R Quick Installation Guide Version 1 01...

Page 2: ...almost a kind of value added service By take advantage of PheeNet WAS 103R the front desk operator does not have to have enough IT technology just identify the customer grade offer the appropriate Pre...

Page 3: ...t to LAN1 or LAN2 port The port will be used by LAN port Administrator can access the WMI Web Management Interface via this port LAN1 or LAN2 port is connected to external network For example it may c...

Page 4: ...et cable the LAN2 port of WAS 103R on the front panel Connect the other end of cable to a PC for configuring the system The LAN2 LED indicator should be ON to indicate a proper connection 4 There are...

Page 5: ...IP Address of WAS 103R or any other device within the network Example of Segment The value for underlined area can be changed as desired the valid range is 1 254 However 254 shall be avoided as it is...

Page 6: ...guration page appears Enter a new administrator s password in the New Password field and re enter it again in the Check New Password a maximum of 32 characters and no space allowed Click Save button t...

Page 7: ...appears Click Edit on VAP0 of Virtual AP List and then VAP0 Configuration page appears Select desired ESSID and Security Type for VAP0 Click Save button to save the settings For security concern it is...

Page 8: ...the Status section under the System Overview page Step 2 Change Password Click System Management and then Admin Configuration page appears Enter a new administrator s password in the New Password fie...

Page 9: ...ty Type and VLAN ID setting for VAP0 We select VLAN0 for this step Click Save button to save the settings For security concern it is strongly recommended to set up Security Type with WPA SPK or WPA2 P...

Page 10: ...e and alive 1 Connect a client device e g Notebook PC with wireless interface to scan the configured VAP0 s ESSID of WAS 103R e g AP00 and get associated with this ESSID 2 The client device will obtai...

Reviews: