background image

20 


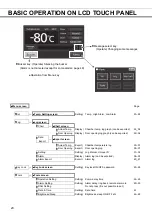
BASIC OPERATION ON LCD TOUCH PANEL 


Message select key:   

(Operate) Changing some messages 


Buzzer key: (Operate) Silencing the buzzer 

(Alarm is not canceled except for some alarms; page 48) 


●Operation from Menu key 


■Menu screen   


Page 


Set 

→ 

■Temp. Setting screen 

(Setting)  Temp., High Alarm, Low Alarm 

23

~

24 


Log 

→ 

■Log screen   


Chart 

→ 

■Chart screen 


Actual Temp.  (Display)  Chamber temp. log graph (can be exported) 

32

~

34 


Door Opening  (Display)  Door opening log graph (can be exported) 

32

~

34 


Data   

Export 

→ 

■Export screen 


Actual Temp.  (Export)  Chamber temperature log 

35

~

37 


Door Opening  (Export)  Door opening log 

35

~

37 


Setting 

(Setting)  Log interval, Unique ID 

31

~

32 


Alarm 

(Display)  Alarm log (can be exported) 

38

~

39 


Alarm Export 

(Export)  Alarm log 

40

~

41 


Key Lock 

→ 

■Key Lock screen 

(Setting)  Key lock ON/OFF, password 

25

~

28 


Tools 

→ 

■Tools screen 


Operation Setting 

(Setting)  Comp. delay time 

24

~

25 


Alarm Setting 

(Setting)  Alarm delay, ring back, remote alarm etc. 

29

~

30 


DAQ Setting 


Do not press (It is not possible to set.) 


Date & Time 

(Setting)  Date, time 

43 


Brightness/Sleep 

(Setting)  Brightness, sleep ON/OFF etc. 

44

~

45 


Summary of Contents for MDF-DU901VHL Series

Page 1: ...ries Please read the operating instructions carefully before using this product and keep the operating instructions for future use See page 62 for all model numbers Operating Instructions Ultra Low Temperature Freezer ...

Page 2: ...ꞏꞏꞏꞏꞏꞏꞏꞏꞏꞏꞏꞏꞏꞏꞏꞏꞏꞏꞏꞏꞏꞏꞏꞏꞏꞏꞏꞏꞏꞏꞏꞏꞏꞏꞏ 32 Exporting operation log ꞏꞏꞏꞏꞏꞏꞏꞏꞏꞏꞏꞏꞏꞏꞏꞏꞏꞏꞏꞏꞏꞏꞏꞏꞏꞏꞏꞏꞏꞏꞏꞏꞏꞏꞏꞏꞏꞏꞏꞏꞏꞏꞏꞏꞏꞏꞏꞏꞏꞏꞏꞏꞏꞏꞏꞏꞏꞏ 35 Displaying alarm logꞏꞏꞏꞏꞏꞏꞏꞏꞏꞏꞏꞏꞏꞏꞏꞏꞏꞏꞏꞏꞏꞏꞏꞏꞏꞏꞏꞏꞏꞏꞏꞏꞏꞏꞏꞏꞏꞏꞏꞏꞏꞏꞏꞏꞏꞏꞏꞏꞏꞏꞏꞏꞏꞏꞏꞏꞏꞏꞏꞏꞏꞏꞏ 38 Exporting alarm log ꞏꞏꞏꞏꞏꞏꞏꞏꞏꞏꞏꞏꞏꞏꞏꞏꞏꞏꞏꞏꞏꞏꞏꞏꞏꞏꞏꞏꞏꞏꞏꞏꞏꞏꞏꞏꞏꞏꞏꞏꞏꞏꞏꞏꞏꞏꞏꞏꞏꞏꞏꞏꞏꞏꞏꞏꞏꞏꞏꞏꞏꞏꞏꞏ 40 OTHER PARAMETERS Setting date and timeꞏꞏꞏꞏꞏꞏꞏꞏꞏꞏꞏꞏꞏꞏꞏꞏꞏꞏꞏꞏꞏꞏꞏꞏꞏꞏꞏꞏꞏꞏꞏꞏꞏꞏꞏꞏꞏꞏꞏꞏꞏꞏꞏꞏꞏꞏꞏꞏꞏꞏꞏꞏꞏꞏꞏꞏꞏꞏꞏꞏꞏꞏ...

Page 3: ...hout notice for improvement of performance or function Contact our sales representative or agent if any page of the operating instructions is lost or the page order is incorrect or if the instructions are unclear or inaccurate No part of the operating instructions may be reproduced in any form without the express written permission of PHC Corporation IMPORTANT NOTICE PHC Corporation guarantees thi...

Page 4: ...s are illustrated in the following way WARNING Warning indicates a potentially hazardous situation which if not avoided could result in serious injury or death CAUTION Failure to observe CAUTION signs could result in injury to personnel and damage to the unit and associated property Symbols have the following meanings This symbol means caution This symbol means an action is prohibited This symbol ...

Page 5: ...ere flammable or volatile substances are present may cause explosions and or a fire Do not install the unit in a location where corrosive gases such as acids are present Installing the unit in a location where corrosive substances are present may cause electrical components to corrode leading to leakage and or electric shock due to the deterioration of insulation resulting from corroded electrical...

Page 6: ...k or short circuit if the liquid is spilled Never damage the power supply cord or power supply plug by breaking adapting placing near a source of heat bending with force twisting pulling adding weight or binding A damaged power supply cord or power supply plug may cause electric shock short circuit or fire Never disassemble repair or modify the unit yourself A high voltage area is located inside t...

Page 7: ... the unit with too much force may cause it to fall over possibly resulting in injury A qualified individual must be assigned to supervise the safe movement and relocation of the unit Install the unit in a well ventilated airy location to prevent the accumulation of flammable refrigerant The flammable refrigerant may cause fire if it leaks Never damage the chamber wall or pipework in the chamber wh...

Page 8: ...e unit Stored items inside the unit may be adversely affected when operation is resumed if the settings have changed To ensure the safety of the service engineer submit a safety check sheet with the required items filled out This is provided as the photocopiable Safety Check Sheet at the end of these operating instructions Use designated parts for parts replacement Using an incorrect part may caus...

Page 9: ...indicates an earth This symbol means ON for a power switch This symbol means OFF for a power switch ENVIRONMENTAL CONDITIONS This equipment is designed to be safe at least under the following conditions based on the IEC 61010 1 Indoor use Altitude up to 2000 m Temperature 5 o C to 40 o C Maximum relative humidity 80 for temperature up to 31 o C decreasing linearly to 50 relative humidity at 40 o C...

Page 10: ...10 FREEZER COMPONENTS Main body 1 When an optional backup cooling kit is installed 7 12 19 13 17 18 5 16 1 15 1 14 1 20 10 10 Door gasket 4 2 1 Outer door 6 8 9 ON OFF POWER 3 11 ...

Page 11: ...lly page 59 10 Access port rear and bottom These ports are used to pass the sensor or cable of measuring equipment the sensor of a temperature recorder optional or the nozzle of a back up cooling kit optional to the chamber 11 Air intake port Manual Adjust the pressure difference inside and outside the chamber manually to open the outer door smoothly page 14 12 Fixture on back side Use the fixture...

Page 12: ...ndicator This indicator is lit when the excessive dust is accumulated on the condenser filter When this indicator is lit clean the condenser filter following the procedure page 50 5 Alarm display pages 46 47 Normal condition Normal is displayed Alarm activated buzzer delayed Alarm is displayed alternately in normal characters and reverse video Alarm activated buzzer sounding Warning is displayed a...

Page 13: ...status or information of the operation monitor system the message on the screen is changeable 10 Menu key Press this key to lead the Menu screen It is possible to set various setting on the Menu screen page 20 11 Buzzer key Press this key to silence the buzzer However when the ring back is ON the buzzer will sound again when the ring back passed and the alarm state still continues pages 29 30 and ...

Page 14: ...power plug is pulled out When pressing Buzzer key ON Non interlock with Buzzer key COM N C Close Open Open Maintain in abnormality COM N O Open Close Close Maintain in abnormality OFF Interlock with Buzzer key COM N C Close Open Close Return to normal COM N O Open Close Open Return to normal Air intake port Manual The difference in pressure inside and outside of the chamber is adjusted automatical...

Page 15: ... ambient temperature is subject to sudden changes it will not be possible to achieve a stable cooling performance A flat surface where the floor is also capable of bearing the total combined weight product optional accessories stored items Install the unit on a flat surface which is even and which is capable of bearing the total combined weight product optional accessories stored items If the unit...

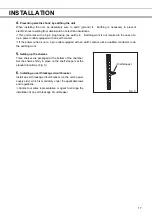
Page 16: ...h dipped in clean water to remove traces of the detergent After this be absolutely sure to wipe the surfaces with a dry cloth allowing the surfaces of the outer cabinet to dry out completely and then proceed with the installation Note Remove the cable tie that bands the power supply cord Prolonged contact with the tie may cause corrosion of the cord coating 2 Securing and levelling the unit using ...

Page 17: ... power outlet is not a 3 pin outlet equipped with an earth contact ask a qualified contractor to do the earthing work 5 Setting up the shelves Three shelves are packaged at the bottom of the chamber Set the shelves firmly in place on the shelf stoppers at the standard locations Fig 3 6 Installing an earth leakage circuit breaker Install an earth leakage circuit breaker on the unit s power supply s...

Page 18: ... Using the temperature display check that the chamber temperature has cooled to the set temperature Check that the chamber temperature falls to the set temperature when the start up after cleaning maintenance or moving 7 Turn on the switch of the optional back up cooling kit if installed 8 Do the alarm test Make sure that the buzzer sounds by pressing Buzzer key for 5 seconds Press Buzzer key agai...

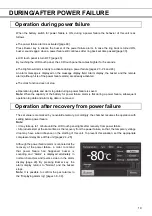
Page 19: ...n the capacity of the battery for power failure alarm is flat during a power failure subsequent operation log data and alarm log data is not saved Operation after recovery from power failure The set value is memorized by nonvolatile memory Accordingly the chamber resumes the operation with setting before power failure Note It may take up to 1 minute until the LCD touch panel lights after recovery ...

Page 20: ...ng log graph can be exported 32 34 Data Export Export screen Actual Temp Export Chamber temperature log 35 37 Door Opening Export Door opening log 35 37 Setting Setting Log interval Unique ID 31 32 Alarm Display Alarm log can be exported 38 39 Alarm Export Export Alarm log 40 41 Key Lock Key Lock screen Setting Key lock ON OFF password 25 28 Tools Tools screen Operation Setting Setting Comp delay ...

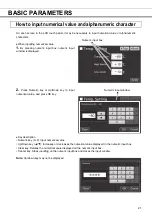
Page 21: ...dow is displayed 2 Press Numeric key or Up Down key to input numerical value and press OK key Key description Numeric key 0 9 Input numerical value Up Down key Increases or decreases the numerical value displayed in the numeric input box Clear key Deletes the numerical value displayed on the numeric input box Cancel key Stops inputting on the numeric input box and closes the input window Note Up D...

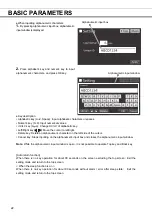
Page 22: ...Delete an alphanumeric character on the left side of the cursor Cancel key Stops inputting on the alphanumeric input box and closes the alphanumeric input window Note While the alphanumeric input window is open it is not possible to operate Top key and Back key Auto return function When there is no key operation for about 90 seconds on the screen excluding the top screen Exit the setting mode and ...

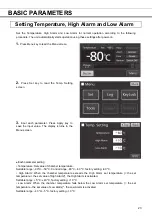
Page 23: ...The display returns to the Menu screen Each parameter setting Temperature Set value of chamber temperature Settable range 90 o C 50 o C Control range 86 o C 50 o C factory setting 80 o C High Alarm When the chamber temperature exceeds the High Alarm set temperature the set temperature the set value of High Alarm the High Alarm is activated Settable range 5 o C 40 o C factory setting 10 o C Low Ala...

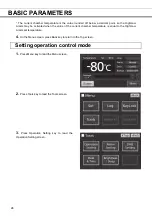
Page 24: ...hen the value of the current chamber temperature is equal to the High Low Alarm set temperature 4 On the Menu screen press Back key to return to the Top screen Setting operation control mode 1 Press Menu key to lead the Menu screen 2 Press Tools key to lead the Tools screen 3 Press Operation Setting key to lead the Operation Setting screen ...

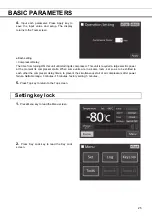
Page 25: ...red a large electric power at the moment its compressor starts When some units are in a same room set so as to be shifted to each other the compressor delay times to prevent the simultaneous start of all compressors after power failure Settable range 3 minutes 15 minutes factory setting 3 minutes 5 Press Top key to return to the Top screen Setting key lock 1 Press Menu key to lead the Menu screen ...

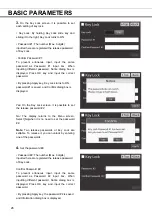
Page 26: ... 1 is saved and Confirm dialog box is displayed Yes On the Key Lock screen it is possible to set the release password 2 No The display returns to the Menu screen Select No when it is no need to set the password 2 Note Two release passwords of Key Lock are settable To release it you can unlock by entering one of the passwords 4 Set the password 2 Password 2 The number Max 6 digits inputted here are...

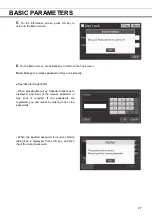
Page 27: ...lease password of Key Lock properly Operation for Keylock ON When pressing Menu key Password input box is displayed and input of the release password of Key Lock is required If two passwords are registered you can unlock by entering one of the passwords When the inputted password is incorrect Notice dialog box is displayed Press OK key and then input the correct password ...

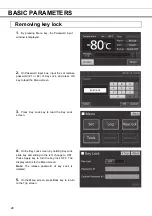
Page 28: ...and press OK key to lead the Menu screen 3 Press Key Lock key to lead the Key Lock screen 4 On the Key Lock screen by holding Key Lock slide key and sliding to the left change to OFF Press Apply key to turn the key lock OFF The display returns to the Menu screen Note The release password of key Lock is deleted 5 On the Menu screen press Back key to return to the Top screen ...

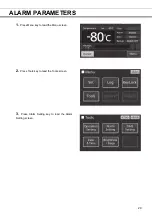
Page 29: ...29 ALARM PARAMETERS 1 Press Menu key to lead the Menu screen 2 Press Tools key to lead the Tools screen 3 Press Alarm Setting key to lead the Alarm Setting screen ...

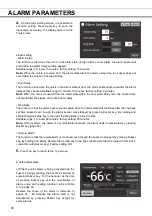
Page 30: ... sounds again when the alarm state still continues after the ring back set time passed even though the alarm buzzer was stopped by pressing Buzzer key By holding and sliding Ring Back slide key to the right the Ring Back is turned to ON Settable range 1 minute 99 minutes factory setting 30 minutes Note At Door alarm the alarm is not re activated because the alarm itself is deactivated by pressing ...

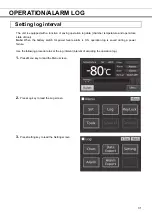
Page 31: ...lose state of door Note When the battery switch for power failure alarm is ON operation log is saved during a power failure Use the following procedure to set the log interval interval of acquiring the operation log 1 Press Menu key to lead the Menu screen 2 Press Log key to lead the Log screen 3 Press Setting key to lead the Setting screen ...

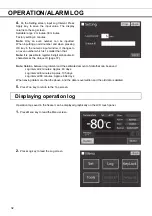
Page 32: ...ble to register 8 digit alphanumeric characters as the Unique ID page 37 Note Relation between log interval and the estimated amount of data that can be saved Log interval 2 minutes Approx 46 days Log interval 6 minutes Approx 135 days Log interval 30 minutes Approx 664 days When saving data more than the above and the data is overwritten and the old data is delated 5 Press Top key to return to th...

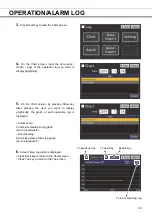
Page 33: ...ey after pressing the item you want to display graphically the graph of each operation log is displayed Actual Temp Chamber temperature log graph Go to procedure 6 Door Opening Open close state of door log graph Go to procedure 7 6 Actual Temp log graph is displayed Press Back key to return to the Chart screen Press Top key to return to the Top screen To previous day To next day To Door Opening lo...

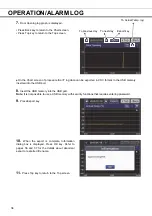
Page 34: ...rted into the USB port 8 Insert the USB memory into the USB port Note It is not possible to use a USB memory with security functions that requires entering password 9 Press Export key 10 When the export is complete Information dialog box is displayed Press OK key Refer to pages 36 and 37 for the details about abnormal export or exported file name 11 Press Top key to return to the Top screen To Act...

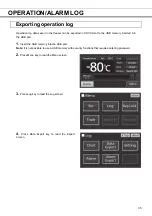
Page 35: ... to the USB memory inserted into the USB port 1 Insert the USB memory into the USB port Note It is not possible to use a USB memory with security functions that requires entering password 2 Press Menu key to lead the Menu screen 3 Press Log key to lead the Log screen 4 Press Data Export key to lead the Export screen ...

Page 36: ...the Export screen select the type of operation log data you want to export To export all types of operation log data press All Ch key To export only operation log data you want to export select operation log data you want to export and then press Selected Ch key Actual Temp Chamber temperature log data Door Opening Open close state of outer door log data Note When no USB memory is inserted into th...

Page 37: ...t e g When exporting all types of data using All from Jan 1st 2019 to Oct 1st 2019 20190101 20191001_AllCh csv 20190101 20191001_Door csv e g When exporting Actual Temp using 1 Day Jan 1st 2019 20190101_Temp csv If the file name is duplicated A sequential number such as 1 is added to the end of the file name to be output later On the beginning of the exported file product name MDF DU901VH is writt...

Page 38: ...7 the oldest alarm log is deleted and then overwritten When the battery switch for power failure alarm is ON operation log is saved during a power failure Alarm log saved in the freezer can be displayed graphically on the LCD touch panel 1 Press Menu key to lead the Menu screen 2 Press Log key to lead the Log screen 3 Press Alarm key to lead the Alarm screen ...

Page 39: ...ge 1 day 45 days Note The error of about 1 minute may be observed during 1 month Refer to page 43 for the procedure of setting time Press Back key to return to the Log screen Press Top key to return to the Top screen On the Alarm screen of procedure 4 or 5 alarm log data can be exported in CSV format to the USB memory inserted into the USB port 6 Insert the USB memory into the USB port Note It is ...

Page 40: ...nserted in the USB port by CSV format 1 Insert a USB memory in the USB port Note It is not possible to use a USB memory with security functions that requires entering password 2 Press Menu key to lead the Menu screen 3 Press Log key to lead the Log screen 4 Press Alarm Export key to lead Alarm Export screen ...

Page 41: ... button and input days Settable range 1 day 45 days Note The error of about 1 minute may be observed during 1 month Refer to page 43 for the procedure of setting time 6 Press Export key Note When USB memory is not inserted in the USB port Notice dialog box is displayed Press OK key and insert an USB memory into the USB port When alarm log data does not exist in the specified days Notice dialog box...

Page 42: ...e A log folder is created in a USB memory and an exported data file is saved in the log folder by CSV format Exported file name The first date during exported period 8 digits the last date 8 digits AlarmLog Example When exporting alarm log data for 7 days on January 7 2019 20190101 20190107_AlarmLog csv If the file name is duplicated A sequential number such as 1 is added to the end of the file na...

Page 43: ...key to lead the Date Time screen 4 On the Date Time screen input the present date and time Press Apply key to save the input value The display returns to the Tools screen Note 24 hour clock It is recommended to set the time periodically since the error of about 1 minute may be observed during a month 5 Press Top key to return to the Top screen ...

Page 44: ...creen 2 Press Tools key to lead the Tools screen 3 Press Brightness Sleep key to lead the Brightness Sleep screen 4 On the Brightness Sleep screen each setting of brightness and sleep is available Press Apply key to save the input value and setup The display returns to the Tools screen ...

Page 45: ...t right the Sleep function is turned to ON Input the set value of time to change the Sleep state Settable range 1 minute 5 minutes factory setting 2 minutes Note It is not possible to operate any key in the Sleep state By touching the LCD touch panel the Sleep state is released and the LCD touch panel returns to the usual state Under this condition key operations are available Brightness Sleep Bri...

Page 46: ...perature Controller Failure When communication between LCD touch panel and control substrate is died out or unstable Communication error Warning Temp Control Failure 2 W09 Temperature Sensor Error If the chamber thermal sensor is disconnected Alarm mode Temperature Sensor disconnected 2 Warning Temp Control Failure 2 W10 Temperature Sensor Error If the chamber thermal sensor is short circuited Tem...

Page 47: ...t Temp Sensor Error When the ambient temp sensor disconnected Ambient Temp Sensor disconnected Status Temp Under Control S15 Ambient Temp Sensor Error When the ambient temp sensor short circuited Ambient Temp Sensor short circuited Status Temp Under Control S16 Main Battery Charging Failure When the battery voltage does not increase after certain period Main Battery Charging Failure Status Temp Un...

Page 48: ...the door alarm Remote Alarm setting Ring Back setting Buzzer from unit Remote Alarm setting When pressing Buzzer key When the Ring Back set time passes ON Non interlock with Buzzer key ON OFF Alarm is canceled OFF Alarm is already canceled OFF OFF OFF Interlock with Buzzer key ON OFF Table 4 shows the situation after being canceled the High Low Alarm and recovery from a power failure with no opera...

Page 49: ...ted surfaces or cause perishing of plastic and rubber components Moreover do not wipe plastic and rubber components with a volatile material In order to maintain the unit s intended level of performance always replace accessories that have been removed for cleaning Cleaning of air intake port Manual Using the cap for air vent is likely to build a frost in around the air intake port Clean it in the...

Page 50: ...s the poor cooling Clean the condenser filter by the procedure below 1 Open the grille by pulling it to you as shown in the figure 2 Take out the condenser filter 3 Wash the condenser filter with water 4 Replace the condenser filter and the grille Set the handle of the condenser filter at the front 5 Check that the filter alarm indicator is off in the event the filter alarm indicator was ON WARNIN...

Page 51: ...refrigerated by liquid carbon dioxide or dry ice 3 Turn off the power switch and battery switch of the freezer 4 Open the outer door and inner door Remove the inner door by lifting up as shown in the figure 5 Leave the freezer in this state until the frost in the chamber melts 6 Wipe up the water that accumulates at the bottom of the chamber with a dry cloth 7 After cleaning the chamber replace th...

Page 52: ... Always follow the procedure for recycling Replacing the battery for backup cooling kit Replace the battery for backup cooling kit about every 3 years Contact our sales representative or agent for the replacement of battery when S19 Exchange a Backup Battery is displayed in the message display field The replacement of the battery for backup cooling kit is a paid service The backup cooling kit will...

Page 53: ...hamber does not get cold enough Warm material has been put in the chamber The door is frequently opened The set value of the chamber temperature is lower than 86 o C The temperature settable range is between 90 o C 50 o C However the temperature control range is between 86 o C 50 o C The unit is in direct sunlight The ventilation around the unit is blocked There is a nearby heat source The ambient...

Page 54: ... an extended period ensure that children do not have access and doors cannot be closed completely The disposal of the unit should be accomplished by appropriate personnel Always remove doors to prevent accidents such as suffocation Recycle of battery Label indication is obliged to comply with Japanese battery regulation Label indication is obliged to comply with Taiwanese battery regulation 廢電池 請回...

Page 55: ...kel rendelkeznek A termékeken a csomagoláson és vagy a kísérő dokumentumokon szereplő szimbólumok azt jelentik hogy az elhasználódott elektromos és elektronikus termékeket szárazelemeket és akkumulátorokat tilos az általános háztartási hulladékkal keverni Az elhasználódott készülékek szárazelemek és akkumulátorok megfelelő kezelése hasznosítása és újrafelhasználása céljából kérjük hogy a helyi tör...

Page 56: ...r Behandlung Aufarbeitung bzw zum Recycling gemäß den gesetzlichen Bestimmungen den zuständigen Sammelpunkten zu Endnutzer sind in Deutschland gesetzlich zur Rückgabe von Altbatterien an einer geeigneten Annahmestelle verpflichtet Batterien können im Handelsgeschäft unentgeltlich zurückgegeben werden Indem Sie diese Produkte und Batterien ordnungsgemäß entsorgen helfen Sie dabei wertvolle Ressourc...

Page 57: ...d almindeligt husholdningsaffald For korrekt behandling indsamling og genbrug af gamle produkter og batterier skal du tage dem til indsamlingssteder i overensstemmelse med den nationale lovgivning Ved at skaffe sig af med dem på korrekt vis hjælper du med til at spare værdifulde ressourcer og forhindre eventuelle negative påvirkninger af menneskers sundhed og miljøet Ønsker du mere udførlig inform...

Page 58: ...την ορθή απόρριψη αυτών των προϊόντων και μπαταριών συμβάλλετε στην εξοικονόμηση πολύτιμων πόρων και την αποφυγή τυχόν αρνητικών επιπτώσεων στην ανθρώπινη υγεία και το περιβάλλον Για περισσότερες πληροφορίες σχετικά με τη συλλογή και την ανακύκλωση παρακαλούμε απευθυνθείτε στις κατά τόπους υπηρεσίες συγκομιδής απορριμάτων Σε περίπτωση αντικανονικής απόρριψης αυτού του προϊόντος ενδεχομένως να επιβ...

Page 59: ...l recorder sensor cover MTR DU700SF is necessary Small inner doors For MDF DU901VHL the small inner door MDF 9ID is available as an optional component The small inner door is suitable for standard shelf location For the installation contact our sales representative or agent Note The cooling performance stated on page 62 cannot be guaranteed when the small inner doors are installed Cooling performa...

Page 60: ... ON OFF type the actual injection temperature deviates from the injection set temperature Note Set the injection set temperature of the backup cooling kit to 10 o C higher than the set temperature Otherwise continuous injection of liquid CO2 may reduce the retention time of liquid CO2 cylinder When the injection set temperature of the backup cooling kit is 70 o C ON 67 o C 65 o C OFF 75 o C 74 o C...

Page 61: ...mputer control system Temperature display LCD Digital display Thermal sensor Platinum resistance Pt 1000 Ω Alarm High Alarm Low Alarm Power failure alarm Door alarm Filter alarm Remote alarm contact Allowable contact capacity DC 30 V 2 A 1 Battery Lead storage battery DC 6 V 7200 mAh Auto recharge Weight 328 kg Accessories 1 set of key 1 scraper 1 stick for air intake port cleaning Optional compon...

Page 62: ...ature 30 o C no load Rated voltage AC 220 230 240 V AC 220 230 V AC 220 V AC 230 V Rated frequency 50 Hz 60 Hz 60 Hz 50 Hz Rated power consumption 600 W Max 940W 600 W Max 930W 595 W Max 930W 595 W Max 940W Noise level 52 dB A background noise 20 dB Maximum pressure 1860 kPa Usable environment condition Temperature 5 o C to 30 o C Humidity equal or less than 80 R H 1 Maximum cooling performance Th...

Page 63: ... unit Unit interior No contamination Decontaminated Contaminated Others 3 Instructions for safe repair maintenance disposal of the unit a The unit is safe to work on b There is some danger see below Procedure to be adhered to in order to reduce safety risk indicated in b below Date Signature Address Division Telephone Product name Model Serial number Date of installation Ultra low temperature MDF ...

Page 64: ...Printed in Japan LDCL058202 1 S0119 10519 1 1 1 Sakada Oizumi machi Ora gun Gunma 370 0596 Japan PHC Corporation 2019 ...

Reviews: