background image

 23


 Section 6: Button Overview

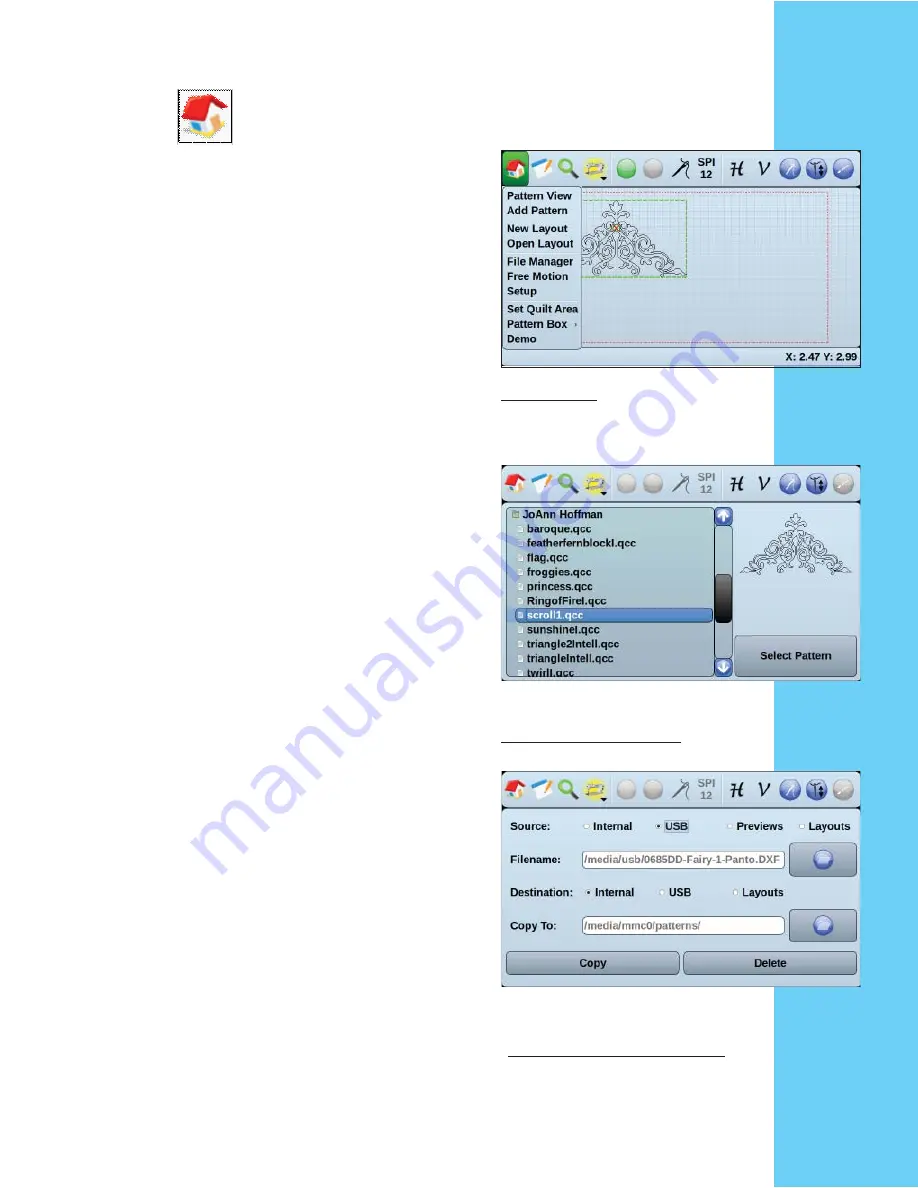
Home menu: 


Pattern view:

 takes you to your edit pattern screen. Here 

you will see any patterns you have added to your pattern 
box and will be able to edit them as needed.  
(for editing options 

see page 34

)

Add pattern:


Opens the pattern selection screen and allows you to add a 
pattern.  You can have as many patterns as you like in each 
pattern box.

   Touch the folder by each category to open the category.

+

    Touch the pattern you want to see and the preview will

      open on the right of the screen.

+

     Touch “select pattern” to place into your pattern view.

    Once “select pattern” is pressed, your design will

      automatically be added to your pattern view screen, 
      and the pattern view screen will automatically open.

Layouts: 


Layout is an option for the user to save your entire quilt 
area will all the pattern boxes and patterns you have placed 
into your quilt area.  It is important to remember exactly 
where the upper left corner of your quilt area is, because 
you will be prompted to set that point when loading a lay-
out.

File Manager:


Used to import patterns onto the remote.  System will use 
a QCC,  QLI or DXF pattern (for instructions on using a 
USB jump drive see troubleshooting section)

+

    Plug a USB jump drive into port located on the side of

      your remote

+

    Ensure the source is set to USB

+

    Touch the square by the select pattern line and a new

       screen will open

+

    Select the pattern you want to save to your system 

       and touch ok

+

    Set the “copy to” where you want it saved

+

    Touch copy

You may use this same method to delete a  pattern as well.
 

Home menu

Touch the pattern you want to 
see and the preview will open 
on the right of the screen

Plug in your jump drive into the 
remote, into the USB port.  Ensure 
the source is set to USB

Summary of Contents for QUILT ARTIST II

Page 1: ...PFAFF and QUILT ARTIST are trademarks of KSIN Luxembourg ll S ar l 2012 KSIN Luxembourg ll S ar l Manual QUILT ARTIST II TM ...

Page 2: ...2 ...

Page 3: ...o your Quilting Machine pg 11 Insert the SD Card with patterns pg 14 Operating the Quilt Artist II Section 4 Getting Started Getting Started pg 17 Section 5 Initial Start up To Run the test patterns follow these steps pg 19 Setting up a Quilt Block pg 21 Setting up a Pantograph style pattern pg 22 Section 6 Button overview Home pg 23 Tablet with Pencil pg 30 Magnifying Glass pg 33 Section 7 Editin...

Page 4: ...4 3 Idler Pulley 4 X belt assembly 2 Carriage Bracket Belt assembly 5 SD card with patterns 6 Motor pulley cover not used with the iQuilt frame 1 Motor Box Section 1 Included Parts ...

Page 5: ...ket optional 120PA187 5 1 2 Carriage Belt Assembly 120PA211 19 1 3 Rear Idler pulley 120PA212 24 1 4 White belt assembly 120PA193 12 1 5 SD Card 1 6 Motor Cover Pulley Cover 120PA208 28 1 7 Power Cord 1 8 Stitcher cable 100EW177A 1 9 Belt Brackets 100MH83A 2 26a Zip Tie Base 103MW72A 5 26b Zip Ties 103MY70A 5 26c Stylus Pen for touch screen 103MA71A 1 26d M5 x 1 2 Bolts 103MA85B 2 26e 10 Washers 1...

Page 6: ...it with out turning the carriage over Note If you already have encoder installed on your carriage this idler pulley will be on the same end as the encoder Step 3 On the bottom of the lower carriage you will find two holes next to each other One with a screw and one without a screw See figure 2 2 Step 4 Remove the screws from the holes shown See figure 2 2 Step 5 You now have the two screws you wil...

Page 7: ...rong end Motor box will be on the opposite end from the idler pulley Step 3 Place two each washers over each hole in the motor box See figure 2 6 Step 4 Line up the motor box holes with the washer under the two holes in the bottom of the lower carriage Step 5 Using the two screws attach the motor box to the carriage See figure 2 7 Step 6 Before you lock the screws into place check that the motor b...

Page 8: ... See figure 2 8 Step 3 Remove the shipped bracket from the upper carriage See figure 2 9 Step 4 Attach the carriage bracket to the upper carriage See figure 2 10 Step 5 Attach the Black metal Y belt holder to the carriage bracket See figure 2 11 Note With the carriage bracket in place you should have the idler pulley carriage bracket and the pulley on the top of the motor box all on the same side ...

Page 9: ...Once you have the belt attached to the fixed position of the metal part and Connect the eye bolt to the opposite end from the fixed side Place the threaded part about half way in so that later if need you can make the belt tighter or looser depending on your needs Place the other end of the belt into the eye of the eye bolt pull the belt tight and clamp in place Now to make adjustments to the tigh...

Page 10: ... the clamps and secure See figure 2 18 Step 3 Locate 2 black clamps and the long belt The belt will be mounted to the front of the frame using the eyebolts that were just attached Step 4 To attach the left end of the belt feed this end of the belt through the left eyebolt allowing 1 inch of tail Fold this tail against the belt with the teeth together Using one of the belt clamps secure the belt in...

Page 11: ...r open and closed posi tion of the motor box x belt pulley See figure 2 21 shows the belt in the pulley area of the motor box Note Belt teeth facing up into the gear Step 8 Locate the Gear Guard and two locknuts Place the Gear Guard so that it covers the gear on the top of the motor box and the two holes line up with the threaded posts on the left edge of the motor box Secure with locknuts See fig...

Page 12: ...ord is pointing towards the top of the box and not towards the ground See figure 3 1 Step 5 Run the power cord across the top to the other side of the box Step 6 Leave the power cord there until all other needed cables have been attached Attaching to the PFAFF PowerQuilter p3 machine Step 1 Locate the black cable stitcher cable that came with your Quilt Artist II Step 2 Plug this cable into the Ro...

Page 13: ...er cable are the only two cables needed Run these cables along the side of the bottom carriage and zip tie using a base anchor near the front and the rear of the bottom carriage See figure 3 5 thru 3 7 Step 5 Plug the power cable into your surge protector Step 6 Ensure the stitching cable is plugged into rear of the machine as noted in step 2 Step 7 Your Quilt Artist II is now setup and ready to i...

Page 14: ...ard faces AWAY from the screen when inserting 2 Once you card is inserted and your entire robotic system is setup you will HAVE to reset the factory defaults before running To do this a Go to the Home Icon b Touch Setup c Go to the Advanced tab d Touch Factory Defaults e Your system has now been reset and synced with your remote Inserting the SD Card with Patterns SD Card port ...

Page 15: ...15 ...

Page 16: ...16 Operating PFAFF QUILT ARTIST II ...

Page 17: ...his screen Let s get to know your PFAFF QUILT ARTIST II automated quilter Let s go through the top screen icons Home Button Think of this button like the file button on your computer All of the master functions are controlled from here Tablet Button This button is for saving moving and nesting features Magnifying Glass With this icon you can zoom to fit your pattern box Sewing Machine Button This ...

Page 18: ...edit menu We will cover the edit menu later in this manual Needle up This button will position your needle in the up position Needle with Thread This button turns the stitching mode on your machine to on The machine stitching is not controlled by the robot You must move the machine yourself if you turn the machine on with this button ...

Page 19: ... machine to the center of your quilt frame 6 Starting at the center of your quilt frame move your machine approx 10 to the front left and touch the for point 1 7 Now move the machine 20 to the right and touch the for point 2 You will see horizontal red line drawn on the screen If there is no line you are outside of your extents and need to cancel out and start the pat tern box over ensuring to kee...

Page 20: ...ern 15 Did you have any errors come up If so go to page 24 and go through the trouble shooting steps If no errors go to step 16 16 If no errors occurred we now want to activate stitching Touch the needle with thread at the top right of the screen If it turns green you are ready to go 17 Unthread your needle and run the pattern just as you had before Your pattern should run through ex actly the sam...

Page 21: ...ent option for setting a pattern box 3 Set up the respective pattern box see pg 27 for setting a pattern box then select the pattern you want to place in the pattern box see pg 23 under add pattern 4 Edit your pattern however you would like see pg 34 by bringing up the edit menu and selecting your desired editing option 5 Once you have finished editing your pattern to your desired liking run the p...

Page 22: ...means you will have jump stitches b The machine will always move left to right if your circles are on the right and the X is on the left you will need to choose reverse path from the edit menu NOTE It is important reverse the pattern before you repeat it or you will run into issues 3 You are now ready to run See pg 37 under When running a pattern 4 NOTE Even though you are able to set up sev eral ...

Page 23: ...to save your entire quilt area will all the pattern boxes and patterns you have placed into your quilt area It is important to remember exactly where the upper left corner of your quilt area is because you will be prompted to set that point when loading a lay out File Manager Used to import patterns onto the remote System will use a QCC QLI or DXF pattern for instructions on using a USB jump drive...

Page 24: ...area ALSO NOTE You do not have to stitch in order to record your movements To Free Motion Touch start Move your machine how you want When finished touch stop If you like what you see touch save and it will save your design to the bottom of your list in the Add Pattern screen Setup System settings and updates will be done here Updates When you receive your update you will copy the tar gz file direc...

Page 25: ...You can set the max speed in the parameters and know exactly what the speed is go ing to be when you go to run This speed will also be displayed on the running pattern screen and can be adjusted from there Min Speed This is the slowest you want your system to run We recommend keeping it in the 1 2 range Lock Number of lock stitches you want at the begin ning and end of each pattern Needle Sets the...

Page 26: ...ou find acceptable For example with jump stitches set to 0 it will always ask you to cut the thread If you want it to jump stitch up to 6 automatically without asking to cut the thread and any jump stitch above 6 it will ask you to cut set your jump stitch to 6 Acceleration determines how quickly your robot will move in and out of the corners Think of this as the mini mum speed your robot will run...

Page 27: ... box This is your individual pattern box you are setting It may be the same size as your quilt area it may be a smaller quilt block The first 2 points of your pattern box are going to set what is called a base line This determines which way your pattern will be inserted into the pattern box You need to ALWAYS set your pattern box points counter clock wise If you want your base line to be at the bo...

Page 28: ...ould see a red cross hair on the screen If you do not you are outside your quilt area 3 Once you have moved your machine to point 1 press the key The touch screen will now say to move to the next point Remember to move in a counter clockwise mo tion 4 As you move to your next point you will see a red line being drawn on the screen this is the base line of your pat tern box If you do not see this l...

Page 29: ...view how many boxes you have by PB 2 of 3 It will show in the up per corners of your screen which pattern box is which way If you are on pattern box 2 and you have 3 pattern boxes at the top it will say PB 2 of 3 In the left corner you will have an arrow that says PB1 and in the right corner you will have an arrow that says PB3 To move to a different pattern box you have 2 options 1 You can slide ...

Page 30: ...ve and release from the screen Auto Center Use this to automatically center your pattern in the center of your pattern box Nest Since you can only see one machine pass on the screen at a time a nest function is necessary for those patterns you want to intertwine For example you have a meander that you want to intertwine with the previously quilted row of meander use the nest feature 1 After finish...

Page 31: ...ower right corner of your quilt area 4 After pressing ok the machine will lock in place again and wait for you to mark the second point 5 Now unlock your rollers and roll your quilt Roll it until your two marks are just below your take up rail If you want to intertwine your next row with the previously stitched row then you will want to still see the bottom portion of the stitched pattern ...

Page 32: ... your screen at this point do not look at your quilt 9 The pattern previously quilted will appear on the screen move your machine until the new pattern nests how you want it to nest and touch the check mark You are only watching the screen Create Set Point A setpoint is when you are go ing to be making modifications to a pattern or box and you re not sure how it s going to turn out You can create ...

Page 33: ...ou will be in trace mode In trace mode your machine will move thru the pat tern without stitching SPI with a number Shows the current stitches per inch of the machine You can change this value by touching this icon a window will open that you can use to change this setting Horizontal lock Will lock your machine horizontally so you can only move it vertically Note If your time out is set to 100 sec...

Page 34: ...the screen and you wanted to modify pattern 2 the pattern without the green box around it touch the next button and the green box will move over to pattern 2 Repeat Allows you the ability to repeat the selected pattern across and down Also able to add spacing in between the patterns or have the patterns overlap by having a negative spacing NOTE Once a pattern is repeated those repeats and the orig...

Page 35: ...atterns not all of them you will need to take a different approach When you repeat a pattern the original pattern and the repeats become all one pattern so it s not possible to move just one of the portions of the repeat because it is all one pat tern You will need to insert the pattern several times in order to move just one individual pattern Remove Will remove the current pattern that is in the...

Page 36: ...iders together so that as you move one the other will move the same amount To lock touch the icon the icon will turn green to show locked To unlock it touch it again and the icon will turn white If you have 2 or more patterns and you select scale the pattern you are currently scaling will be black and all others will be blue Properties Local start X Y Telling you from the upper left corner of your...

Page 37: ...n If your thread breaks or bobbin runs out of thread while running touch the pause button on the screen and touch thread break Re thread the machine or insert a full bobbin and move your machine to the place where the thread broke Don t worry if you re off the line a bit the machine will pull in to be exactly on the line If that is the place you want to start touch yes pull up the bobbin thread an...

Page 38: ...ur robot on the right side of your screen you will see two arrows the up arrow will speed your machine up and the down arrow will slow the machine down Any time your PFAFF QUILT ARTIST II is running this will control the speed Note This is referring to how fast or slow your machine is moving thru the pattern not how fast or slow it is stitching NOTE For those intricate designs set your speed a bit...

Page 39: ...hen pressing it down it should travel about 1 2 If it travels farther this belt needs to be tightened 2 If adjusting the belts doesn t fix the errors go into the setup screen to the ADVANCED tab Touch factory defaults and follow the on screen prompts Q When I insert my pattern into the pattern box it is coming in upside down or sideways and I want it straight up and down A The pattern will always ...

Page 40: ...ou can fix that by using these steps 1 While the system is running touch both the belts and find out which is vibrating 2 You can tighten your belts a touch and it should clean up the sound 3 If you feel your belts are already at a good tension you can adjust your constants 4 Go into HOME SETUP CONSTANTS 5 Think about this like Trigonometry Math class X Axis is left right Y axis is top bottom If y...

Page 41: ...updating your remote or robot it is most likely an easy fix 1 Make sure the file has been un zipped 2 Make sure you are opening the folder and selecting the file to update with 3 Make sure that you have all the correct files on the jump drive Plug your jump drive into your computer and remember how the files are named Notice which files are in folders and which aren t If the file you are trying to...

Page 42: ...42 ...

Reviews: