Pfaff Embroidery Mode-Stitch-Out User Manual Download Page 9

9:9

3

Embr

oidery mode - stitch-out

Common embroidery 

stitch-out pop-ups

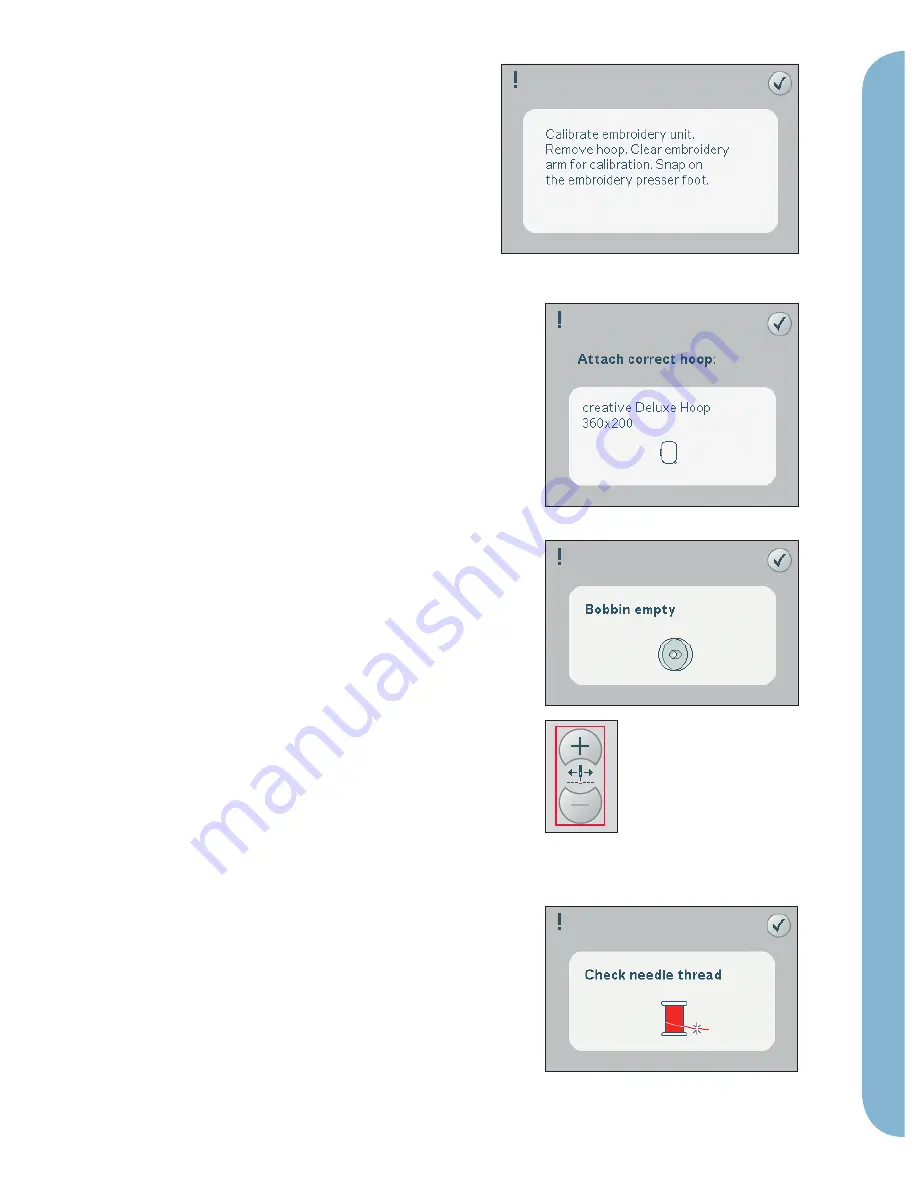
Embroidery unit calibration

When the embroidery unit is attached, a pop-

up asks you to slide off the hoop and clear the 

machine area for calibrating the embroidery 

arm. You will also be reminded to snap on the 

embroidery presser foot 6A.
Note: It is very important to remove the hoop, otherwise 

the hoop or the embroidery unit may be damaged while 

calibrating. 

Attach correct hoop

If the size of the hoop attached to the machine 

does not match the size displayed on screen, the 

machine will not embroider. You must change 

the hoop to the displayed size or change the hoop 

setting to the hoop size attached.
To change hoop settings, re-enter embroidery edit 

and go to select hoop.

Bobbin empty

When the bobbin is almost empty, the machine 

stops automatically and a pop-up appears on the 

screen.
Note: It is possible to embroider until the thread has 

completely run out. Press the start/stop button to 

continue embroidering without closing the bobbin empty 

pop-up. 
Close the pop-up. Replace the empty bobbin with a 

full one. Pull back excess needle thread and move 

a few stitches backwards using the current stitch 

icons (3). Start embroidering again by pressing the 

start/stop button or the foot control.
Note: Use the bobbin position to get easier access to 

the bobbin. When the bobbin is replaced, touch current 

position to move the hoop back to where the embroidery 

stopped.

Check needle thread

The machine stops automatically if the needle 

thread runs out or breaks. Re-thread the needle 

thread, close the pop-up, step back a few stitches 

and start embroidering again.

Summary of Contents for Embroidery Mode-Stitch-Out

Page 1: ...Embroidery mode stitch out ...

Page 2: ...all 10 Touch function pan always active 11 More options 12 Speed control 13 Hoop position 14 Precise Positioning To enter embroidery stitch out To embroider your design s enter embroidery stitch out by touching the embroidery toggle icon A on the task bar The embroidery unit needs to be connected and the machine enters embroidery stitch out Functions used when embroidering a design are now shown E...

Page 3: ...uns out Touch and hold to move through the stitches quickly The crosshair will follow the stitches in the embroidery field Go to stitch 4 To move to a particular stitch in the design touch the go to stitch icon A pop up will appear where you can enter the desired stitch number Current stitch will then move to that stitch number If the number entered is too large current stitch will move to the las...

Page 4: ...e B Touch the icon to activate monochrome embroidery All designs are shown in a grey color and the machine does not stop for color block changes To deactivate monochrome embroidery touch the icon again Color merge C If you want the machine to ignore the stop between identical thread colors e g after having used color block sort touch the color merge icon Full screen D To see your design as large a...

Page 5: ...sition When you want to return to the current stitch and start embroidering again where the embroidery was interrupted touch the current position icon You can also press the start stop button once to return to the current stitch and start to embroider Park position When you have finished your embroidery remove the hoop and select park position The embroidery arm will be placed in a position that w...

Page 6: ...function move F Touch function rotate G Touch function pan H Wheel I Orbiting to check corners To select locking point and position hoop Select locking point A Place the red crosshair where you would like the locking point to be in your embroidery Next activate B position hoop The red crosshair will be locked on the screen changing color from red to blue with a ring around the center of the lockin...

Page 7: ... can be used to trace the design field by touching each of the four corner icons You can find the center of the design again by touching the centering icon The orbit function will also swiftly move the crosshair to the selected position when doing precise positioning Use the corner icons to set the connecting point for precise positioning in a corner of the design This is the easiest and most prec...

Page 8: ...ing point to the upper left corner of the embroidered design Use the touch function move Check that the needle is at the exact position If satisfied close precise positioning and start embroidering 3 To line up the design on the screen with the previously embroidered select matching point C to be the corner Use the touch function move or the orbiting icons 4 Select the next function rotate design ...

Page 9: ...oidery edit and go to select hoop Bobbin empty When the bobbin is almost empty the machine stops automatically and a pop up appears on the screen Note It is possible to embroider until the thread has completely run out Press the start stop button to continue embroidering without closing the bobbin empty pop up Close the pop up Replace the empty bobbin with a full one Pull back excess needle thread...

Page 10: ...ine The next recommended color is shown in the pop up Cut thread end After changing the thread the machine will sew a few stitches and then stop so you can cut the thread end Embroidery is finished clear screen When the embroidery is finished the machine will ask you if you want to clear the screen If you touch OK the designs will be deleted Touch cancel to get back to your design ...

Reviews: