PUSH
i
j
k
l
g
e
h
f
a
b
c
d
006806008
006905008
006Q6A0150
006914008
18
19
20
21
22
24
23
14
15
17
16
25
26
1
2
3
4
5
6
78
11
10
12
13
9
All manuals and user guides at all-guides.com
Page 1: ...gs und Sicherheitshinweise N HMASCHINE SEWING MACHINE Operation and Safety Notes MACHINE A COUDRE Instructions d utilisation et consignes de s curit All manuals and user guides at all guides com a l l...
Page 2: ...n Abbildungen aus und machen Sie sich anschlie end mit allen Funktionen des Ger tes vertraut Before reading unfold the page containing the illustrations and familiarise yourself with all functions of...
Page 3: ...PUSH i j k l g e h f a b c d 006806008 006905008 006Q6A0150 006914008 18 19 20 21 22 24 23 14 15 17 16 25 26 1 2 3 4 5 6 7 8 11 10 PUSH 12 13 9 All manuals and user guides at all guides com...
Page 4: ...All manuals and user guides at all guides com...
Page 5: ...terfaden heraufholen Seite 14 Wahl des Musters Seite 15 Stichbreiten und Stichl ngenrad Seite 16 N hen von Geradstichen Seite 17 Vern hen Naht beenden Faden abschneiden Seite 17 Wahl von Elastikstiche...
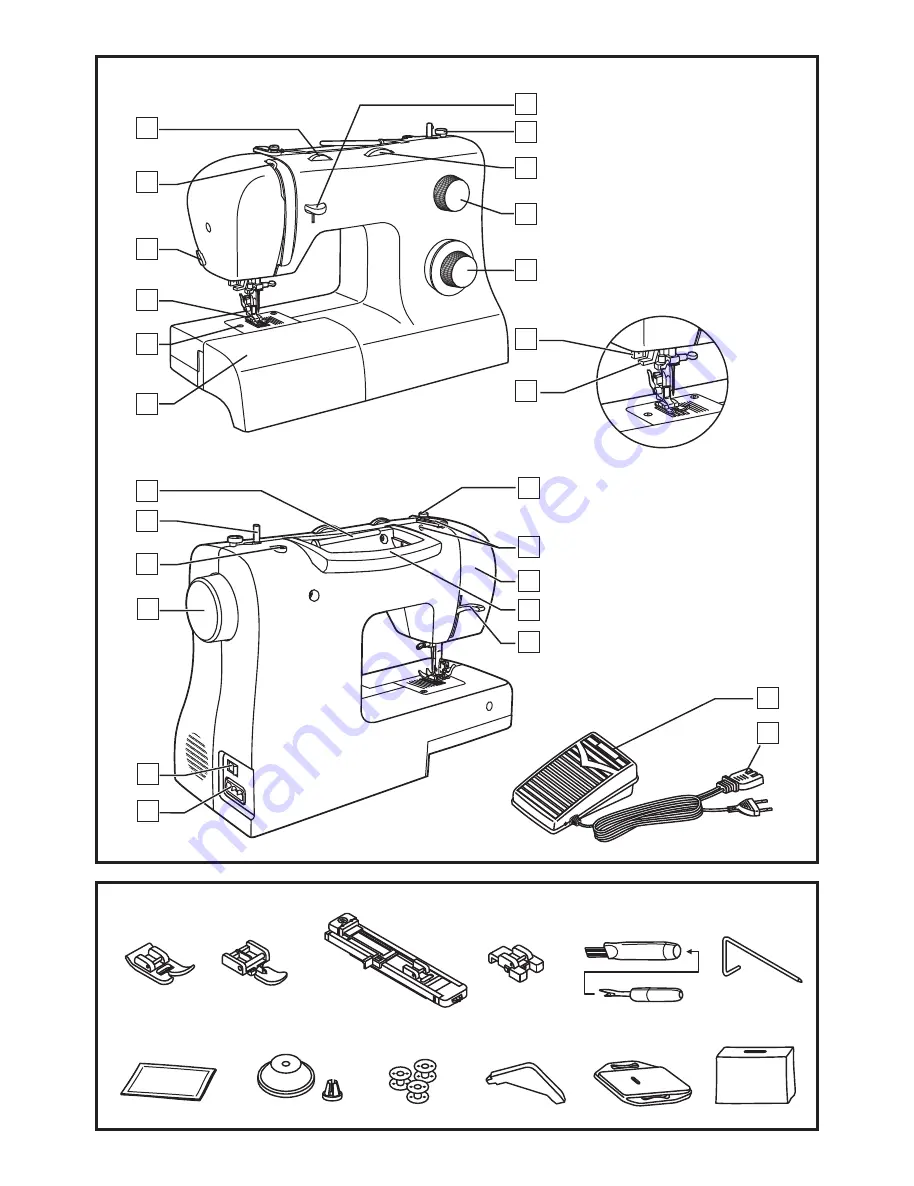
Page 6: ...adel h Gro er und kleiner Garnhalter i Spulen j Schraubenzieher k Stopfplatte l Schutzhaube 6 Einleitung DE AT CH Wir gratulieren zum Kauf Ihrer PFAFF N hmaschine die Ihnen das N hen Schneidern und Au...
Page 7: ...nlasser f r N hgeschwindigkeit N hlicht 70 Watt ca 1 4 m ca 5 2 kg Aluminium Kunststoff vorhanden vorhanden vorhanden CB Greifer 130 705H nach EU Richtlinie Ja 3 Jahre Schutzklasse N hmaschine N hmasc...
Page 8: ...leitungsbuch beschrieben durchf hren 10 Werfen Sie keine Gegenst nde in die ffnungen der Maschine 11 Verwenden Sie die Maschine nicht im Freien 12 Um die Maschine abzuschalten stellen Sie alle Schalte...
Page 9: ...lten Wenden Sie sich an einen qualifizierten Techniker wenn es beim Anschlie en der Maschine ans Stromnetz Zweifel gibt Trennen Sie die Maschine vom Netz wenn die Maschine nicht in Betrieb ist Achtung...
Page 10: ...m Ann hen fest bis er fixiert ist 7 Drucken Sie dann den Fusanlasser bis das Garn aufgespult ist und der Spulenstopper automatisch stoppt 8 Nach dem Spulen schneiden Sie den Faden ab 9 Bewegen Sie die...
Page 11: ...e so ein dass sich die Spule im Uhrzeigersinn dreht 3 Ziehen Sie den Faden bis er in der Kerbe einrastet 4 Arbeiten Sie mit einem Fadenanfang von ca 15 cm Halten Sie die Spulenkapsel an der kleinen La...
Page 12: ...e und alle Fadenst rken Die Spannung muss je nach Stoff oder Faden neu reguliert werden Eine ausgewogene Spannung Ober und Unterfaden gleich fest ist nur bei Geradstich sinnvoll Bei Zierstichen oder b...
Page 13: ...ert werden 2 Ziehen Sie den Faden wie abgebildet von der Garnrolle durch die Oberfadenf hrung 3 und dann durch die Vorspannungsfeder 4 F deln Sie den Faden durch das Spannungsmodul indem Sie den Faden...
Page 14: ...den Hauptschalter aus auf O Achtung A B D C A C B D A Einf deln der N hmaschine Unterfaden heraufholen Halten Sie den Oberfaden mit der linken Hand und drehen Sie das Handrad mit der rechten Hand 1 Zi...
Page 15: ...wahlknopf Passen Sie Stichl nge und Stichbreite entsprechend dem Stoff an der gerade benutzt wird Um die anderen Muster zu erhalten muss die Stichl nge nach S1 oder S2 gedreht werden W hlen Sie das ge...
Page 16: ...genrad in Richtung 0 drehen wird die L nge des jeweiligen Stiches reduziert Wenn Sie es in Richtung 4 drehen nimmt die L nge des gew hlten Stiches zu Allgemein gilt f r schwerere Stoffe und dickere Na...
Page 17: ...zu festigen sollten Sie die R ckw rtstaste dr cken und einige Stiche nach r ckw rts n hen A Lassen Sie die R ckw rtstaste los und n hen Sie weiter Am Ende der Naht wiederholen Sie den Vorgang 1 Drehe...
Page 18: ...Sie das Stichw hlrad auf ein Diese Einstellung dient der dreifachen Verst rkung von elastischen und besonders strapazierf higen N hten Die Maschine n ht zun chst zwei Stiche nach vorn und dann einen S...
Page 19: ...ereichs Allgemein gilt f r leichtere Stoffe werden schmalere Stiche und f r schwerere Stoffe breitere Stiche verwendet Probieren Sie die Maschineneinstellungen zun chst auf einem St ck des gew nschten...
Page 20: ...Knopflochhebel ab und dr cken Sie ihn vorsichtig nach hinten C 6 Halten Sie den Oberfaden leicht hoch und starten Sie die Maschine 7 Knopfl cher werden in dieser Reihenfolge D gen ht 8 Halten Sie die...
Page 21: ...das linke Loch im Knopf hineingeht Stellen Sie die Stichbreite so ein dass sie dem Abstand der beiden L cher im Knopf entspricht N hen Sie den Knopf mit ca 10 Stichen langsam an Heben Sie die Nadel au...
Page 22: ...thilfe des N hfu hebers ab bis sich die Aussparung c exakt ber dem Stift d befindet 2 Der N hfu f rastet automatisch ein Heben Sie den N hfu mithilfe des N hfu hebers an 3 Wenn Sie den Hebel e nach ob...
Page 23: ...toffe grobe Strickstoffe Dicke Wollstoffe dicke Jeansstoffe Zeltstoffe M belstoffe schwere Vorhangstoffe etc Dickeren Faden verwenden Die meisten handels blichen F den k nnen f r diese Nadelst rke ver...
Page 24: ...ten Sie die Maschine immer aus bevor Sie die Nadel wechseln Nadeln m ssen immer in perfektem Zustand sein Probleme k nnen auftreten mit A Verbogenen Nadeln B Besch digten Spitzen C Stumpfen Nadeln Ach...
Page 25: ...ist gezogen 1 Staub oder l in dem Greifer oder der Nadelstange 2 Die lqualit t ist schlecht 3 Die Nadel ist besch digt Faden im Greifer 4 Die Nadel ist besch digt Faden im Greifer 1 Die Maschine neu...
Page 26: ...en sind Sch den durch nicht sachgem e Handhabung Nichtbeachtung der Bedienungsanleitung oder Eingriff durch nicht autorisierte Personen sowie Verschlei teile Durch die Garantieleistung wird die Garant...
Page 27: ...sing the Bobbin Thread Page 36 How to Choose Your Pattern Page 37 Stitch Width Dial Stitch Length Dial Page 38 Sewing Straight Stitch Page 39 Reverse Sewing Removing the Work Cutting the Thread Page 3...
Page 28: ...foot d Button sewing foot e Seam ripper brush f Edge quilting guide g Pack of needles h Spool holder i Bobbin 3x j L screwdriver k Darning plate l Soft cover 28 Introduction GB IE As the owner of a ne...
Page 29: ...tt Approx L x x Approx 1 8 m Approx 1 4 m Approx 5 kg Aluminium plastic Available Available Available 130 705H In acc with EU Directive Yes 3 years When handle is folded down Power cable Foot control...
Page 30: ...o not use bent needles 8 Do not pull or push fabric while stitching It may deflect the needle causing it to break 9 Switch the sewing machine off O when making any adjustments in the needle area such...
Page 31: ...en machine is not in use The foot control must be used with the appliance by KD 1902 FC 1902 110 120V area KD 2902 FC 2902D 220 240V area 4C 316B 110 125V area 4C 326G 230V area Press main switch A to...
Page 32: ...7 Step on foot control pedal 8 Cut thread 9 Push bobbin spindle to left 10 and remove When the bobbin winder spindle is in bobbin winding position the machine will not sew and the hand wheel will not...
Page 33: ...ne hand Insert the bobbin so that the thread runs in a clockwise direction arrow 3 Pull the thread through the slit and under the finger 4 Leave a 6 inch tail of thread Hold the bobbin case by the hin...
Page 34: ...twice If the tension is correct the thread will unwind by about an inch or two If the tension is too tight it does not unwind at all If the tension is too loose it will drop too much To adjust turn t...
Page 35: ...rough the upper thread guide 3 and pulling thread through pre tension spring as illustrated 4 Thread tension module by leading thread down right channel and up left channel 5 During this process it is...
Page 36: ...O A B D C A C B D A Threading the Machine Raising the Bobbin Thread Hold the upper thread with the left hand Turn the handwheel 1 towards you counterclockwise lowering then raising needle If it is dif...
Page 37: ...ctor dial Adjust the stitch length and stitch width according to the fabric being used To obtain the other patterns turn the stitch length dial to S1 or S2 select the pattern desired with pattern sele...
Page 38: ...zag stitches increase as the setting of stitch length dial approaches 0 Neat zig zag stitches are usually achieved at 2 5 or below Dense zig zag stitches are called satin stitches For straight stitch...
Page 39: ...e end of a seam press down the reverse sewing lever A Sew a few reverse stitches Release the lever and the machine will sew forwards again 1 Turn the handwheel toward you counterclockwise to bring the...
Page 40: ...ugh there are several stretch patterns here are two examples Set the Pattern Selector Dial to Used to add triple reinforcement to stretch and hardwearing seams The machine sews two stitches forward an...
Page 41: ...hter weight fabrics and a wider stitch is used for heavier weight fabrics Sew a test first to make sure the machine settings are appropriate for the fabric Turn up the hem to the desired width and pre...
Page 42: ...the buttonhole lever and gently push it back C 6 While lightly holding the upper thread start the machine 7 Buttonhole stitching is done in the order D 8 Stop the machine when the buttonhole cycle ha...
Page 43: ...cleanly into the left and right holes of the button Adjust the stitch width as needed according to the distance between the holes of the button Slowly sew on the button with about 10 stitches Raise th...
Page 44: ...trated 1 Lower the presser foot shank b until the cut out c is directly above the pin d 2 Raise the lever e Lower the presser foot shank b and the presser foot f will engage automatically Raise the pr...
Page 45: ...Medium weight fabrics cotton duck woolen heavier knits terrycloth denims Heavyweight fabrics canvas woolens outdoor tent and quilted fabrics denims upholstery material light to medium Heavy duty threa...
Page 46: ...eedle Needles must be in perfect condition Problems can occur with A Bent needles B Damaged points C Blunt needles Attention as illustrated as follows A C B A B C D Maintenance and Trouble shooting Di...
Page 47: ...ality oil has been used 4 The needle is damaged Thread is caught in the hook 1 Rethread the machine 2 Reduce the thread tension lower number 3 Select a larger needle 4 Remove and reinsert the needle f...
Page 48: ...e following article number 1070s Damage caused by improper handling non observance of the operating instructions or unauthorised interference with the appliance are excluded from the warranty The perf...
Page 49: ...largeur de point et cadran de longueur de point Page 60 Couture de points droits Page 61 Couture en marche arri re Pour retirer votre ouvrage en cours Pour couper le fil Page 61 Choisir les motifs de...
Page 50: ...lti usage b Pied pour fermeture clair c Pied pour boutonni re d Pied pour pose de bouton e Brosse D couseur f Guide couture matelassage g tui aiguilles h Arr t bobine i Canette 3x j Tournevis L k Plaq...
Page 51: ...tion Cordon p dale Machine coudre Interrupteur Allum Eteint P dale pour commander la vitesse de couture Lampe pour coudre 120 Volt 60 Hz North America 230 Volt 50 Hz Europe Watt North America Europe 8...
Page 52: ...ser d aiguilles tordues 8 Ne pas tirer sur le tissu ou le pousser lors de la couture Ceci pourrait entra ner une courbure de l aiguille causant une casse 9 Mettre la machine hors tension position O av...
Page 53: ...autre Afin de r duire les risques d lectrocution brancher la machine en respectant la taille des trous de la prise Si la fiche n entre pas compl tement dans la prise inverser le sens Si vous rencontre...
Page 54: ...placez celle ci sur l axe 5 Poussez la canette vers la droite 6 Tenez l extr mit du fil 7 Appuyez sur le rh ostat de la machine 8 Coupez le fil 9 Repoussez l axe du d vidoir vers la gauche 10 et retir...
Page 55: ...ns le sens des aiguilles d une montre fl che 3 Engagez le fil dans la fente et tirez le vers la gauche et sous le ressort jusqu ce que le fil apparaisse dans l ouverture rectangulaire 4 Laisser d pass...
Page 56: ...e zigzag et d corative Le bon r glage de la tension est important pour bien coudre Il n existe pas un r glage de tension standard pour toutes les fonctions de points fil ou tissu Une tension quilibr e...
Page 57: ...e Passez le fil de la bobine travers le guide fil sup rieur 3 Guider le fil autour du guide en le tirant travers le ressort de pr tension tel qu illustr 4 Enfilez le module de tension en guidant le fi...
Page 58: ...C B D A 1 2 3 58 FR BE Enfilage de la machine Pour remonter le fil de canette Tenir le fil sup rieur avec la main gauche Tourner le volant 1 vers vous sens anti horaire pour abaisser et lever l aigui...
Page 59: ...tionnez le point l aide du bouton de s lection de points R glez la longueur et la largeur de point en fonction du type de tissu Pour obtenir les autres points mettre le bouton de longueur de point sur...
Page 60: ...ts en zigzag augmente au fur et mesure que le r glage du cadran de longueur de point approche du 0 Des points en zigzag soign s sont g n ralement obtenus sur 2 5 ou en dessous 2 Les points en zigzag s...
Page 61: ...uper le fil Afin de renforcer le d but et la fin d une couture abaisser le bouton marche arri re en le poussant ver le bas Faire quelques points en sens inverse L cher le bouton et la machine reprendr...
Page 62: ...extensibles et en voici deux exemples R gler le cadran de s lection de motifs sur Utilis pour ajouter un triple renforcement aux coutures extensibles et r sistant l usure La machine coud deux points...
Page 63: ...un point plus troit est utilis pour les tissus plus l gers et un point plus large est utilis pour les tissus plus lourds Faire un test en premier pour assurer que les r glages de la machine conviennen...
Page 64: ...tonni re et le pousser doucement vers l arri re C 6 Tout en tenant l g rement le fil du haut mettre la machine en marche 7 La couture de boutonni re se fait dans l ordre D 8 Arr ter la machine lorsque...
Page 65: ...entre proprement dans les trous gauches et droits du bouton R gler la largeur de point selon le besoin suivant la distance entre les trous du bouton Coudre lentement le bouton avec environ 10 points R...
Page 66: ...quilting g dans la rainure comme illustr R gler selon le besoin pour les ourlets plis quilting etc 4 Eteindre l interrupteur sur O lorsque vous effectuez n importe laquelle des op rations ci dessus P...
Page 67: ...la qualit du tissu Tissus l gers cotons l gers voile serge soie mousseline Qiana tissu interlock tricots de coton tricots jerseys cr pes polyester tiss tissus pour chemises et blouses File de coton l...
Page 68: ...lacer l aiguille r guli rement plus particuli rement si elle indique des signes d usure et cause des problem s Ins rer l aiguille tel qu indiqu ci contre A B Le c t plat de la tige doit tre face l arr...
Page 69: ...e sur le crochet ou la barre d aiguille 3 De l huile de qualit inf rieure a t utilis e 4 L aiguille est endommag e Du fil est coinc dans le crochet 1 R enfiler la machine 2 R duire la tension valeur...
Page 70: ...es dommages dus une manipulation non conforme au non respect des instructions du mode d emploi ou une intervention par une personne non autoris e ainsi que les pi ces d usure par ex ampoule La dur e d...
Page 71: ...All manuals and user guides at all guides com a l l g u i d e s c o m...
Page 72: ...onen Last Information Update 03 2014 Ident No 1070s032014 DE GB FR DE GB FR PFAFF is a registered trademark of KSIN Luxembourg II S r l The trademark is used under license by VSM Group AB 2014 KSIN Lu...