


Part No. 81-9059-0668-0 Rev. B
Set-up, configuration and monitoring functions of Vidblox SL-3G TX module are
performed over a facility network through GUI menu screens of PESA’s Cattrax
network controller application installed on a host PC running Microsoft Windows
®
2000, XP, Vista or Windows 7 operating system; or on a single module through a USB
connection using Cattrax Cub controller application
USB driver file must be installed on host PC in order for Cattrax Cub to communicate
with PESA equipment over USB port
Cattrax and Cattrax Cub automatically search for PESA equipment through a process
called “discovery”
Using Cattrax Cub, only one module may be connected to USB port at a time
Vidblox is shipped from factory with an auto-run CD that loads Cattrax Cub controller
application and USB driver onto a host PC
Host PC Running
Cattrax Cub
with QFX Device Driver
Installed
POWER
SUPPLY
Start the Cattrax Cub software control application
Cattrax will discover and display the ID of the active Vidblox module
Double click the entry for the active module (shown in bold letters) you wish to control
and proceed to the
Configuration Screens
portion of this guide
C
ONNECT
V
IDBLOX
M
ODULE TO
H
OST
PC V
IA
USB P
ORT
:
If it is not already started from the previous step, start Cattrax (for network control)
or Cattrax Cub (for USB control) by clicking desktop icon, or navigating through
Start Menu of the Windows
®
operating system to Cattrax or Cattrax Cub program
folder and clicking on
Cattrax.exe
file
Double click the ID of the active (bold letters) Vidblox module you wish to control
Vidblox Information Menu screen similar to that shown below is displayed on PC
monitor
C
ONTROLS
M
ENU
Input Selection
Video Input Type:
-
Auto – Auto is default selection. Vidblox automatically determines format of
incoming video as digital or analog
-
DVI – Manually selects incoming video as a digital DVI source
-
Analog – Manually selects incoming video as an analog source
Analog I/P Type:
-
Auto - Auto is the default selection. Vidblox automatically determines type of
incoming analog video
-
VGA - Manually identifies incoming analog video as a VGA (RGBHV) source
-
SOG - Manually identifies incoming video as a component analog “sync on green”
signal
-
RGBS - Manually identifies incoming video as a RGB component analog signal with
a separate composite sync signal
Input Color:
-
RGB – Identifies incoming video as a component analog signal using RGB color
space
-
YPbPr – Indentifies incoming video as a component analog signal using YPbPr
color space
Tx Output Control
Aspect Ratio:
-
Minimal – Minimal is default selection - Vidblox attempts to process incoming
images without scaling and will only scale images that do not fit into selected
transport stream
-
Scale-to-Fit – Scales image to just fit within selected SMPTE transport stream while
maintaining aspect ratio of original image
-
Full Screen – Scales input image both horizontally and vertically to completely fill
output transport format – this setting can alter aspect ratio of input signal
SMPTE Format:
-
1080p – Default selection: selects format of SDI transport stream at 1080p
-
1080i – Selects format of SDI transport stream at 1080i
-
720p – Selects format of SDI transport stream at 720p
Field Rate:
-
50Hz – Selects field rate of SDI transport stream at 50Hz
-
59.94Hz – Selects field rate of SDI transport stream at 59.94Hz
-
60Hz – Default selection: selects field rate of SDI transport stream at 60Hz
S
TATUS
O
VERVIEW
D
ISPLAY
Top portion of every menu screen always displays Status Overview data
Module status data updated in real-time:
-
Input Resolution
– Displays resolution of computer graphics video signal entering
Video Input connector
-
Input Type
– Displays format of input signal
-
Test Mode
– Identifies when user-selectable test pattern signal is enabled or
disabled
-
Audio Source
– Displays embedded audio source as input signal, 1 kHz test tone
or audio muted
I
NFORMATION
M
ENU
Model and Serial Number
– Model identifier and serial number of module
MAC Address
– MAC address of module
Type
– Indentifies type of module: TX or RX
SW Boot and SW Main
– Revision levels of boot code and main program
firmware
FPGA Ver
– Indicates version number of code programmed into FPGA device
Alias
– Enter any alias name you wish to assign to module
User Text Fields
– Use Text Field #1 and #2 to enter information concerning
module
5
Step
S
YSTEM
S
ET
-U
P AND
C
ONFIGURATION
(C
ONT
.)
5
Step
S
YSTEM
S
ET
-U
P AND
C
ONFIGURATION
(C
ONT
.)
Quick-Start Guide
SL-3G TX M
ODULE
Communicating with Vidblox over a network:
Locate Cattrax (NOT Cattrax Cub) software CD included with module and place in
drive of host PC
If installation program does not automatically start, navigate to directory of install CD
and double-click Setup.exe
Follow screen prompts to install Cattrax
Ensure that host PC is actively communicating over the facility network
Ensure that an Ethernet cable is attached to the Vidblox network connector
Apply power to Vidblox module by connecting external power supply to module and
to a source of primary power, or connect power cable jumper to Extender Frame
power distribution module
Vidblox supports the DHCP protocol and should automatically receive a valid IP
address from the facility DHCP serv
er, if one is present on the network – if no DHCP
server available, manually enter and select network addressing paramet
ers – see
Chapter 4 of User Manual
Start the Cattrax software control application
If PESA equipment you wish to control resides on multiple subnets, ensure all
required subnets are active – see Chapter 4 of User Manual
Cattrax will discover and display in bold letters the ID of all active Vidblox modules
on the network
Double click the entry for the module you wish to control and proceed to the
SL-3G
TX Configuration Screens
portion of this guide
Communicating with a single Vidblox module through USB:
Locate Cattrax Cub (NOT Cattrax) software CD included with module and place in
drive of host PC
If installation program does not automatically start, navigate to directory of install CD
and double-click Setup.exe
Follow screen prompts to install Cattrax
When Cattrax Cub has installed, prompt to install USB driver is displayed
Click “OK” to install the driver
If USB driver is not present on host PC, Cattrax Cub will not communicate via USB
with module
Follow screen prompts to install USB driver
Prompt is displayed when driver installation is complete
Ensure that USB driver is installed on host PC
Apply power to Vidblox module by connecting external power supply to module and
to a source of primary power
SL-3G TX C
ONFIGURATION
S
CREENS
:
SL-3G TX C
ONFIGURATION
S
CREENS
C
ONTINUED ON
N
EXT
P
AGE
5
Step
S
YSTEM
S
ET
-U
P AND
C
ONFIGURATION
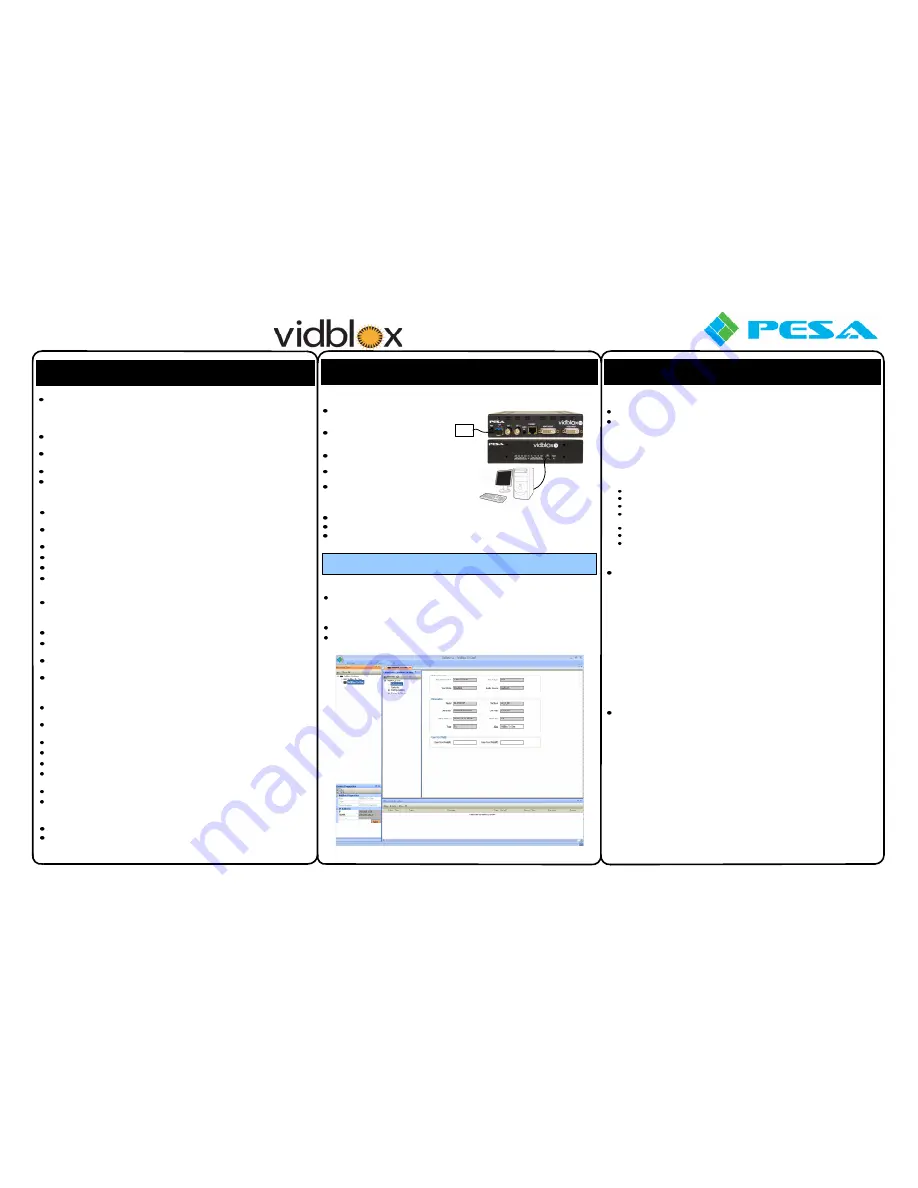
Connect USB cable first to mini-USB
connector on module then to open USB
port on host PC, as shown at right
Allow “Plug and Play” capability of the
Windows
®
operating system to interface
Vidblox hardware to host PC
Follow on-screen prompts to complete
hardware installation
Vidblox module should now be
communicating with host PC
If you encounter any difficulty
establishing communication with host
PC, consult the Vidblox SL-3G TX User
Manual
C
ONNECT
V
IDBLOX
M
ODULE TO
H
OST
PC V
IA
USB P
ORT
(C
ONTINUED
):
For further information, refer to Chapter 4 in the Vidblox SL-3G TX User Manual
I
NFORMATION
M
ENU


