Perkins WK 1300 Series EDi User Handbook Manual Download Page 30

4

26

User’s Handbook, TPD 1352E, issue 4

1300 Series EDi Models WK to WS

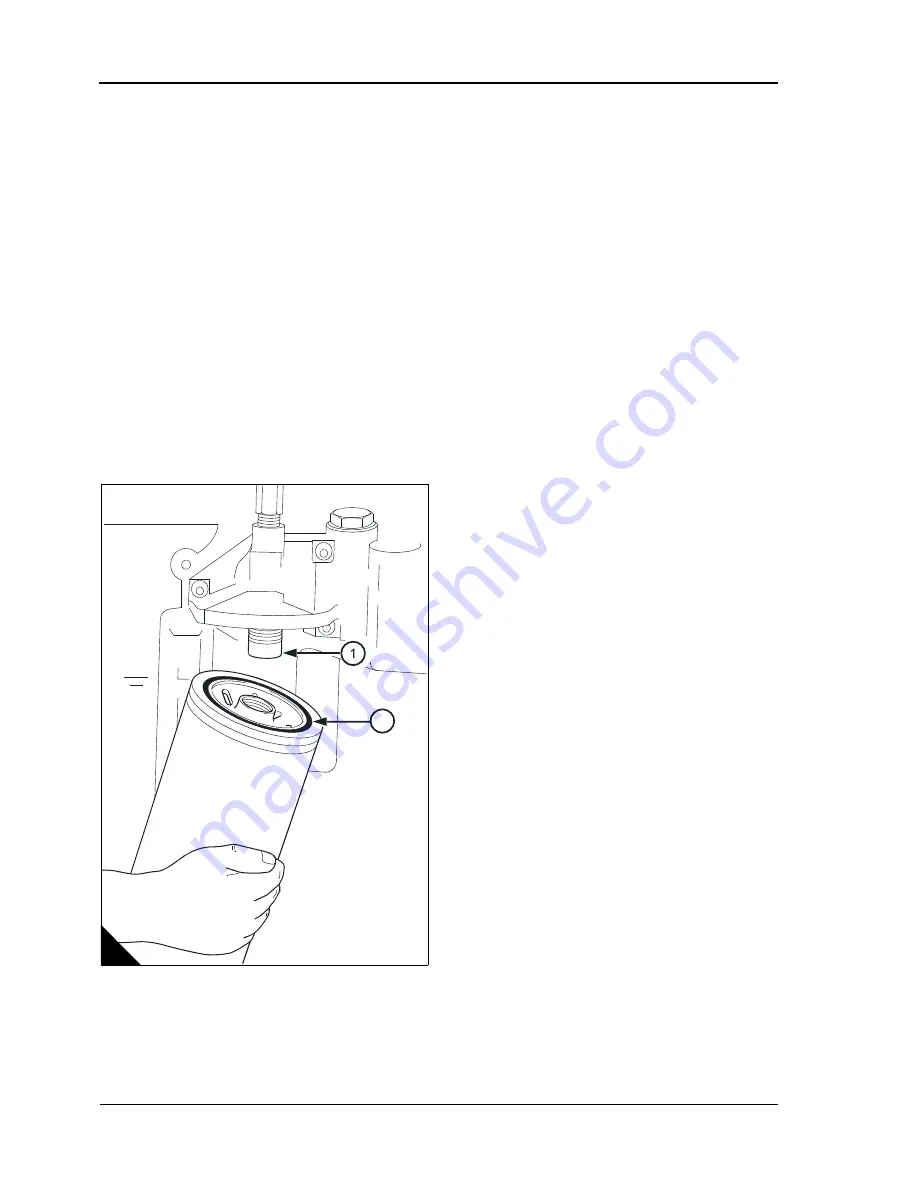
How to renew the canister of the lubricating oil filter

1  

Put a tray under the filter to retain spilt lubricating oil.

2  

Clean thoroughly the outside surfaces of the filter assembly.

3  

Use a strap wrench or similar tool to loosen the filter canister. Remove and discard the canister. Ensure that 

the adaptor (A1) is secure in the filter head.

Warning! Discard the used canister and lubricating oil in a safe place and in accordance with local regulations.

4  

Clean inside the filter head

5  

Lubricate the seal (A2) on top of the canister with clean engine lubricating oil.

6  

Fill the new filter canister with clean engine lubricating oil. Fit the new canister and tighten by hand until the 

seal contacts the filter head. Tighten the canister a further 

1

/

2

 to 

3

/

4

 of a turn by hand only. Do not use a strap 

wrench.

7  

Ensure that there is lubricating oil in the sump.

8  

Turn the start key to the "ON" position and start the engine.

Note: 

The engine will not start and operate until oil pressure is obtained. Oil pressure is indicated when the 

warning light is extinguished or by a reading on the gauge.

When the engine starts check for leakage from the filter. Stop the engine. After 15 minutes  check the oil level 
on the dipstick and, if necessary, put more lubricating oil of an approved grade into the sump.

Caution: Do not fill the sump past the "FULL" mark on the dipstick.

A

W014

Summary of Contents for WK 1300 Series EDi

Page 1: ...TPD1352E Issue 4 November 2011 User s Handbook 1300 Series EDi WK WL WM WN WP WQ WR WS...

Page 2: ...roved Clear E nglish This publication is divided into six chapters 1 General information 2 Engine views 3 Operation instructions 4 Preventive maintenance 5 Engine fluids 6 Fault diagnosis The followin...

Page 3: ...tion 4 Parts and service 5 Training 5 Service literature 5 Engine identification 6 Engine data 8 2 Engine views Introduction 11 Location of engine parts 11 3 Operation instructions How to start the en...

Page 4: ...o remove the drive belt 22 Fuel pre filter 23 How to renew the fuel strainer and the canister of the fuel filter 23 How to eliminate air from the fuel system 24 How to renew the lubricating oil 25 How...

Page 5: ...Perkins approved assembly and quality standards together with the latest technology have been applied to the manufacture of your engine to give you reliable and economic power Note To ensure that you...

Page 6: ...tem while the engine is hot and while the coolant is under pressure because dangerous hot coolant can be discharged z Do not use salt water or any other coolant which can cause corrosion in the closed...

Page 7: ...e because dangerous oil can be discharged z Fit only genuine Perkins parts How to care for your engine This handbook has been written to assist you to maintain and operate your engine correctly To obt...

Page 8: ...Fill the sump to the full mark on the dipstick with new and clean lubricating oil Use a correct preservative fluid instead of the lubricating oil If a preservative fluid is used this must be drained...

Page 9: ...than 180 degrees Visibly check for damage or corrosion to the engine If the engine protection is done correctly according to the above recommendations no corrosion damage will normally occur Perkins a...

Page 10: ...is WP1296N1234567 The components of the engine number are as follows WP Type code letters 1296 Build list number N Built in the USA 1234567 Engine serial number Certain engines built after 4th January...

Page 11: ...1 User s Handbook TPD 1352E issue 4 7 1300 Series EDi Models WK to WS A W002 B PW250 1 1 1 C...

Page 12: ...nd WS 8 71 litres 531 0 in3 Firing order 1 5 3 6 2 4 Valve tip clearances cold Inlet and exhaust 0 64 mm 0 025 in Lubricating oil pressure minimum Idle 137 kPa 20 lbf in2 1 4 kgf cm2 maximum engine sp...

Page 13: ...1 User s Handbook TPD 1352E issue 4 9 1300 Series EDi Models WK to WS...

Page 14: ...This page is intentionally blank...

Page 15: ...arness to the sensor for injection control pressure 3 Sensor for engine oil temperature 4 Camshaft position sensor 5 Sensor for engine oil pressure 6 Crankshaft damper 7 Sump for the engine lubricatin...

Page 16: ...20 Flywheel 21 Flywheel housing 22 Canister for the lubricating oil filter 23 Air inlet connection 24 Front lift bracket 25 Coolant temperature sensor 26 Alternator 27 Tensioner for the drive belt 28...

Page 17: ...ith fuel of the correct specification see Chapter 5 Engine fluids z Check the air filter and its connections z Ensure that all of the electrical connections are tight Notes z For the correct engine fl...

Page 18: ...ck that the lubricating oil pressure exceeds 138 kPa 20 lbs in2 1 4 kgf cm2 within the first 10 seconds see Engine data on page 8 for the correct lubricating oil pressure If a gauge is not fitted chec...

Page 19: ...amount of ether into the engine Caution Release of ether into the cylinders before the starter motor is engaged may cause damage to the pistons and piston rings 5 Release the start key or the start bu...

Page 20: ...ne operator Engine operation at idle speed Do not operate the engine for long periods at idle speed as this could have an adverse affect on the engine performance or damage the engine Running in A gra...

Page 21: ...ch the engine is installed Use the periods which are shortest When the operation of the engine must conform to the local regulations these periods and procedures may need to be adapted to ensure corre...

Page 22: ...for debris z Check and adjust if necessary the antifreeze mixture 2 z Test the level of coolant conditioner and adjust if necessary 2 z Check the condition of the drive belt z Renew the coolant 4 z Re...

Page 23: ...cooler in order to drain the engine Ensure that the drain holes are not restricted 4 Open the tap or remove the drain plug at the bottom of the radiator in order to drain the radiator If the radiator...

Page 24: ...filler cap while the engine is still hot and the system is under pressure because dangerous hot coolant can be discharged 1 Remove the filler cap of the cooling system 2 The cooling system must be fi...

Page 25: ...Valves in the filter head will prevent the loss of coolant when the canister is removed 4 Ensure that the threaded adaptor A2 is secure in the filter head and that the inside of the head is clean 5 Lu...

Page 26: ...he lever to release the tension from the belt A4 and remove the belt The tensioner will return to its original position by spring pressure 3 Remove the lever To tighten the alternator pulley nut 1 Fit...

Page 27: ...mm 1 1 8 in socket spanner to remove the plastic cover A5 from the fuel strainer Remove the strainer A3 and the O ring A4 from the cover 4 Fit a new strainer and a new O ring to the cover and fit the...

Page 28: ...oceed as follows 1 Loosen the vent plug A1 on the top of the fuel filter head 2 Operate the plunger of the fuel priming pump A2 until fuel free from air comes from the filter vent point Tighten the ve...

Page 29: ...nd dipstick assembly from the filler tube 5 Fill the sump to the FULL mark on the dipstick B1 with new and clean lubricating oil of an approved grade see Lubricating oil specification on page 30 6 Fit...

Page 30: ...ne lubricating oil 6 Fill the new filter canister with clean engine lubricating oil Fit the new canister and tighten by hand until the seal contacts the filter head Tighten the canister a further 1 2...

Page 31: ...element must be cleaned or renewed according to the manufacturer s recommendations Restriction indicator The restriction indicator for these engines must work at a pressure difference of 635 mm 25 in...

Page 32: ...crankshaft in the normal direction of rotation until valve 11 A has just opened and valve 12 has not closed fully Check adjust the clearances of valves 1 and 2 4 Set valves 3 and 4 as indicated above...

Page 33: ...weight hydrocarbons can affect the combustion characteristics Low temperature fuels Special winter fuels may be available for engine operation at temperatures below 0 C These fuels have a lower viscos...

Page 34: ...y be affected by the quality of the fuel which is available For further details see Fuel specification on page 29 Always ensure that the correct viscosity grade of lubricating oil is used for the ambi...

Page 35: ...cification at least as good as the requirements of either BS6580 or MOD AL39 The quality of the antifreeze coolant must be checked at least once a year for example at the beginning of the cold period...

Page 36: ...This page is intentionally blank...

Page 37: ...exhaust smoke 11 13 15 17 19 21 22 37 38 39 40 42 43 44 61 63 66 Blue or white exhaust smoke 4 15 21 23 37 38 39 42 43 44 45 52 58 62 66 68 The pressure of the low pressure lubricating oil system is t...

Page 38: ...ipe 20 Engine temperature is too high 21 Engine temperature is too low 22 Incorrect valve tip clearances 23 Too much oil or oil of the wrong type is used in wet type air cleaner if one is fitted 24 No...

Page 39: ...Fault in thermostat or thermostat is of an incorrect type 56 Restriction in coolant passages 57 Fault in water pump 58 Valve stem seal is damaged 59 Restriction in sump strainer 60 Valve spring is br...

Page 40: ...position 65 Warning Diesel engine exhaust and some of its constituents are known to the State of California to cause cancer birth defects and other reproductive harm Battery posts terminals and relate...

Reviews: