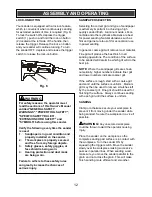
Performax 241-0971 Owner'S Manual Download Page 12


12 


LOCK-ON BUTTON 

 
Your sander is equipped with a lock-on feature, 
which is convenient when continuously sanding 
for extended periods of time is required (Fig. 6). 
To lock the switch ON, depress the trigger 
switch (1), push in and hold the lock-on button 
(2) located at the left side of the handle, then 
release the trigger. Release the lock-on button 
and your sander will continue running. To turn 
the sander OFF, depress and release the trigger 
switch to release the lock-on button. 
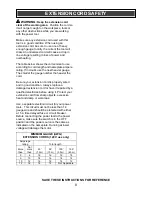


SANDPAPER SELECTION 

 
Selecting the correct grit and type of sandpaper 
is extremely important in achieving a high 
quality sanded finish.  Aluminum oxide, silicon 
carbide and other synthetic abrasives are best 
for power sanding. Natural abrasives such as 
flint and garnet are too soft for economical use 
in power sanding. 
 
In general, coarse grit will remove most material. 
Fine grit will produce the best finish in all 
sanding operations. The condition of the surface 
to be sanded will determine which grit will do the 
best job. 
 

NOTE:

 Where the sandpaper grits are shown 

numerically, higher numbers indicate finer grit 
and lower numbers indicate coarser grit. 
 
If the surface is rough, start with a coarse grit 
and sand until the surface is uniform.  Medium 
grit may then be used to remove scratches left 
by the coarser grit. Fine grit should be used for 
finishing the surface.  Always continue sanding 
with each grit until the surface is uniform. 
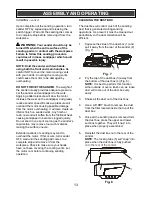
 

SANDING 

 
Clamp or otherwise secure your workpiece to 
prevent it from moving under the sander while 
being sanded. Secure the workpiece in a vice if 
possible.        


WARNING:

 Any unsecured workpiece 

could be thrown toward the operator causing 
injury.  
 
Place the sander on the workpiece so the 
complete sanding pad surface is in contact with 
the workpiece. Turn the sander ON by 
squeezing the trigger switch. Move the sander 
slowly over the workpiece making successive 
passes in parallel lines. When sanding wood, 
make sure you move the sander parallel to the 
grain and not across the grain. This will make 
finish sanding more efficient and smoother. 

ASSEMBLY AND OPERATING 


For safety reasons, the operator must 
read the sections of this Owner

’s Manual 

entitled "GENERAL SAFETY 
WARNINGS", "POWER TOOL SAFETY", 
"SPECIFIC SAFETY RULES", 
"EXTENSION CORD SAFETY" and 
"SYMBOLS" before using this sander. 
 
Verify the following every time the sander 
is used: 
1. 

Sandpaper is in good condition and 
properly installed on the sander. 

2. 

The workpiece is properly secured 
and free from any foreign objects. 

3. 

Safety glasses, safety goggles, or 
face shield is being worn. 

4. 

Hearing protection and dust mask 
are being worn. 

 
Failure to adhere to these safety rules 
can greatly increase the chances of 
serious injury. 


WARNING 

Fig. 6 


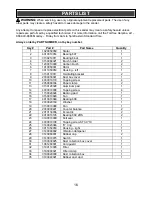
Summary of Contents for 241-0971

Page 1: ...Amp Speed 12 000 OPM no load Sanding pad size 3 1 2 X 7 3 8 90 X 187 mm Replacement sandpaper size 1 3 sheet 3 1 2 X 9 90 X 229 mm Weight 3 lb 10 oz 1 6 kg Need Assistance Call us on our toll free cus...

Page 2: ...y 5 6 Power tool use and care 6 Service 6 Specific safety rules 7 Extension cord safety 8 Symbols 9 Know your sander 10 Available accessories 10 Assembly and operating 11 13 Installing a sandpaper 11...

Page 3: ...t eyewear can cause serious injury if broken during the operation of a power tool SAVE THESE INSTRUCTIONS FOR REFERENCE GENERAL SAFETY WARNINGS WARNING Before using this tool or any of its accessories...

Page 4: ...NMENT WARNING Dust that is created by power sanding sawing grinding drilling and other construction activities may contain chemicals that are known to cause cancer birth defects or other genetic abnor...

Page 5: ...lectric shock When operating a power tool outdoors use an extension cord suitable for outdoor use Use of a cord suitable for outdoor use reduces the risk of electric shock If operating a power tool in...

Page 6: ...familiar with the power tool or these instructions to operate the power tool Power tools are dangerous in the hands of untrained users Maintain power tools Check for misalignment or binding of moving...

Page 7: ...NING Always use hearing protection when sanding particularly during extended periods of operation WARNING Always unplug the tool from the power source before changing the sanding disc or buffing pad a...

Page 8: ...properly wired and in good condition Always replace a damaged extension cord or have it repaired by a qualified electrician before using it Protect your extension cord from sharp objects excessive hea...

Page 9: ...ead all safety warnings and instructions Direct current No load speed Alternating or direct current Class II construction Splash proof construction Watertight construction Protective grounding at grou...

Page 10: ...dpaper punch plate Sandpaper 1 ea 60 80 120 grit Dust box Main handle Front handle Cooling vents ON OFF trigger switch Lock on button Cooling vents Backing pad Front sandpaper clamp Sandpaper clamp ar...

Page 11: ...over the backing pad 6 and insert it into the open rear sandpaper clamp 7 Fig 3 NOTE Make sure the sandpaper is pulled tightly over the backing pad for proper sanding operation 4 Lift the sandpaper c...

Page 12: ...remove scratches left by the coarser grit Fine grit should be used for finishing the surface Always continue sanding with each grit until the surface is uniform SANDING Clamp or otherwise secure your...

Page 13: ...long as the sander s rapid action may remove too much material making the surface uneven Extended periods of sanding may tend to overheat the motor If this occurs turn sander OFF wait until the sandi...

Page 14: ...elerated wear and possible premature failure when they are used on fiberglass boats and sports cars wallboard spackling compounds or plaster The chips and grindings from these materials are highly abr...

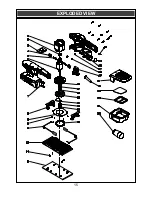
Page 15: ...15 EXPLODED VIEW...

Page 16: ...50061 Rotor 1 7 3011050053 Housing left 1 8 3150110017 Oscillating bracket 2 9 2030030041 Dust box cover 1 10 4030010179 Tapping screw 4 11 2050080184 Paper clamp 2 13 3150120028 Aluminum pad 1 14 403...

Page 17: ...1 excludes expendable parts including but not limited to blades brushes belts bits light bulbs and or batteries 2 shall be void if this tool is used for commercial and or rental purposes and 3 does n...

Reviews: