background image

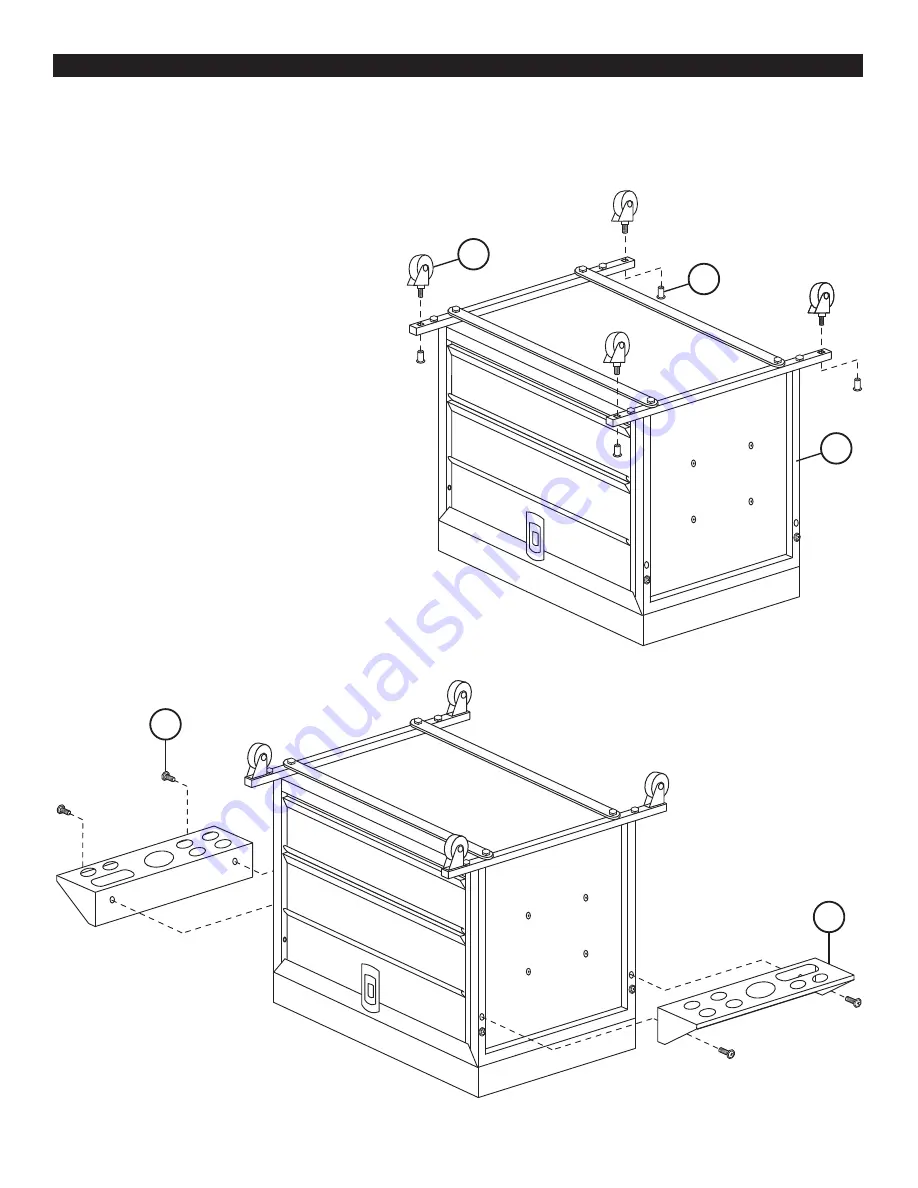
Step 1: Position the Tool Chest Frame (6) 

so the bottom is accessible and insert two 

2-1/2 in. Casters (9) through the bottom of 

the square holes at the ends of the Tool 

Chest Frame (6). 
Step 2: Place one Caster Nut M8 (8) 

through top of hole, thread on to the caster 

stem and hand tighten. Ensure the square 

portion of the caster stem is seated into the 

square opening and use a 6mm hex key to 

tighten each Caster Nut M8 (8) firmly.
Step 3: Rotate the Tool Chest so the holes 

for the other 2 casters are accessible and 

repeat steps 1 & 2.
Step 4: On one side of the Tool Chest 

position Tool Shelf (5) over the holes as 

shown and insert two M6*25 bolts (4) and 

tighten with a #2 Phillips screwdriver.
Step 5: Repeat for the 2nd Side Tool Tray 

(5) on the other side.

ASSEMBLY

3

Before assembly of this product, make sure all hardware and components are present. Compare parts with the parts 

list and diagram. If any part is missing or damaged, do not attempt to assemble, install or operate the product.

6

9

8

5

4

Summary of Contents for W85024

Page 1: ... usage The tool shall be inspected per the operating instructions Protect yourself and others by observing all safety information Failure to comply with instructions could result in personal injury and or property damage If you encounter any problems or difficulties please contact our customer service department at 1 800 426 1262 between 6 30 a m and 4 30 p m Pacific time ROLLING SEAT TOOL CHEST O...

Page 2: ... in Drawer Dimensions 12 1 2 x 7 3 4 x 2 1 4 in Maximum Drawer Capacity 20 Lbs PARTS LIST No Description Qty 1 Stool Pad 1 2 Bolt M6 x 12 4 3 Tool Chest 1 4 Bolt M6 x 25 4 5 Side Tool Tray 2 6 Tool Chest Frame 2 7 Bolt M6 x 30 4 No Description Qty 8 Caster Nut M8 4 9 2 1 2 in Caster 4 10 Nut M8 4 11 Bolt M8 x 40 4 12 Support Bar 2 13 Plastic End Cap 4 This product is designed to support a maximum ...

Page 3: ...en each Caster Nut M8 8 firmly Step 3 Rotate the Tool Chest so the holes for the other 2 casters are accessible and repeat steps 1 2 Step 4 On one side of the Tool Chest position Tool Shelf 5 over the holes as shown and insert two M6 25 bolts 4 and tighten with a 2 Phillips screwdriver Step 5 Repeat for the 2nd Side Tool Tray 5 on the other side ASSEMBLY 3 Before assembly of this product make sure...

Page 4: ...se or any inability to use the product The sole and exclusive remedy for a defective product or part shall be the repair or replacement thereof as provided above The laws on limitation of remedies or on consequential incidental or special damages may vary from state to state so the above limitations may not apply in all cases Copyright 2018 WILMAR CORPORATION P O Box 88259 Tukwila WA 98138 Little ...

Reviews: