

7
8
INTENDED USE
The tool is designed for screwing and unscrewing as well as for drilling in wood, metal,
ceramic and plastic materials. This tool should not be used for purposes other than those
described above.
BEFORE USE
Before turning on the cordless drill, read the following notes:
1. Charge the battery with the provided charger. A fully discharged battery recharges in about
one hour.
2. Use only appropriate bits and tip screwdrivers.
3. When screwing and drilling into walls, check for hidden power, gas or water lines.
CHARGING THE BATTERY
1. Remove the battery from the tool by depressing both battery lock buttons and pulling down.
2. Check if the power voltage on the rating plate corresponds to the voltage available.
3. Plug charger's power lead into top of battery. The red LED indicates that the battery is
charging. Once charged, the red LED turns off and the green LED stays on continuously.
5. During charging, it is normal for the battery to warm slightly. If you can not charge the
battery, check:
- That the socket has voltage.
- That the charger contacts are reliable.
TORQUE SETTINGS
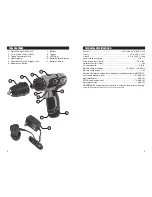
The tool has a mechanical torque adjustment ring (3) with 18 + 1 different settings.
Setting 1 is the lowest torque setting and 18 the highest. A clicking will be heard and felt when
the torque setting has been reached. Use the right setting for the application. This will help
prevent overtightening and stripping of fasteners.
The last torque setting ( ) bypasses the mechanical ratchet and applies maximum torque.
Use this setting for using drill bits or when maximum torque is required.
ATTENTION! Do not adjust the torque adjustment ring until the tool comes to a complete stop.
DRILLING
To drill, turn the torque adjustment ring to the "drill" setting ( ). While on the "drill" setting the
safety clutch is deactivated so when drilling, the maximum torque is available.
SWITCHING THE DIRECTION OF ROTATION
The directional switch (5) above the trigger allows you to choose the rotational direction of the tool
or set the trigger lock. You can select clockwise (forward) rotation, counter clockwise (reverse) or
trigger lock. To prevent damaging the tool, do not change the direction of rotation while the tool is
running. When the slide switch is in the center position (trigger lock), the trigger is locked and the
tool is inoperable.
TRIGGER
The trigger (8) allows you to adjust the speed continuously, depending on the intensity
with which the trigger is pulled.
SWITCHING THE SPEED
Note: Only change the gear selector (4) when the driver is not in operation.
In the first gear (gear selector position 1) a speed of 400 min-1 and maximum torque is
achieved. This setting is suitable for all fastening applications.
In the second gear (gear selector position 2) a speed of about 1400 min-1 is achieved to carry
out drilling operations.
OPERATION
DISPLAY BATTERY STATUS
Three color LEDs (9) indicate the status whenever the ON / OFF button is pressed.
- All LEDs are lighted: the battery is fully charged.
- Yellow and red LEDs lighted: the battery has charge.
- Red LED lighted: the battery is empty and needs to be recharged.
LED DISPLAY
The LED light (10) can illuminate the screwing and unscrewing area under unfavorable lighting
conditions. The LED light illuminates automatically, any time the on / off trigger is pulled.
TOOL CHANGE
The cordless screwdriver is equipped with a quick coupling drill chuck with automatic lock.
To install removable chuck:
· Verify the locking ring is depressed to the unlock position (see arrow indicators on the
locking ring).
· Insert the drill chuck over the ¼ in. quick connect chuck and align so it seats all the way down.
· Push locking ring down into the "lock" position. You should hear / feel a click and you
should not be able to remove the drill chuck.
· To remove, follow the previous steps in reverse.
OPERATION