background image

5

 TROUBLESHOOTING

WARNING - Disconnect spray gun from air source before making adjustments

NOTE:

Problems listed above with more than one solution may have a combination of causes. Please be sure that all solutions listed for each problem have been checked to eliminate possibility of further trouble. 
Sometimes solutions may need to be repeated for best results.

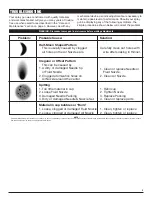
Half-Moon Shaped Pattern
  This is usually caused by clogged 

air holes on the Air Nozzle ears. 

1. Clean, tighten or replace
2. Clean, tighten or replace

Problem:

Probable Cause:

Solution:

Your spray gun was constructed with quality materials 
and workmanship and will give you many years of trouble 
free use when cared for as described in the "Care and 
Maintenance" section on page 3. However, as with any 

mechanical device, periodic adjustments are necessary to 
maintain a peak level of performance. Should your spray 
gun be displaying any of the following symptoms, the 
simple procedures shown below will correct the problem.

Irregular or Offset Pattern
  This can be caused by
1. A dirty or damaged Needle tip 

or Fluid Nozzle

2. Clogged atomization holes on 

Air Nozzle around the center

Spitting
1. Too little material in cup
2. Loose Fluid Nozzle
3. Damaged Needle Packing
4. Dirty or damaged Needle & Nozzle Set.

Carefully clean out holes with 

wire after soaking in thinner.

1. Clean or replace Needle or 

Fluid Nozzle.

2. Clean Air Nozzle

1. Refill cup
2. Tighten Nozzle
3. Replace Packing
4. Clean or replace parts

Material in cup bubbles or “Boils”
1. Loose, clogged or damaged Fluid Nozzle
2. Loose, clogged or damaged Air Nozzle

Summary of Contents for M701

Page 1: ...will not be reflected in this manual Although we strive to maintain complete and accurate information it is possible in some instances that the product may differ slightly from printed specifications Illustrations are intended for reference only Actual merchandise may vary Wilmar is not responsible for typographical errors Please read these instructions carefully and retain them for future use ...

Page 2: ...ry strain on the air inlet threads possibly causing them to wear out prematurely Instead install them on a short length of air hose attached to the tool 11 Follow manufacturers instructions and safety information to ensure safe handling and proper use of paints lacquers Avg Air Consumption CFM 2 0 Fluid Inlet NPS 3 8 in Air Inlet NPS 1 4 in Hose Size ID 3 8 in thinners base coats etc Do not use la...

Page 3: ...angle from horizontal to vertical by turning the Air Nozzle Pattern is perpendicular to ears on nozzle That is when the ears are horizontal the spray pattern will be vertical and when the ears are vertical the spray pattern will be horizontal Trigger Fluid Control Knob Air Inlet CARE MAINTENANCE Warning Clean gun before and after each use To protect the precision machined internal parts and fit ti...

Page 4: ...LIST 1 Screw 1 2 Spring 1 3 Combination Needle 1 4 Trigger 1 5 Trigger Pin 1 6 Circlip 1 7 Gun Body 1 8 Screw 1 9 Gasket 1 10 Washer 1 11 Fluid Nozzle 1 12 Air Nozzle 2 13 Positioning Ring 1 14 Paint Tube 1 15 Washer 1 16 Paint Cup 1 Description Qty Description Qty 12 2 1 5 4 6 8 9 7 10 13 11 14 16 15 3 ...

Page 5: ...scribed in the Care and Maintenance section on page 3 However as with any mechanical device periodic adjustments are necessary to maintain a peak level of performance Should your spray gun be displaying any of the following symptoms the simple procedures shown below will correct the problem Irregular or Offset Pattern This can be caused by 1 A dirty or damaged Needle tip or Fluid Nozzle 2 Clogged ...

Page 6: ...rmance or reliability nor shall these warranties apply to any product or part which has been subject to misuse neglect accident or wear and tear incident to normal use and service PERFORMANCE TOOL does not authorize any other person to make any warranty or to assume any liability in connection with its products Except for warranties of title and the limited express warranties set forth above PERFO...

Reviews: