background image

OXY5336A 3.5" SBC User’s Manual

www.perfectron.com


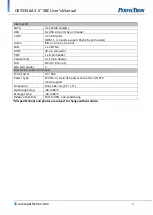
Internal I/O 

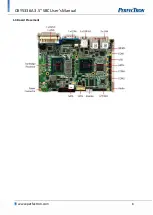
SATA 

2 x SATAIII (6 Gb/s) 

USB 

8 x USB 2.0 ports by pin header 

COM  

3


x COM ports 

(COM 1, 3, 4 ports support RS232 by pin header) 

Audio 

Mic-in, Line-in, Line-out 

FAN 

1 x CPU fan 

LVDS 

30-pin connector 

PS/2 

1 x 8-pin header 

Parallel Port 

2 x 13-pin header 

DIO 

8-bit (4 in/4 out) 

SIM card holder 

Mechanical and Environment 

Form Factor 

3.5" SBC 

Power Type 

12V DC-in, 4-pin ATX power connector, AT/ATX  

mode support 

Dimension 

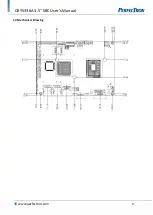
146 x 102 mm (5.7" x 4") 

Operating Temp. 

-40 to 85°C 

Storage Temp 

-40 to 85°C 

Relative Humidity 

10% to 90%, non-condensing 

*All specifications and photos are subject to change without notice.


7

Summary of Contents for OXY5336A

Page 1: ...Version 1 0 Revision Date June 05 2013 www perfectron com OXY5336A 3 5 SBC with Intel Ivy Bridge HM76 User s Manual User s Manual ...

Page 2: ...mpany If the power supply is broken do not try to fix it by yourself Contact a qualified service technician or your local distributor Operation safety Before installing the motherboard and adding devices on it carefully read all the manuals that came with the package Before using the product make sure all cables are correctly connected and the power cables are not damaged If you detect any damage ...

Page 3: ... Version 1 0 05 06 2013 Initial release Packing list OXY5336A 3 5 SBC CD Driver user s manual Optional Accessories Cable kit Thermal kit Active heatsink up to 60 C Copper heat spreader Passive heatsink up to 75 C If any of the above items is damaged or missing please contact your local distributor 2 ...

Page 4: ...ltage selection 11 JP8 LCD Panel voltage selection 11 JP5 COM2 Ring 5V 12V selection 11 CN37 Front Panel connector 12 CN26 LPT port connector 12 CN16 SATA Power Connector 12 CN17 Audio connector 13 CN21 CN22 CN23 COM port RS232 connector 13 CN28 CN29 CN30 CN31 USB connector 13 CN38 PS2 keyboard and mouse connector 13 CN7 LVDS connector 14 CN25 Fan connector 14 CN8 Backlight connector 14 CN3 Batter...

Page 5: ...figuration 29 3 4 5 2 1 Parallel Port Configuration 29 3 4 5 3 GPIO Configuration 30 3 4 5 3 1 GPIO Configuration 31 3 4 6 Serial Port Console Redirection 31 3 4 6 1 Console Redirection 32 3 4 6 1 1 Console Redirection settings 33 3 4 7 Intel R 82579LM Gigabit Network Connection 34 3 4 7 1 Port Configuration Menu 34 3 4 7 1 1 NIC configuration 35 3 4 8 Intel R 82574L Gigabit Network Connection 36 ...

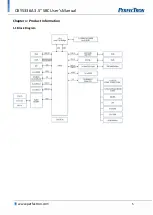
Page 6: ...OXY5336A 3 5 SBC User s Manual www perfectron com Chapter 1 Product Information 1 1 Block Diagram 5 ...

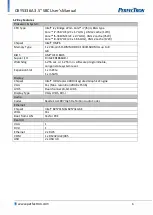
Page 7: ...up to 8 GB BIOS AMI UEFI BIOS Supoer I O Fintek F81866AD I Watchdog 1 255 sec or 1 255 min software programmable can generate system reset Expansion Slot 1 x mPCIe 1 x mSATA Display Chipset Intel HD Grapics 4000 Integrated Graphics Engine VGA Yes Max resolution 2048 x 1536 LVDS Dual channel 24 bit LVDS Display Type VGA LVDS DVI I Audio Codec Realtek ALC887 High Definition Audio Codec Ethernet Chip...

Page 8: ...PU fan LVDS 30 pin connector PS 2 1 x 8 pin header Parallel Port 2 x 13 pin header DIO 8 bit 4 in 4 out SIM card holder 1 Mechanical and Environment Form Factor 3 5 SBC Power Type 12V DC in 4 pin ATX power connector AT ATX mode support Dimension 146 x 102 mm 5 7 x 4 Operating Temp 40 to 85 C Storage Temp 40 to 85 C Relative Humidity 10 to 90 non condensing All specifications and photos are subject ...

Page 9: ...OXY5336A 3 5 SBC User s Manual www perfectron com 1 3 Board Placement 8 ...

Page 10: ...OXY5336A 3 5 SBC User s Manual www perfectron com 1 4 Mechanical Drawing 9 ...

Page 11: ...Front Panel connector CN26 LPT port connector CN16 SATA Power Connector CN17 Audio connector CN21 CN22 CN23 COM port RS232 connector CN28 CN29 CN30 CN31 USB connector CN38 PS2 keyboard and mouse connector CN7 LVDS connector CN25 Fan connector CN8 Backlight connector CN3 Battery connector CN24 RS232 422 485 COM port connector CN5 DVI VGA CN14 CN15 SATA connector CN32 Dual USB3 0 connector CN4 CN6 L...

Page 12: ...Mode OFF ATX Mode JP7 LCD Backlight voltage selection Jumper Function description Setting 1 2 5V 2 3 12V Default setting 2 3 JP8 LCD Panel voltage selection Jumper Function description Setting 1 2 5V 2 3 3 3V Default setting 2 3 JP5 COM2 Ring 5V 12V selection Jumper Function description Setting 1 2 12V 3 4 RI2 _SEL 5 6 5V Default setting 3 4 11 ...

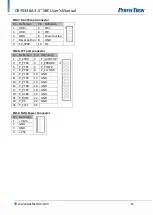
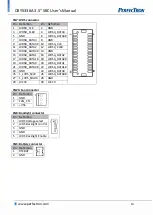
Page 13: ...8 GND 9 FP_SPKR 10 NC CN26 LPT port connector Pin Definition Pin Definition 1 P_STB 2 P_AUTOFD 3 P_PTD0 4 P_ERROR 5 P_PTD1 6 P_PINIT 7 P_PTD2 8 P_SLCTIN 9 P_PTD3 10 GND 11 P_PTD4 12 GND 13 P_PTD5 14 GND 15 P_PTD6 16 GND 17 P_PTD7 18 GND 19 P_ACK 20 GND 21 P_BUSY 22 GND 23 P_PE 24 GND 25 P_SLCT 26 CN16 SATA Power Connector Pin Definition 1 V12S 2 GND 3 GND 4 V5S 12 ...

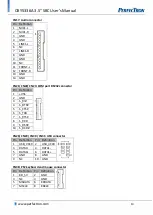
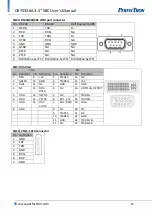
Page 14: ...1 CN22 CN23 COM port RS232 connector Pin Definition 1 V5S 2 GND 3 S_RI 4 S_DTR 5 S_CTS 6 S_TXD 7 S_RTS 8 S_RXD 9 S_DSR 10 S_DCD CN28 CN29 CN30 CN31 USB connector Pin Definition Pin Definition 1 USB_VCC0 2 USB_VCC0 3 DATA0 4 DATA1 5 DATA0 6 DATA1 7 GND 8 GND 9 NC 10 GND CN38 PS2 keyboard and mouse connector Pin Definition Pin Definition 1 KB_5V 2 GND 3 NC 4 GND 5 MSDATA 6 KBDATA 7 MSCLK 8 KBCLK 13 ...

Page 15: ... 14 GND 15 LVDSB_DATA1 16 LVDSA_DATA2 17 LVDSB_DATA1 18 LVDSA_DATA2 19 LVDSB_DATA0 20 LVDSA_DATA1 21 LVDSB_DATA0 22 LVDSA_DATA1 23 GND 24 LVDSA_DATA0 25 1_LVDS_SCLK 26 LVDSA_DATA0 27 1_LVDS_SDATA 28 GND 29 LVCC0 30 LVCC0 CN25 Fan connector Pin Definition 1 GND 2 FAN_CTL 3 V5S CN8 Backlight connector Pin Definition 1 LVDS Voltage select 2 LVDS Backlight control 3 GND 4 GND 5 LVDS Backlight Enable C...

Page 16: ...by JP5 CN5 DVI VGA VGA DVI Pin Definition Pin Definition Pin Definition Pin Definition 1 RED 9 5V 1 TMDS2 13 NC 2 GREEN 10 GND 2 TMDS2 14 5V 3 BLUE 11 NC 3 GND 15 GND 4 NC 12 DDC DATA 4 NC 16 HOTPLUG_DETECT 5 GND 13 HSYNC 5 NC 17 TMDS0 6 GND 14 VSYNC 6 DDC_CLK 18 TMDS0 7 GND 15 DDC CLOCK 7 DDC_DATA 19 GND 8 GND 8 NC 20 NC 9 TMDS1 21 NC 10 TMDS1 22 GND 11 GND 23 TMDSCLK 12 NC 24 TMDSCLK CN14 CN15 S...

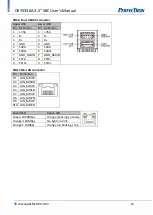
Page 17: ... GND 5 SSRX 5 SSRX 6 SSRX 6 SSRX 7 GND_DRAIN 7 GND_DRAIN 8 SSTX 8 SSTX 9 SSTX 9 SSTX CN4 CN6 LAN connector Pin Definition R1 LAN_MDI0P R2 LAN_MDI0N R3 LAN_MDI1P R4 LAN_MDI1N R7 LAN_MDI2P R8 LAN_MDI2N R9 LAN_MDI3P R10 LAN_MDI3N Speed LED Active LED Green 1000Mbps Orange blinking activity Orange 100Mbps No light not link No Light 10Mbps Orange no blinking link 16 ...

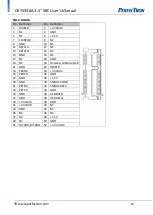
Page 18: ..._N 12 UIM_CLK 13 PCIE_MINI1_100M_P 14 UIM_RESET 15 GND 16 UIM_VPP 17 NC 18 GND 19 NC 20 CARD_EN 21 GND 22 MINI_RST 23 RXN 24 3 3VAUX 25 RXP 26 GND 27 GND 28 1 5V 29 GND 30 SCLK0 31 TXN 32 SDATA0 33 TXP 34 GND 35 GND 36 USB_D 37 GND 38 USB_D 39 3 3V 40 GND 41 3 3V 42 NC 43 GND 44 NC 45 NC 46 NC 47 NC 48 1 5V 49 NC 50 GND 51 NC 52 3 3V CN19 12V DC connector Pin Signal Name 1 12V 2 GND 17 ...

Page 19: ...LK 12 NC 13 REFCLK 14 NC 15 GND 16 NC 17 NC 18 GND 19 NC 20 Wireless LAN Disable 21 GND 22 RESET 23 PERN0 24 3 3VAUX 25 PERP0 26 GND 27 GND 28 1 5V 29 GND 30 SMBUS CLOCK 31 PETN0 32 SMBUS DATA 33 PETP0 34 GND 35 GND 36 USB DATA 37 GND 38 USB DATA 39 3 3VAUX 40 GND 41 3 3VAUX 42 NC 43 GND 44 NC 45 NC 46 NC 47 NC 48 1 5V 49 NC 50 GND 51 MCARD_DISABLE 52 3 3V VAUX 18 ...

Page 20: ...BIOS setup utility hot keys can be used at any time during the setup navigation process Some of the hot keys are F1 F10 Enter ESC and Arrow keys Some of the navigation keys may differ from one screen to another Left Right The Left and Right Arrow keys moves the cursor to select a menu Up Down The Up and Down Arrow keys moves the cursor to select a setup screen or sub screen Plus Minus The Plus and...

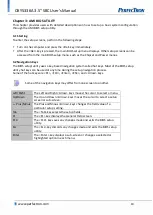
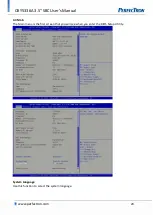
Page 21: ...A 3 5 SBC User s Manual www perfectron com 3 3 Main The Main menu is the first screen that you will see when you enter the BIOS Setup Utility System Language Use this function to select the system language 20 ...

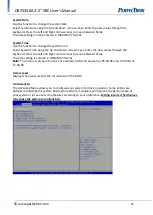
Page 22: ...es through the keyboard Press the Left and Right Arrow keys to move between fields The time setting is entered in HH MM SS format Note The time is in 24 hour format For example 5 30 A M appears as 05 30 00 and 5 30 P M as 17 30 00 Access Level Displays the access level of the current user in the BIOS 3 4 Advanced The Advanced Menu allows you to configure your system for basic operation Some entrie...

Page 23: ... 3 5 SBC User s Manual www perfectron com 3 4 1 ACPI Settings System ACPI parameters 3 4 1 1 ACPI Sleep State ACPI Sleep State Select ACPI sleep state the system will enter when the SUSPEND button is pressed 22 ...

Page 24: ...om 3 4 2 Trusted Computing Trusted Computing Settings 3 4 2 1 Configuration Security Device Support Enables or disables BIOS support for security device O S will not show security device TCG EFI protocol and INT1A interface will not be available 23 ...

Page 25: ...OXY5336A 3 5 SBC User s Manual www perfectron com 3 4 3 CPU Configuration CPU configuration parameters 3 4 3 1 CPU Configuration 24 ...

Page 26: ...OXY5336A 3 5 SBC User s Manual www perfectron com 3 4 4 SATA Configuration SATA device options settings 3 4 4 1 SATA Mode Selection Determines how SATA controllers operate 25 ...

Page 27: ...OXY5336A 3 5 SBC User s Manual www perfectron com 3 4 5 F81866 Super IO Configuration System Super IO chip parameters 3 4 5 1 Serial Port Configuration Set parameters of serial port COM 26 ...

Page 28: ...C User s Manual www perfectron com 3 4 5 1 1 1 Serial Port Configuration Serial Port Enable or disable serial port COM Change Setting Select an optimal setting for Super IO device Mode RS232 RS 422 RS 485 selection 27 ...

Page 29: ...OXY5336A 3 5 SBC User s Manual www perfectron com 3 4 5 1 1 Serial Port Configuration Serial Port Enable or disable serial port COM Change Settings Select an optimal setting for Super IO device 28 ...

Page 30: ... 5 SBC User s Manual www perfectron com 3 4 5 2 Parallel Port Configuration Set Parameters of parallel port LPT LPTE 3 4 5 2 1 Parallel Port Configuration Parallel Port Enable or disable parallel port LPT LPTE 29 ...

Page 31: ...336A 3 5 SBC User s Manual www perfectron com Change Settings Select an optimal setting for Super IO device Device Mode Change the printer port mode 3 4 5 3 GPIO Configuration GPIO configuration settings 30 ...

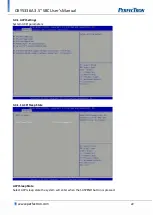
Page 32: ...n com 3 4 5 3 1 GPIO Configuration General Purpose I O General purpose I O and parallel port share the same pins Enable this function will force parallel port to be disabled 3 4 6 Serial Port Console Redirection Serial port console redirection 31 ...

Page 33: ...edirection Console Redirection Console redirection enable or disable Console Redirection settings The settings specify how the host computer and the remote computer which the user is using will exchange data Both computers should have the same or compatible settings 32 ...

Page 34: ...hen VT100 See above in Console Redirection Settings page for more help with Terminal Type Emulation Bits per second Selects serial port transmission speed The speed must be matched on the other side Long or noisy lines may require lower speeds Flow Control Flow control can prevent data loss from buffer overflow When sending data if the receiving buffers are full a stop signal can be sent to stop t...

Page 35: ...er s Manual www perfectron com 3 4 7 Intel R 82579LM Gigabit Network Connection Configure Gigabit Ethernet device parameters 3 4 7 1 Port Configuration Menu NIC configuration Click to configure the network device port 34 ...

Page 36: ... com Blink LEDs range 0 15 seconds Blink LEDs for the specified duration up to 15 seconds 3 4 7 1 1 NIC configuration Link Speed Change link speed and duplex for current port Wake on LAN Enable this option to wake the system with a magic packet 35 ...

Page 37: ...OXY5336A 3 5 SBC User s Manual www perfectron com 3 4 8 Intel R 82574L Gigabit Network Connection Configure Gigabit Ethernet device parameters 3 4 8 1 Port Configuration Menu 36 ...

Page 38: ...k to configure the network device port Blink LEDs range 0 15 seconds Blink LEDs for the specified duration up to 15 seconds 3 4 8 1 1 Link Speed Link Speed Change link speed and duplex for current port Wake on LAN Enable this option to wake the system with a magic packet 37 ...

Page 39: ...ectron com 3 5 Chipset This section gives you functions to configure the system based on the specific features of the chipset The chipset manages bus speeds and access to system memory resources System Agent SA System Agent SA parameters 38 ...

Page 40: ... 3 5 SBC User s Manual www perfectron com 3 5 1 System Agent SA VT d Check to enable VT d function on MCH Graphics Configuration Config graphics settings Memory Configuration Memory configuration parameters 39 ...

Page 41: ...n 3 5 1 1 1 LCD Contol Primary IGFX Boot Display Select the video device which will be activated during POST This has no effect if external graphics present Secondary boot display selection will appears based on your selection VGA modes will be supported only on primary display 40 ...

Page 42: ... com Second IGFX Boot Display Select secondary display device LCD Panel Type Select LCD panel used by internal graphics device by selecting the appropriate setup item Panel Color Depth Select the LFP panel color depth 3 5 1 2 Memory Information 41 ...

Page 43: ...re the boot features Setup Prompt Timeout Number of seconds to wait for setup activation key 65535 0xFFFF means indefinite waiting Bootup NumLock State Select the keyboard NumLock state Quiet Boot Enables or disables quiet boot option CSM parameters OpROM execution boot options filter etc 42 ...

Page 44: ... User s Manual www perfectron com 3 6 1 CSM parameters Launch PXE OpROM policy Controls the execution of UEFI and Legacy PXE OpROM Launch Storage OpROM policy Controls the execution of UEFI and legacy storage OpROM 43 ...

Page 45: ...OXY5336A 3 5 SBC User s Manual www perfectron com 3 7 Security Use the Security Menu to establish system passwords Administrator Password Set administrator password User Password Set User Password 44 ...

Page 46: ...nd Exit Exit system setup without saving changes Save Changes and Reset Reset the system after saving the changes Discard Changes and Reset Reset system setup without saving any changes Save Changes Save changes done so far for any of the setup options Discard Changes Discard changes done so far to any of the setup options Restore Defaults Restore Load default values for all the setup options Save...

Page 47: ...www perfectron com Restore User Defaults Restore the user defaults to all the setup options Lauch EFI Shell from filesystem device Attempts to Launch EFI shell application Shellx64 efi from one of the available filesystem devices 46 ...

Reviews: