background image

47

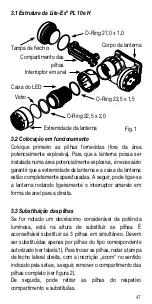
3.1 Estrutura da Lite-Ex

®

 PL 10e H

3.2 Colocação em funcionamento

Coloque primeiro as pilhas fornecidas (fora da área 
potencialmente explosiva). Para que a lanterna possa ser 
instalada numa área potencialmente explosiva, é necessário 
garantir que a extremidade da lanterna e a caixa da lanterna 
estão completamente aparafusadas. A seguir, pode ligar-se 
a lanterna rodando ligeiramente o interruptor amarelo em 
forma de anel para a direita.

3.3 Substituição das pilhas

Se for notado um decréscimo considerável da potência 
luminosa, está na altura de substituir as pilhas. É 
aconselhável substituir as 3 pilhas em simultâneo. Devem 
ser substituídas apenas por pilhas do tipo correspondente 
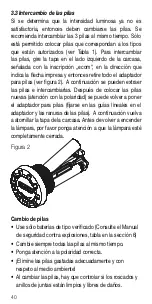
autorizado (ver tabela 1). Para trocar as pilhas, rodar a tampa 
de fecho lateral direita, com a inscrição „ecom“ no sentido 
indicado pela seta e, a seguir, remover o compartimento das 
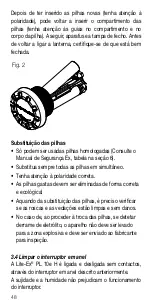
pilhas completo (ver figura 2).
De seguida, pode retirar as pilhas do respetivo 
compartimento e substituílas. 

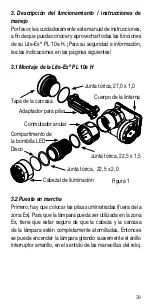
O-Ring 22,5 x 1,5

O-Ring 22,5 x 2,0

Vidro

O-Ring 27,0 x 1,0

Compartimento das 

pilhas

Tampa de fecho

Fig. 1

Corpo da lanterna

Interruptor em anel

Caixa do LED

Extremidade da lanterna

Summary of Contents for Ecom Lite-Ex PL 10e H

Page 1: ...1 Operating Instructions Bedienungsanleitung Notice d utilisation Istruzioni per l uso Instrucciones de uso Manual de instruçoes Intrinsically Safe Headlamp Lite Ex PL 10e H Z o n e 0 2 0 ...

Page 2: ...2 English Page 3 Deutsch Seite 11 Français Page 20 Italiano Page 28 Español Página 37 Português Sida 45 ...

Page 3: ...turer Content 1 Safety instructions 4 2 Technical specifications 4 3 Functional description operating instructions 4 3 1 Assembly of the Lite Ex PL 10e H 5 3 2 Getting started 5 3 3 Battery replacement 5 3 4 Cleaning the ring switch 6 3 5 Bulb replacement 7 3 6 Replacing the protective disc 7 4 Repairs 8 5 Cleaning maintenance and storage 8 6 Disposal 9 7 Warranty and liability 9 8 EU Declaration ...

Page 4: ...t a distance of 1m 6 Optik approx 1800 lx at a distance of 1 m 25 Optics Luminous flux 64 lm Operating time approx 55 hours continuous operation Dimensions 60 x 87 x 69 mm H x L x W Weight approx 180g with headband IP protection class IP 65 67 ESD protection Anti static housing CE designation 0102 3 Functional description operating instructions Please read these operating instructions carefully so...

Page 5: ...ce is no longer deemed to be satisfactory It is advisable to change all 3 batteries at the same time Only the appropriate approved types of batteries may be used see Ex Safety Manual table with approved batteries To replace the batteries turn the left hand side cap which bears the ecom inscription in the direction of the arrow and then remove the entire battery adapter see fig 2 You can then remov...

Page 6: ...n appropriate and environmentally friendly manner When changing the batteries examine the threads and seals for cleanliness and signs of damage If you notice any spilled electrolyte when changing the battery do not take the unit into the Ex area but send it to the manufacturer for inspection 3 4 Cleaning the ring switch A non contacting ring switch is used to switch on the Lite Ex PL 10e H see 3 2...

Page 7: ... emitted The disc is made of high quality material If however it should break it can be replaced To do this grasp the body of the Lite Ex PL 10e H and the ring switch and then carefully unscrew the lamp head by turning it anti clockwise To unscrew the lamp head from the LED housing use an Allen key A F 4 to secure the LED housing in place see Fig 3 and unscrew the lamp head The protective disc can...

Page 8: ...the device checked by the manufacturer every two years The batteries should be taken out of the unit if it is to be stored for extended periods The storage temperature should be within the permitted range of 30 C to 60 C It should be observed that the electrical performance of specific types of Zinc Manganese Dioxide Zn MnO2 batteries are limited to ambient temperatures below the product specified...

Page 9: ...iate collection points in your country Note The battery used in this unit poses a fire hazard and can cause chemical injuries if it is used improperly Neither the batteries nor the battery cells should be opened or disassembled and they should not be burned or exposed to temperatures exceeding 60 C In case of disposal the battery can be removed as described in the Ex safety manual under point 6 Th...

Page 10: ...U Declaration of Conformity is enclosed with the sales packaging as a separate document Please also observe the information provided underneath the table of contents The current EU Declaration of Conformity can be downloaded from the relevant product page at www ecom ex com www pepperl fuchs com 9 EU type examination certificate The current EU type examination certificate can be downloaded from th...

Page 11: ...rdert werden Inhalt 1 Sicherheitshinweise 12 2 Technische Daten 12 3 Funktionsbeschreibung Bedienungshinweise 12 3 1 Aufbau der Lite Ex PL 10e H 12 3 2 Inbetriebnahme 13 3 3 Batteriewechsel 13 3 4 Reinigen des Ringschalters 15 3 5 Leuchtmittelwechsel 15 3 6 Wechsel der Schutzscheibe 15 4 Reparatur 16 5 Reinigung Wartung und Lagerung 17 6 Entsorgung 17 7 Garantie und Haftung 18 8 EU Konformitätserk...

Page 12: ...D Leuchtkraft 3 000 lx bei 1m Abstand 6 Optik 1800 lx bei 1m Abstand 25 Optik Lichtstrom 64 lm Betriebsdauer ca 55 Stunden Dauerbetrieb Abmessungen 60 x 87 x 69 mm H x L x B Gewicht ca 180g mit Kopfband IP Schutzart IP 65 67 ESD Schutz antistatisches Gehäuse CE Kennzeichnung 00102 3 Funktionsbeschreibung Bedienungshinweise Bitte lesen Sie diese Bedienungsanleitung sorgfältig durch damit Sie alle F...

Page 13: ...kann die Lampe durch eine leichte Drehung des gelben Ringschalters im Uhrzeigersinn eingeschaltet werden 3 3 Batteriewechsel Sollte festgestellt werden dass die Leuchtkraft nicht mehr zufriedenstellendist solltendieBatteriengewechseltwerden Es empfiehlt sich alle 3 Batterien gleichzeitig zu wechseln Es dürfen nur Batterien des entsprechend zugelassenen Typs eingesetzt werden siehe Ex Sicherheitsha...

Page 14: ...ieder komplett verschlossen ist Bild 2 Batteriewechsel Nur typgeprüfte Batterien verwenden Siehe Ex Sicherheitshandbuch Tabelle Punkt 6 Immer alle Batterien gleichzeitig auswechseln Auf richtige Polarität achten Verbrauchte Batterien sach und umweltgerecht entsorgen Beim Batteriewechsel sind die Gewinde und Dichtungen auf Sauberkeit und Beschädigung zu überprüfen Wird beim Batteriewechsel ausgetre...

Page 15: ...lebigen LED Leuchtmittel ausgestattet Ein Wechsel der LED wird im Normalfall nicht notwendig sein Bei einem Defekt oder bei nachlassender Helligkeit ist die Lampe zur Überprüfung oder Reparatur an ecom instruments zu senden Das LED Gehäuse darf nicht geöffnet werden Selbständige Eingriffe am LED Gehäuse oder Leuchtmittel gefährden die Sicherheit der Lampe und sind nicht zulässig 3 6 Wechsel der Sc...

Page 16: ...nge benutzen Beim Aufsetzen des Lampenkopfes auf das LED Gehäuse ist darauf zu achten dass Dichtung und Scheibe sauber anliegen Es dürfen nach der Montage keine Dichtungsanteile im Lichtaustritt sichtbar sein Sind der innere Lampenkopf oder die Linse ebenfalls beschädigt worden so ist die Lampe zur Reparatur an den Hersteller zu senden Bild 3 4 Reparatur Reparaturen dürfen nur von der ECOM Instrum...

Page 17: ...uren bereits unterhalb der für das Produkt angegebenen Umgebungstemperaturbereiche nachlässt Lesen Sie die Informationen des entsprechenden Batterieherstellers um den empfohlenen Umgebungstemperaturbereich der Batterie zum Erzielen einer maximalen Batterieleistung zu ermitteln 6 Entsorgung Elektro und Elektronik Altgeräte von der Firma ECOM Instruments GmbH werden zu unseren Lasten der Entsorgung ...

Page 18: ... Garantie und Haftung Für dieses Produkt gewährt die ECOM Instruments GmbH laut den allgemeinen Geschäftsbedingungen eine Garantie von zwei Jahren auf Funktion und Material unter den angegebenen und zulässigen Betriebs und Wartungsbedingungen Ausgenommen hiervon sind alle Verschleißteile z B Batterien Leuchtmittel etc Weitere Informationen zu den Allgemeinen Liefer und Zahlungsbedingungen der ECOM...

Page 19: ...19 9 EG Baumusterprüfbescheinigung Die aktuelle EU Baumusterprüfbescheinigung steht auf der entsprechenden Produktseite unter www ecom ex com www pepperl fuchs com zum Download zur Verfügung ...

Page 20: ...ire 1 Consigne de sécurité 21 2 Caractéristiques techniques 21 3 Description fonctionnelle consignes d utilisation 21 3 1 Structure de la Lite Ex PL 10e H 22 3 2 Mise en service 22 3 3 Remplacement des piles 22 3 5 Remplacement de l ampoule 24 3 6 Remplacement de la lentille de protection 24 4 Réparation 25 5 Nettoyage entretien et stockage 25 6 Élimination 26 7 Garantie et responsabilité 27 8 Déc...

Page 21: ...minosité environ 3 000 lux à une distance de 1 m 6 Optique environ 1 800 lux à une distance de 1 m 25 Optique Courant d éclairage 64 lm Autonomie environ 55 heures utilisation prolongée Dimensions 60 x 87 x 69 mm h x L x l Poids env 180g avec bandeau de tête Indice de protection IP IP 65 67 Indice ESC boîtier antistatique Marquage CE 0102 3 Description fonctionnelle consignes d utilisation Veuille...

Page 22: ...e temps Seules des piles de type homologué peuvent être utilisées voir manuel de sécurité Ex table avec des batteries approuvées Pour procéder au remplacement des piles tournez le cache latéral gauche portant l inscription ecom dans le sens de la flèche imprimée et retirer l adaptateur pour piles dans son intégralité voir illustration 2 Vous pouvez ensuite retirer et remplacer les piles Après l in...

Page 23: ...s Si lors du changement de piles on constate la présence d électrolyte l appareil ne doit pas être introduit dans la zone explosible Le renvoyer au fabricant à des fins de contrôle 3 4 Nettoyage du commutateur à anneau La Lite Ex PL 10e H commute sans contact via le commutateur à anneau décrit précédemment La saleté et l humidité ne peuvent pas nuire à la fonction de commutation Si le commutateur ...

Page 24: ...émentaire Si malgré sa grande qualité la lentille se cassait il serait possible de la remplacer Pour cela maintenir le boîtier de la lampe Lite Ex PL 10e H et le commutateur à anneau et faire tourner délicatement la tête de lampe dans le sens anti horaire Pour dévisser la tête de lampe de l enveloppe de la DEL bloquer l enveloppe de la DEL avec une clé six pans de 4 voir illustration 2 et dévisser...

Page 25: ... un chiffon ou une éponge appropriée Lors du nettoyage ne pas utiliser de solvants ou d agents abrasifs Il est recommandé de faire vérifier tous les deux ans par le fabricant le bon fonctionnement et la précision de l appareil En cas de stockage prolongé retirer les piles de l appareil Respecter les températures de stockage comprises entre 30 C et 60 C Veuillez noter que les performances électriqu...

Page 26: ...ectriques et électroniques ne doivent pas être jetés avec les déchets normaux ni avec les déchets ménagers Mettez les piles au rebut conformément à la directive européenne 2006 66 CE Les piles ne doivent pas être jetées avec les déchets normaux ou ménagers L élimination peut se faire via des points de collecte appropriés dans votre pays Attention la batterie utilisée dans cet appareil peut provoqu...

Page 27: ...onsultez le site www ecom ex com www pepperl fuchs com ou adressez vous directement au fabricant 8 Déclaration UE de conformité La déclaration UE de conformité est fourni avec le produit sous forme d un document distinct Veuillez également observer les informations fournies au dessous de la table des matières La déclaration de conformité UE en cours de validité peut être téléchargée sur la page du...

Page 28: ...e 1 Avvertenza di sicurezza 28 2 Dati tecnici 29 3 Descrizione delle funzioni Funzionamento 29 3 1 Struttura della Lite Ex PL 10e H 30 3 2 Messa in funzione 30 3 3 Sostituzione delle batterie 30 3 4 Pulizia del commutatore ad anello 32 3 5 Sostituzione della lampadina 32 3 6 Sostituzione del vetro di protezione 32 4 Riparazione 33 5 Pulizia manutenzione e conservazione 34 6 Smaltimento 34 7 Garanz...

Page 29: ...000 lx ad una distanza di 1 m 6 Ottica ca 1 800 lx ad una distanza di 1 m 25 Ottica Flusso luminoso 64 lm Durata di funzionamento ca 55 ore funzionamento continuo Dimensioni 60 x 87 x 69 mm A x L x P Peso ca 180g con fascia per la testa Tipo di protezione IP IP 65 67 Protezione ESD Parti esterne antistatiche Marchio CE 0102 3 Descrizione delle funzioni Funzionamento Leggere attentamente le present...

Page 30: ...erie Quando si nota che l intensità luminosa è diminuita è necessario sostituire le batterie Si consiglia di sostituire tutte e 3 le batterie Devono essere utilizzate solo batterie dei modelli omologati vedere il manuale sicurezza Ex tabella con batterie approvate Per cambiare le batterie ruotare il cappuccio laterale sinistro con la dicitura ecom nella direzione della freccia stampata dopodiché r...

Page 31: ...e il manuale sicurezza Ex tabella nella sezione 6 Sostituire sempre tutte le batterie nello stesso momento Accertarsi della corretta polarità Provvedere allo smaltimento corretto ed ecologico delle batterie esauste Al momento della sostituzione delle batterie verificare che la filettatura e le guarnizioni siano pulite e non siano state danneggiate Se al momento della sostituzione delle batterie si...

Page 32: ...mpadina La Lite Ex PL 10e H è dotata di una lampadina a LED di lunga durata Solitamente non è necessaria una sostituzione dei LED In caso di guasto o calo della luminosità inviare la lampada alla ecom instruments affinché venga sottoposta a controllo o riparazione L alloggiamento del LED non deve essere aperto Interventi arbitrari sull alloggiamento del LED o sulla lampadina compromettono la sicur...

Page 33: ...sotto il vetro di protezione utilizzare solo guarnizioni ecom originali Durante il rimontaggio della testa della lampada sull alloggiamento LED assicurarsi che guarnizione e vetro siano correttamente posizionati Alla fine del montaggio la guarnizione o parti della guarnizione non devono essere visibili nel punto di fuoriuscita luce In caso di danni alla lente o all interno della lampada inviare l ...

Page 34: ...o l intervallo di temperature ambiente specificate dal prodotto È necessario consultare le schede tecniche del produttore specifico e del tipo di batteria utilizzata per verificare qual è l intervallo di temperatura ambiente consigliato per ottenere prestazioni ottimali dalla batteria 6 Smaltimento Gli apparecchi elettronici dismessi di ECOM Instruments GmbH verranno inviati a nostre spese per lo ...

Page 35: ...recchi dismessi 7 Garanzia e responsabilità Conformément à ses conditions générales de vente Pepperl Fuchs SE accorde pour ce produit une garantie de deux ans pièces et main d œuvre dans les conditions d utilisation et d entretien indiquées et autorisées En sont exclues toutes les pièces d usure p ex piles ampoules d éclairage etc Per maggiori informazioni sulle Condizioni generali di consegna e p...

Page 36: ...36 9 Certificato di esame UE del tipo Il certificato di esame UE del tipo può essere scaricato dalla pagina del prodotto corrispondente su www ecom ex com www pepperl fuchs com ...

Page 37: ...e 1 Instrucciones de seguridad 38 2 Especificaciones técnicas 38 3 Descripción del funcionamiento instrucciones de manejo 39 3 1 Montaje de la Lite Ex PL 10e H 39 3 2 Puesta en marcha 39 3 3 Intercambio de las pilas 40 3 4 Limpieza del anillo interruptor 41 3 5 Cambio del foco de luz 41 3 6 Cambio del cristal de protección 41 4 Reparación 42 5 Limpieza mantenimiento y almacenamiento 43 6 Eliminaci...

Page 38: ...uente de alimentación 3 x LR03 véase el Manual de Seguridad Ex tabla con las baterías aprobadas Lámpara LED de gran potencia Luminosidad aprox 3 000 lx a 1 m de distancia 6 Óptica aprox 1 800 lx a 1 m de distancia 25 Óptica Flujo luminoso 64 lm Tiempo operativo aprox 55 horas funcionamiento continuo Dimensiones 60 x 87 x 69 mm alto largo ancho Peso aprox 180g con cinta para la cabeza Tipo de prote...

Page 39: ...locar las pilas suministradas fuera de la zona Ex Para que la lámpara pueda ser utilizada en la zona Ex tiene que estar seguro de que la cabeza y la carcasa de la lámpara estén completamente atornilladas Entonces se puede encender la lámpara girando suavemente el anillo interruptor amarillo en el sentido de las manecillas del reloj Junta tórica 22 5 x 2 0 Disco Adaptador para pilas Tapa de la carc...

Page 40: ...iarlas Después de colocar las pilas nuevas atención con la polaridad se puede volver a poner el adaptador para pilas fijarse en las guías lineales en el adaptador y las ranuras de las pilas A continuación vuelva a atornillar la tapa de la carcasa Antes de volver a encender la lámpara por favor ponga atención a que la lámpara esté completamente cerrada Cambio de pilas Use sólo baterías de tipo veri...

Page 41: ...e quedar puesta sobre el círculo marcado en la cabeza de la lámpara A continuación se puede volver a atornillar la cabeza de la lámpara 3 5 Cambio del foco de luz La Lite Ex PL 10e H está implementada con un foco LED de vida útil extremadamente larga Un cambio del foco LED normalmente no será necesario En caso de un defecto o de una disminución de la luminosidad se debe enviar la lámpara a ecom in...

Page 42: ...én el anillo de junta está debajo del cristal de protección enmarcado en una ranura utilizar sólo anillos de junta ecom originales Al colocar la cabeza de la lámpara en la carcasa LED se debe tener en cuenta que la junta y el cristal se ajusten perfectamente Tras el montaje no debe verse ninguna parte de la junta en la salida de la luz Si se llegan a dañar el interior de la cabeza de la lámpara o ...

Page 43: ...sulte las fichas técnicas del fabricante específico y del tipo de baterías utilizado para ver cuál es el rango de uso de temperaturas ambiente recomendado para lograr el rendimiento máximo de las baterías 6 Eliminación Los aparatos eléctricos antiguos de ECOM Instruments GmbH se destinarán a la eliminación a nuestro cargo y se desecharán gratuitamente de acuerdo con la Directiva Europea 2012 19 UE...

Page 44: ...c Dispone de más información respecto a las Condiciones generales de entrega y pago de Pepperl Fuchs SE en www ecom ex com www pepperl fuchs com o también puede solicitarla directamente al fabricante 8 Declaración de conformidad de la UE La Declaración de conformidad de la UE y el certificado forman parte del paquete comercial del dispositivo en el que se incluye como documento independiente Conte...

Page 45: ...Dados técnicos 46 3 Descrição das funções Indicações de utilização 46 3 1 Estrutura da Lite Ex PL 10e H 47 3 2 Colocação em funcionamento 47 3 3 Substituição das pilhas 47 3 4 Limpar o interruptor em anel 48 3 5 Substituição dos agentes de iluminação 49 3 6 Substituição do vidro de proteção 49 4 Reparação 50 5 Limpeza manutenção e armazenamento 50 6 Eliminação 51 7 Garantia e responsabilidade 52 8...

Page 46: ...inosa aprox 3 000 lx a uma distância de 1 m 6 Ótica aprox 1 800 lx a uma distância de 1 m 25 Ótica Fluxo luminoso 64 lm Autonomia aprox 55 horas funcionamento contínuo Dimensões 60 x 87 x 69 mm A x C x L Peso aprox 180 g com fita para a cabeça Grau de proteção IP IP 65 67 Proteção ESD caixa antiestática Identificação CE 0102 3 Descrição das funções Indicações de utilização Leia com atenção este ma...

Page 47: ... notado um decréscimo considerável da potência luminosa está na altura de substituir as pilhas É aconselhável substituir as 3 pilhas em simultâneo Devem ser substituídas apenas por pilhas do tipo correspondente autorizado ver tabela 1 Para trocar as pilhas rodar a tampa de fecho lateral direita com a inscrição ecom no sentido indicado pela seta e a seguir remover o compartimento das pilhas complet...

Page 48: ... todas as pilhas em simultâneo Tenha atenção à polaridade correta As pilhas gastas devem ser eliminadas de forma correta e ecológica Aquando da substituição das pilhas é preciso verificar se as roscas e as vedações estão limpas e sem danos No caso de ao proceder à troca das pilhas se detetar derrame de eletrólito o aparelho não deve ser levado para a zona explosiva e deve ser enviado ao fabricante...

Page 49: ...caixa do LED não pode ser aberta Intervenções por moto próprio na caixa do LED ou na lâmpada prejudicam a segurança da lanterna e não são autorizadas 3 6 Substituição do vidro de proteção A caixa do LED está protegida através da extremidade da lanterna que a envolve e através de um vidro adicional na saída da luz Se apesar do vidro de elevada qualidade colocado estesepartir podesersubstituído Para...
Page 50: ...s pela ECOM Instruments GmbH ou por pessoal autorizado ou assistência técnica autorizada pela ECOM Instruments GmbH pois a segurança do dispositivo deve ser testada depois que os reparos forem implementados 5 Limpeza manutenção e armazenamento Limpe o aparelho apenas com uma esponja ou pano adequado Não utilize produtos solventes ou abrasivos na limpeza É aconselhável solicitar ao fabricante que v...

Page 51: ...s eletrónicos Os custos relacionados com a devolução de aparelhos à ECOM Instruments GmbH deverão ser suportados pelo remetente Os aparelhos usados não devem ser eliminados em conjunto com o lixo normal ou doméstico Eliminar as pilhas em conformidade com a Directiva Europeia 2006 66 CE As pilhas não devem ser eliminadas com lixo normal ou doméstico A eliminação pode ser feita através de pontos de ...

Page 52: ... www pepperl fuchs com ou contacte diretamente o fabricante 8 Declaração de Conformidade da UE A declaração de Conformidade da UE e o certificado acompanham a embalagem de venda como um documento separado Consulte também as informações fornecidas abaixo do índice A Declaração de Conformidade da UE atual pode ser baixada na página de produto específico em www ecom ex com www pepperl fuchs com 9 Cer...

Page 53: ...53 ...

Page 54: ...54 ...

Page 55: ...55 ...

Page 56: ...m Dokument vorzunehmen oder das Dokument zurückzuziehen Copyright 2021 ECOM Instruments GmbH The contents of this document either in part or in their entirety may not be reproduced forwarded distributed or saved in any way without ECOM Instruments GmbH prior written consent The contents of this document are presented as they currently exist ECOM Instruments GmbH does not provide any express or tac...

Reviews: