background image

BTC12N-*

BIOS Settings

 2

0

2

0

-0

5

39

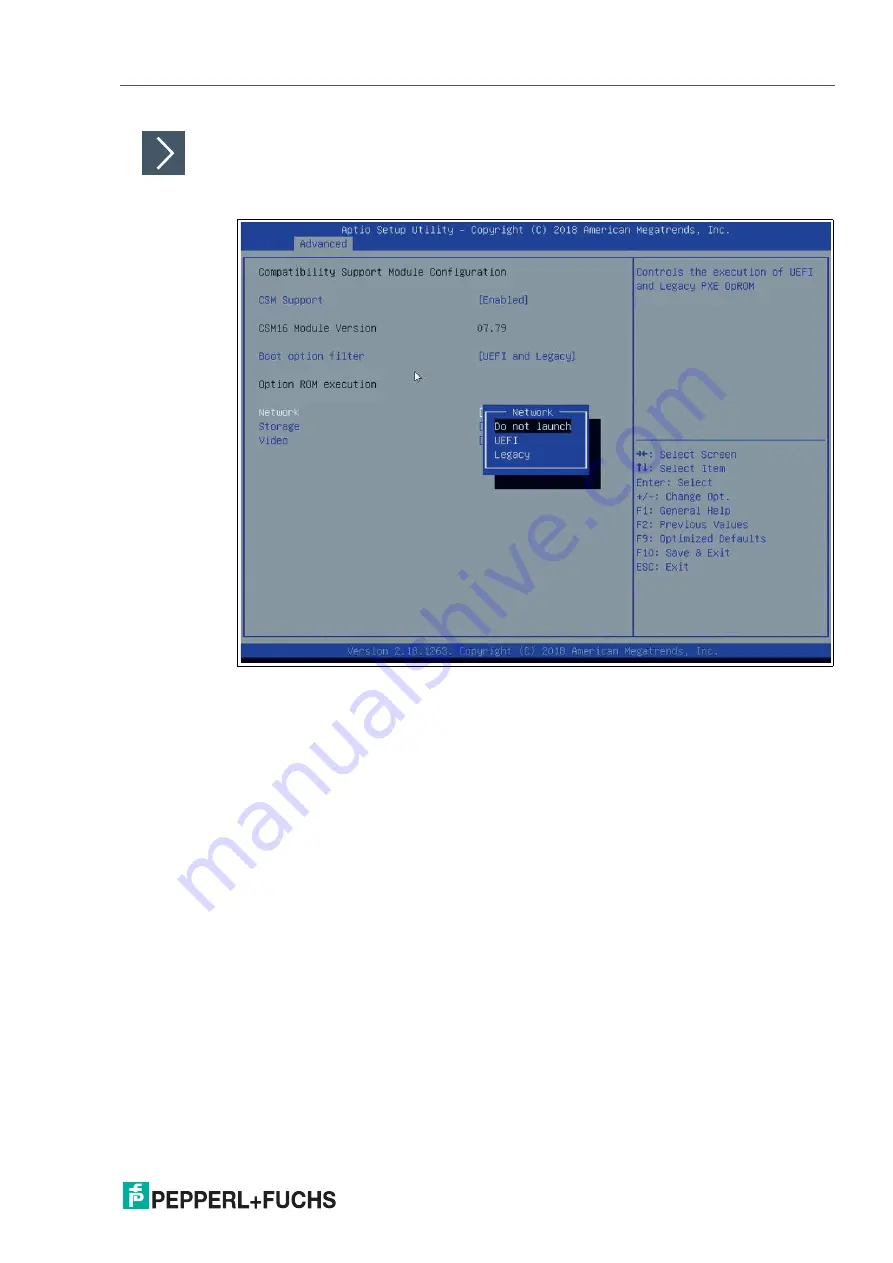
Enabling Boot via LAN (PXE)

1.

Select 

Advanced

 from the BIOS setup page.

Figure 4.8

Configuring the compatibility support module

2.

Select 

CSM Configuration

 with the arrow keys and press ENTER.

3.

Select 

Network

 with the arrow keys. Press ENTER. Select 

UEFI

 or 

Legacy

, depending on 

what your PXE server supports. Press ENTER in the pop-up window.

Summary of Contents for BTC12N Series

Page 1: ...BTC12N Box Thin Client for Industrial Applications Manual ...

Page 2: ...sion as well as the supplementary clause Expanded reservation of proprietor ship Worldwide Pepperl Fuchs Group Lilienthalstr 200 68307 Mannheim Germany Phone 49 621 776 0 E mail info de pepperl fuchs com North American Headquarters Pepperl Fuchs Inc 1600 Enterprise Parkway Twinsburg Ohio 44087 USA Phone 1 330 425 3555 E mail sales us pepperl fuchs com Asia Headquarters Pepperl Fuchs Pte Ltd P F Bu...

Page 3: ...ware 8 2 4 Technical Data 9 2 5 Dimensions and Nameplates 11 3 Installation 13 3 1 Mounting 13 3 2 Electrical Connection 24 3 3 I O Connection 25 4 BIOS Settings 31 4 1 Creating a New BIOS Password 33 4 2 Changing Serial Interface Mode RS 232 RS 485 34 4 3 USB Configuration 36 4 4 Turning Audio on off via DisplayPort 37 4 5 Boot Configuration 38 4 6 Resetting the BIOS to Factory Settings 41 5 Serv...

Page 4: ...rmity Attestation of conformity Certificates Control drawings Instruction manual Other documents 1 1 2 Manufacturer 1 1 3 Target Group Personnel Responsibility for planning assembly commissioning operation maintenance and dismount ing lies with the plant operator Only appropriately trained and qualified personnel may carry out mounting installation com missioning operation maintenance and dismount...

Page 5: ... descending order as fol lows Informative Symbols Action This symbol indicates a paragraph with instructions You are prompted to perform an action or a sequence of actions Danger This symbol indicates an imminent danger Non observance will result in personal injury or death Warning This symbol indicates a possible fault or danger Non observance may cause personal injury or serious property damage ...

Page 6: ...ctory and process automation Figure 2 1 Two monitors with Ultra HD resolution 4K at 60 Hz Danger User access Warning Do not open the device The BTC12 is a closed unit with no user accessible parts Note Radio interference This device has been tested and found to comply with the limits for a Class A digital device pursuant to part 15 of the FCC regulations These limits are designed to provide reason...

Page 7: ...is required to connect an Ultra HD capable moni tor or TV through an HDMI 2 0 interface These adapters are available as accessories Figure 2 2 Series connection of up to three Multi Stream Transport MST capable DisplayPort monitors DisplayPort Multi Stream Transport MST protocol technology allows a series connection of up to three monitors This requires monitors that have a DisplayPort MST hub Mon...

Page 8: ...he VisuNet RM Shell 5 firmware allows the user to easily access applications running on a host system via Ethernet e g workplace PC or server RM Shell 5 is based on Windows 10 IoT Enterprise LTSB an embedded version of Windows with long term support that is com patible with the latest versions of popular remote protocols such as RDP 10 and VNC Using these protocols the BTC12 and other VisuNet remo...

Page 9: ...ation please refer to the according ACP ThinManager documentation https kb thinmanager com index php Supported_Hardware Pepperl 2BFuchs 2 4 Technical Data Hardware Supply Interface Note Please visit www pepperl fuchs com regularly to check for the latest version of RM Shell Note The standard version of the BTC12 is BTC12N GP TS2 DP N0 GP versions are for ordinary locations D2 versions are for haza...

Page 10: ... 60 C 4 140 F Storage temperature 20 60 C 4 140 F Relative humidity 95 at 40 C non condensing acc to EN 60068 2 78 Shock resistance 40 g 11 ms when operating Vibration resistance 3 grms 5 500 Hz Housing material aluminum body and sheet metal painted powder coated Degree of protection IP40 Mass 1 32 kg Dimensions 216 mm x 130 mm x 47 mm Mounting Desktop or wall mounting VESA mount and DIN rail moun...

Page 11: ...ription 2020 05 11 2 5 Dimensions and Nameplates Dimensions Figure 2 5 BTC12 dimensions Labels The following labels are attached to the BCT12 Nameplate Ordinary Location Nameplate Hazardous Location 130 100 200 216 188 47 ...

Page 12: ...is located on the side of the device The COA label is only available with pre installed Windows operating systems and is affixed to the back of the device Nameplate General Purpose Operator need to consult this man ual all warnings as applicable need to be taken into consideration Hot surface Certificate of Authenticity COA ...

Page 13: ...in a housing power dissipation from the device must be taken into account see chapter 3 2 Vertical installation provides optimal cooling since air passes through the cooling fins Observe the following recommended distances to other electrical components or to a housing wall Below the device if mounted vertically 100 mm All other sides 50 mm Figure 3 1 Horizontal mounting desktop mounting Warning I...

Page 14: ... Figure 3 2 Vertical mounting 50 mm 50 mm 50 mm 100 mm 50 mm Danger Ambient conditions Do not operate the device outside the specified ambient temperature Warning Hot surface The surface of the device may become hot during operation ...

Page 15: ...n materials required Screwdriver 4 anchors 4 screws included in scope of delivery 1 Attach the DIN rail adapter to the back of the BTC12 Use the thread on the bottom of the BTC12 to secure the adapter Tighten the supplied screws to a tightening torque of 0 4 Nm Figure 3 3 ...

Page 16: ... is a movable clamp on the top of the DIN rail adapter Install the BTC12 at a slight angle with the movable clamp over the DIN mounting rail Apply light pressure to pull the BTC12 downward and clamp the adapter into the rail Figure 3 4 1 2 ...

Page 17: ...BTC12N Installation 2020 05 17 Figure 3 5 ...

Page 18: ...ion diagram to secure the device to the wall Use wall anchors if nec essary Figure 3 6 Caution Insufficient load capacity If the mounting surface for wall and vertical mounting does not have sufficient load capacity the device may fall and be damaged It is the responsibility of the installer to select a suitable location with sufficient strength for the equipment ...

Page 19: ...BTC12N Installation 2020 05 19 Figure 3 7 Installation diagram 200 100 12 Ø 8 4 5 ...

Page 20: ...A fixture to the VESA arm or the back panel of the monitor using the screws provided by the monitor manufacturer Figure 3 8 Danger Ambient temparature range Warning The ambient temperature range needs to be taken into consideration for use in hazardous locations ...

Page 21: ...BTC12N Installation 2020 05 21 Figure 3 9 2 Secure the BTC12 to the VESA fixture using the supplied screws ...

Page 22: ...2020 05 22 BTC12N Installation 3 Screw M4 tightening torque 0 7 0 1 Nm Figure 3 10 ...

Page 23: ...BTC12N Installation 2020 05 23 Figure 3 11 ...

Page 24: ...d 31 6 W CPU full load 14 W total output power to USB ports Normal operation 16 W CPU full load no additional electrical consumers Standby 3 4 W Power dissipation Maximum heat dissipation 17 6 W CPU full load 14 W total output power to USB ports Normal operation power dissipation power consumption Figure 3 12 ...

Page 25: ...against vibration Locking mechanisms are available as accessories for additional strain relief 5 Optional strain relief locking mechanisms can also be attached to the USB ports 6 Connect the BTC12 to the AC DC power supply e g FSP065 REBN2 3 3 I O Connection Figure 3 13 BTC12 ports front Figure 3 14 BTC12 ports rear Note Strain relief locking mechanisms are available as accessories The screws requ...

Page 26: ... port is not to be used in a hazardous location Symbol On off switch Back Ground connection Not required for standard installations Power plug 5 5 x 2 5 mm DC jack bush with locking mechanism M8 screw 16 VDC to 28 VDC Polarity USB1 Default Font USB 3 1 Super Speed x 2 COM RS 232 RS 485 port with DB 9 connector x 1 Ethernet 2 Secondary port 1000BaseT RJ45 plug Ethernet 1 Primary port DisplayPort 2 ...

Page 27: ...a Terminal Ready A 5 GND Ground 6 DSR Data Set Ready E 7 RTS Request to Send A 8 CTS Clear to Send E 9 RI Incoming Call E Pin Type Description 1 Data Transmit receive data I O for half duplex mode 2 Data Transmit receive data I O for half duplex mode 3 Not con nected 4 Not con nected 5 M Signal ground 6 Not con nected 7 Not con nected 8 Not con nected 9 Not con nected 1 9 5 6 1 9 5 6 ...

Page 28: ...ta OR WH or OR 3 Receive Data WH GN 4 Bidirectional Data BU WH or BU 5 Bidirectional Data WH BU 6 Receive Data GN WH or GN 7 Bidirectional Data WH BN 8 Bidirectional Data BN WH or BN No Type Description Green LED Off no connection Flashing active data On connection Yellow LED Off 10 Mbit s connection Flashing 100 Mbit s connection On 1 Gbit s connection 1 8 1 2 1 2 1 2 19 20 ...

Page 29: ... 8 GND Ground 9 ML_Lane2 DP Data 2 Output 10 ML_Lane3 DP Data 3 Output 11 GND Ground 12 ML_Lane3 DP Data 3 Output 13 CONFIG1 CAD Cable adapter detection Input 14 CONFIG2 Ground pull down 15 AUX_CH Auxiliary channel Input output 16 GND Ground 17 AUX_CH Auxiliary channel Input output 18 HPD Hot Plug Detect Input 19 GND Ground 20 DP_PWR 3 3 V fused Output Pin Type Description 1 USB_P5V_ fused A 5 V f...

Page 30: ... Description 1 BI_DA Bidirectional data A input output 2 BI_DA Bidirectional data A input output 3 BI_DB Bidirectional data B input output 4 BI_DC Bidirectional data C input output 5 BI_DC Bidirectional data C input output 6 BI_DB Bidirectional data B input output 7 BI_DD Bidirectional data D input output 8 BI_DD Bidirectional data D input output No Type Description Orange LED On port is active no...

Page 31: ...ut Function Description Left right arrow keys Select screen Menu bar and select a BIOS setup page e g the main page Up down arrow key and click Select ele ment Select a BIOS setup element or a subpage Enter dou ble click Select Select an option to edit its value or access a submenu Change option Change the field value of a specific setup element e g date time F1 General Help Displays the general H...

Page 32: ...h day and year in sequence Enter the appropriate value Press ENTER to move to the next field 3 Press F10 to save the changes Setting the System Time 1 Use the arrow buttons to set the time 2 Navigate to hour minute and seconds in sequence Enter the appropriate value Press ENTER to move to the next field 3 Press F10 to save the changes BIOS Setup Menu ...

Page 33: ...ministrator Password using the arrow keys and press Enter 2 Enter a password of at least 3 characters The password can be up to 20 characters long and is case sensitive 3 Re enter the password when the pop up window appears prompting you to confirm the password Note After changing note down the password and keep it in a safe place Pepperl Fuchs assumes no liability in the event that the password i...

Page 34: ...2020 05 34 BTC12N BIOS Settings 4 2 Changing Serial Interface Mode RS 232 RS 485 Select Advanced from the BIOS setup page Figure 4 3 Advanced BIOS menu ...

Page 35: ...Enabled or Disabled Press ENTER in the pop up window 3 The enabled port selects the appropriate setting change and device mode Press ENTER Figure 4 4 Select mode Settings for Serial Port 1 Device settings Mode select Auto IO 3F8h IRQ 4 IO 3F8h IRQ 10 11 12 15 IO 2F8h IRQ 10 11 12 15 IO 3E8h IRQ 10 11 12 15 IO 2E8h IRQ 10 11 12 15 RS 232 RS 485 RS 485 Termination Resistor Note Serial port 2 cannot ...

Page 36: ...e USB device displays the USB device detected by the BIOS during the power on self test Figure 4 5 Enabling and disabling the USB device Enabling and Disabling the USB Device 1 Select USB Mass Storage Driver Support using the arrow keys and press Enter 2 Select Enabled or Disabled as needed Press Enter in the pop up window ...

Page 37: ...setup page Figure 4 6 Chipset BIOS menu Changing Audio Configuration HD Audio Configuration allows you to view and configure the DisplayPort audio con troller The analog signal cannot be configured 1 Select HD Audio Configuration using the arrow keys Press ENTER 2 Select Enabled or Disabled Press ENTER ...

Page 38: ...OS menu You can change the following settings on the Boot configuration page Setup Prompt Timeout Sets the time period within which the Delete key must be pressed to enter the BIOS at power on BootUp NumLock State Enables and disables the numeric keys on the keyboard Set the PXE ROM before changing boot options ...

Page 39: ...he BIOS setup page Figure 4 8 Configuring the compatibility support module 2 Select CSM Configuration with the arrow keys and press ENTER 3 Select Network with the arrow keys Press ENTER Select UEFI or Legacy depending on what your PXE server supports Press ENTER in the pop up window ...

Page 40: ... is turned on In the event of a power failure the device will also automatically power up after the power supply has been restored This is a default setting that cannot be changed Save Options Select Save Exit from the BIOS setup page Save the changes and exit the system When you have finished making changes to the system configuration save the changes using the following instructions Saving Confi...

Page 41: ...elect No to exit the process 4 6 Resetting the BIOS to Factory Settings Restoring Default Settings You can restore the system using the following instructions 1 Use the arrow keys to select Restore Defaults Press ENTER 2 Select Yes Press ENTER to load the optimized default settings 3 Select No to exit the process Restoring the Factory Settings with F9 1 Press F9 Optimized Defaults Press ENTER 2 Se...

Page 42: ...information about the products described in this document visit www pepperl fuchs com Please have the following information ready when contacting your local representative or tech nical support Product name Serial number of the product Image version and RM shell version ...

Page 43: ...ower supply cable with protective conductor Type IEC 60320 C5 Country Australia Type I AS 3112 Length approx 1 8 m 70105590 S BN 19 1800 CH1 Power supply cable with protective conductor Type IEC 60320 C5 Country Switzerland Type J SEV 1011 Length approx 1 8 m 70105591 S BN 19 1800 IT1 Power supply cable with protective conductor Type IEC 60320 C5 Country Italy Type L CEI 23 16 VII Length approx 1 ...

Page 44: ...ve adapter cable for BTC12 DisplayPortTM 1 1 connector to HDMI 1 4 socket Cable length 0 2 m 548405 CLUB3D CAC 2070 Active adapter cable for BTC12 DisplayPortTM 1 2 connector to HDMI 2 0 UHD socket 4K at 60 Hz Cable length 0 2 m 548406 STARTECH DP2DVI2 Passive adapter cable for BTC12 DisplayPortTM 1 1 connector to DVI D socket Cable length 0 15 m 548407 STARTECH DP2VGA3 Active adapter cable for BT...

Page 45: ...Pepperl Fuchs Quality Download our latest policy here www pepperl fuchs com quality www pepperl fuchs com Pepperl Fuchs Subject to modifications Printed in Germany DOCT 6221C ...

Reviews: