background image

48

1

Gettin

g

 Sta

rte

d

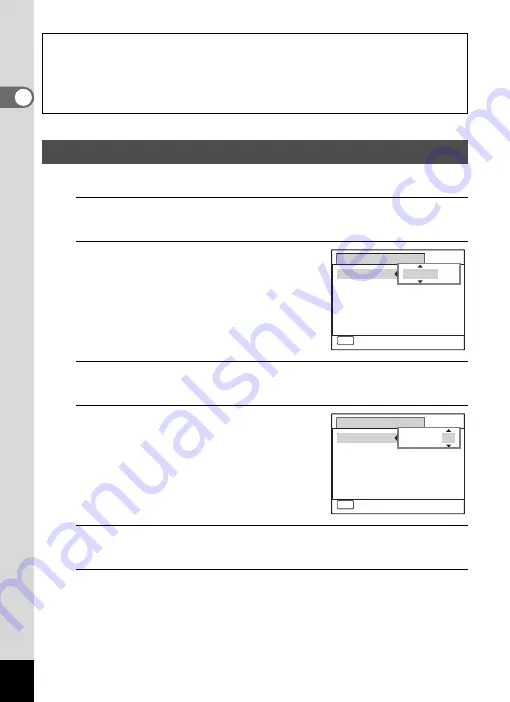
Set the current date and time and the display style.

1

Press the four-way controller (

5

).

The frame moves to [mm/dd/yy].

2

Use the four-way controller (

23

to choose the date format.

Choose from [mm/dd/yy], [dd/mm/yy] or 
[yy/mm/dd].

3

Press the four-way controller (

5

).

The frame moves to [24h].

4

Use the four-way controller (

23

to select [24h] (24-hour display) or 
[12h] (12-hour display).

5

Press the four-way controller (

5

).

The frame returns to [Date Format].

6

Press the four-way controller (

3

).

The frame moves to [Date].

The video output format (NTSC/PAL) is set to the format of the city selected in 
[Hometown] on the [Initial Setting] screen. Refer to “List of World Time Cities” 
(p.239) f
or the video output format of each city that will be set at the time of initial 
setting, and “Changing the Video Output Format” (p.200) for changing the video 
output format.

Setting the Date and Time

MENU

Date Adjustment

Cancel

Date Format
Date

Time

Settings complete

mm dd yy
01/01/2011

00:00

/ /

24h

MENU

MENU

Date Adjustment

Cancel

Date Format
Date

Time

Settings complete

01/01/2011

00:00

mm dd yy

/ /

24h

Summary of Contents for Optio RX18

Page 1: ...GING FRANCE S A S European Headquarters 112 Quai de Bezons B P 204 95106 Argenteuil Cedex FRANCE HQ http www pentax eu France http www pentax fr PENTAX RICOH IMAGING DEUTSCHLAND GmbH Julius Vosseler S...

Page 2: ...ries Windows Vista is either a registered trademark or trademark of Microsoft Corporation in the United States and or other countries Macintosh and Mac OS are trademarks of Apple Inc registered in the...

Page 3: ...of light may appear on the screen display This phenomenon is referred to as smear and is not a malfunction of the camera There is a possibility that the illustrations and the display screen in this m...

Page 4: ...hen discharging the flash Discoloration may occur Some portions of the camera heat up during use There is a risk of low temperature burns when holding such portions for long periods Should the monitor...

Page 5: ...objects on or forcefully bend the AC plug cord Doing so may damage the cord Should the AC plug cord be damaged consult a PENTAX Service Center Do not touch or short circuit the terminal area of the A...

Page 6: ...nd other metal objects away from the and contacts of the battery Do not short the battery or dispose of the battery in fire This can cause an explosion or fire If any leakage from the battery should c...

Page 7: ...y decrease the battery performance Avoid storing in high temperatures If the battery is left inserted and the camera is not used for a long time the battery will over discharge and shorten the battery...

Page 8: ...a tripod to avoid damaging the camera The lens on this camera is not interchangeable The lens is not removable Do not clean the product with organic solvents such as thinner alcohol or benzine Use a l...

Page 9: ...y be deleted in the following circumstances We do not accept any liability for data that is deleted 1 when the SD Memory Card is mishandled by the user 2 when the SD Memory Card is exposed to static e...

Page 10: ...3 Charging the Battery 33 Installing the Battery 34 Using the AC Adapter 37 Installing the SD Memory Card 39 Number of Images Recordable on an SD Memory Card 41 Turning the Camera On and Off 42 Starti...

Page 11: ...osite Mode 90 Using the Self timer 92 Taking a Series of Pictures Continuous Shooting Burst Shooting Mode 93 Taking Pictures Using the Remote Control Unit Optional 95 Using the Digital Wide Function D...

Page 12: ...ly Face Close up Playback 146 Deleting Images and Sound Files 148 Deleting a Single Image 148 Deleting Selected Images and Sound Files 150 Deleting All Images and Sound Files 152 Protecting Images and...

Page 13: ...tput Format 200 Setting Eye Fi Communication 201 Adjusting the Brightness of the Display 202 Using the Power Saving Function 203 Setting the Auto Power Off Function 204 Changing the Start up Screen 20...

Page 14: ...27 Functions Available for Each Shooting Mode 228 Messages 230 Troubleshooting 232 Default Settings 234 List of World Time Cities 239 Optional Accessories 240 Main Specifications 241 WARRANTY POLICY 2...

Page 15: ...lated operation indicates information that is useful to know indicates precautions to be taken when operating the camera A mode This is the mode for capturing still pictures and recording movies In th...

Page 16: ...Memo 14...

Page 17: ...ack and Deleting Images This chapter explains how to view still pictures and movies on the camera or on a TV screen and how to delete them from the camera 5 Editing and Printing Images This chapter ex...

Page 18: ...only a few buttons Simply by choosing the appropriate icon you can select the shooting mode p 69 and choose the optimal settings for the situation or the playback mode p 138 p 160 and enjoy the vario...

Page 19: ...picture with this camera you can choose from fun frames to create attractive framed shots p 90 You can also add frames to pictures you have taken p 169 Adjust the position of the subject in the pictur...

Page 20: ...aying back and editing images without having to connect the camera to your computer and transfer the images first The camera is all you need to take and edit still pictures and movies p 160 Advanced M...

Page 21: ...y Charger Kit K BC92 For other optional accessories refer to Optional Accessories p 240 Checking the Contents of the Package Camera Optio RZ18 Optio RX18 Strap O ST104 Software CD ROM S SW121 USB cabl...

Page 22: ...20 Front Names of Parts Microphone Speaker Lens Flash Self timer lamp Focus assist Battery card cover lock lever Tripod socket Remote control receiver Battery card cover...

Page 23: ...Functions p 52 p 55 for an explanation of the function of each button Display Power switch Shutter release button Strap lug PC AV terminal cover 4 W button Green i button Four way controller 3 button...

Page 24: ...y Histogram Info and No Info Monitor Indications Display in A Mode When the shooting mode is set to 9 Green mode the monitor display is as shown on the right You cannot change the information on the d...

Page 25: ...lligent Zoom icon p 78 2 Face Detection icon p 72 3 D Range Setting p 111 12 Memory status p 42 4 Camera shake reduction icon p 118 13 Remaining image storage capacity 5 Shutter speed 14 Battery level...

Page 26: ...the shutter release button is pressed halfway For 9 when the focus mode is set to and the Auto Macro function is activated the q appears on the display p 104 Some indications may not appear depending...

Page 27: ...hutter release button is pressed halfway When the shooting mode is b Auto Picture and if you press the shutter release button halfway the automatically selected shooting mode appears in A1 even when N...

Page 28: ...n Normal Display Histogram Info and No Info Display in Q Mode OK OK OK F3 5 F3 5 1 250 1 250 F3 5 1 250 100 100 0038 0038 100 0038 14 25 14 25 14 25 200 200 200 Edit Edit Edit 09 09 2011 09 09 2011 09...

Page 29: ...layback of movies sound files or voice memos p 135 p 184 p 187 A1 Face Detection icon p 72 A9 Battery level indicator p 36 A2 Playback mode A10 Volume icon Q Still Picture p 134 A11 Captured date and...

Page 30: ...ss dark at the left and bright at the right and the vertical axis represents the number of pixels The shape of the histogram before and after shooting tells you whether the brightness and contrast are...

Page 31: ...is too dark the part to the left is cut off dark portions and when the image is too bright the part to the right is cut off bright portions Understanding Contrast The graph peaks gradually for images...

Page 32: ...Memo 30...

Page 33: ...1 Getting Started Attaching the Strap 32 Powering the Camera 33 Installing the SD Memory Card 39 Turning the Camera On and Off 42 Initial Settings 44...

Page 34: ...ing Started Attaching the Strap Attach the strap O ST104 supplied with the camera 1 Pass the narrow end of the strap through the strap lug 2 Pass the other end of the strap through the loop and pull t...

Page 35: ...ord rated 125 V 7A minimum 6 ft 1 8 m 1 Connect the AC plug cord to the battery charger 2 Plug the AC plug cord into the power outlet 3 Place the battery in the battery charger so that the PENTAX logo...

Page 36: ...rger may overheat or be damaged The battery has reached the end of its service life when it starts to run down soon after being charged Replace it with a new battery If the battery is inserted correct...

Page 37: ...he lens If the battery is incorrectly oriented malfunction may result Removing the Battery This camera uses a rechargeable lithium ion battery D LI92 Use of any other type of battery may damage the ca...

Page 38: ...u can check the battery level by the indicator on the display Image Storage Capacity 1 flash used for 50 of shots Movie Recording Time 2 Sound Recording Time 2 Playback Time 2 Approx 240 pictures Appr...

Page 39: ...to p 34 p 35 on how to open close the battery card cover and remove the battery 3 Insert the DC coupler while holding down the battery lock lever Confirm the DC coupler is locked in place 4 Extract th...

Page 40: ...ure that the AC plug cord and the DC terminal connecting the AC adapter to the camera are inserted securely Data may be lost if either becomes disconnected while data is being recorded on the SD Memor...

Page 41: ...190 for instructions on formatting When you intend to use a brand new Eye Fi card for the first time copy the Eye Fi Manager installation file to your computer before formatting the card Make sure th...

Page 42: ...the card in until it clicks Data may not be recorded correctly if the card is not inserted all the way 3 Close the battery card cover After closing the battery card cover slide the cover lock lever i...

Page 43: ...or still pictures on the A Rec Mode menu Choose the appropriate number of recorded pixels and frame rate in Movie on the A Rec Mode menu For an approximate guide to the number of images or the length...

Page 44: ...e display turns off the lens closes and the camera turns off The SD Memory Card is checked when the camera turns on and the memory status is displayed Taking Still Pictures 1p 66 Checking the SD Memor...

Page 45: ...de 1 Press the power switch while holding down the Q button The display turns on with the lens retracted and the camera turns on in the playback mode Starting up in the Playback Mode To switch from th...

Page 46: ...he four way controller 2345 to choose the desired display language The language date and time can be changed later Refer to the pages below for instructions To change the language follow the steps in...

Page 47: ...desired settings do not appear 3 Press the four way controller 3 twice to select Settings complete 4 Press the 4 button The Date Adjustment screen appears Set the date and time by following the proced...

Page 48: ...ng screen is canceled and the camera is set to still picture capture mode 2 Press the 3 button The A Rec Mode menu appears 3 Press the four way controller 5 4 Use the four way controller 32 to select...

Page 49: ...four way controller 45 to select O On or P Off 8 Press the 4 button The Initial Setting screen reappears 9 Press the four way controller 3 to select Settings complete 10 Press the 4 button The Date A...

Page 50: ...s to Date Format 6 Press the four way controller 3 The frame moves to Date The video output format NTSC PAL is set to the format of the city selected in Hometown on the Initial Setting screen Refer to...

Page 51: ...00 seconds To set the exact time press the 4 button when the time signal on the TV radio etc reaches 00 seconds When the Initial Setting or Date Adjustment screen is displayed you can cancel the sett...

Page 52: ...the pages below for instructions To change the language follow the steps in Changing the Display Language 1p 198 To change the date and time follow the steps in Changing the Date and Time 1p 192 To c...

Page 53: ...2 Common Operations Understanding the Button Functions 52 Setting the Camera Functions 57...

Page 54: ...r release button Focuses the camera on the subject when pressed halfway in still picture capture mode except in 3 s and modes Takes a still picture when pressed down fully p 67 Starts and stops movie...

Page 55: ...On 6 Four way controller 2 Changes the drive mode p 92 p 93 3 Displays the Capture Mode Palette p 69 4 Changes the flash mode p 102 5 Changes the focus mode p 104 23 Adjusts the focus when the focus...

Page 56: ...mage when turned to the right y during single image display Returns to the previous display when turned to the left f p 145 Turn to the left f during nine image display to change to folder or calendar...

Page 57: ...ves the image when using the Frame Composite function p 169 7 4 W button Changes the information on the display p 26 Returns to single image display during four nine image display or zoom display p 13...

Page 58: ...Q button The camera switches to Q mode 1 Press the Q button or the shutter release button halfway The camera switches to A mode Switching Between A Mode and Q Mode To Switch from A Mode to Q Mode To S...

Page 59: ...ing menu Menus for playing back and editing images and sound files are called up from the Playback Mode Palette p 138 Press the 3 button in A mode to display the A Rec Mode menu Press the 3 button in...

Page 60: ...ce AE Metering Sensitivity AF Setting AWB AUTO Recorded Pixels 38 38 38 14 25 14 25 14 25 09 09 2011 09 09 2011 09 09 2011 38 38 38 14 25 14 25 14 25 09 09 2011 09 09 2011 09 09 2011 ISO80 800 AUTO IS...

Page 61: ...he items that can be selected The pull down menu displays only those items that can be selected with the current camera settings 6 Use the four way controller 23 to change the setting The focusing are...

Page 62: ...us 7 Press the 3 button The changes are canceled and the screen shown in Step 3 reappears To use another operation refer to the following alternate Step 7 options To Save the Setting and Start Taking...

Page 63: ...E Metering For setting the area of the screen that is metered to determine the exposure p 114 Sensitivity For setting the sensitivity p 115 AUTO ISO Range For setting the adjustment range when sensiti...

Page 64: ...Enhancer For setting whether to perform the IQ enhancer p 123 Use the 9 Green mode to enjoy easy picture taking using standard settings regardless of the settings in the A Rec Mode menu p 76 Assignin...

Page 65: ...B Connection For setting the USB connection mode MSC or PTP when connected to a computer via the USB cable p 215 Video Out For setting the output format to AV equipment p 200 Eye Fi For starting to tr...

Page 66: ...World Time English Folder Name Text Size Date Standard MENU Exit 1 3 W Setting Menu 2 Setting Video Out Eye Fi 2 3 MENU Exit NTSC Power Saving Auto Power Off 5sec Brightness Level 3min USB Connection...

Page 67: ...3 Taking Pictures Taking Still Pictures 66 Setting the Shooting Functions 102 Recording Movies 127 Saving the Settings Memory 131...

Page 68: ...irm the subject and shooting information on the display The focus frame in the middle of the display indicates the zone of automatic focusing When the camera detects a person s face the Face Detection...

Page 69: ...play turns green when the camera focuses on the subject at the correct distance 4 Press the shutter release button fully The picture is taken The flash discharges automatically depending on the light...

Page 70: ...Shutter Release Button Poor focusing conditions The camera may not be able to focus under the following conditions In these cases lock the focus on an object the same distance away as the subject by...

Page 71: ...s the four way controller 3 in A mode The Capture Mode Palette appears 2 Use the four way controller 2345 to choose a shooting mode When an icon is selected in the Capture Mode Palette the guide for t...

Page 72: ...p 80 C Movie For recording movies p 127 a Landscape For capturing landscape views Enhances colors of sky and foliage f Blue Sky Emphasizes saturation of the sky to produce a bright image K Sunset For...

Page 73: ...ontrast can be adjusted p 89 Q Surf Snow For bright images such as sand or snow Accurately meters for bright scenes p 87 X Digital Wide Stitches two pictures together to create a wider image p 97 F Di...

Page 74: ...t to Face Detection On You can switch to the Smile Capture function which automatically releases Using the Face Detection Function Face Detection AF and AE may not work if the subject is wearing sungl...

Page 75: ...Natural Skin Tone or R Kids mode In these modes the Face Detection function is always activated and only either Face Detection On or Smile Capture can be selected Face Detection On is automatically se...

Page 76: ...tivated and the face detection frame appears p 72 When the camera detects the pet s full face a light blue pet detection frame appears and the shutter is automatically released 4 Press the shutter rel...

Page 77: ...b mode You cannot turn the Face Detection function off The focusing area setting is fixed at J Multiple The Flower mode cannot be selected when using Digital Zoom or Intelligent Zoom If the Night Sce...

Page 78: ...icture is taken In 9 Green mode you can enjoy easy picture taking using standard settings regardless of the settings in the A Rec Mode menu The 9 mode settings are as shown below Taking Pictures in th...

Page 79: ...the subject at the correct distance 3 Press the shutter release button fully The picture is taken The 9 mode is available only when it is assigned to the Green button in Green Button of the A Rec Mod...

Page 80: ...switches from optical zoom to Intelligent Zoom and stops at the point where the zoom switches to Digital Zoom Once the lever is released and turned again the camera switches to Digital Zoom The focus...

Page 81: ...other support to prevent camera shake when taking pictures at high zoom Pictures taken in the Digital Zoom range appear grainier than pictures taken in the optical zoom range Intelligent Zoom is not a...

Page 82: ...e a shooting mode appropriate for taking pictures of dark scenes such as nightscapes To Set the Digital Zoom Saving the Digital Zoom Function setting 1p 131 Taking Pictures of Dark Scenes Night Scene...

Page 83: ...ct distance 5 Press the shutter release button fully The picture is taken c Digital SR Higher sensitivity reduces blur The sensitivity is automatically set to AUTO and the number of recorded pixels is...

Page 84: ...ra returns to capture status When the camera detects a person s face the Face Detection function is activated and the face detection frame appears p 72 4 Press the shutter release button halfway The f...

Page 85: ...2 Use the four way controller 2345 to select R 3 Press the 4 button The R mode is selected and the camera returns to capture status When the camera detects a person s face the Face Detection function...

Page 86: ...ected and the camera returns to capture status When the camera detects the pet s full face a light blue pet detection frame appears and the shutter is automatically released 1 Press the I button on th...

Page 87: ...ill be canceled and the camera returns to still picture capture mode Only dogs and cats can be registered in e Pet mode Other animals or human faces cannot be registered You may not be able to registe...

Page 88: ...ant to shoot and the camera returns to capture status 1 Press the I button on the capture status screen in e Pet mode The pet registration screen appears 2 Use the four way controller 45 to select the...

Page 89: ...me on the display turns green when the camera focuses on the subject at the correct distance When the mode is selected the focus frame follows the subject while the shutter release button is pressed h...

Page 90: ...lected and the camera returns to capture status When the camera detects a person s face the Face Detection function is activated and the face detection frame appears p 72 4 Press the shutter release b...

Page 91: ...the four way controller 2345 to select c 3 Press the 4 button The c mode selection screen appears 4 Use the four way controller 23 to select c d c or d Taking Pictures of Text Text Mode c Color Maint...

Page 92: ...subject at the correct distance 7 Press the shutter release button fully The picture is taken In N Frame Composite mode you can take pictures using the frames stored in the camera 1 Press the four way...

Page 93: ...y The focus frame on the display turns green when the camera focuses on the subject at the correct distance 8 Press the shutter release button fully The picture is taken Four way controller 45 Press t...

Page 94: ...W121 supplied with the camera To use these frames copy them from the CD ROM p 172 These optional frames are deleted if the files on the built in memory are deleted with a computer or if the built in m...

Page 95: ...a while the self timer lamp is blinking when taking still pictures In C Movie mode recording will start after ten seconds or two seconds Press the shutter release button halfway while the self timer i...

Page 96: ...er release button fully Pictures are taken continuously as long as you keep the shutter release button pressed A Burst Shooting L The number of recorded pixels is fixed at f 2592 1944 and pictures are...

Page 97: ...ce are locked with the first shot When the Face Detection function is activated p 72 it works only when taking the first shot The Blink Detection function works only for the last shot In b Auto Pictur...

Page 98: ...uickly and the camera takes a picture after about three seconds When h 0 sec Remote Control is selected The camera takes a picture immediately The operating range is approx 4 m 13 ft from the front of...

Page 99: ...mera into a single frame up to approx 19 mm coverage 35 mm film equivalent 1 Press the four way controller 3 in A mode The Capture Mode Palette appears 2 Use the four way controller 2345 to select X U...

Page 100: ...second image Overlap the image on the preview guide on the left of the screen to compose the second image Repeat Steps 4 and 5 to take the second image The stitched first and second image appears on...

Page 101: ...controller 3 in A mode The Capture Mode Palette appears 2 Use the four way controller 2345 to select F To Cancel after Taking the First Shot Save Saves the first image and you can retake the first sh...

Page 102: ...subject at the correct distance 6 Press the shutter release button fully The screen for taking the second frame is displayed after you take the first frame If you select right 5 in Step 4 The right ed...

Page 103: ...nd second frames or the second and third frames on the preview guide When the Face Detection function is activated p 72 it works only when taking the first frame Blink Detection does not work To Cance...

Page 104: ...Flash On Red eye This mode reduces the phenomenon of red eyes caused by the light from the flash being reflected in the subject s eyes The flash discharges regardless of the light conditions A pre fl...

Page 105: ...red in the resulting picture This phenomenon occurs when the light from the flash is reflected in the subject s eyes It can be reduced by illuminating the area around the subject or moving closer to...

Page 106: ...n is pressed halfway r Super Macro This mode is used when the distance to the subject is approx 4 cm to 30 cm 1 6 in to 12 in The camera is focused on the subject in the autofocus area when the shutte...

Page 107: ...ly select q or 3 The focus mode is fixed at s in S Fireworks mode When is selected and the subject is closer than 40 cm the camera automatically focuses from 10 cm Auto Macro function In this case q a...

Page 108: ...troller 5 The AF Setting screen appears 4 Press the four way controller 5 A pull down menu appears 5 Use the four way controller 23 to change the focusing area setting 6 Press the 4 button The setting...

Page 109: ...5 Use the four way controller 45 to select O On P Off The setting is saved 6 Press the 3 button twice The camera returns to capture mode In C Movie and N Frame Composite modes the focusing area cannot...

Page 110: ...ra does not emit the focus assist light under the following conditions In C Movie S Fireworks modes When the focus mode is set to 3 Pan Focus s Infinity or z Manual Focus The default setting in e Pet...

Page 111: ...corded pixels for images captured in 9 Green mode is fixed at m The number of recorded pixels for images captured in N Frame Composite is fixed at h The number of recorded pixels for images captured i...

Page 112: ...EV setting in the range of 2 0 EV to 2 0 EV in 1 3 EV steps 4 Press the 3 button The camera returns to capture status Setting the Exposure EV Compensation When the histogram is displayed in still pic...

Page 113: ...The D Range Setting screen appears 4 Use the four way controller 23 to select Highlight Correction or Shadow Correction 5 Use the four way controller 45 to select O On or P Off 6 Press the 3 button t...

Page 114: ...ton p 123 Adjusting the White Balance F Auto The camera adjusts the white balance automatically G Daylight Use this mode when taking pictures outside in sunlight l Shade Use this mode when taking pict...

Page 115: ...e paper or similar material ready 1 In the White Balance screen use the four way controller 23 to select K Manual 2 Point the camera at the blank sheet of paper or other material so that it fills the...

Page 116: ...the AE Metering setting 5 Press the 4 button The setting is saved 6 Press the 3 button The camera returns to capture status Setting the AE Metering L Multi segment metering The camera divides the imag...

Page 117: ...pose your picture again and press the shutter release button fully Depending on the selected shooting mode the AE metering setting may not be changed Refer to Functions Available for Each Shooting Mod...

Page 118: ...down menu appears When the sensitivity is set to 3200 or 6400 the number of recorded pixels is fixed at f 2592 1944 When set to 9 Green or C Movie mode only AUTO sensitivity 80 800 is available When s...

Page 119: ...four way controller 45 to select O or P O Blink Detection function works P Blink Detection function does not work The setting is saved 4 Press the 3 button The camera returns to capture status When H...

Page 120: ...ler 5 A pull down menu appears 4 Use the four way controller 23 to choose the Shake Reduction setting 5 Press the 4 button The setting is saved 6 Press the 3 button The camera returns to capture statu...

Page 121: ...the corrected image is saved When Shake Reduction is set to CCD Shift CCD shifting sound may occur during shooting with C Burst Shooting H This is not malfunction In the following situations Shake Re...

Page 122: ...hange the sharpness level F Soft G Normal H Sharp 4 Press the 3 button The camera returns to capture status Instant Review 1p 69 If the Blink Detection function worked when shooting the message Closed...

Page 123: ...ress the 3 button in A mode The A Rec Mode menu appears 2 Use the four way controller 23 to select Contrast 3 Use the four way controller 45 to change the contrast level F Low G Normal H High Setting...

Page 124: ...Date Time Time or Off 5 Press the 4 button The setting is saved 6 Press the 3 button The camera returns to capture status If you change the Contrast setting frequently you can save time by assigning...

Page 125: ...reen button 9 Green Mode p 76 Voice Recording p 182 Movie p 127 or Fn Setting You can activate the assigned function by just pressing the 9 Green button O appears on the display in A mode when Date Im...

Page 126: ...ending on the capture mode used before the 3 button is pressed When you press the 3 button in still picture capture mode Still picture capture functions are assigned When you press the 3 button in mov...

Page 127: ...e function you want to register The following functions can be registered When Fn Setting is Selected Still picture mode functions Recorded Pixels White Balance Focusing Area AE Metering Highlight Cor...

Page 128: ...ons differ depending on whether the camera is in still picture mode or movie mode before the 9 button is pressed 2 Use the four way controller 2345 to select the function you want to change 3 Use the...

Page 129: ...the C mode and returns to capture status The following information appears on the display 1 Movie mode icon 2 Recording indicator blinks during recording 3 Remaining recordable time 4 Focus frame doe...

Page 130: ...o Manual Focus you can adjust the focus before recording starts You can use the optical zoom only before recording while the Digital Zoom is available both before and during recording Even if you chan...

Page 131: ...ll down menu appears Selecting the Recorded Pixels and Frame Rate for Movies Setting Recorded Pixels Frame Rate Use M 1280 720 30 fps Records images in HDTV format 16 9 Movement is recorded smoothly d...

Page 132: ...3 button in A mode The A Rec Mode menu appears 2 Use the four way controller 23 to select Movie 3 Press the four way controller 5 The Movie screen appears 4 Use the four way controller 23 to select M...

Page 133: ...setting for each item is O or P Item Description Default Setting Page Face Detection The Face Detection mode set with the I button P p 72 Flash Mode The flash mode set with the four way controller 4 O...

Page 134: ...Memory 3 Press the four way controller 5 The Memory screen appears 4 Use the four way controller 23 to choose an item 5 Use the four way controller 45 to select O or P 6 Press the 3 button twice The...

Page 135: ...4 Playing Back and Deleting Images Playing Back Images 134 Deleting Images and Sound Files 148 Connecting the Camera to AV Equipment 156...

Page 136: ...he i button while the image is displayed to display the Delete screen Press the four way controller 2 to select Delete and press the 4 button Playing Back Still Pictures To Play Back the Previous or N...

Page 137: ...tops Playing Back a Movie Zoom lever to the right x Increases the volume Zoom lever to the left w Reduces the volume Four way controller 2 Pauses playback Four way controller 5 Fast forwards playback...

Page 138: ...splayed images change four or nine images at a time page by page Use the four way controller 2345 to move the frame If there are too many images to display on one page pressing the four way controller...

Page 139: ...isplay 1 In Q mode turn the zoom lever to the left f three times The screen changes to folder display or calendar display Folder display The list of folders with recorded images and sound files appear...

Page 140: ...layback function is called up Four waycontroller 2345 Moves the frame Zoom lever to the right y Displays the images for that date in nine image display 4 button Displays the first image recorded on th...

Page 141: ...OK 1 2 1 2 Slideshow Slideshow OK OK OK MENU Cancel Cancel Slideshow OK Cancel For continuously playing back images Screen or sound effects can be set 1 2 1 2 Image Rotation Image Rotation Rotates ca...

Page 142: ...rom a movie as a still picture p 173 Divide Movies For dividing a movie into two Z Red eye Compensation For compensating red eye May not work due to the condition of the image p 168 n Resize Changes R...

Page 143: ...se the four way controller 23 to select Start 6 Press the 4 button The slideshow starts Pressing the 4 button during the slideshow pauses the slideshow To resume the slideshow press the 4 button again...

Page 144: ...select Screen Effect 5 Press the four way controller 5 A pull down menu appears 6 Use the four way controller 23 to choose the screen effect and press the 4 button 7 Use the four way controller 23 to...

Page 145: ...sound will be played through to the end before the next picture is played back regardless of the interval setting However pressing the four way controller 5 while playing back a movie or a picture wit...

Page 146: ...or 180 appears 5 Use the four way controller 2345 to choose the rotation direction and press the 4 button The rotated image is saved Panoramic images and movies cannot be rotated Protected images can...

Page 147: ...ously You can use the guide mark appears at the bottom left of the screen to check which portion of the image is magnified Available operations while an image is magnified 3 Press the 4 button The ima...

Page 148: ...the image you want to magnify 2 Confirm that the I icon is displayed in the image and press the I button The image is magnified around the face first detected when the image was taken If multiple face...

Page 149: ...ion ratio Zoom lever to the left f Zooms on the subject being displayed for Face close up playback at an equal or slightly smaller magnification ratio Face close up playback is not available for movie...

Page 150: ...r way controller 45 to choose the image sound file you want to delete 2 Press the i button A confirmation dialog appears 3 Use the four way controller 23 to select Delete 4 Press the 4 button The imag...

Page 151: ...with sound U appears on the images with sound 2 Press the i button A confirmation dialog appears 3 Use the four way controller 23 to select Delete Sound 4 Press the 4 button The sound data is deleted...

Page 152: ...de turn the zoom lever to the left f once or twice Four image display or nine image display appears 2 Press the i button P appears on the images and sound files Deleting Selected Images and Sound File...

Page 153: ...ing you to check whether you really want to delete it or not The display returns to four nine image display when you release the lever However protected images cannot be displayed in single image disp...

Page 154: ...se the four way controller 23 to select Delete All 3 Press the four way controller 5 The Delete All screen appears 4 Use the four way controller 23 to select Delete All Deleting All Images and Sound F...

Page 155: ...screen for selecting Single Image Sound or All Images Sounds appears 5 Use the four way controller 23 to select Single Image Sound 6 Press the 4 button The message Protects this image sound appears To...

Page 156: ...e protection of the data select Unprotect in Step 7 Y appears on the protected images and sound files during playback The maximum number of images and sound files you can protect in succession with Si...

Page 157: ...in Step 1 reappears 5 Use the four way controller 23 to select Cancel and press the 4 button The Playback Mode Palette reappears Protected images and sound files are deleted when the SD Memory Card or...

Page 158: ...ther ends of the AV cable to the video input terminal and audio input terminal of the AV device When using stereo sound equipment insert the sound terminal into the L white terminal 4 Turn the AV devi...

Page 159: ...happens change the video output format setting p 200 The camera display turns off and the volume cannot be adjusted with the zoom lever while the camera is connected to AV equipment When the camera is...

Page 160: ...Memo 158...

Page 161: ...ervice DPOF 178 About printing The following options are available for printing images taken with this camera 1 Use a printing service 2 Use your printer with an SD Memory Card slot to print directly...

Page 162: ...controller 3 The Playback Mode Palette appears 3 Use the four way controller 2345 to select n Resize 4 Press the 4 button The screen for choosing the number of recorded pixels appears 5 Use the four...

Page 163: ...pped image as a new image 1 In Q mode use the four way controller 45 to choose the image you want to crop 2 Press the four way controller 3 The Playback Mode Palette appears 3 Use the four way control...

Page 164: ...with the Face Detection function p 72 when taking pictures so that they look smaller 1 In Q mode use the four way controller 45 to choose the image you want to edit 2 Press the four way controller 3...

Page 165: ...reduction ratio F Approx 5 G Approx 7 H Approx 10 8 Press the 4 button A confirmation dialog for overwriting the image appears If the selected image is protected the processed image is saved as a new...

Page 166: ...can choose from six filters red pink purple blue green and yellow Extract Color Extracts only a specific color and processes the rest of the image into black and white You can choose from three filte...

Page 167: ...ilter selection screen appears 1 B W 2 Sepia 3 Toy Camera 4 Retro 5 Color 6 Extract Color 7 Color Emphasis 8 High Contrast 9 Starburst 10 Soft 11 Brightness 12 Miniature Subsequent steps vary dependin...

Page 168: ...four way controller 23 to choose a filter The preview image of the result of the filter effect appears 6 Use the four way controller 45 to choose the color The color filter changes in the following s...

Page 169: ...the four way controller 23 to choose a filter The preview image of the result of the filter effect appears 6 Use the four way controller 45 to adjust the effect To Select Toy Camera High Contrast Bri...

Page 170: ...the flash has caused the subject to appear with red eyes 1 In Q mode use the four way controller 45 to choose the image you want to correct 2 Press the four way controller 3 The Playback Mode Palette...

Page 171: ...in the camera 1 In Q mode use the four way controller 45 to choose the image to which you want to add a frame 2 Press the four way controller 3 The Playback Mode Palette appears Adding a Frame Frame...

Page 172: ...n single image display You can choose another frame using either of the following operations Four way controller 45 Press to choose a different frame Zoom lever to the left f Returns to the 9 frame di...

Page 173: ...d the processed image is saved as a new image and the following confirmation dialog does not appear 9 Use the four way controller 23 to select Overwrite or Save as 10 Press the 4 button The processed...

Page 174: ...on connecting the camera to a computer 3 When the device detection window opens click Cancel 4 Insert the CD ROM S SW121 into the CD ROM drive 5 When the installer window opens click EXIT 6 If there i...

Page 175: ...Movie Editing 4 Press the 4 button The movie edit selection screen appears Subsequent steps vary depending on your selection To Use a New Frame Extract the downloaded frame and copy it to the FRAME fo...

Page 176: ...ct Divide Movies on the movie edit selection screen 6 Press the 4 button The screen for choosing the dividing position appears 7 Use the four way controller 2345 to determine the dividing position 2 P...

Page 177: ...SD Memory Card has been inserted in the camera 1 Press the four way controller 3 in Q mode The Playback Mode Palette appears 2 Use the four way controller 2345 to select p Image Sound Copy The protect...

Page 178: ...ages and sound files are copied to the SD Memory Card Selected images and sound files from the SD Memory Card are copied to the built in memory one by one 4 Use the four way controller 23 to select 2...

Page 179: ...the built in memory To copy other images or sound files repeat Steps 4 to 7 Select Cancel to exit the copy operation If sound voice memo has been added to an image the image is copied with the sound W...

Page 180: ...or each image 1 In Q mode press the four way controller 3 The Playback Mode Palette appears 2 Use the four way controller 2345 to select r DPOF 3 Press the 4 button The DPOF setting method selection s...

Page 181: ...r data repeat Steps 6 to 8 9 Press the 4 button The settings are saved and the screen shown in Step 4 reappears Depending on the printer or printing equipment at the photo processing lab the date may...

Page 182: ...s 7 and 8 in Printing a Single Image p 179 for details on how to make the settings 4 Press the 4 button The settings for all the images are saved and the DPOF setting method selection screen reappears...

Page 183: ...6 Recording and Playing Back Sound Recording Sound Voice Recording 182 Adding a Voice Memo to Images 186...

Page 184: ...to the Green button first 1 Press the 3 button in A mode The A Rec Mode menu appears 2 Use the four way controller 23 to select Green Button 3 Press the four way controller 5 A pull down menu appears...

Page 185: ...to 18 hours When the Green button is pressed during recording an index is added to the current sound file 3 Press the shutter release button fully Recording stops Recording Sound If you press and hold...

Page 186: ...ases the volume Zoom lever to the left w Reduces the volume Four way controller 2 Pauses playback Four way controller 4 If there are no recorded indexes Fast reverses playback If there are recorded in...

Page 187: ...ound Available operations while playback is paused 4 Press the four way controller 3 Playback stops Four way controller 2 Resumes playback Four way controller 4 Rewinds approx 5 seconds Four way contr...

Page 188: ...o 4 Press the 4 button Recording starts You can record a voice memo continuously for up to 18 hours 5 Press the 4 button Recording stops Recording a Voice Memo A voice memo cannot be added to the imag...

Page 189: ...ess the four way controller 2 Playback starts Available operations during playback 3 Press the four way controller 3 Playback stops Playing Back a Voice Memo Zoom lever to the right x Increases the vo...

Page 190: ...Memo 188...

Page 191: ...7 Settings Camera Settings 190...

Page 192: ...during formatting as this may damage the card and render it unusable Formatting deletes protected images and any data recorded on the card with a computer or any camera SD Memory Cards formatted on a...

Page 193: ...ontroller 23 to select Sound 3 Press the four way controller 5 The Sound screen appears 4 Use the four way controller 23 to select Operation Volume 5 Use the four way controller 45 to adjust the volum...

Page 194: ...Steps 4 to 7 9 Press the 3 button twice The camera returns to A mode or Q mode You can change the initial date and time settings p 48 You can also set the format in which the date appears on the camer...

Page 195: ...returns to Date Format 9 Press the four way controller 3 The frame moves to Date 10 Press the four way controller 5 The frame moves to one of the following items depending on the date format set in St...

Page 196: ...s in Steps 8 to 12 If you selected 12h in Step 7 the setting switches between am and pm corresponding to the time 14 Press the four way controller 3 to select Settings complete 15 Press the 4 button T...

Page 197: ...our way controller 23 to select World Time 3 Press the four way controller 5 The World Time screen appears 4 Use the four way controller 23 to select X Destination 5 Press the four way controller 5 Th...

Page 198: ...Q mode The W Setting menu appears When you press the 3 button in A mode press the four way controller 5 once 2 Use the four way controller 23 to select World Time 3 Press the four way controller 5 Th...

Page 199: ...layed in A mode You can set the text size of the item selected with the cursor on the menu to Standard normal display or Large magnified display 1 Press the 3 button in Q mode The W Setting menu appea...

Page 200: ...hai Korean Traditional Chinese and Simplified Chinese 1 Press the 3 button in Q mode The W Setting menu appears When you press the 3 button in A mode press the four way controller 5 once 2 Use the fou...

Page 201: ...Name 3 Press the four way controller 5 A pull down menu appears Changing the Naming System of the Folder PENTX xxxPENTX where xxx is the 3 digit folder number Date xxx_mmdd 3 digit folder number_mont...

Page 202: ...pull down menu appears 4 Use the four way controller 23 to select a video output format Choose the video output format to match the input format of the AV equipment 5 Press the 4 button The setting i...

Page 203: ...ss the 3 button in A mode press the four way controller 5 once 2 Use the four way controller 23 to select Eye Fi 3 Use the four way controller 45 to select O or P O Starts transferring using the Eye F...

Page 204: ...the four way controller 23 to select Brightness Level 3 Use the four way controller 45 to adjust the brightness F Dark G Normal H Bright 4 Press the 3 button The camera returns to A mode or Q mode The...

Page 205: ...select the time until the camera enters the power saving mode Choose from 2min 1min 30sec 15sec 5sec or Off 5 Press the 4 button The setting is saved Using the Power Saving Function Power Saving does...

Page 206: ...the camera turns off automatically Choose from 5min 3min or Off 5 Press the 4 button The setting is saved Setting the Auto Power Off Function Auto Power Off does not function in the following situatio...

Page 207: ...45 to select Start up Screen 3 Press the 4 button The image selection screen appears 4 Use the four way controller 45 to choose the image for the start up screen Only images available for the start up...

Page 208: ...roller 5 The Pixel Mapping screen appears Once the start up screen has been set it will not be deleted even if the original image is deleted or the SD Memory Card or built in memory is formatted Howev...

Page 209: ...way controller 5 once 2 Use the four way controller 23 to select Reset 3 Press the four way controller 5 The Reset screen appears 4 Use the four way controller 23 to select Reset When the battery leve...

Page 210: ...208 7 Settings 5 Press the 4 button The settings return to the defaults The following settings are not affected by resetting Date Adjustment World Time Language Video Out...

Page 211: ...8 Connecting to a Computer Setting Up Your Computer 210 Connecting to Your Computer 217 Transferring Images Using an Eye Fi Card 224...

Page 212: ...in the provided CD ROM S SW121 Image viewing managing editing software Windows MediaImpression 3 1 for PENTAX Macintosh MediaImpression 2 1 for PENTAX Applicable languages English French German Spanis...

Page 213: ...ore 2 Duo 2 0 GHz or equivalent AMD Athlon X2 processor recommended Memory 512 MB minimum 1 GB or more recommended Hard Disk Space 300 MB minimum Others CD ROM drive USB port as standard equipment 102...

Page 214: ...rive S SW121 icon The installation screen appears 5 Click MediaImpression 3 1 for PENTAX choose a language in the Choose Setup Language screen and click OK The setup screen appears Follow the on scree...

Page 215: ...lication 7 Click Finish Installation is complete Reboot your computer 1 Turn your Macintosh on 2 Insert the provided CD ROM S SW121 into the CD ROM DVD drive 3 Double click the CD ROM S SW121 icon 4 D...

Page 216: ...the Internet please click Product Registration on the installation screen The world map screen shown on the right for Internet Product Registration is displayed Click the displayed country or region...

Page 217: ...ection 4 Press the four way controller 5 A pull down menu appears 5 Use the four way controller 23 to select MSC 6 Press the 4 button The setting is saved Setting the USB Connection Mode Make sure to...

Page 218: ...Storage Class you can copy read and write files from a computer without installing a dedicated driver PTP Picture Transfer Protocol A protocol that allows transfer of digital images and control of di...

Page 219: ...using the USB cable Connect the terminal of the USB cable with pointing toward the 4 on the PC AV terminal of the camera 4 Turn your camera on For Windows the AutoPlay screen appears on the computer I...

Page 220: ...manufacturer s name or model number When the AutoPlay screen does not appear 1 Double click the MediaImpression icon on the desktop MediaImpression starts and the Start page appears 2 Click PhotoImpr...

Page 221: ...and the import screen appears 6 Select an image to import To select multiple images choose the images while pressing the Ctrl key To specify the destination location click the folder icon 7 Click Imp...

Page 222: ...s folder MediaImpression 2 1 for PENTAX starts and the Start page appears 6 Click Import The import screen appears For subsequent steps refer to Step 6 and 7 on p 219 Macintosh If the images from the...

Page 223: ...on the desktop to the trash If the SD Memory Card has a volume label drag the icon of that name to the trash 2 Disconnect the USB cable from your Macintosh and the camera Disconnecting the Camera fro...

Page 224: ...rt page appears 2 Click PhotoImpression The Media Browser screen appears 3 Select and click the folder containing the images you wish to view The images are displayed 4 Select and double click an imag...

Page 225: ...n by using the help pages 1 Select Help in Menu at the top right of the screen for Windows or MediaImpression Help in Help on the menu bar for Macintosh The help screen appears in the web browser 2 Cl...

Page 226: ...a on 5 Select O On for Eye Fi on the W Setting menu The images are transferred automatically For details on how to set up the camera refer to Setting Eye Fi Communication p 201 One of the following ic...

Page 227: ...he optional AC adapter kit K AC117 is recommended Auto Power Off does not function while transferring images The camera may be turned off automatically to protect the internal components when the insi...

Page 228: ...Memo 226...

Page 229: ...Functions Available for Each Shooting Mode 228 Messages 230 Troubleshooting 232 Default Settings 234 List of World Time Cities 239 Optional Accessories 240 Main Specifications 241 WARRANTY POLICY 245...

Page 230: ...z z z z z Manual Focus z z z z z A Rec Mode menu Recorded Pixels z z 7 z z z 8 White Balance 12 z 12 z 12 z AF Setting Focusing Area 13 z 13 z z z 14 Focus Assist z z 20 z z 24 AE Metering 15 z 15 z...

Page 231: ...Compensation p 110 z z z z z z D Range Setting p 111 z z z 22 z 22 z 22 z 22 Shake Reduction p 118 z z z z Blink Detection p 69 z z z z Sharpness p 120 Saturation p 121 Contrast p 121 z z z z z z Dat...

Page 232: ...e camera p 190 Card is locked The SD Memory Card is write protected p 7 Compression error This message appears when the camera fails to compress an image Change the number of recorded pixels of the im...

Page 233: ...yed when there are no images or sound files This image sound cannot be processed Displayed for files that cannot be processed No card in the camera Displayed when no SD Memory Card is inserted The bui...

Page 234: ...evel in the W Setting menu p 202 Power Saving function is activated When the Power Saving function is activated the display automatically darkens after a certain amount of time Press a button to retur...

Page 235: ...te the desired subject in the focus frame focusing area in the center of the display If it is difficult to do so first lock the focus on the desired subject focus lock and then move the camera to reco...

Page 236: ...7 No The setting is saved even after reset N A A Rec Mode Menu Items Item Default Setting Last Memory Setting Reset Setting Page Recorded Pixels m 4608 3456 Yes Yes p 108 White Balance F Auto Yes p 11...

Page 237: ...ance P Off Yes Yes Sensitivity P Off Yes Yes EV Compensation P Off Yes Yes AE Metering P Off Yes Yes Digital Zoom O On Yes Yes DISPLAY P Off Yes Yes File No O On Yes Yes Green Button Green Mode Yes Ye...

Page 238: ...orld Time Select Time W Hometown Yes Yes p 195 Destination City According to the initial setting Yes No Destination DST P Off Yes No Hometown City According to the initial setting Yes No Hometown DST...

Page 239: ...t1 Yes Yes p 169 Red eye Compensation p 168 Movie Editing Save as Still Image p 173 Divide Movies Resize Recorded Pixels Depending on the picture taken p 160 Cropping Depending on the picture taken p...

Page 240: ...de angle No p 78 Four way controller 2 Drive Mode 9 Standard Yes p 92 p 93 3 Shooting Mode b Auto Picture Yes Yes p 69 4 Flash Mode Auto Yes p 102 5 Focus Mode Standard Yes p 104 3 button Menu Display...

Page 241: ...le PAL New York NTSC Delhi PAL Halifax NTSC Colombo PAL Central and South America Mexico City NTSC Kathmandu PAL Lima NTSC Dacca PAL Santiago NTSC East Asia Yangon NTSC Caracas NTSC Bangkok PAL Buenos...

Page 242: ...ttery D LI92 Battery charger kit K BC92 Battery charger D BC92 AC plug cord AC adapter kit K AC117 AC adapter D AC115 DC coupler D DC92 AC plug cord The battery charger and AC plug cord are only sold...

Page 243: ...ty is set to 3200 or 6400 Fixed at f in Burst Shooting L M H mode Movie M 1280 720 30 fps F 1280 720 15 fps G 640 480 30 fps H 640 480 15 fps I 320 240 30 fps J 320 240 15 fps recorded pixels frame ra...

Page 244: ...16 sec H 640 480 15 fps 2 min 46 sec 53 min 55 sec I 320 240 30 fps 2 min 13 sec 44 min 32 sec J 320 240 15 fps 4 min 5 sec 1 hr 18 min 48 sec Sound 26 min 14 sec 8 hr 44 min 34 sec The above figures...

Page 245: ...cus Type TTL contrast detection system by sensor 9 point autofocus multiple spot automatic tracking AF changeable Focus range From lens face Standard 0 4 m Wide angle 1 3 m Telephoto Macro 0 1 m 0 5 m...

Page 246: ...ntrol type control time Approx 10 sec 2 sec Time Function World Time 75 cities 28 time zones Power Source Rechargeable lithium ion battery D LI92 AC adapter kit optional Battery Life Number of Recorda...

Page 247: ...facturer If there is no representative of the manufacturer in your country send the equipment to the manufacturer with postage prepaid In this case it will take a considerable length of time before th...

Page 248: ...rs in some countries can supersede this warranty policy Therefore we recommend that you review the warranty card supplied with your product at the time of purchase or contact the PENTAX distributor in...

Page 249: ...l interference to radio communications However there is no guarantee that interference will not occur in a particular installation If this equipment does cause harmful interference to radio or televis...

Page 250: ...with the standards Records maintained continue to reflect the equipment being produced can be expected to be within the variation accepted due to quantity production and testing on the statistical bas...

Page 251: ...o inappropriate waste handling If a chemical symbol is added beneath the symbol shown above in accordance with the Battery Directive this indicates that a heavy metal Hg Mercury Cd Cadmium Pb Lead is...

Page 252: ...Landscape 70 f Blue Sky 70 K Sunset 70 b Flower 70 c Portrait 82 Q Surf Snow 87 Sport 87 c Digital SR 81 R Kids 83 e Pet 84 K Food 71 S Fireworks 81 N Frame Composite 90 B Party 88 d Natural Skin Tone...

Page 253: ...Digital Filter 164 Digital SR 80 Digital Wide Mode 97 Digital Zoom 78 80 Display brightness 202 Display language 44 198 Dividing movies 174 DPOF settings 178 D Range Setting 111 Drive Mode 92 93 E Ed...

Page 254: ...3 button 53 55 Miniature filter 164 Movie 127 Movie SR Movie Shake Reduction Function 130 MSC 216 Multi segment metering L 114 N Natural Skin Tone Mode 82 Night Scene Mode 80 Night Scene Portrait Mod...

Page 255: ...92 Sensitivity 115 Sepia filter 164 Setting menu 63 236 Shade l 112 Shadow Correction 111 Shake Reduction 118 Sharpness 120 Shooting information 23 Shooting mode 69 Shutter release button 52 54 68 Sl...

Page 256: ...254 9 Appendix W White Balance 112 Windows 211 World Time 195 Z Zoom x w 78 Zoom lever 52 54...

Page 257: ...Memo...

Page 258: ...Memo...

Page 259: ...Memo...

Page 260: ...GING FRANCE S A S European Headquarters 112 Quai de Bezons B P 204 95106 Argenteuil Cedex FRANCE HQ http www pentax eu France http www pentax fr PENTAX RICOH IMAGING DEUTSCHLAND GmbH Julius Vosseler S...

Reviews: