background image

76

3

B

asic Op

er

atio

ns

3

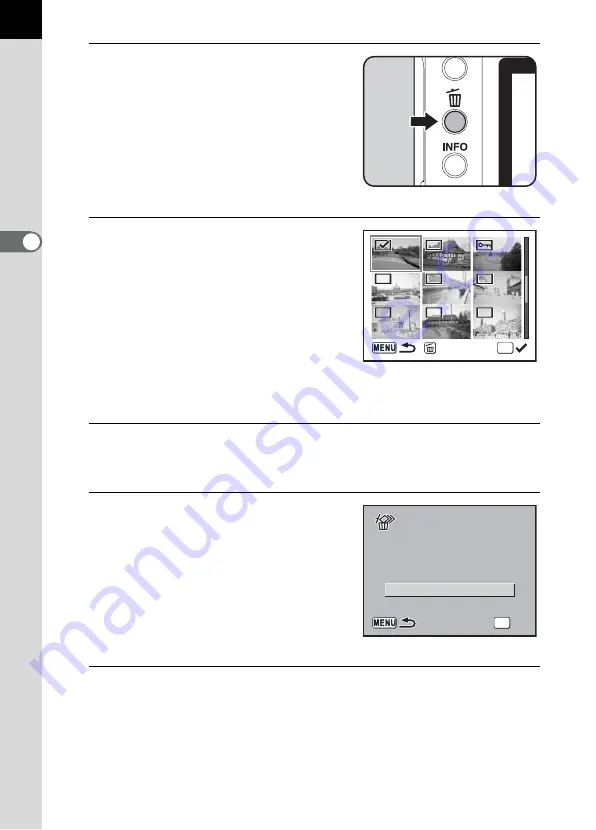
Press the 

i

 button.

9

 appears above the images.

4

Use the four-way controller 
(

2345

) to move to the 

images to delete and press the 

4

 button.

Image is selected and 

O

 appears.

Press 

{

 button to select all images. 

(The selection of images may take time 
to complete depending on the number 
of images.)

5

Press the 

i

 button.

The Delete confirmation screen appears.

6

Use the four-way controller (

2

to select [Select&Delete].

7

Press the 

4

 button.

The selected images are deleted.

OK

Delete

Select&Delete

OK

OK

OK

OK

Cancel

Cancel

Cancel

All selected

All selected

images are deleted

images are deleted

All selected

images are deleted

Summary of Contents for 18428

Page 1: ... Netherlands Spinveld 25 4815 HR Breda NETHERLANDS http www pentax nl for Belgium Luxembourg Weiveldlaan 3 5 1930 Zaventem BELGIUM http www pentax be PENTAX Schweiz AG Widenholzstrasse 1 Postfach 367 8305 Dietlikon SWITZERLAND http www pentax ch PENTAX Scandinavia AB P O Box 650 75127 Uppsala SWEDEN http www pentax se PENTAX Imaging Company A Division of PENTAX of America Inc Headquarters 600 12th...

Page 2: ...owners To users of this camera There is a possibility that recorded data may be erased or that the camera may not function correctly when used in surroundings such as installations generating strong electromagnetic radiation or magnetic fields The liquid crystal panel used in the LCD display is manufactured using extremely high precision technology Although the level of functioning pixels is 99 99...

Page 3: ...g directly with the telephoto lens may lead to a loss of eyesight Be sure to store batteries out of the reach of children Seek medical assistance immediately if a battery is accidentally swallowed Always use the AC adapter exclusively developed for this product with the specified power and voltage Using an AC adapter not exclusive to this product or using the exclusive AC adapter with an unspecifi...

Page 4: ... battery with a new one It may cause explosion or a fire The batteries should be inserted correctly with regard to polarity and marked on the batteries and the camera AA lithium batteries AA alkaline batteries and disposable CR V3 are not rechargeable Do not disassemble the batteries Recharging and disassembling can cause explosion or leakage Take the Worldwide Service Network that is included in ...

Page 5: ...wly at low temperatures This is due to liquid crystal properties and is not a fault Periodic inspections are recommended every one to two years to maintain high performance Sudden temperature changes will cause condensation on the inside and outside of the camera Place the camera in your bag or a plastic bag removing the camera after temperature of the camera and surroundings are equalized Avoid c...

Page 6: ...16 Viewfinder Indications 20 LCD Panel Indications 22 Getting Started 23 Attaching the Strap 24 Inserting the Batteries 25 Batteries 26 Battery Level Indicator 27 Approximate Image Storage Capacity and Playback Time new batteries 27 Using the AC Adapter Optional 28 Inserting Removing the SD Memory Card 29 Recorded Pixels and Quality Level 31 Turning the Camera On and Off 32 Initial Settings 33 Set...

Page 7: ...ll Pictures 63 Playing Back Images 63 Enlarging Playback Images 65 Nine Image Display 66 Slideshow 68 Connecting the Camera to AV Equipment 70 Processing Images with Filters 71 Deleting Images 73 Deleting a Single Image 73 Deleting All Images 74 Deleting Selected Images from Nine Image Display 75 Protecting Images from Deletion Protect 77 Setting the Printing Service DPOF 79 Printing Single Images...

Page 8: ...uality Level 110 Setting the Saturation Sharpness Contrast 111 Setting the White Balance 112 Setting the Sensitivity 115 Setting the Color Space 117 Focusing 118 Using the Autofocus 118 Setting the Focusing Area 121 Setting the AF Mode 122 Fixing the Focus Focus Lock 123 Adjusting the Focus Manually Manual Focus 125 Setting the Exposure 127 Effect of Aperture and Shutter Speed 127 Selecting the Me...

Page 9: ...ttings 162 Formatting the SD Memory Card 162 Turning the Beep On and Off 163 Changing the Date and Time and the Display Style 163 Setting the World Time 164 Setting the Display Language 167 Turning the Guide Display On and Off 167 Adjusting the Brightness of the LCD Monitor 168 Selecting the Video Output Format 168 Setting Auto Power Off 169 Resetting the File Number 169 Setting the Instant Review...

Page 10: ...Various Lens Combinations 178 Notes on Using Aperture Ring 180 Cleaning the CCD 181 Optional Accessories 183 Error Messages 186 Troubleshooting 188 Main Specifications 190 Specifications for Remote Control F Optional 192 Glossary 193 Index 198 WARRANTY POLICY 202 ...

Page 11: ...tructions 3 Basic Operations Explains the procedures for taking playing back and printing still pictures Read it to learn all of the basic operations about capturing playing back and printing 4 Menu Reference Explains the functions of L by buttons and menus 5 Function Reference Introduces functions to further enhance your L experience 6 Appendix Explains troubleshooting introduces optional accesso...

Page 12: ...Memo 10 ...

Page 13: ...1 Before Using Your Camera Check the package contents and names of working parts before use L Camera Characteristics 12 Checking the Contents of the Package 13 Names of Working Parts 14 ...

Page 14: ...ngle will differ between the L and 35 mm SLR cameras even if the same lens is used because the format size for 35 mm film and CCD are different Sizes for 35 mm film and CCD 35 mm film 36 24 mm L CCD 23 5 15 7 mm Angles of view being equal the focal length of a lens used with a 35 mm camera must be approximately 1 5 times longer than that of L To obtain a focal length framing the same area divide t...

Page 15: ...ed with the camera are for checking the camera s functionality Hot shoe cover FK Installed on camera Eyecup FN Installed on camera ME Viewfinder cap Body mount cover Installed on camera USB cable I USB17 Video cable I VC28 Software CD ROM S SW34 Strap O ST10 AA Alkaline batteries four Operating Manual this manual PENTAX PHOTO Browser 2 1 PENTAX PHOTO Laboratory 2 1 Operating Manual ...

Page 16: ...s mode lever Tripod socket Battery cover Self Timer lamp Remote control receiver AF coupler Mirror Lens unlock button Lens mount index Main switch Shutter release button e dial L Z button 3 button i button Q button M button Lensinformation contacts button Four way controller ...

Page 17: ...ver Card cover unlock lever Card access lamp Diopter adjustment lever Mode dial Built in flash mc button Hot shoe USB Video terminal DC input terminal LCD panel Strap lug K button Terminal cover Cable switch terminal Viewfinder LCD monitor ...

Page 18: ...s p 99 1 Flash mode Active mode appears p 49 2 Drive mode p 102 3 AE metering p 130 4 Focusing area p 121 5 White balance p 112 6 Sensitivity p 115 7 Shooting mode Mode dial position p 104 8 World time warning display p 164 9 Date and time p 163 Indicators 3 4 5 and 6 only appear when the setting other than the default setting is selected 8 only appears when World Time is On LCD monitor 12 12 30 3...

Page 19: ... 6 Auto bracket p 145 15 Saturation p 111 7 ISO sensitivity p 115 16 Sharpness p 111 8 Image tone p 108 17 Contrast p 111 9 Quality level p 110 18 Lens focal length 12 12 30 30 AF AF sRGB sRGB 40 40mm mm ISO ISO 800 800 Detailed Info Detailed Info Detailed Info Detailed Info 12 30 AF sRGB 40mm ISO 800 2005 2005 25 25 06 06 2005 25 06 1 14 15 16 6 5 4 3 2 17 8 7 10 9 12 18 11 13 Auto Picture Auto P...

Page 20: ...ivity p 115 5 Focus mode p 118 18 Image tone p 108 6 Focusing area p 121 19 Contrast p 111 7 Shutter speed p 134 20 Quality level p 110 8 Aperture p 136 21 Recorded pixels p 109 9 EV compensation p 141 22 Color space p 117 10 Saturation p 111 23 Lens focal length 11 Shooting mode p 104 24 White balance p 112 12 AE metering p 130 25 Captured date and time p 163 12 12 30 30 sRGB sRGB 40 40mm mm 12 3...

Page 21: ...age folder number and file number p 169 3 Protect icon p 77 4 Histogram Areas where blooming occurred blink if Bright Portion warning is on p 160 Press the four way controller 23 in the histogram display to move the Histogram display position up or down 100 0046 100 0046 100 0046 1 2 4 3 ...

Page 22: ...en focus mode is set to k Continuous mode 6 Picture mode icon p 47 Icon for Picture mode in use appears Night Scene Portrait Moving Object q Macro s Landscape Portrait U Normal 7 Focus indicator p 44 Appears when image is focused When blinking indicates an out of focus subject 8 Shutter speed p 134 Shutter speed when capturing or adjusting underlined when shutter speed can be adjusted with e dial ...

Page 23: ...images EV compensation Show the number of recordable images with current quality and recorded pixel setting Show the number of continuous shooting recordable images p 100 EV compensation value appears when EV compensation is being adjusted p 133 The difference with the appropriate exposure value appears if exposure mode is a p 138 12 Manual focus p 125 Appears when focus mode is 13 ISO sensitivity...

Page 24: ...used 6 AE metering p 130 No indicator Multi segment metering a Flash off M Center weighted metering E Auto discharge N Spot metering Red eye reduction flash on 7 Auto bracketing p 145 4 Drive Mode p 102 8 White balance p 112 Not displayed when set to Auto 9 Single frame shooting j Continuous shooting 9 Battery level g Self Timer shooting 10 EV compensation p 141 h Remote control shooting 11 Number...

Page 25: ...e camera to taking pictures Be sure to read it and follow the instructions Attaching the Strap 24 Inserting the Batteries 25 Inserting Removing the SD Memory Card 29 Turning the Camera On and Off 32 Initial Settings 33 Attaching the Lens 37 Adjusting the Viewfinder Diopter 39 ...

Page 26: ...Attaching the Strap 1 Pass the end of the strap through the strap lug then secure on the inside of the clasp 2 Pass the other end of the strap through the other strap lug on the camera then secure on the inside of the clasp ...

Page 27: ...er to Batteries p 26 for details on compatible batteries and when to use them CR V3 AA lithium batteries and AA alkaline batteries are not rechargeable Do not open the battery cover or remove the batteries while the power is on Remove the batteries when you will not use the camera for a long while The batteries may leak If the date and time settings have been reset when you insert new batteries af...

Page 28: ...teries Batteries CR V3 The CR V3 is a long life battery and is convenient when traveling AA Ni MH rechargeable batteries These are rechargeable and are economical AA lithium batteries Recommended in cold climates AA alkaline batteries Provided with the camera These are easily obtainable when your usual batteries run out but they may not support all the camera functions under certain conditions We ...

Page 29: ...0 use CR V3 23 C 850 750 650 700 minutes 0 C 560 500 410 470 minutes AA lithium batteries 23 C 750 650 550 470 minutes 0 C 670 570 470 400 minutes AA rechargeable batteries NiMH 2500mAh 23 C 560 500 440 350 minutes 0 C 500 440 380 300 minutes AA Alkaline Batteries 23 C 90 70 50 140 minutes 0 C Not applicable Not applicable Not applicable 70 minutes Battery performance temporarily decreases as the ...

Page 30: ...r 4 Plug the AC cord into the power outlet Using the AC Adapter Optional Make sure the camera is turned off before connecting or disconnecting the AC adapter Make sure connections are secure between the camera AC adapter AC plug cord terminal and the power outlet SD Memory Card and data will be corrupted if disconnected while camera is recording or reading data Be sure to read the AC adapter D AC1...

Page 31: ...rd cover unlock lever in the indicated direction Card cover opens 2 Insert the card all the way with the SD Memory Card label toward the LCD monitor 3 Close the card cover Push the SD Memory Card in once to remove Do not remove the SD Memory Card while card access lamp is lit Format new SD Memory Card Also format SD Memory Card used with other cameras Refer to Formatting the SD Memory Card p 162 f...

Page 32: ...be deleted in the following circumstances PENTAX does not accept any liability for data that is deleted if 1 the SD Memory Card is mishandled by the user 2 the SD Memory Card is exposed to static electricity or electrical interference 3 the card has not been used for a long time 4 the card is ejected or the battery is removed while the data on the card is being recorded or accessed The SD Memory C...

Page 33: ...ired number of pixels For example to print in postcard size R 1536 1024 is adequate Set the appropriate recorded size and quality level depending on purpose Choose the appropriate number of recorded pixels and quality level for images on the A Rec Mode menu 1Setting the Recorded Pixels p 109 1Setting the Quality Level p 110 Recorded Pixels Quality Level and Approximate Image Storage Capacity The a...

Page 34: ... ON position The camera will turn on Move the main switch to OFF position to turn off the camera Always turn the camera off when not in use The power will automatically turn off when you do not perform any operations within a set period of time Default setting is 1 minute p 169 ...

Page 35: ...your camera on You can choose the language in which the menus error messages etc are displayed from the following English French German Spanish Italian Swedish Dutch Russian Korean Chinese traditional simplified and Japanese 1 Press the four way controller 5 2 Use the four way controller 2345 to select your applicable language The default setting is English 3 Press the 4 button Setting the Display...

Page 36: ...to W 5 Press the four way controller 45 to select the city 6 Press the four way controller 3 The cursor moves to DST daylight saving time 7 Use the four way controller 45 to select O On or P Off 8 Press the 4 button The screen for setting the date and time will be displayed ...

Page 37: ...troller 5 The frame moves to 24h 4 Use the four way controller 23 to select 24h 24 hour display or 12h 12 hour display 5 Press the four way controller 5 The frame returns to Date Style 6 Press the four way controller 3 The frame moves to Date Setting the Date and Time OK mm dd yy24h 2005 01 01 00 00 Date Style Date Adjust Date Time OK Cancel 24h 00 00 OK OK Cancel mm dd yy 2005 01 01 Date Style Da...

Page 38: ... to the H Set up menu Press the 4 button again You can cancel the setting operation and switch to Capture mode during initial settings by pressing the 3 button In this case the Initial Settings screen will appear again the next time you turn the camera on When you finish the settings and press the 4 button the camera clock is reset to 00 seconds To set the exact time press the 4 button when the ti...

Page 39: ...stom function settings p 101 1 Check that the camera is off 2 Remove the body mount cover and lens mount cover Be sure to put the lens down with the lens mount side facing upward to protect from damage to the area around the lens mount after removal 3 Align the red dots on the camera and the lens and secure by turning the lens clockwise until it clicks After attaching check that the lens is secure...

Page 40: ...tches and block dust when shipped Body Mount Cap K is sold separately and has a lock function We assume no responsibility nor liability for accidents damages and malfunctions resulting from the use of lenses made by other manufacturers The camera body and lens mount incorporate lens information contacts and an AF coupler Dirt dust or corrosion may damage the electrical system Clean the contacts wi...

Page 41: ...iewfinder and point the camera at a well lit scene Slide the diopter adjustment lever left or right Adjust the lever until the AF frame in the viewfinder is focused Eyecup is attached to the viewfinder portion when camera leaves the factory Diopter adjustment is available with the eyecup attached However adjustment is easier with the eyecup removed as shown above To remove the eyecup pull one side...

Page 42: ...Memo 40 ...

Page 43: ...ctions and settings for taking pictures refer to chapter 4 and onward Basic Shooting Operation 42 Selecting the Appropriate Capturing Mode for Scenes 47 Using the Zoom Lens 48 Using the Built in Flash 49 Other Shooting Modes 53 Playing Back Still Pictures 63 Connecting the Camera to AV Equipment 70 Processing Images with Filters 71 Deleting Images 73 Setting the Printing Service DPOF 79 Printing U...

Page 44: ...ject such as a table tree or wall Although there are individual differences among photographers the shutter speed for a handheld camera is generally 1 focal length 1 5 For example it is 1 75 of a second for a focal length of 50 mm and 1 150 of a second for 100mm A tripod should be used for shutter speeds slower than this When using a telephoto lens a tripod that is heavier than the total weight of...

Page 45: ...the subject lighting distance and motion 1 Set the mode dial to I The camera will select the optimal capturing mode for the subject 1Selecting the Appropriate Capturing Mode for Scenes p 47 2 Set the focus mode lever to Autofocus mode is set p 118 Letting the Camera Choose the Optimal Settings ...

Page 46: ...lease button halfway The autofocus system operates The focus indicator appears in the viewfinder when the subject is in focus The flash pops up automatically when necessary Manually lift the flash when Flash mode is not set to Auto 1OPERATING THE SHUTTER RELEASE BUTTON p 45 1Hard to Autofocus Subjects p 46 1Using the Built in Flash p 49 5 Press the shutter release button fully The picture is taken...

Page 47: ...wo positions Pressing it down halfway first position turns on the viewfinder and LCD panel indicators and the autofocus system operates Pressing it fully second position takes the picture Press the shutter release button gently when taking a picture to prevent camera shake Practice pressing the shutter release button halfway to learn where the first position is The viewfinder indicators stay on wh...

Page 48: ...ect with the aid of the matte field in the viewfinder p 126 a Extremely low contrast subjects such as a white wall in the focusing area b Subjects which do not reflect much light within the focusing area c Fast moving objects d Strongly reflected light or strong backlighting bright background e If vertical or horizontal line patterns appear within the focusing area f Multiple subjects in the foreg...

Page 49: ...from Normal Portrait Landscape Macro and Moving Object modes U Normal The basic picture taking mode Portrait Optimal for capturing portraits s Landscape Deepens the focus range emphasizes contour and saturation of trees and the sky and produces a bright image q Macro Lets you take vibrant pictures of flowers up close Moving Object Lets you take sharp pictures of a quickly moving subject such as at...

Page 50: ...Turn the zoom ring to the right or left Turn the zoom ring clockwise for telephoto and counterclockwise for wide angle The smaller the number of the displayed focal length the wider the angle The larger the number the more magnified the image appears Power Zoom functions Image Size Tracking Zoom Clip and Auto Zoom Effect are not compatible with this camera Wide Angle Telephoto ...

Page 51: ...discharge Discharges flash manually Flash discharges when popped up does not discharge when retracted C Auto flash Redeye reduct Light a red eye reduction light before automatic flash D Manl flash Redeye reduct Discharges flash manually Light a red eye reduction light before manual flash Manual discharge mode Flash ON is used regardless of flash mode settings if the K button is pressed to pop up t...

Page 52: ... U q or 2 Press the shutter release button halfway The built in flash pops up if necessary and begins charging When the flash is fully charged b appears in the LCD panel and viewfinder p 17 p 20 p 22 Selecting Flash Mode When the mode dial is set to e b c a or p B and C appear gray and cannot be selected Using Auto Discharge B C Automatic Flash Popup 200 200 200 Fn OK Exit Exit Exit Auto discharge...

Page 53: ... the LCD panel and viewfinder p 17 p 20 p 22 2 Press the shutter release button fully The flash discharges and the picture is taken 3 Push the flash down to retract Switch between Auto discharge mode and Manual discharge mode Flash ON by pressing the K button while the built in flash is popped up If Auto discharge is set E appears on the LCD panel Using Manual Discharge Flash ON b D Switch between...

Page 54: ...re flash is discharged just before the shutter is released This reduces pupil dilation The main flash is then discharged while the pupils are smaller reducing the red eye effect To use the red eye reduction function set C Red eye reduction auto flash in Picture mode or D Red eye reduction manual flash in other modes for Flash mode In daylight conditions the flash will eliminate shadows when a port...

Page 55: ...sic Operations Other Shooting Modes Pictures can be taken continuously while the shutter release button is held down 1 Press the button The Fn menu appears Continuous Shooting 200 200 200 Fn OK Exit Exit Exit ...

Page 56: ...ady to take pictures 5 Press the shutter release button halfway The autofocus system operates The focus indicator appears in the viewfinder when the subject is in focus OK OK OK Drive Mode Drive Mode OK Drive Mode Single frame shooting Single frame shooting Single frame shooting OK OK OK Drive Mode Drive Mode OK Drive Mode Continuous shooting Continuous shooting Continuous shooting ...

Page 57: ...s is adjusted each time the shutter is released if the focus mode is set to l Single mode p 122 Focusing is continuously active when the mode dial is set to e b c or a and focus mode is set to k Continuous mode or when Picture mode is set to Moving Object Note that the shutter will release even if the focusing is not complete The shutter cannot be released until charging is complete when using the...

Page 58: ...56 3 Basic Operations 2 Press the button The Fn menu appears 3 Press the four way controller 2 200 200 200 Fn OK Exit Exit Exit ...

Page 59: ...in the viewfinder that the subject you wish to shoot is in the display and press the shutter release button halfway The focus indicator appears when the subject is in focus OK OK OK Drive Mode Drive Mode OK Drive Mode Single frame shooting Single frame shooting Single frame shooting OK OK OK Drive Mode Drive Mode OK Drive Mode Self Timer 12 secs Self Timer 12 secs Self Timer 12 secs ...

Page 60: ...ressed fully 1 The beep can be turned off Turning the Beep On and Off p 163 8 Turn the camera off after shooting The next time the power is turned on self timer shooting is canceled and returns to single frame shooting Exposure may be affected if light enters the viewfinder Attach the provided ME viewfinder cap or use the AE lock function p 142 Ignore the light entering the viewfinder when the exp...

Page 61: ...nt the camera to a tripod 2 Press the button The Fn menu appears Remote Control Shooting Remote Control F Sold Separately h The shutter will be released immediately after the shutter release button on the remote control unit is pressed i The shutter will be released three seconds after the shutter release button on the remote control unit is pressed 200 200 200 Fn OK Exit Exit Exit ...

Page 62: ...utofocus system operates The focus indicator appears in the viewfinder when the subject is in focus You cannot focus with the remote control unit in default settings Focus on the subject first before operating with the remote control You can set AF in remote control to On in the custom function p 100 When using the Remote Control Unit flash does not pop up automatically even when set to B Auto dis...

Page 63: ...ction p 142 Ignore the light entering the viewfinder when the exposure mode is set to a manual p 138 Remove the Eyecup FN by pulling one side out and toward you when using accessories such as the ME viewfinder cap Turn the power off to stop the remote control operation after it has been activated The remote control may not operate in backlit conditions The remote control does not work while the fl...

Page 64: ...shake when mirror pops up by using this method Follow the procedure below to take a picture with the mirror lock up 1 Mount the camera to a tripod 2 Use the button and the four way controller 2 to select r 2 sec Self Timer p 55 3 Focus on the subject 4 Press the shutter release button fully The mirror pops up and the picture is taken two seconds later AE lock is enabled with the exposure value set...

Page 65: ...r taking a picture The most recently captured image image with the largest file number is displayed on the LCD monitor Playing Back Images Use the included PENTAX PHOTO Browser 2 1 software to play back using a PC Refer to the PENTAX PHOTO Browser 2 1 PENTAX PHOTO Laboratory 2 1 Operating Manual for details 100 0046 100 0046 100 0046 ...

Page 66: ...ly easier to view 1 Press the Q button after taking a picture The most recently captured image image with the largest file number is displayed on the LCD monitor 2 Press the four way controller 3 The image is rotated 90 counterclockwise each time the button is pressed Rotating Images 100 0001 100 0001 100 0001 100 0001 100 0001 100 0001 100 0001 100 0001 100 0001 OK OK OK OK OK OK OK OK ...

Page 67: ... can magnify images up to 12 times when displaying 1 Press the Q button and use the four way controller 45 to select an image The most recently captured image image with the largest file number is displayed first on the LCD monitor Enlarging Playback Images 100 0046 100 0046 100 0046 ...

Page 68: ... left toward f to return Press the 4 button to return to the original size Press four way controller 2345 in zoom display to change the display area You can display nine images on the LCD monitor at the same time The first calibration on the e dial is 1 2 times You can change this in Mag to Strt Zm Plybk in A Custom menu p 101 Nine Image Display 2 0 2 0 ...

Page 69: ...ur way controller 2345 to select an image A scroll bar appears at the right of the screen With an image selected in the bottom row pressing the four way controller 3 displays the next nine images appears for an image that cannot be displayed 3 Turn the e dial to the right towards y or press the 4 button A full screen display of the selected image appears 100 0046 100 0046 100 0046 Select Delete 10...

Page 70: ...u screen displayed on the LCD monitor 1 Press the Q button and use the four way controller 45 to select an image to be displayed first The most recently captured image image with the largest file number is displayed first on the LCD monitor 2 Press the button The Fn menu appears Slideshow 100 0046 100 0046 100 0046 Fn OK Exit Exit Exit ...

Page 71: ...Press any button to end slideshow Press the shutter release button or the Q button slide the main switch to preview or turn the mode dial to change to Capture mode Set the display time for slideshow in the Q Playback menu Alternatively start the slideshow from the Q Playback menu p 161 Start Start Start ...

Page 72: ...e Video Output Format p 168 1 Connect the video cable to the USB Video terminal on the camera 2 Connect the other end of the video cable to the video IN jack on the TV 3 Turn the TV and camera on If you intend to use the camera continuously for a long period use of the AC adapter optional is recommended p 28 For AV equipment with multiple video IN jacks such as TVs check the operating manual of th...

Page 73: ...s cannot be processed using the digital filter Additionally set digital filters from the Q Playback menu B W Convert to a black and white image Sepia Add a vintage touch to photos by converting them to sepia color Soft Create a soft image by lightly fading the entire image Select from three levels Slim Change the horizontal and vertical ratio of images Adjust height or width up to two times the or...

Page 74: ...cted Turn counterclockwise for wider and clockwise for slimmer if slim filter is selected Select softness from three levels if soft filter is selected Use the four way controller 45 to select an image The image appears in the set slimness or softness 6 Press the 4 button The save confirmation screen appears 7 Use the four way controller 2 to select Save as 8 Press the 4 button The filtered image i...

Page 75: ... 2 Press the i button The Delete screen appears 3 Use the four way controller 2 to select Delete 4 Press the 4 button The image is deleted Deleting a Single Image Deleted images cannot be restored Protected images cannot be deleted 100 0046 100 0046 100 0046 Delete 100 0046 100 0046 100 0046 OK OK OK Cancel Cancel OK Cancel All images All images All images ...

Page 76: ...s the four way controller 2 to select Delete All and press the 4 button All images are deleted Deleting All Images Deleted images cannot be restored Protected images cannot be deleted Delete All Delete All Cancel Cancel Delete All OK OK OK OK Cancel Delete all images Delete all images on memory card on memory card Delete all images on memory card ...

Page 77: ...h the largest file number is displayed first on the LCD monitor 2 Turn the e dial to the left toward f Nine thumbnail images appear Deleting Selected Images from Nine Image Display Deleted images cannot be restored Protected images cannot be deleted Only files in the same folder can be selected at once 100 0046 100 0046 100 0046 100 0046 Select Delete ...

Page 78: ...all images The selection of images may take time to complete depending on the number of images 5 Press the i button The Delete confirmation screen appears 6 Use the four way controller 2 to select Select Delete 7 Press the 4 button The selected images are deleted OK Delete Select Delete OK OK OK OK Cancel Cancel Cancel All selected All selected images are deleted images are deleted All selected im...

Page 79: ...ect screen appears 3 Use the four way controller 2 to select Protect 4 Press the 4 button The selected image is protected Protecting Images from Deletion Protect Even protected images are deleted if the SD Memory Card is formatted Select Unprotect in step 3 to cancel the Protect setting The Y symbol is displayed when playing back protected images p 19 100 0046 100 0046 100 0046 Protect 100 0046 10...

Page 80: ...four way controller 2 to select Protect and press the 4 button All images saved in the SD Memory Card are protected Protecting All Images Select Unprotect in step 3 to cancel the Protect setting on all of the images Protect OK OK OK OK Unprotect Unprotect Protect all images Protect all images Unprotect Protect all images ...

Page 81: ...oller 45 to select an image 2 Press the button The Fn menu appears 3 Press the four way controller 2 The DPOF screen appears If DPOF settings have already been made for an image the previous number of prints and date setting O on or P off will be displayed DPOF settings cannot be applied to RAW images Printing Single Images Copies Choose the number of copies You can print up to 99 copies Date Spec...

Page 82: ...e will not be imprinted 6 Press the 4 button The DPOF settings are saved and the camera returns to playback status Depending on the printer or printing equipment at the photo processing lab the date may not be imprinted on the pictures even if the DPOF setting was made To cancel DPOF settings set the number of copies to 00 in Step 4 and press the 4 button 01 01 01 100 0046 100 0046 100 0046 Fn Cop...

Page 83: ...ller 45 to choose the number of copies and whether to insert the date O or not P Refer to Steps 4 and 5 in Printing Single Images p 80 for details of how to make the settings Settings for All Images Fn OK Exit Exit Exit 00 Copies 100 0046 100 0046 100 0046 Fn OK OK OK All images All images Date Date OK Date All images 02 Copies OK OK OK OK Date Date Date DPOF setting for all DPOF setting for all i...

Page 84: ...he images are saved and the camera returns to playback status The number of copies specified in settings for all images applies to all the images Before printing check that the number is correct Settings for single images are canceled when settings are made for all images ...

Page 85: ...with DPOF settings p 90 Disconnect the camera from the printer p 90 Use of the AC adapter is recommended when connecting the camera to a printer The printer may not work properly or the image data may be lost if the battery runs out of power while the camera is connected to the printer Do not disconnect the USB cable during data transfer Depending on the type of printer not all the settings made o...

Page 86: ...ars 2 Use the four way controller 45 to select the H Set up menu 3 Use the four way controller 23 to select Transfer Mode 4 Press the four way controller 5 A pop up menu appears Setting Transfer Modes English Format Set up Beep Date Adjust World Time Guide display Exit ...

Page 87: ...urn the camera off 2 Connect the camera and PictBridge compatible printer using the USB cable supplied with the camera The PictBridge logo is displayed on PictBridge compatible printers Connecting the Camera to the Printer NTSC PC PC F Brightness Level Set up Video Out Transfer Mode Auto Power Off File Sensor Cleaning 0 OK OK Cancel PictBridge ...

Page 88: ...oose an image to print PictBridge menu is not displayed if Transfer Mode is set to PC or PC F Printing Single Images Print One Print All DPOF AUTOPRINT OK OK OK OK Select printing mode Select printing mode Select printing mode Print One Print All DPOF AUTOPRINT OK OK OK OK Select printing mode Select printing mode Select printing mode Date Date 1 Copies Copies Date OK 1 Copies 100 0046 100 0046 10...

Page 89: ...r Size and press the four way controller 5 The Paper Size screen appears 9 Use the four way controller 2345 to choose the paper size You can only choose a size that is supported by your printer When the Paper Size is set to Standard images are printed according to the printer settings Quality Paper Type Paper Size Standard Std Std Std Border Status OK Print Print Print Fn Change Setting Change Set...

Page 90: ...per Type with more E supports higher quality paper Quality with more E indicates higher print quality 12 Press the 4 button twice The image is printed according to the settings Press the 3 button to cancel printing 1 Use the four way controller 23 to select Print All on the PictBridge menu 2 Press the 4 button The Print all images screen appears Printing All Images Print One Print All DPOF AUTOPRI...

Page 91: ... details on how to make the settings 4 Press the 4 button The print settings confirmation screen appears 5 Press the 4 button on the print settings confirmation screen All the images are printed according to the settings Press the 3 button to cancel printing Date Date 1 28 28 Copies Copies Total Total Date OK 1 28 Copies Total 100 0046 100 0046 100 0046 Fn Print Print Date Date Print all images Pr...

Page 92: ...ears 4 Press the 4 button on the print settings confirmation screen The images are printed according to the settings Press the 3 button to cancel printing Disconnect the cable from the printer when you have finished printing 1 Disconnect the USB cable from the camera 2 Disconnect the USB cable from the printer Printing Images Using the DPOF Settings Disconnecting the Cable from the Printer 1 10 10...

Page 93: ...ns of L by buttons and menus Using the Button Functions 92 Using the Menu 96 Using the Fn Menu 102 Using the Mode Dial 104 When using menus and Fn menu items which cannot be changed due to camera settings appear gray and cannot be selected ...

Page 94: ...ed during shooting are noted Shutter release button Press to capture images p 45 Main switch Move to turn the power on off p 32 and confirm the depth of field Preview p 129 Lens unlock button Press to detach lens p 38 Capture Mode 3 5 6 7 8 9 10 11 12 13 14 15 4 1 2 1 2 3 ...

Page 95: ...nitor p 17 Q button Switches to the Playback mode p 63 mc button Press to set aperture and EV compensation values p 136 p 141 L button Record the exposure before shooting p 142 Automatically adjust the appropriate exposure in a Manual mode p 140 e dial Set shutter speed aperture and EV compensation values p 134 p 136 p 141 4 button Commit to the setting you selected in the menu Four way controller...

Page 96: ...ch to capture mode Main switch Move to turn the camera on and off p 32 3 button Press to display the Q Playback menu p 98 Next press the four way controller 45 to display H Set up menu p 99 A Custom menu p 100 and A Rec Mode menu p 98 i button Press to delete images p 73 Playback 1 3 5 6 10 7 8 9 4 2 1 2 3 4 ...

Page 97: ...protect images from being accidentally erased p 77 4 button Commit to the setting you selected in the menu or playback screen Four way controller 2345 Use to move cursor or change items in menus Fn menu and playback screen button Press to display the Fn menu Press the four way controller 245 to determine the following operation p 102 5 6 7 8 9 10 ...

Page 98: ...3 button in Capture mode The A Rec Mode menu appears on the LCD monitor 2 Press the four way controller 5 Q Playback menu H Set up menu and A Custom menu appears each time the four way controller is pressed How to Operate the Menu Exit Image Tone Rec Mode Recorded Pixels Quality Level Saturation Sharpness Contrast English Format Set up Beep Date Adjust World Time Guide display Exit ...

Page 99: ...return to Capture or Playback mode Even after you press the 3 button and close the menu screen your settings will not be saved if the camera is turned off improperly such as by removing the batteries while the camera is on You can use the e dial to switch among the A Rec Mode menu the Q Playback menu H Set up menu and A Custom menu when no pop up menu is displayed If the 3 button is pressed in Cap...

Page 100: ... Review time p 170 Auto Bracket Set Auto Bracket shooting p 145 AE Metering Choose the part of the screen to use for measuring brightness and determining exposure p 130 Focusing Area Change the area on which the autofocus focuses p 121 AF Mode Choose the autofocus mode p 122 Flash Exp Comp Adjust the amount of flash discharged p 146 Q Playback Menu Setting Items Item Function Page Plybk dsply mthd...

Page 101: ...g of local time when traveling abroad p 164 Language Change the language in which menus and messages appear p 167 Guide display Set to display indicators in LCD monitor p 167 Brightness Level Change the brightness of the LCD monitor p 168 Video Out Set the output format to the TV monitor p 168 Transfer Mode Set the USB cable connection PC or printer p 84 Auto Power Off Set the time to turn off aut...

Page 102: ... and AE Set to adjust AE and Focusing Area in multi segment metering based on AF point p 131 Meter Operating Time Set the exposure metering time p 132 AE L with AF locked Set to fix exposure value when focus is locked p 124 Recordable Image No Set to switch number of recordable images in the LCD panel and viewfinder to number of continuous shooting recordable images when shutter release button is ...

Page 103: ... the built in flash is charging p 147 Instant Review Dsply Set to display histogram during Instant Review p 170 Mag to Strt Zm Plybk Set the initial magnification of the zoom playback Choose from 1 2 times 2 times 4 times 8 times and 12 times The default setting is 1 2 times Man WB Measurement Set to meter entire screen or Spot area when setting white balance to manual p 113 Color Space Set the co...

Page 104: ... Four way controller Item Function Page 2 Drive Mode Select Continuous shooting Self Timer Remote control or Auto bracket p 53 p 55 p 59 p 143 3 Flash Mode Adjust the method of flash discharge p 49 4 White Balance Adjust the color for the color of the light source illuminating the subject p 112 5 Sensitivity Set the sensitivity p 115 200 200 200 Fn OK Exit Exit Exit ...

Page 105: ... to set the operation Playback Four way controller Item Function Page 2 DPOF Settings Set the DPOF settings p 79 4 Digital Filter Edit captured images to black and white or sepia tint or add softening and slimming effects p 71 5 Slideshow Play back recorded images one after another p 68 Fn OK Exit Exit Exit ...

Page 106: ... taking mode Portrait Optimal for capturing portraits s Landscape Deepens the focus range emphasizes contour and saturation of trees and the sky and produces a bright image q Macro Take vibrant pictures of flowers up close Moving Object Lets you take sharp pictures of a quickly moving subject such as a sporting event Night Scene Portrait Lets you capture people against a night view or dusk a Flash...

Page 107: ...st moving subjects that look still or subjects that give a sense of movement p 134 c Aperture Priority Set aperture and use when you want to adjust the depth of field Use to blur or focus on the background p 136 a Manual Lets you create the picture you have in mind by combining set shutter speed and aperture p 138 p Bulb Use to capture images that require slow shutter speeds such as fireworks and ...

Page 108: ...Memo 106 ...

Page 109: ...ons to further enhance your L experience Setting the Recorded Pixels and Quality Level 108 Focusing 118 Setting the Exposure 127 Using the Built in Flash 146 Settings During Playback 160 Camera Settings 162 Resetting to Default Settings 171 ...

Page 110: ...e in the A Rec Mode menu p 98 Setting the Image Tone F Bright Images are finished brightly with high contrast and sharp G Natural Images are finished naturally and suitable for retouching Settings cannot be changed in Picture mode p 47 Setting is fixed to F bright OK OK Image Tone Rec Mode Recorded Pixels Quality Level Saturation Sharpness Contrast Cancel ...

Page 111: ... settings The default setting is P 3008 2000 JPEG Set in Recorded Pixels in the A Rec Mode menu p 98 Setting the Recorded Pixels P 3008 2008 RAW 3008 2000 JPEG Suited for printing on A3 paper Q 2400 1600 Suited for printing on A4 paper R 1536 1024 Suited for printing on A5 paper Recorded Pixels cannot be selected if the Quality Level is set to RAW Fixed at 3008 2008 OK OK Image Tone Rec Mode Recor...

Page 112: ...e but such information is saved Transfer to a PC apply effects with the enclosed PENTAX PHOTO Laboratory 2 1 and create JPEG and TIFF images C Best Lowest compression rate suited for printing large pictures such as A4 size Image is saved in JPEG format D Better Standard compression rate suited for viewing as photographs or on your computer screen Image is saved in JPEG format E Good Highest compre...

Page 113: ...r contrast Towards Lower contrast Setting the Saturation Sharpness Contrast Saturation Set the color saturation Sharpness Make the image outlines sharp or soft Contrast Set the image contrast Settings cannot be changed in Picture mode p 47 Exit Image Tone Rec Mode Recorded Pixels Quality Level Saturation Sharpness Contrast Exit Image Tone Rec Mode Recorded Pixels Quality Level Saturation Sharpness...

Page 114: ...00 to 8000K G Daylight Set when taking pictures in sunlight About 5200K H Shade Set when taking pictures in the shade About 8000K Cloudy Set when taking pictures on cloudy days About 6000K J Fluorescent Light Set this when taking pictures under fluorescent lighting Select the type of fluorescent light from W white 4200K N neutral white 5000K and D daylight 6500K I Tungsten Light Set when taking pi...

Page 115: ...creen appears Adjusting the White Balance Manually Color Temperature The color of light shifts towards blue as the color temperature rises and towards red as the color temperature falls Color temperature describes this change in light color in terms of absolute temperature K Kelvin This camera is capable of setting the white balance to enable taking pictures with natural coloring under a variety o...

Page 116: ...o set again You can set the range to measure white balance when setting manually White balance is measured using the entire screen using multi segment metering p 130 if Entire screen is selected for Man WB Measurement in A Custom menu p 101 White Balance is only adjusted in the spot metering area p 131 if Spot Metering Area is selected If picture is extremely overexposed or underexposed white bala...

Page 117: ...tured images can show more noise if higher Sensitivity is set Setting the Range of Automatic Correction in AUTO 1 ISO 200 400 Corrects sensitivity automatically in the range of ISO 200 to 400 2 ISO 200 800 Corrects sensitivity automatically in the range of ISO 200 to 800 3 ISO 200 1600 Corrects sensitivity automatically in the range of ISO 200 to 1600 4 ISO 200 3200 Corrects sensitivity automatica...

Page 118: ...ure mode is a Manual or p Bulb mode Flash is discharged Auto bracketing EV Compensation ISO Sensitivity Warning Display 1 Off ISO Sensitivity Warning is not displayed 2 ISO 400 ISO Sensitivity Warning is displayed when ISO 400 is set or exceeded 3 ISO 800 ISO Sensitivity Warning is displayed when ISO 800 is set or exceeded 4 ISO 1600 ISO Sensitivity Warning is displayed when ISO 1600 is set or exc...

Page 119: ... input output devices such as digital cameras monitors and printers differ This color range is called the Color Space To recreate different color spaces in different devices standard color spaces have been proposed This camera supports sRGB and AdobeRGB sRGB is mainly used for devices such as a PC AdobeRGB covers a wider area than sRGB and is used for occupational uses such as industrial printing ...

Page 120: ... release button is pressed halfway to focus on the subject and the focus is locked at that position and k Continuous mode where the subject is kept in focus by continuous adjustment while the shutter release button is pressed halfway p 122 1 Set the focus mode lever to Autofocus The camera is focused when the shutter release button is pressed halfway Manual focus Manually adjust the focus Using th...

Page 121: ...ng object as long as the shutter release button is kept pressed halfway The shutter cannot be released until the subject is in focus in l Single mode p 122 If the subject is too close to the camera move back and take the picture Adjust the focus manually if the subject is difficult to focus p 46 p 125 In l Single mode press the shutter release button halfway The built in flash will discharge autom...

Page 122: ...es that are compatible with Quick Shift Focus Select 4 Cancel AF appears in the viewfinder while the 4 button is pressed Autofocus does not activate when the shutter release button is pressed This is useful when you wish to temporarily use manual focus while using autofocus You can focus using the focus ring and release the shutter while 4 button is pressed when using a lens compatible with Quick ...

Page 123: ...reen within the focusing area and focuses on the nearest object 6 Spot The camera narrows the focusing area to facilitate focusing on a specific subject If 2 Spot AF is selected for OK btn when shooting p 120 in the A Custom menu the camera switches to 6 Spot for as long as the 4 button is held down when the focusing area is set to N Wide Instant Review 1 sec Rec Mode Auto Bracket AE Metering Focu...

Page 124: ...ject the focus is locked at that position k Continuous mode The subject is kept in focus by continuous adjustment while the shutter release button is pressed halfway Settings cannot be changed in Picture mode p 47 k Continuous mode can be set when the mode dial is set to e b c or a The autofocus mode is set to k in Moving Object of Picture mode Instant Review 1 sec Rec Mode Auto Bracket AE Meterin...

Page 125: ...n use focus lock function when the subject you wish to focus on is not inside the focusing area 2 Center the subject to focus in the viewfinder and press the shutter release button halfway The focus indicator appears and you will hear a beep when the subject comes into focus If it is blinking the subject is not in focus 3 Lock the focus Keep the shutter release button pressed halfway The focus wil...

Page 126: ...s lock mode may cause the subject to be out of focus The beep can be turned off p 163 You cannot set focus lock when the focus mode is set to k Continuous mode or the capture mode is set to Moving Object In k Continuous mode or Moving Object mode the autofocus continues to focus on the subject until the shutter is released Continuous Autofocus Fixing Exposure when Focus is Locked 1 Off Exposure is...

Page 127: ...st focus You can manually adjust the focus using the focus indicator 1 Set the focus mode lever to 2 Look through the viewfinder press the shutter release button halfway and turn the focusing ring The focus indicator appears and you will hear a beep when the subject comes into focus Adjusting the Focus Manually Manual Focus Using the Focus Indicator Focus indicator ...

Page 128: ...us mode lever to 2 Look through the viewfinder and turn the focusing ring until the subject looks sharp on the screen Use the matte field in the viewfinder when the subject is difficult to focus p 46 and the focus indicator will not stay lit The beep can be turned off p 163 Using the Viewfinder Matte Field ...

Page 129: ... light is allowed to strike the CCD Adjust the amount of light striking the CCD Using slower shutter speed If the subject is moving the image will be blurred because the shutter is open longer It is possible to enhance the effect of motion rivers waterfalls waves etc by intentionally using a slower shutter speed Using faster shutter speed Choosing a faster shutter speed will allow freezing the act...

Page 130: ...landscape in front and behind the flower will be in focus Effect of Aperture Depth of Field When you focus on a portion of the subject there is a range in which object closer and farther will also be in focus This focused range is called the depth of field The depth of field for the L differs depending on the lens but compared to a 35 mm camera the value is roughly one aperture setting lower the f...

Page 131: ...e depth of field in the viewfinder before taking a picture 1 Focus on the subject 2 Turn the main switch to while looking through the viewfinder You can check the depth of field in the viewfinder while holding the main switch How to Check Depth of Field No shooting information is displayed in the viewfinder and the shutter cannot be released while the main switch is in the preview position You can...

Page 132: ...g the Metering Method L Multi segment Segment the screen in 16 parts meter each portion and determine the appropriate exposure M Center weighted Measure the entire screen with an emphasis on the center and determine the exposure N Spot metering Measure only the center of the screen and determine exposure Using the Multi Segment Metering The center weighted metering mode is automatically set even i...

Page 133: ...limited area at the center of the screen as shown in the illustration You can use this in combination with the AE lock p 142 when the subject is extremely small and proper exposure is difficult to obtain Using the Center Weighted Metering Using the Spot Metering Linking AF Point and AE During Multi Segmented Metering In Link AF Point and AE p 100 of the A Custom menu you can link the exposure and ...

Page 134: ...that look still or subjects that show movement Yes Yes No c Aperture Priority Set aperture and use when you want to adjust the depth of field Use to blur the background or be sharp from front to back Yes No Yes a Manual Combine set shutter speed and aperture to create the picture you have in mind No Yes Yes p Bulb Use to capture images that require slow shutter speeds such as fireworks and night s...

Page 135: ...CD panel The shutter speed and aperture value are also displayed while adjusting the exposure Using the e Program Mode Set EV Compensation in increments of 1 2EV or 1 3EV Set exposure setting steps in Expsr Setting Steps in the A Custom menu p 142 You can automatically correct the sensitivity if appropriate exposure cannot be set with the set criteria Set Sensitivity to AUTO in the Fn menu p 115 S...

Page 136: ...wn the shutter and capture lively images Aperture value is automatically set to appropriate exposure depending on the shutter speed 1 Effect of Aperture and Shutter Speed p 127 1 Set the mode dial to b 2 Turn the e dial and adjust the shutter speed The shutter speed and aperture value are displayed in the viewfinder and on the LCD panel Using the b Shutter Priority Mode ...

Page 137: ...on when using a lens with an aperture ring Exposure Warning If the subject is too bright or too dark the aperture value will blink in the viewfinder and on the LCD panel If the subject is too bright choose a faster shutter speed If it is too dark choose a slower shutter speed When the aperture value indication stops blinking you can take the picture with proper exposure If both the shutter speed a...

Page 138: ...allower and the front and back of the focused object is blurred when aperture is set to a small value Shutter speed is automatically set to appropriate exposure depending on the aperture value 1 Effect of Aperture and Shutter Speed p 127 1 Set the mode dial to c 2 Turn the e dial and adjust the aperture value The shutter speed and aperture value are displayed in the viewfinder and on the LCD panel...

Page 139: ... the auto lock button when using a lens with an aperture ring Exposure Warning If the subject is too bright or too dark the shutter speed will blink in the viewfinder and on the LCD panel If the subject is too bright set the aperture smaller larger number and when too dark open the aperture further smaller number Once blinking stops you can take the picture If both the shutter speed and aperture v...

Page 140: ...for taking pictures using the same shutter speed and aperture setting combination or taking intentionally under exposed darker or over exposed brighter photographs 1 Effect of Aperture and Shutter Speed p 127 1 Set the mode dial to a 2 Turn the e dial and adjust the shutter speed 3 Turn the e dial while pressing the mc button and adjust the aperture Using a Manual Mode ...

Page 141: ...n a Manual mode the sensitivity is equivalent to ISO 200 when sensitivity is set to AUTO Blinks when the difference with appropriate exposure is over 3 0 Set the shutter speed and aperture values in increments of 1 2EV or 1 3EV Set in Expsr Setting Steps in the A Custom menu p 142 Set the aperture to the s position while holding down the auto lock button when using a lens with an aperture ring Dif...

Page 142: ...cess to reduce noise image roughness or unevenness caused by low shutter speed Set in Noise Reduction in the A Custom menu p 100 When in p Bulb mode the sensitivity is equivalent to ISO 200 when sensitivity is set to AUTO About the L Button The aperture and shutter speed are automatically adjusted to the appropriate exposure at that moment if the L button is pressed in a Manual mode You can choose...

Page 143: ...ensation with the e dial while the mc button is pressed 2 Confirm the compensation value in the viewfinder m is displayed during compensation m blinks when the flash is popped up if the flash compensation is set Setting the Exposure Exposure compensation is not available when the exposure mode is set to a Manual or p Bulb mode The exposure compensation cannot be canceled by turning the camera off ...

Page 144: ...L button is kept pressed or the shutter release button is kept pressed halfway You will hear a beep when the L button is pressed The beep can be turned off p 163 AE lock is not available when the exposure mode is a Manual or p Bulb mode The combination of shutter speed and aperture value changes depending on the zooming position even while the AE lock is engaged when using a zoom lens for which ma...

Page 145: ... third is over exposed positive compensation 1 Press the button in capture mode The Fn menu appears 2 Press the four way controller 2 The Drive Mode options screen appears 3 Use the four way controller 5 to select V Auto Bracket Changing the Exposure and Shooting Auto Bracket Normal exposure Under exposure Over exposure 200 200 200 Fn OK Exit Exit Exit OK OK OK Drive Mode Drive Mode Auto Bracket A...

Page 146: ...etting is 20 seconds p 132 when you release your finger from the shutter release button during auto bracketing and you can take the next picture at the next compensation value In this case auto focusing works for each frame After about twice as much time as the metering timer default setting is 20 seconds the camera returns to settings for taking the first picture You can combine Auto Bracket with...

Page 147: ...tep interval 1 2EV 0 5 1 0 1 5 2 0 1 3EV 0 3 0 7 1 0 1 3 1 7 2 0 Shooting images 0 0 0 Auto Bracket Bracketng amount 0 5 0 Shooting images Taking Only Over exposed or Under exposed Pictures You can use the auto bracketing mode for only under exposure or over exposure shots by combining the operation with exposure compensation p 141 The auto bracketing is performed in both cases on the basis of the...

Page 148: ...al Flash Compensation 1 2EV 2 0 1 5 1 0 0 5 0 0 0 5 1 0 1 3EV 2 0 1 7 1 3 1 0 0 7 0 3 0 0 0 3 0 7 1 0 m blinks in the viewfinder when the flash pops up during Flash Compensation p 20 If the maximum flash output is exceeded when corrected to the plus side no compensation will be effective Compensating to the minus side may not effect the image if the subject is too close aperture is low or sensitiv...

Page 149: ... You can set the desired aperture to take a flash photograph when you want to change the depth of field or shoot a subject farther away The shutter speed automatically changes with the ambient brightness The shutter speed shifts automatically anywhere from 1 180 sec to a slow shutter speed p 42 that reduces camera shake The slowest shutter speed depends on the focal length of the lens in use The s...

Page 150: ...speed is set Set the shutter speed so that aperture does not flash 3 Press the K button The flash pops up 4 Take the picture Using a Manual Mode 1 Set the mode dial to a a Manual mode is set 2 Set the shutter speed under 1 180 sec and aperture value to obtain correct exposure 3 Press the K button The flash pops up In a Manual mode pop up the flash at any time 4 Take the picture Using Slow Speed Sy...

Page 151: ...above is a fixed value which applies only when using the built in flash alone Example When sensitivity is ISO200 and aperture value is F4 L1 15 6 4 approx 3 9 m L2 3 9 5 approx 0 8 m Therefore the flash can be used in a range of about 0 8 m to 3 9 m The flash cannot be used when the distance is less than 0 7 m When the flash is used at closer than 0 7 m it causes vignetting in the picture corners ...

Page 152: ...de number shooting distance When sensitivity is ISO200 and shooting distance is 5 2 m aperture value is F 15 6 5 2 3 If the resulting number 3 in the above example is not available as a lens aperture the smaller number that is closest 2 8 in the above example is generally used Calculating Aperture Value from Shooting Distance ...

Page 153: ... the focal length is 28 mm and the shooting distance is less than 1m vignetting may occur FA J18 35 mm F4 5 6 AL Vignetting may occur if focal length is 18 mm and the shooting distance is less than 1m DA18 55 mm F3 5 5 6 AL Yes FA20 35 mm F4AL Yes FA24 90 mm F3 5 4 5AL IF Yes FA28 70 mm F4AL Yes FA 28 70 mm F2 8AL Vignetting may occur if focal length is between 28 and 35 mm and the shooting distan...

Page 154: ...mm F1 4 Yes FA50 mm F1 7 Yes FA77 mm F1 8 Limited Yes FA 85 mm F1 4 IF Yes FA135 mm F2 8 IF Yes FA 200 mm F2 8ED IF Yes FA 300 mm F2 8ED IF No FA 300 mm F4 5ED IF Yes FA 400 mm F5 6ED IF Yes FA 600 mm F4ED IF No D FA Macro 50 mm F2 8 Yes D FA Macro 100 mm F2 8 Yes FA Macro 50 mm F2 8 Yes FA Macro 100 mm F2 8 Yes FA Macro 100 mm F3 5 Yes FA Macro 200 mm F4ED IF Yes FA Soft 28 mm F2 8 Built in flash...

Page 155: ...nal flash 5 Two or more AF360FGZ units are required Using an External Flash Optional Flash Camera Function Built in Flash AF360FGZ Red eye reduction flash Yes Yes Automatic flash discharge Yes Yes After the flash is charged the camera automatically switches to the flash sync speed Yes Yes Aperture is automatically set in e Program mode and b Shutter Priority mode Yes Yes Auto check in the viewfind...

Page 156: ...360FGZ 2 Turn on the AF360FGZ 3 Set the AF360FGZ flash mode to P TTL auto 4 Confirm that the flash is fully charged and then take the picture About the LCD Panel Display for AF360FGZ Lens focal length 85mm 77mm 50mm 35mm 28mm 24mm 20mm 18mm AF360FGZ LCD panel Exposure metering timer Off 85mm 70mm 50mm 35mm 28mm 24mm Exposure metering timer On 58mm 48mm 34mm 24mm 19mm 16mm Using P TTL Auto Mode P T...

Page 157: ...ash sync 5 Confirm that the AF360FGZ is fully charged and then take the picture Shoot using the flash without connecting the camera and flash with a cord by using two AF360FGZ units The High speed sync mode is also available in wireless mode Using High Speed Flash Sync Mode The b will light in the viewfinder when the flash is ready fully charged High speed flash sync is only available when the shu...

Page 158: ...ontrol P TTL Flash Mode The following information is exchanged between the two AF360FGZ flash units before the flash is discharged when the AF360FGZ is used for wireless flash Press the shutter release button fully 1 The camera s flash discharges a pre flash The camera s flash mode is transmitted 2 The external flash unit discharges a pre flash The subject s lighting condition is checked 3 The cam...

Page 159: ...f camera shoe adapter F optional to the bottom of the external flash and connect these with the extension cord F5P optional The off camera shoe adapter F comes with a tripod screw for securing to your tripod Only the P TTL auto flash can be used in combination with the built in flash When combining with the built in flash Red Eye Reduction The red eye reduction feature works even when only an exte...

Page 160: ...nd connect the extension cord F5P optional to the off camera shoe adapter F on the other external flash When combining two or more external flashes Discharging Multiple Flashes Do not combine with accessories that have a different number of contacts such as a Hot Shoe Grip A malfunction may occur Combining with flashes from other manufacturers may cause equipment breakdown We recommend using the A...

Page 161: ...rast Control Sync Flash Do not combine with accessories that have a different number of contacts such as a Hot Shoe Grip as a malfunction may occur Combining with flashes from other manufacturers may cause equipment breakdown We recommend using the PENTAX dedicated automatic flashes For contrast control synch flash photography when using two external flashes the flash set as the contrast control f...

Page 162: ... images are displayed Image Histgrm Images and histogram are displayed Image Detailed Info Image details appear with a small image in the upper left Last memory Display settings are retained from previous session Refer to p 18 for various display information details Displaying Bright Portion Warning OFF Turn off the bright portion warning Instant Review Bright portion warning is displayed only dur...

Page 163: ...terval to 3 sec 5 sec 10 sec or 30 sec The default setting is 3 sec Set in Slideshow in the Q Playback menu p 98 Setting the Slideshow Display Interval After setting press the 4 button to start slideshow OFF Instant Review Instnt review Plybck OK OK Cancel Bright Portion Plybk dsply mthd 3 sec 5 sec 10 sec 30 sec Playback Bright Portion Digital Filter Slideshow Cancel OK OK ...

Page 164: ... the four way controller 5 to display the Format screen 3 Use the four way controller 2 to select Format 4 Press the 4 button Formatting starts When formatting is completed the camera is ready to take pictures Formatting the SD Memory Card Do not open the card cover while formatting SD Memory Card The card may be damaged beyond use Formatting will delete protected data Be aware Format Cancel Forma...

Page 165: ...ettings You can also set the display style Choose mm dd yy dd mm yy or yy mm dd Choose 12 hour or 24 hour for time display method 1Setting the Date and Time p 35 Turning the Beep On and Off Changing the Date and Time and the Display Style English Format Set up Beep Date Adjust World Time Guide display Exit OK mm dd yy24h 2005 01 01 00 00 Date Style Date Adjust Date Time OK Cancel ...

Page 166: ... World Time screen appears 3 Use the four way controller 45 to select O On or P Off 4 Press the four way controller 3 The selection frame moves to X The city with X blinks 5 Press the four way controller 5 The screen for magnifying the Destination region appears Use the four way controller 45 to change the region to magnify 6 Press the four way controller 3 The frame moves to city Setting the Worl...

Page 167: ...saving time DST 10 Press the 4 button The World Time setting is saved To continue with World Time setting operations press the 4 button to return to the World Time screen 11 Press the 3 button twice The camera is ready to take pictures See List of World Time Cities p 166 for cities that can be specified as a destination Select W in Step 4 to set the city and DST setting X appears on the guide disp...

Page 168: ...acca Halifax East Asia Yangon Central and South America Mexico City Bangkok Lima Kuala Lumpur Santiago Vientiane Caracas Singapore Buenos Aires Phnom Penh Sao Paulo Ho chi Minh Rio de Janeiro Jakarta Europe Madrid Hong Kong London Beijing Paris Shanghai Amsterdam Manila Milan Taipei Rome Seoul Berlin Tokyo Stockholm Guam Athens Oceania Perth Helsinki Adelaide Moscow Sydney Africa West Asia Dakar N...

Page 169: ...se Traditional Simplified and Japanese 1Setting the Display Language p 33 Set to display guides on the LCD monitor when main switch is on or Exposure mode is changed p 16 Set in Guide display in the H Set up menu p 99 Setting the Display Language Turning the Guide Display On and Off O Guide display on P Guide display off English Deutsch Español Italiano Nederlands Svenska OK OK Français English Fo...

Page 170: ...images Set in Video Out in the H Set up menu p 99 1Connecting the Camera to AV Equipment p 70 Adjusting the Brightness of the LCD Monitor Selecting the Video Output Format The video output format varies according to region The video output format used in North America is NTSC Brightness Level 1 min 0 Set up Video Out Transfer Mode Auto Power Off File Sensor Cleaning OK OK SerialNo NTSC PAL 0 Brigh...

Page 171: ... control shooting or while displaying menu or Fn menu Resetting the File Number SerialNo The file number for the most recently captured image is placed in memory and the file number will remain continuous after inserting the new SD Memory Card Reset Every time a new SD Memory Card is inserted the file number is the smallest number When an SD Memory Card with stored images is inserted numbering con...

Page 172: ... in Instant Review Dsply in the A Custom menu p 101 The default setting is to not display histogram Setting the Instant Review Setting the Display Time Displaying Histogram During Instant Review 1 sec 3 sec 5 sec Off Instant Review Rec Mode Auto Bracket AE Metering Focusing Area AF Mode Flash Exp Comp AF S 0 0 OK OK Cancel Instant Review Dsply Playback with histogram is performed Normal Playback P...

Page 173: ... Adjust Language Video Out and World Time are not reset 1 Select Reset on the H Set up menu 2 Press the four way controller 5 to display the Reset screen 3 Use the four way controller 2 to select Reset 4 Press the 4 button The camera is ready to take or play back images Resetting Rec Mode Playback Set up Menu Reset Cancel Reset Back to initial settings OK OK ...

Page 174: ...lect Reset on the A Custom menu 2 Press the four way controller 5 and display the Reset Custom Fnction screen 3 Use the four way controller 2 to select Reset 4 Press the 4 button The camera is ready to take or play back images Resetting the Custom Function Menu Reset Custom Fnction Cancel Reset Returns the custom function settings to initial settings OK OK ...

Page 175: ...ctions Available with Various Lens Combinations 178 Notes on Using Aperture Ring 180 Cleaning the CCD 181 Optional Accessories 183 Error Messages 186 Troubleshooting 188 Main Specifications 190 Glossary 193 Index 198 WARRANTY POLICY 202 ...

Page 176: ... slim filter and soft filter are saved Item Default Setting Last Memory Setting Reset Setting Page Image Tone F Bright Yes Yes p 108 Recorded Pixels P 3008 2000 Yes Yes p 109 Quality Level C Best Yes Yes p 110 Saturation 0 Yes Yes p 111 Sharpness 0 Yes Yes p 111 Contrast 0 Yes Yes p 111 Instant Review 1 sec Yes Yes p 170 Auto Bracket 0 5 0 Yes Yes p 145 AE Metering L Multi segment Yes Yes p 130 Fo...

Page 177: ...g to default setting Yes No Hometown DST According to default setting Yes No Destination City Same as Hometown Yes No Destination DST Same as Hometown Yes No Language According to default setting Yes No p 167 Guide display O On Yes Yes p 167 Brightness Level 0 Yes Yes p 168 Video Out According to default setting Yes No p 168 Transfer Mode PC Yes Yes p 84 Auto Power Off 1 min Yes Yes p 169 File Ser...

Page 178: ...Yes Yes p 132 AE L with AF locked Off Yes Yes p 124 Recordable Image No Remaining image storage capacity Yes Yes p 100 OK btn when shooting Off Yes Yes p 120 p 121 AE L bttn on M expsr Program Line Yes Yes p 140 AF in remote control Off Yes Yes p 100 FI with S lens used Not available Yes Yes p 101 Using aperture ring Prohibited Yes Yes p 180 Release when Chrging Off Yes Yes p 147 Instant Review Ds...

Page 179: ...ft filter are saved Item Default Setting Last Memory Setting Reset Setting Page Drive Mode 9 Single frame shooting No 1 Yes p 53 p 55 p 59 p 143 Flash Mode B Auto Yes Yes p 49 White Balance F Auto Yes Yes p 112 ISO Sensitivity AUTO Yes Yes p 115 DPOF Settings Yes No p 79 Digital Filter B W Yes 2 Yes p 71 Slideshow 3 sec Yes Yes p 68 ...

Page 180: ...f f 5 6 or brighter 3 To use an F FA soft 85 mm f 2 8 lens or FA soft 28 mm f 2 8 lens set Using aperture ring to 2 Permitted in the A Custom menu p 100 Pictures can be taken with the aperture you set but only within manual aperture range 4 When using the built in flash and AF360FGZ 5 Focusing Area is set to Spot Lens Mount type Function DA D FA FA J FA lens KAF KAF2 3 F lens KAF 3 A lens KA Autof...

Page 181: ...hout a s Auto position or accessories such as an auto extension tube or auto bellows are used camera does not operate unless Using aperture ring is set to 2 Permitted in the A Custom menu p 101 Refer to Notes on Using Aperture Ring p 180 for restriction that apply when Using aperture ring is set to 2 Permitted in the A Custom menu All camera exposure modes are available when using DA FA J or lense...

Page 182: ...pen aperture but an exposure error may occur In the viewfinder F appears for the aperture indicator D FA FA F A M S with diaphragm accessories such as extension tube K c Aperture Priority mode Pictures can be taken with the specified aperture value but an exposure error may occur In the viewfinder F appears for the aperture indicator Manual diaphragm lens such as reflex lens lens only c Aperture P...

Page 183: ...lb mode Always cap the lens mount area to prevent dirt and dust from accumulating on the CCD when no lens is on the camera It is recommended to use the AC adapter when cleaning the CCD When the battery level is low Not enough battery remaining to clean sensor is displayed on the LCD monitor If you are not using the AC adapter please use batteries with ample capacity remaining A warning beep will s...

Page 184: ...Clean the CCD Use a brush less blower to remove dirt and dust from the CCD Using a blower with a brush may scratch the CCD Do not wipe the CCD with a cloth 8 Turn the camera off 9 Attach the lens after the mirror returns to its original position Sensor Cleaning Cancel Mirror Up Mirror Up to Clean CCD Turn the power OFF to end OK OK ...

Page 185: ...mera This is a remote shutter release cord The cord length is 0 5 m Shoot pictures from within 5 m of the front of the camera Auto Flash AF360FGZ This is an auto flash unit with a maximum guide number of 36 ISO 100 m Its features include slave sync flash contrast control sync flash AF spot beam high speed sync wireless flash and front rear curtain sync AC Adapter D AC10 Cable Switch CS 205 Remote ...

Page 186: ... viewfinder accessory is for magnifying the central area of the viewfinder Ref converter A This is an accessory that changes the viewfinder viewing angle at 90 intervals The viewfinder magnification can be switched between 1 and 2 Diopter correction lens adapter M This accessory adjusts the diopter Install it on the viewfinder If it is difficult to see the viewfinder image clearly choose one of th...

Page 187: ...185 6 Appendix Camera Case O CC34 The accessories below are the same as the accessories that are packaged with the camera ME viewfinder cap Eyecup FN Strap O ST10 Camera Case Others ...

Page 188: ...impossible It may be viewable on a PC but not the camera Card not formatted The SD Memory Card you have inserted is unformatted or has been formatted on a computer or other device and is not compatible with this camera Use after formatting with the camera p 162 Card locked A locked SD Memory Card is inserted in the camera Unlock the SD Memory Card p 30 Card is locked Rotation information cannot be...

Page 189: ...igital filter No image to be filtered If digital filter is started from Q Playback menu this message appears if all saved images are RAW files or images captured with other cameras This image cannot be filtered Appears when digital filter is started from Fn menu for images captured with other cameras No DPOF files No file set with DPOF Set DPOF and print p 79 Printer error There is an error with t...

Page 190: ...on SD Memory Card Insert SD Memory Card with available space or delete unwanted images p 29 p 73 Recording Wait until recording is finished The Autofocus does not work Subject is difficult to focus on Autofocus cannot focus well on subjects that have low contrast the sky white walls dark colors intricate designs are moving quickly or scenery shot through a window or a net like pattern Lock focus o...

Page 191: ...ure mode to setting other than Moving Object mode p 47 AE lock function does not operate AE lock is not available when set to a manual mode or p bulb mode Use AE lock with any setting other than a manual mode or p bulb mode Flash does not discharge When flash mode is set to Auto discharge or Auto flash Redeye reduct the flash will not discharge when the subject is bright Set flash mode to Manual d...

Page 192: ...Approx 90 Approx 46 Approx 22 Approx 11 P 3008 2000 C Approx 330 Approx 167 Approx 78 Approx 34 D Approx 607 Approx 311 Approx 149 Approx 70 E Approx 966 Approx 498 Approx 242 Approx 117 Q 2400 1600 C Approx 459 Approx 234 Approx 111 Approx 51 D Approx 807 Approx 415 Approx 201 Approx 96 E Approx 1397 Approx 674 Approx 330 Approx 161 R 1536 1029 C Approx 880 Approx 453 Approx 220 Approx 106 D Appr...

Page 193: ...h ready Blinking Flash should be used or incompatible lens is being used Shutter speed Aperture value e dial enabled indicator AE lock Capacity remaining and m Exposure compensation K Manual white balance k Continuous mode Picture mode icon Manual focus o ISO warning LCD Panel display b is lit Built in flash ready Blinking Flash should be used or incompatible lens is being used E Auto discharge E ...

Page 194: ...e batteries Battery Exhaustion Battery exhaustion symbol is lit The shutter is locked and no indication appears in the viewfinder when starts blinking In Out Port USB Video terminal USB2 0 high speed compatible DC input terminal Cable switch terminal Video Output Format NTSC PAL PictBridge Compatible printer PictBridge compatible printer Print mode Print One Print All DPOF AUTOPRINT Dimensions and...

Page 195: ...or automatically changing the shooting conditions When the shutter button is pressed three images are shot The first one has no compensation the second is under exposed and the third is over exposed Bright Portion Bright portion in the image loses contrast and appears white Camera Shake Blur When the camera moves while the shutter is open the entire image appears as if flowing This occurs more oft...

Page 196: ... of focus This depends on the aperture lens focal length and distance to the subject For example select a smaller aperture to increase the depth of field or use a larger aperture to decrease the depth of field DPOF Digital Print Order Format Rules for writing information onto a card with recorded images regarding the specific images and number of copies to be printed Prints can easily be made by t...

Page 197: ...in JPEG format are suited for viewing on your PC or for attaching to e mail ND Neutral Density Filter A filter with many saturation levels that adjusts the brightness without affecting the picture itself Noise Reduction Process to reduce noise image roughness or unevenness caused by low shutter speed NTSC PAL These are video output formats NTSC is mainly used in Japan North America and South Korea...

Page 198: ...ize Sensitivity The degree of light With a high sensitivity images can be shot with a high shutter speed even in dark places reducing camera shake However images with high sensitivity are more susceptible to noise Shutter Speed The length of time that the shutter is open and light strikes the CCD The amount of light that strikes the CCD can be changed by altering the shutter speed sRGB standard RG...

Page 199: ...Memo 197 ...

Page 200: ...ne batteries 26 Aperture 128 Aperture Priority Mode c 136 Auto Bracket 143 Auto Picture I 43 47 Auto Power Off 169 Autofocus 118 Autofocus 118 AV Equipment 70 c Aperture Priority mode 136 B B W Digital Filter 71 Batteries 25 Beep 163 Bright 108 Bright Portion 160 Brightness of the LCD Monitor 168 Built in flash 49 146 p Bulb Mode 140 Bulb Mode p 140 C Cable Switch 140 Capture Information 17 18 Car...

Page 201: ...ure Warning 135 137 139 External flash 153 F File 169 Filter 71 Fireworks 140 Fix Exposure 124 Fix Focus 123 Flash 49 146 Flash White Balance 112 Flash Compensation 146 Flash Off 47 Flash OFF a 47 K Flash pop up button 93 Fluorescent Light White Balance 112 button 93 95 Fn Menu 102 Focus Indicator 125 Focus Lock 123 Focus mode lever 93 Focus point 131 Focusing 118 Focusing Area 121 Format 162 Four...

Page 202: ...ram Mode 133 PAL 168 Panel Indications 22 PC F 189 PictBridge 83 Pixels 109 Playback 18 63 Q Playback button 93 95 Q Playback Menu 98 174 Playback Time 27 Portrait 47 Power 32 Press fully 45 Press halfway 45 Preview 129 Print All 88 Print One 86 Print Service 79 Printer connection 85 Program Mode e 133 Protect 77 Z Protect button 95 P TTL Auto 154 P TTL Flash 156 Q Quality Level 31 110 R RAW 110 R...

Page 203: ...Filter 71 Soft Digital Filter 71 Spot 121 Spot Metering 131 sRGB 117 Strap 24 T Transfer Mode 84 Tungsten Light White Balance 112 Turning 167 TV 70 b Shutter Priority mode 134 U USB cable 83 Using aperture ring 180 V Video cable 70 Video Output Format 168 Viewfinder 20 39 Vignetting 196 W White Balance 112 Wide 121 Wireless Mode 155 World Time 164 Z Zoom Display 65 Zoom Lens 48 ...

Page 204: ... by nonauthorized PENTAX service facilities Procedure During 12 month Warranty Period Any PENTAX which proves defective during the 12 month warranty period should be returned to the dealer from whom you purchased the equipment or to the manufacturer If there are no representatives of the manufacturer in your country send the equipment to the manufacturer with postage prepaid In this case it will t...

Page 205: ...and only after you accept the quoted service charge instruct the service station to proceed with the servicing This warranty policy does not affect the customer s statutory rights The local warranty policies available from PENTAX distributors in some countries can supersede this warranty policy Therefore we recommend that you review the warranty card supplied with your product at the time of purch...

Page 206: ...lled and used in accordance with the instructions may cause harmful interference to radio communications However there is no guarantee that interference will not occur in a particular installation If this equipment does cause harmful interference to radio or television reception which can be determined by turning the equipment off and on the user is encouraged to try to correct the interference by...

Page 207: ...liant with the standards Records maintained continue to reflect the equipment being produced can be expected to be within the variation accepted due to quantity production and testing on the statistical basis as required by 47CFR 2 909 Operation is subject to the following two conditions 1 This device may not cause harmful interference and 2 This device must accept any interference received includ...

Page 208: ... Netherlands Spinveld 25 4815 HR Breda NETHERLANDS http www pentax nl for Belgium Luxembourg Weiveldlaan 3 5 1930 Zaventem BELGIUM http www pentax be PENTAX Schweiz AG Widenholzstrasse 1 Postfach 367 8305 Dietlikon SWITZERLAND http www pentax ch PENTAX Scandinavia AB P O Box 650 75127 Uppsala SWEDEN http www pentax se PENTAX Imaging Company A Division of PENTAX of America Inc Headquarters 600 12th...

Reviews: